Howto:Firmware Upgrade and initial Configuration of IP72 via USB: Difference between revisions
| Line 17: | Line 17: | ||
*IP72 firmware | *IP72 firmware | ||
for current tools and firmware please always check [http://download.innovaphone.com] | for current tools and firmware please always check [http://download.innovaphone.com innovaphone download page] | ||
===Installation=== | ===Installation=== | ||
Revision as of 11:18, 14 August 2007
This article describes procedure of Firmware upgrade and initial configuration of IP72 via USB interface.
Applies To
This information applies to
- IP72
innovaphone Firmware Build 07-60631 and later.
More Information
Problem Details
In some cases you will need to update IP72 firmware before WLAN connection to the device is available. For that purposes you can use USB Charger for IP72 to upload new firmware or change phone configuration.
System Requirements
- USB-Charger
- USB-driver for MS Windows
- IP72 firmware
for current tools and firmware please always check innovaphone download page
Installation
At first install USB Driver. Plug USB-Charger to any free USB-Port on your PC and wait till Windows Device Manager ask you for Driver location. This step is unnecessary if you plan to configure the phone via phone-keyboard (Phone-based config). Note that WEP key input may get time consuming with numeric keyboard.
Firmware Update
If you have an Ascom i75 phone branded as innovaphone IP72 with Ascom firmware installed on it, see Upgrade from i75 to IP72 .
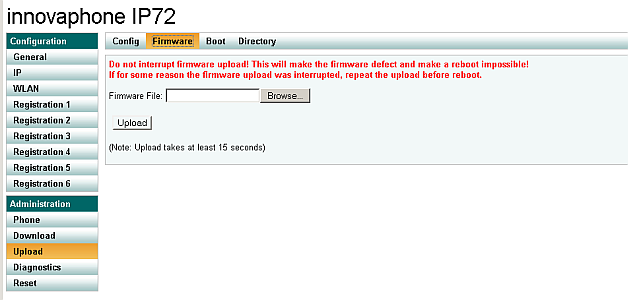
You can either upgrade the firmware via existing WLAN connection, or through the USB charger (programming device).
- WLAN
To access the telephone with a browser using the http protocol, read the IP addrss on the IP72 by navigating Main Manu -> Administration ->Information -> Network. Than point the browser to this address, login (with default admin,ip72) and got to Upload -> Firmware. Upon completion, a reset is required.
- USB charger
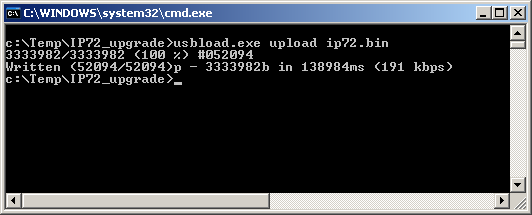
Turn on IP72 and connect it with USB Charger. Open new DOS Box and change to directory containing ip72.bin and usbload.exe and run:
usbload.exe upload ip72.bin
Do not interrupt connection to IP72 or close upload.exe!!! This can break the device!
Initial WLAN and H.323/SIP Configuration
To configure initial IP72 settings, You can either enter the information on the phone directly or use the "usbload.exe" command line application.
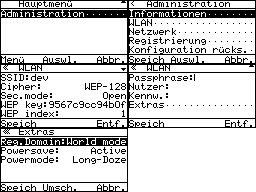
- Phone-based config
WLAN settings are reached through Menu-Administration-WLAN. H.323/SIP settings are reached through Menu-Administration-Registration. Use the Menu Softkey to save the changes made.
- PC-based config
Here the usbload help page:
usbload config /login user,pass (default:ip72,admin)
               /ssid <ssid>
               /wep-key <hex-wep-key>
               /wep-index [1-4]
               /cipher <none|wep|wep128|tkip|aes-wrap|aesccmp|ckip>
               /security-mode <open|wpa-psk|wpa2-psk|leap|peap-mschapv2|eap-md5>
               /passphrase <passphrase>
               /user <user>
               /password <password>
               /prot h323|sip
               /gk-addr <gk-IP-addr>
               /e164 <registration number>
               /h323 <registration name>
Here an example:
usbload.exe config /ssid myssid /wep-key 9512c9cc94b0fbab30e242dc7f /cipher wep128 /wep-index 1 /prot h323 /gk-addr 192.168.0.10 /e164 501
WLAN Options: ssid:msssid wep-key:512c9cc94b0fbab30e242dc7f wep-key-index:1 cipher:WEP128 VoIP Options: protocol:H.323 gatekeeper:192.168.0.10 reg-numer:501
Saving the configuration may sometimes require an automatic IP72 reset.
Please not that you have to run the IP72 in normal mode (not in charger mode) in order to use usbload.
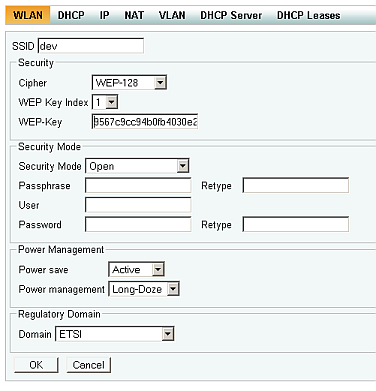
- WLAN-based config
This is naturally only possible with an existing WLAN connection on the IP72. Access the IP72 with the browser and point it to WLAN screen.
Advanced USB command line
For advanced users, usbload can be used as a telnet-like console interface. Open new DOS Box and chage to directory containing usbload.exe and start usbload with
usbload.exe interactive
If USB Driver correctly installed and IP72 is connected to USB Port you will see login prompt after pressing <Enter>.
IP72 default login : admin,ip72
To configure WLAN with SSID IP72Trial and 128bit HEX WEP-Key e78b52074e0144d3d2fd61efaa use following command:
config change WLANMGR0 /ssid IP72Trial /wep-key e78b52074e0144d3d2fd61efaa /cipher wep128 /wep-index 1
See next section for complete reference.
To change Registration options:
config change PHONE SIG /prot H323 /gk-addr 172.16.0.1 /h323 testuser /tones 0
Save and activate the changes with:
config write
config activate
Read out traces:
log
WLAN configuration reference
 config change WLANMGR0
   /trace
   /xtrace
   /ssid <ssid>
   /wep-key <hex-wep-key>
   /wep-index [1-4]
   /cipher <none|wep|wep128|tkip|aes-wrap|aesccmp|ckip>
   /security-mode <open|wpa-psk|wpa2-psk|leap|peap-mschapv2|eap-md5>
   /passphrase <passphrase>
   /user <user>
   /password <password>
   /channel-mask <hex-bitmask>
   /regdomain <world|usa|canada|etsi|spain|france>
   /power-save <active|poll|uapsd>
   /power-mode <active|short-doze|long-doze>
Troubleshooting and Tracing WLAN
Here some steps how to access WLAN trace on IP72.
1. Place IP72 into USB charger 2. Log into command interface (default login : admin,ip72)
usbload.exe interactive
3. activate WLAN trace with
config add WLANMGR0 /xtrace
config change ASCDEBUG0 /enable supp /enable wlan
config write
reset
4. fetch trace with
log
5. deactivate trace with
config rem WLANMGR0 /xtrace
config change ASCDEBUG0
config write
config activate
Known Problems
A typical problem are Access Points not supporting IEEE 802.11d - World Mode. Without World Mode support, the IP72 must be configured manually to country of usage through Menu-Administration-WLAN-Advanced.
Sometimes usbload can not find any IP72 Devices allthough this correctly connected. Rebooting PC will help in most cases.


