Howto:Recorder as a service
The Voice Recorder application can be started also as a service using a utility.
The advantage starting the recorder as a service is that no user login is necessary and therefor the service can start automatically when the PC starts up.
Services have no user interface as they run “in background” and they are user independent. All files are stored in absolute directory like “c:\myRecorder\” and require therefore admin rights.
Applies To
This information applies to innovaphone voicerecorder Build 1135 and later.
Please note that the voice recorder as a service can only work as such: therefore no http player server or pcap converter can run as a service. The recorder can record only in the native pcap file format. If the customer require down mix or wave/mp3 con version in addition has to run a recorder as converter. See Concept article.
Running as a service the recorder sees only local disk drives, therefore for example it is not possible record to network drives. If the customer requires storage on a network drive (for example a Nas) the files must be stored (buffered) first on the local drive and then transferred (cut) to those drives by using an external 3rt party backup software. In such a scenario it is also possible copy the pcap files and run the conversion recorder in foreground on those final destination.
Installing the recorder as a service - Walkthroughs
First initial recorder setup
Before starting you should have a clear idea where and how install the recorder.
Please read the chapter “recorder command line arguments” in the concept article.
When you install an recorder with the innovaphone installer package the recorder is installed in a directory like this one “c:\Programms (86)\innovaphone\VoiceRecording\”. You can execute the application “innovaphone_Recorder.exe” from this position but also copy the exe in a simpler directory like “c:\myRec\”; just copy the .exe in that directory. To avoid that a user start the recorder in the original path you can also remove now the recorder using the Windows control panel (Programs and Features).
innovaphone_Recorder.exe is a self-containing software that requires no external dll or other files and can be start just clicking on it. Decide where the setup and all other parameters should be stored. In our example we decide to store all that in a sub directory where the .exe is running, so we create a directory “data” in “c:\myRec\data\”.
Note: If you are already operating a recorder and want maintain all counters, logs and setup copy the entire content of the actual directory (just follow in the recorder setup the link) in this new directory.
Remember that the recorder must be started from now on with administrator rights (typical) or have in any way the right to access and modify files in the “c:\myRec\data\” directory. Before setting the service mode we want start the recorder in foreground. If foreground operation works fine we can proceed with the background “service” mode.
Therefore we must start the recorder with the parameter used in the service mode. This can be done using a command line argument, but it is more comfortable create once a batch file. We open the Editor and put in the line “innovaphone_recorder.exe recpath=c:\myRec\data\” and save the file with the name you like but the extension .bat, in our example “Recorder_foregr.bat”. At this point you should have a directory like this one:
Note also the line of the editor as described.
The batch files must be started with administrator rights. To start a batch file with admin rights a little trick must be applied. After writing your .bat file, create a shortcut and put it for example on your desktop. Now press the right mouse, select property and select “Advanced Properties”.
Once started the batch file the recorder will start up, do all the recoder setup, restart the recorder and test the recording.
Note that after the first start-up of the recorder you will find the files “pcap2wav.exe” and “iREC_Error_Log” in the directory myRec and a additional directory “TMP”. In the recorder setup must be select the option “Store PCAP files” and not selected “Work as..”, those options are in the General Setup Tab.
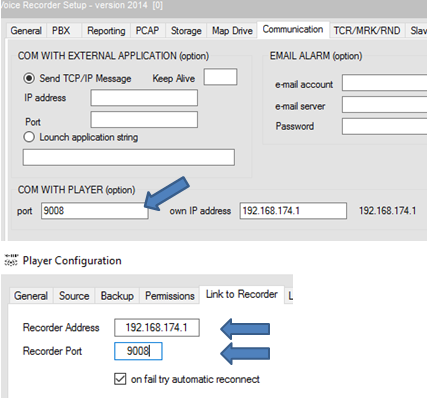
A recorder working as a service has no user interface, the control of the recorder is done using a innovaphone player. You can install one on the PC where the recorder is running or do this from any other recorder. Set the communication parameter on recorder and player:
Check in the Player setup, tab “Permissions” the item “Stop Recorder” if you want allow to stop the recorder from the player. Remember anyway that the service once stopped can only be started again in the Task Manager or rebooting the PC (if the automatic start-up of this process is switched on in the Task manager).
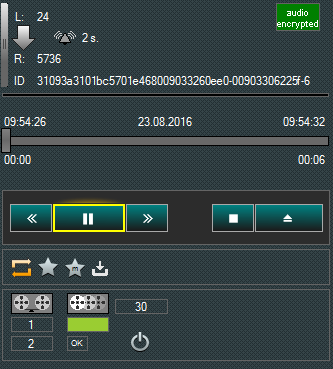
If in the player the flag “on fail try automatic reconnect” is flagged after few second the player will connect, if not (or you want force immediately the connection) press the “connect” button.
Once the connection is up the recorder status is displayed, the following example picture of the player shows the Power off button enabled.
This type of player/recorder interfacing is possible also with the recorder in foreground, but essential if working as a service.
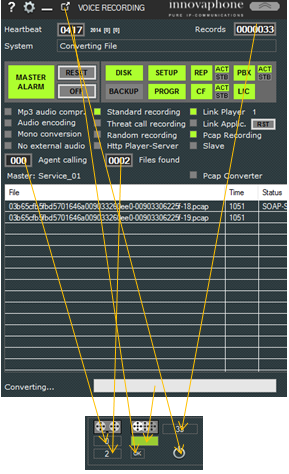
The following picture shows the elements of the recorder shown on the player:
If the interface works and also the recorder in foreground works fine stop the recorder go on installing the drivers.
Installing Drivers
You have to know your application path of your PC. The path is mostly in C:\WINNT\SYSTEM32 in Windows NT, but in all other OS not.
Therefore check where your path environment value is pointing. How to check this depends on your OS:
Windows 8:
• Drag the Mouse pointer to the Right bottom corner of the screen
• Click on the Search icon and type: Control Panel (in German “Systemsteuerung”)
• Click on -> Control Panel -> System -> Advanced (in German “System/Erweitere Systemeinstellungen”)
• Click on Environment Variables (in German “Umgebungsvariablen”), under System Variables (in German “Sytemvariablen”), find PATH, here is the $path of your system.
A typical application path for a “normal” Win8 PC is “c:\programms (x86)\Windows Live\Shared\”.
Windows 7:
• Select Computer from the Start menu
• Choose System Properties from the context menu
• Click Advanced system settings > Advanced tab
• Click on Environment Variables, under System Variables, find PATH, here is the $path of your system.
Win 10
The way is the same than with Win8, but you must click on “Path” in the lower window of the environment variable view. Now all path are shown, a little confusing, anyway here are the path, select the one you like.
One hint: if in your win10 System there is not the path “c:\programms (x86)\Windows Live\Shared\” and you have not such a directory, create the directory, put the 3 files in and put also this path in the path editor (using the “search path”, the result will be a path with “). Control the path putting the command “path” in a Dos box.
For all other Systems: if you don´t know .... better give this job to expert people.
Check now if your system has the run-time library “msvcrt.dll”. If this dll is not on your PC download it from MS for your OS System and copy it in the directory of your path. A typical standard Windows Win8/10 PC has this dll in the directory “c:\windows\system32”.
Download now the actual version of “srvstart.exe”, you can find it for example in this external site:
http://www.nick.rozanski.org.uk/software#srvstart
In this site you will find also all the information stated here, so feel free to follow the original instructions; this Walkthroughs guide you with a typical recording installation.
Srvstart will not modify the registry (apart from the registry changes due to installing the service itself) and you have to do no Registry operation.
You can use also any other software for start a user defined service, for example “srvany” from MS or NSSM (https://nssm.cc ,tested with Windows 2012r2).
Unpack the zipped file of SRVSTART and copy the files “srvstart.exe”, “srvstart.dll” and “logger.dll” in the directory of your application path.
After doing that in the directory “c:\programms (x86)\Windows Live\Shared\” (or in your system path directory) must be in the files “srvstart.exe”, “srvstart.dll” and “logger.dll”
Writing Batch Files
We need a start-up directory, for example “C:\rec_Start\”, but it could also be the same directory where the innovaphone_recorder.exe is in, so we use in our example “c:\myRec\”.
Open the Editor and write this Text:
[RECORDER_SERVICE]
startup=C:\myRec\innovaphone_Recorder.exe -a -b -c recpath=c:\myRec\data\
Save that file in the directory “C:\myRec\” and call it “SRVSTART.INI”
The “[RECORDER_SERVICE]” is the service to call while the second line point on the recording application and at the end you see the recorder setup path “recpath=c:\myRec\data\”.
Now open the cmd window or "Windows PowerShell (x86)" on Windows Server 2012(r2) as an administrator of the system or, if you are logged as a user open is with the administrator rights (Win8, Windows key, type “cmd”, right click on the CMD symbol, select “execute as administrator”).
Write
srvstart.exe install RECORDER_SERVICE –c C:\myRec\SRVSTART.INI
Observing the case (use for example “ –c” and not “-C”).
The first time this will require some seconds and this procedure should terminate without error messages.
If the system fails with the message “Failed to get full path of SrvStart Executable” you System path is not correct.
Now the service is installed and can be started and stopped.
You can start the service with the command
net start RECORDER_SERVICE
or start the service in the Task manager under “Services”, Search the Service RECORDER_SERVICE and start it (right mouse click + “start service”).
Do not use the command “net stop RECORDING_SERVICE” or the task manager to terminate the service. If you want to stop the Recorder use the stop button on the Player.
Just in this way all counters are saved correctly and the service is shut down in a controlled way. Killing the service with the task manager is for the Recorder mostly like switching off the power of the PC.
Activating Autostart
After the installation the service is in manual mode and will not start automatically when the PC is starting up. To set automatic start-up proceed as following:
Open or start the Task Manager and select the Tab “Services”, order the services by name and search the “RECORDER_SERVICE”. Select the service and click the right mouse button, select “open services”; the MS Service panel opens. Search and select again “RECORDER_SERVICE”, right Mouse click, select properties. Here you can define the manual or automatic start-up.
If you want that the service start-up automatically open the control panel (in German “Systemsteuerung”) select Services (in German “Verwaltung) and in Services (in German “Dienste”) you will find the service “RECORDER_SERVICE”, select and open property, select automatic start. The next time the PC starts up the service will be started automatically.
Run Recorder setup
If you want modify the setup of Recorder you have two options: you can stop the service, start the Recorder as described with the batch file (or in a command line) and there open the setup or you start the Recorder with the “setup” command line option. This can be done even during operation of the service, but remember that many parameters require a restart and therefore you have to stop and restart the service.
For command line description see the voice recording concept article.
Please note that running two or more Recorder with the setup in the same working directory causes unpredictable results. So never run two Recorder in the same directory, even if one is working on background as a service. Just in setup mode this can be done in a safe mode.


