Howto:Snom IP phones - Snom - 3rd Party Product: Difference between revisions
mNo edit summary |
|||
| Line 1: | Line 1: | ||
==Product name== | ==Product name== | ||
{{3rd_Party_Input}} | |||
'''Snom Technology GmbH''' | '''Snom Technology GmbH''' | ||
Models: D120, D305, D315, D345, D375, D710, D712, D715, D725, D735, D745, D765, D785 | |||
[[Image:Snom d785 bw overview 264x300.png 264x300 q85 subsampling-2.png]][[Image:Snom 375 overview 292x327.png 264x300 q85 subsampling-2.png]] | [[Image:Snom d785 bw overview 264x300.png 264x300 q85 subsampling-2.png]][[Image:Snom 375 overview 292x327.png 264x300 q85 subsampling-2.png]] | ||
| Line 18: | Line 16: | ||
[[Category:3rdParty_Terminals|{{PAGENAME}}]] | [[Category:3rdParty_Terminals|{{PAGENAME}}]] | ||
== | == Configuration (German) == | ||
===Informationen zum PBX-System=== | |||
Die hier verwendete PBX ist eine innovaphone IP811. Die Angaben sind jedoch auf die weiteren innovaphone Modelle übertragbar. | |||
Für die Sprachübertragung zwischen den VoIP-Komponenten wird das Protokoll SIP verwendet. | |||
Diese Telefone kamen für unseren Test verschiedene Snom IP-Telefone zum Einsatz. | Diese Telefone kamen für unseren Test verschiedene Snom IP-Telefone zum Einsatz. | ||
* '''Snom D315''' | |||
* '''Snom D345''' | |||
=== Installation der innovaphone PBX === | |||
Verbinden Sie die linke '''ETH0'''-Buchse am Gerät über ein Ethernet-Kabel mit einem PoE-Switch. Sobald es an die Spannungsversorgung angeschlossen ist, wird das Gerät eingeschaltet und die LED Ready leuchtet. | Verbinden Sie die linke '''ETH0'''-Buchse am Gerät über ein Ethernet-Kabel mit einem PoE-Switch. Sobald es an die Spannungsversorgung angeschlossen ist, wird das Gerät eingeschaltet und die LED Ready leuchtet. | ||
[[Image: | [[Image:innovaphone Network Ports.png]] | ||
Normalerweise erhält das Gerät eine IP-Adresse, die vom DHCP-Server im Netzwerk vergeben wird. Um auf die Web-Benutzeroberfläche zur Konfiguration der Telefonanlage zuzugreifen, geben Sie diese IP-Adresse in Ihren Webbrowser ein und geben Sie den Benutzernamen und das Passwort ein. | Normalerweise erhält das Gerät eine IP-Adresse, die vom DHCP-Server im Netzwerk vergeben wird. Um auf die Web-Benutzeroberfläche zur Konfiguration der Telefonanlage zuzugreifen, geben Sie diese IP-Adresse in Ihren Webbrowser ein und geben Sie den Benutzernamen und das Passwort ein. | ||
Wenn Sie keinen DHCP-Server in Ihrem Netzwerk haben, können Sie auf das Gerät zugreifen, | |||
indem Sie die MAC-Adresse in einen Browser (z.B. http: //0090331e16b8) eingeben oder das Gerät werkseitig zurücksetzen. | |||
Nach dem Reset haben beide Ethernet-Ports statische IP-Adressen (http: //192.168.0.1 (ETH0) oder http: //192.168.1.1 (ETH1)). | |||
[[Image:innovaphone Reset.png]] | |||
Drücken Sie die Reset-Taste mit einem spitzen Gegenstand (z.B. einem Kugelschreiber). | |||
== Netzwerk konfigurieren: == | === Netzwerk konfigurieren: === | ||
Unter "'''IP4/ETH0/IP'''" können sie die Netzwerkeinstellungen für die erste Netzwerkkarte ('''ETH0''') vornehmen. | Unter "'''IP4/ETH0/IP'''" können sie die Netzwerkeinstellungen für die erste Netzwerkkarte ('''ETH0''') vornehmen. | ||
[[Image: | [[Image:innovaphone Network Settings.png]] | ||
Um es aktiv zu schalten muß man unter "'''IP4/ETH0/DHCP'''" zunächst den "'''DHCP'''" deaktivieren: | Um es aktiv zu schalten muß man unter "'''IP4/ETH0/DHCP'''" zunächst den "'''DHCP'''" deaktivieren: | ||
[[Image: | [[Image:innovaphone DHCP Disable.png]] | ||
Anschließend ist ein Reset notwendig. Diesen kann man unter "'''Maintenance/Reset'''" veranlassen. | Anschließend ist ein Reset notwendig. Diesen kann man unter "'''Maintenance/Reset'''" veranlassen. | ||
[[Image: | [[Image:innovaphone Reset Setting.png]] | ||
== PBX Lizenz & Testmode == | === PBX Lizenz & Testmode === | ||
Bevor Sie neue Telefone zu Ihrer | Bevor Sie neue Telefone zu Ihrer innovaphone hinzufügen können, müssen Sie zunächst Ihre Lizenz aktivieren oder wenn sie es testen wollen ohne die Lizenz, den Testmode aktivieren. | ||
* Um Ihre Lizenz hochzuladen oder den Testmode zu aktivieren gehen sie zu "'''General/License'''". | |||
[[Image: | [[Image:innovaphone License Testmode.jpg]] | ||
* Wenn sie eine Lizenz haben klicken sie auf "'''Datei auswählen'''" und dann auf "'''upload'''". | |||
* Wenn Sie den Testmodus aktivieren möchten, drücken Sie "'''Testmodus'''". Im Testmodus akzeptiert die innovaphone PBX Registrierungen für 8 Stunden. | |||
Danach müssen Sie eine Lizenz hochladen oder den Testmodus erneut aktivieren. | Danach müssen Sie eine Lizenz hochladen oder den Testmodus erneut aktivieren. | ||
== Neuen Benutzer hinzufügen: == | === Neuen Benutzer hinzufügen: === | ||
Gehen sie zu "'''PBX/Ojects'''", wählen "'''User'''" und klicken auf "'''show'''". | Gehen sie zu "'''PBX/Ojects'''", wählen "'''User'''" und klicken auf "'''show'''". | ||
[[Image: | [[Image:innovaphone PBX Objects Show.jpg]] | ||
Es erscheint die Übersicht aller User (Geräte). | Es erscheint die Übersicht aller User (Geräte). | ||
[[Image: | [[Image:innovaphone PBX Objects List.jpg]] | ||
Nun klicken sie auf "'''new'''" und es erscheint folgendes Fenster: | Nun klicken sie auf "'''new'''" und es erscheint folgendes Fenster: | ||
[[Image: | [[Image:innovaphone ip811 pbx General new user en sm.jpg]] | ||
[[Image:Snom WUI Identity | [[Image:Snom WUI Identity innovaphone sm de.jpg]] | ||
'''Hier gilt es ein paar Dinge zu beachten:''' | '''Hier gilt es ein paar Dinge zu beachten:''' | ||
* Das Feld "'''Name'''" und das Feld "'''Hardware ID'''" müssen den selben Wert haben, bzw. den selben Inhalt. | |||
* Das Feld Number enthält die Telefonnummer. Diese tragen sie auch genau so im Webinterface (WUI) Ihres Snom Telefons ein unter "'''Identität 1'''" im Feld Account. | |||
* Das Feld Passwort ist das gleiche das sie im Webinterface (WUI) Ihres Snom Telefons benötigen. | |||
== Konfiguration der SNOM Telefone: == | === Konfiguration der SNOM Telefone: === | ||
'''Bitte stellen Sie sicher, dass Ihr Telefon korrekt angeschlossen ist.''' | '''Bitte stellen Sie sicher, dass Ihr Telefon korrekt angeschlossen ist.''' | ||
* Zuerst packen Sie Ihr Snom Phone aus und stellen Sie es auf den Tisch. | |||
* Verwenden Sie dazu das beiliegende Netzwerkkabel und verbinden Sie die Buchse "'''Net'''" Ihres Telefons mit Ihrem Netzwerk-Switch. | |||
* Um Ihr Snom Phone mit Strom zu versorgen, benötigen Sie entweder einen Netzwerk-Switch mit "'''POE'''" (Power over Ethernet) oder ein geeignetes Snom-Netzteil. | |||
(in der Regel 5V - Keine Garantie für Schäden bei Verwendung eines externen Netzteils). | (in der Regel 5V - Keine Garantie für Schäden bei Verwendung eines externen Netzteils). | ||
| Line 115: | Line 110: | ||
'''Bitte überprüfen Sie vorab, ob auf Ihrem Telefon die neueste stabile Firmware-Version installiert ist.''' | '''Bitte überprüfen Sie vorab, ob auf Ihrem Telefon die neueste stabile Firmware-Version installiert ist.''' | ||
* Bitte besuchen sie hierfür unser Snom Wiki: http: //wiki.snom.com | |||
'''Snom Web-Benutzeroberfläche''' | '''Snom Web-Benutzeroberfläche''' | ||
* Da die automatische Bereitstellung von der innovaphone PBX nicht unterstützt wird, muss das Snom Telefon über seine Web-Benutzeroberfläche (WUI) eingerichtet werden. | |||
* Um auf das Telefon zuzugreifen, geben Sie die IP-Adresse Ihres Telefons in Ihren Internet-Browser ein (z.B. http: //192.168.1.100). | |||
* Um die IP-Adresse Ihres Telefons herauszufinden, drücken Sie die Konfigurationstaste (Zahnradsymbol) ? "'''Informationen'''" ? "'''Systeminformationen'''". | |||
== Snom Identität konfigurieren: == | === Snom Identität konfigurieren: === | ||
Wählen Sie zunächst den Menüpunkt "'''Identität 1'''" auf der linken Seite und geben Sie die Benutzer-ID und das Passwort ein, die Sie in die innovaphone PBX eingegeben haben. | Wählen Sie zunächst den Menüpunkt "'''Identität 1'''" auf der linken Seite und geben Sie die Benutzer-ID und das Passwort ein, die Sie in die innovaphone PBX eingegeben haben. | ||
* '''Angezeigter Name''': testphone1 | |||
* '''Nutzerkennung''': 100 (Rufnummer) | |||
* '''Passwort''': 123 (wie in der innovaphone vergeben) | |||
* '''Registrar''': 192.168.100.250 (IP der innovaphone) | |||
Klicken sie unten auf "'''übernehmen'''". | Klicken sie unten auf "'''übernehmen'''". | ||
[[Image: | [[Image:innovaphone ip811 identity Login de.jpg]] | ||
'''Ihr Snom Telefon ist nun erfolgreich an der | '''Ihr Snom Telefon ist nun erfolgreich an der innovaphone PBX registriert''' und kann Anrufe tätigen und entgegennehmen. | ||
Bitte beachten Sie die Zeitbegrenzung von 8 Stunden, wenn Sie im Testmodus arbeiten. Nach dieser Zeit wird das Telefon nicht mehr registriert. | |||
== Konfiguration der | === Konfiguration der innovaphone sichern. === | ||
Sie können die Konfiguration Ihrer | Sie können die Konfiguration Ihrer innovaphone in einer Config Datei Exportieren. | ||
Gehen sie dafür zu "'''Maintenance/Diagnostics/Config-Show'''". Dort wird Ihnen eine komplette Liste angezeigt. Markieren sie die ganze Liste von oben nach unten und kopieren den Inhalt in eine Textdatei. | Gehen sie dafür zu "'''Maintenance/Diagnostics/Config-Show'''". Dort wird Ihnen eine komplette Liste angezeigt. Markieren sie die ganze Liste von oben nach unten und kopieren den Inhalt in eine Textdatei. | ||
[[Image: | [[Image:innovaphone Config Show.png]] | ||
== Zurücksetzen der | === Zurücksetzen der innovaphone PBX === | ||
Sollte es aus irgendeinem Grund notwendig erscheinen die | Sollte es aus irgendeinem Grund notwendig erscheinen die innovaphone PBX neuzustarten oder auf Werkseinstellung zurückzusetzten, zeigen wir ihnen hier wie das geht: | ||
'''Neustart mit Erhalt der Konfigurationsdaten:''' | '''Neustart mit Erhalt der Konfigurationsdaten:''' | ||
* Durch einen kurzen '''Reset''' wird das Gerät neu gestartet. Der Reset-Knopf darf dabei '''nicht länger als eine Sekunde''' gedrückt werden. | |||
[[Image:innovaphone Reset.png]] | |||
'''Neustart mit Rücksetzen der Konfiguration auf Werkseinstellungen:''' | '''Neustart mit Rücksetzen der Konfiguration auf Werkseinstellungen:''' | ||
* Hierzu wird ein langer Reset durchgeführt, wobei der Reset- Knopf länger als 20 Sekunden gedrückt wird. | |||
Dadurch wird der Flash-Speicher des Gerätes gelöscht und dieses auf die Werkseinstellungen zurückgesetzt. | Dadurch wird der Flash-Speicher des Gerätes gelöscht und dieses auf die Werkseinstellungen zurückgesetzt. | ||
* Anschließend wechselt es in den TFTP-Modus. Je nach Größe und Nutzung des Flash-Speichers kann dieser Vorgang bis zu 60 Sekunden dauern. | |||
Die LED des Geräts flackert solange, bis der Speicher komplett gelöschtwurde. | Die LED des Geräts flackert solange, bis der Speicher komplett gelöschtwurde. | ||
* '''Bitte führen Sie währenddessen keinen erneuten Reset durch und unterbrechen Sie die Stromversorgung nicht.''' | |||
* Wenn das Flackern erloschen ist und die LED rot leuchtet, dann bitte kurz dasGerät von der Stromversorgung trennen. | |||
* Das Gerät ist nun im Werkszustand und kann wieder über seine IP-Adresse oder die NetBIOS-Methode erreicht werden. | |||
== Wiederherstellen der Konfiguration == | === Wiederherstellen der Konfiguration === | ||
Wenn Sie über den Browser auf das Admin-UI zugreifen, gehen Sie bitte zu "'''Maintenance/Upload/Config'''" und laden Sie die Backup-Konfigurationsdatei hoch. | Wenn Sie über den Browser auf das Admin-UI zugreifen, gehen Sie bitte zu "'''Maintenance/Upload/Config'''" und laden Sie die Backup-Konfigurationsdatei hoch. | ||
[[Image: | [[Image:innovaphone Upload Config.png]] | ||
* Evtl. kommt eine Meldung, "'''Lines skipped'''", das können sie ignorieren. | |||
Anschließend führen sie wie verlangt einen Reset der Box aus (Klick auf Reset Button). | Anschließend führen sie wie verlangt einen Reset der Box aus (Klick auf Reset Button). | ||
[[Image: | [[Image:innovaphone Upload Config Reset sm.png]] | ||
Nach dem Neustart hat die | Nach dem Neustart hat die innovaphone PBX die wiederhergestellte Konfiguration. | ||
[[Image: | [[Image:innovaphone General Info sm.png]] | ||
== | == Configuration (English) == | ||
== Installation of | === Installation of innovaphone PBX === | ||
Connect the left '''ETH0''' socket on the device to a PoE switch via an Ethernet cable. As soon as it is connected to the power supply, the unit is switched on and the LED marked Ready lights up. | Connect the left '''ETH0''' socket on the device to a PoE switch via an Ethernet cable. As soon as it is connected to the power supply, the unit is switched on and the LED marked Ready lights up. | ||
[[Image: | [[Image:innovaphone Network Ports.png]] | ||
Normally, the device will get an IP address assigned by the DHCP server in the network. To access the web user interface to configure the PBX, type in this IP address into your web browser and insert the username and password. | Normally, the device will get an IP address assigned by the DHCP server in the network. To access the web user interface to configure the PBX, type in this IP address into your web browser and insert the username and password. | ||
If you do not have a DHCP server in your network, you can access the device by typing in the MAC address into a browser (e.g. http: //0090331e16b8), | |||
or you factory reset the device. | |||
After the reset, both Ethernet ports will have static IP addresses (http: //192.168.0.1 (ETH0) or http: //192.168.1.1 (ETH1)). | |||
[[Image:innovaphone Reset.png]] | |||
Press the reset button with a pointed object (e.g. a ballpoint pen). | |||
== Network configuration == | === Network configuration === | ||
Under "'''IP4/ETH0/IP'''" you can change the network settings for the first network card ( '''ETH0''' ). | Under "'''IP4/ETH0/IP'''" you can change the network settings for the first network card ( '''ETH0''' ). | ||
[[Image: | [[Image:innovaphone Network Settings.png]] | ||
To activate it, first deactivate "'''DHCP'''" under "'''IP4/ETH0/DHCP'''": | To activate it, first deactivate "'''DHCP'''" under "'''IP4/ETH0/DHCP'''": | ||
[[Image: | [[Image:innovaphone DHCP Disable.png]] | ||
A reset is then necessary. This can be initiated under "'''Maintenance/Reset'''". | A reset is then necessary. This can be initiated under "'''Maintenance/Reset'''". | ||
[[Image: | [[Image:innovaphone Reset Setting.png]] | ||
== PBX License & Test mode == | === PBX License & Test mode === | ||
Before you can add new phones to your | Before you can add new phones to your innovaphone PBX, you need to first activate your license or if you want to test it without a license, activate the test mode. | ||
* To upload your license file or activate the test mode go to "'''General/License'''". | |||
[[Image: | [[Image:innovaphone License Testmode.jpg]] | ||
* If you have a license click on "'''Select file'''" and then on "'''upload'''". | |||
* If you want to activate the test mode, press "'''Test Mode'''". In test mode the innovaphone PBX will accept registrations for 8 hours. After that, you will need to upload a license or activate the test mode again. | |||
== Adding new users == | === Adding new users === | ||
Go to "'''PBX/Ojects'''", select "'''User'''" and click on "'''show'''". | Go to "'''PBX/Ojects'''", select "'''User'''" and click on "'''show'''". | ||
[[Image: | [[Image:innovaphone PBX Objects Show.jpg]] | ||
An overview list of all users (devices) appears. | An overview list of all users (devices) appears. | ||
[[Image: | [[Image:innovaphone PBX Objects List.jpg]] | ||
Now click on "'''new'''" and the following window will appear: | Now click on "'''new'''" and the following window will appear: | ||
[[Image: | [[Image:innovaphone ip811 pbx General new user en sm.jpg]] | ||
[[Image:Snom WUI Identity | [[Image:Snom WUI Identity innovaphone sm en.jpg]] | ||
'''There are a few things to consider here:''' | '''There are a few things to consider here:''' | ||
* The "'''Name'''" field and the "'''Hardware ID'''" field must have the same value or content. | |||
* The "'''Number'''" field contains the telephone number. This same number is used in the "'''Account Field'''" in the web interface (WUI) of your snom phone under "'''Identity 1'''". | |||
* Please provide a strong enough password for the account. | |||
== Configuration of the Snom phone == | === Configuration of the Snom phone === | ||
'''Please make sure your phone is set up correctly.''' | '''Please make sure your phone is set up correctly.''' | ||
* First of all, unpack your Snom Phone and put it on the table. | |||
* To connect it use the enclosednetwork cable and connect the "'''Net'''" socket of your telephone to your network switch. | |||
* To get power for your Snom Phone either a network switch with "'''POE'''" (Power over Ethernet) or a suitable Snom power supply unit | |||
(usually 5V - No guarantee for damage when using an external power supply). | (usually 5V - No guarantee for damage when using an external power supply). | ||
| Line 279: | Line 272: | ||
'''Please check in advance that your phone has the latest stable firmware version installed.''' | '''Please check in advance that your phone has the latest stable firmware version installed.''' | ||
* Have a look on our Snom Wiki: http: //wiki.snom.com | |||
'''Enter Snom Webinterface''' | '''Enter Snom Webinterface''' | ||
Since auto provisioning is not supported by the | Since auto provisioning is not supported by the innovaphone PBX, the Snom Phone needs to be set up using its web user interface (WUI). | ||
To access the phone, type the IP address of your phone into your internet browser (e.g. http: //192.168.1.100). | To access the phone, type the IP address of your phone into your internet browser (e.g. http: //192.168.1.100). | ||
To find out the IP address of your phone press the Configuration key (gear wheel symbol) | To find out the IP address of your phone press the Configuration key (gear wheel symbol) ? "'''Information'''" ? "'''System information'''". | ||
== Register a SIP account == | === Register a SIP account === | ||
First select the " '''Identity 1''' " menu item on the left-hand side and enter the user ID and password you entered into the innovaphone PBX. | First select the " '''Identity 1''' " menu item on the left-hand side and enter the user ID and password you entered into the innovaphone PBX. | ||
* '''Displayname:''' testphone1 | |||
* '''Account:''' 100 (telephone number) | |||
* '''Password:''' 123 (as assigned in the innovaphone) | |||
* '''Registrar:''' 192.168.100.250 (IP Adress of the innovaphone) | |||
Click on "'''apply''' " below. | Click on "'''apply''' " below. | ||
[[Image: | [[Image:innovaphone ip811 identity Login en.jpg]] | ||
'''The phone configuration is now complete.''' Your Snom phone is now successfully registered on the | '''The phone configuration is now complete.''' Your Snom phone is now successfully registered on the innovaphone PBX and can make and receive calls. | ||
Please note the time limit of 8 hours if you are running in test mode. After this time the phone will be no longer registered. | Please note the time limit of 8 hours if you are running in test mode. After this time the phone will be no longer registered. | ||
== Backup the configuration of the | === Backup the configuration of the innovaphone PBX === | ||
You can export the configuration of your | You can export the configuration of your innovaphone PBX in a config file. | ||
Go to "'''Maintenance/Diagnostics/Config-Show'''". A complete list is displayed there. | Go to "'''Maintenance/Diagnostics/Config-Show'''". A complete list is displayed there. | ||
Select the whole list from top to bottom and copy the content into a text file. | Select the whole list from top to bottom and copy the content into a text file. | ||
[[Image: | [[Image:innovaphone Config Show.png]] | ||
== Resetting the | === Resetting the innovaphone PBX === | ||
If for any reason it seems necessary to restart the | If for any reason it seems necessary to restart the innovaphone PBX or reset it to factory settings, we will show you how to do this here: | ||
'''Restart with receipt of the configuration data:''' | '''Restart with receipt of the configuration data:''' | ||
* A short '''reset''' restarts the device. The reset '''button must not be pressed for more than one second'''. | |||
[[Image:innovaphone Reset.png]] | |||
'''Restart with resetting the configuration to factory settings:''' | '''Restart with resetting the configuration to factory settings:''' | ||
* For this purpose, a long reset is carried out, whereby the reset button is pressed for more than 20 seconds. | |||
This erases the flash memory of the device and resets it to the factory settings. | This erases the flash memory of the device and resets it to the factory settings. | ||
* It then switches to TFTP mode. Depending on the size and use of the flash memory, this process can take up to 60 seconds. | |||
The LED of the device flickers until the memory is completely erased. | The LED of the device flickers until the memory is completely erased. | ||
* '''Please do not carry out another reset during this time and do not interrupt the power supply.''' | |||
* If the flickering has gone out and the LED lights red, please disconnect the device from the power supply briefly. | |||
* The device is now in factory state and can be accessed again via its IP address or the NetBIOS method. | |||
== Restore the configuration == | === Restore the configuration === | ||
If you access the admin UI via browser, please go to "'''Maintenance/Upload/Config'''" and upload the backup config file. | If you access the admin UI via browser, please go to "'''Maintenance/Upload/Config'''" and upload the backup config file. | ||
[[Image: | [[Image:innovaphone Upload Config.png]] | ||
* You might see a message "'''Lines skipped'''". You can ignore that. | |||
Then perform a reset of the box as requested (click on Reset button). | Then perform a reset of the box as requested (click on Reset button). | ||
[[Image: | [[Image:innovaphone Upload Config Reset sm.png]] | ||
After the restart the | After the restart the innovaphone PBX will have the restored configuration. | ||
[[Image: | [[Image:innovaphone General Info sm.png]] | ||
== | ==Vendor== | ||
'''Snom Technology GmbH''' | '''Snom Technology GmbH''' | ||
Revision as of 09:30, 1 August 2018
Product name
Snom Technology GmbH
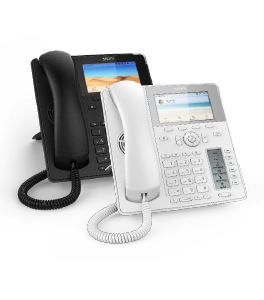
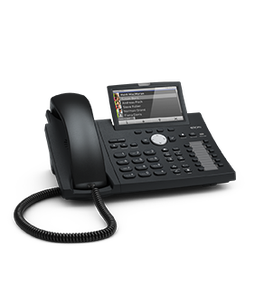
Models: D120, D305, D315, D345, D375, D710, D712, D715, D725, D735, D745, D765, D785
Certification Status

Category
Configuration (German)
Informationen zum PBX-System
Die hier verwendete PBX ist eine innovaphone IP811. Die Angaben sind jedoch auf die weiteren innovaphone Modelle übertragbar.
Für die Sprachübertragung zwischen den VoIP-Komponenten wird das Protokoll SIP verwendet.
Diese Telefone kamen für unseren Test verschiedene Snom IP-Telefone zum Einsatz.
- Snom D315
- Snom D345
Installation der innovaphone PBX
Verbinden Sie die linke ETH0-Buchse am Gerät über ein Ethernet-Kabel mit einem PoE-Switch. Sobald es an die Spannungsversorgung angeschlossen ist, wird das Gerät eingeschaltet und die LED Ready leuchtet.

Normalerweise erhält das Gerät eine IP-Adresse, die vom DHCP-Server im Netzwerk vergeben wird. Um auf die Web-Benutzeroberfläche zur Konfiguration der Telefonanlage zuzugreifen, geben Sie diese IP-Adresse in Ihren Webbrowser ein und geben Sie den Benutzernamen und das Passwort ein.
Wenn Sie keinen DHCP-Server in Ihrem Netzwerk haben, können Sie auf das Gerät zugreifen, indem Sie die MAC-Adresse in einen Browser (z.B. http: //0090331e16b8) eingeben oder das Gerät werkseitig zurücksetzen. Nach dem Reset haben beide Ethernet-Ports statische IP-Adressen (http: //192.168.0.1 (ETH0) oder http: //192.168.1.1 (ETH1)).
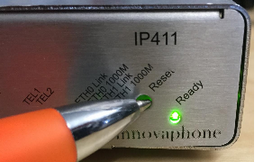
Drücken Sie die Reset-Taste mit einem spitzen Gegenstand (z.B. einem Kugelschreiber).
Netzwerk konfigurieren:
Unter "IP4/ETH0/IP" können sie die Netzwerkeinstellungen für die erste Netzwerkkarte (ETH0) vornehmen.
Um es aktiv zu schalten muß man unter "IP4/ETH0/DHCP" zunächst den "DHCP" deaktivieren:
Anschließend ist ein Reset notwendig. Diesen kann man unter "Maintenance/Reset" veranlassen.
PBX Lizenz & Testmode
Bevor Sie neue Telefone zu Ihrer innovaphone hinzufügen können, müssen Sie zunächst Ihre Lizenz aktivieren oder wenn sie es testen wollen ohne die Lizenz, den Testmode aktivieren.
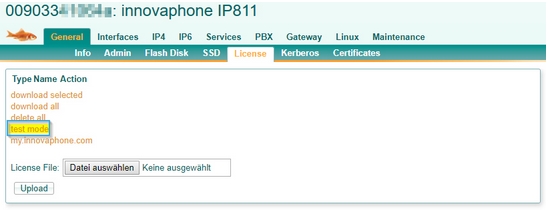
- Um Ihre Lizenz hochzuladen oder den Testmode zu aktivieren gehen sie zu "General/License".
- Wenn sie eine Lizenz haben klicken sie auf "Datei auswählen" und dann auf "upload".
- Wenn Sie den Testmodus aktivieren möchten, drücken Sie "Testmodus". Im Testmodus akzeptiert die innovaphone PBX Registrierungen für 8 Stunden.
Danach müssen Sie eine Lizenz hochladen oder den Testmodus erneut aktivieren.
Neuen Benutzer hinzufügen:
Gehen sie zu "PBX/Ojects", wählen "User" und klicken auf "show".
Es erscheint die Übersicht aller User (Geräte).
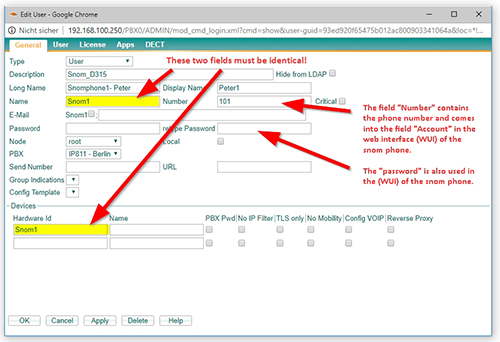
Nun klicken sie auf "new" und es erscheint folgendes Fenster:
 File:Snom WUI Identity innovaphone sm de.jpg
Hier gilt es ein paar Dinge zu beachten:
- Das Feld "Name" und das Feld "Hardware ID" müssen den selben Wert haben, bzw. den selben Inhalt.
- Das Feld Number enthält die Telefonnummer. Diese tragen sie auch genau so im Webinterface (WUI) Ihres Snom Telefons ein unter "Identität 1" im Feld Account.
- Das Feld Passwort ist das gleiche das sie im Webinterface (WUI) Ihres Snom Telefons benötigen.
Konfiguration der SNOM Telefone:
Bitte stellen Sie sicher, dass Ihr Telefon korrekt angeschlossen ist.
- Zuerst packen Sie Ihr Snom Phone aus und stellen Sie es auf den Tisch.
- Verwenden Sie dazu das beiliegende Netzwerkkabel und verbinden Sie die Buchse "Net" Ihres Telefons mit Ihrem Netzwerk-Switch.
- Um Ihr Snom Phone mit Strom zu versorgen, benötigen Sie entweder einen Netzwerk-Switch mit "POE" (Power over Ethernet) oder ein geeignetes Snom-Netzteil.
(in der Regel 5V - Keine Garantie für Schäden bei Verwendung eines externen Netzteils).
Bitte überprüfen Sie vorab, ob auf Ihrem Telefon die neueste stabile Firmware-Version installiert ist.
- Bitte besuchen sie hierfür unser Snom Wiki: http: //wiki.snom.com
Snom Web-Benutzeroberfläche
- Da die automatische Bereitstellung von der innovaphone PBX nicht unterstützt wird, muss das Snom Telefon über seine Web-Benutzeroberfläche (WUI) eingerichtet werden.
- Um auf das Telefon zuzugreifen, geben Sie die IP-Adresse Ihres Telefons in Ihren Internet-Browser ein (z.B. http: //192.168.1.100).
- Um die IP-Adresse Ihres Telefons herauszufinden, drücken Sie die Konfigurationstaste (Zahnradsymbol) ? "Informationen" ? "Systeminformationen".
Snom Identität konfigurieren:
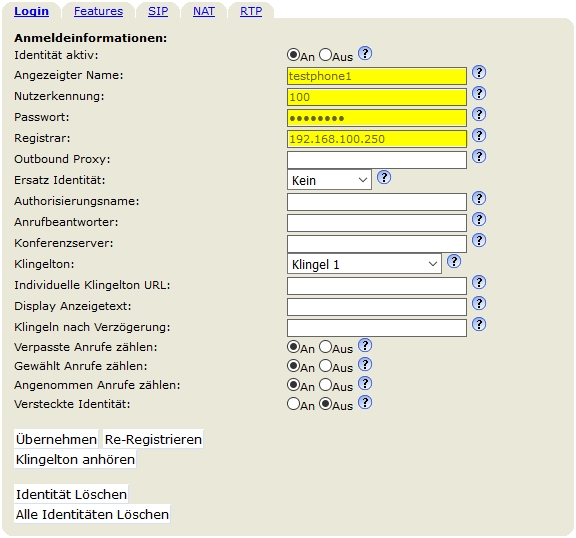
Wählen Sie zunächst den Menüpunkt "Identität 1" auf der linken Seite und geben Sie die Benutzer-ID und das Passwort ein, die Sie in die innovaphone PBX eingegeben haben.
- Angezeigter Name: testphone1
- Nutzerkennung: 100 (Rufnummer)
- Passwort: 123 (wie in der innovaphone vergeben)
- Registrar: 192.168.100.250 (IP der innovaphone)
Klicken sie unten auf "übernehmen".
Ihr Snom Telefon ist nun erfolgreich an der innovaphone PBX registriert und kann Anrufe tätigen und entgegennehmen.
Bitte beachten Sie die Zeitbegrenzung von 8 Stunden, wenn Sie im Testmodus arbeiten. Nach dieser Zeit wird das Telefon nicht mehr registriert.
Konfiguration der innovaphone sichern.
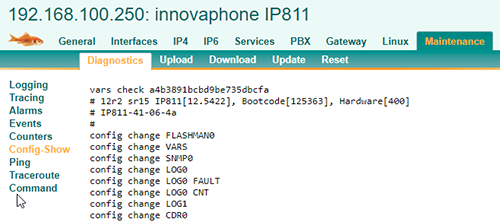
Sie können die Konfiguration Ihrer innovaphone in einer Config Datei Exportieren. Gehen sie dafür zu "Maintenance/Diagnostics/Config-Show". Dort wird Ihnen eine komplette Liste angezeigt. Markieren sie die ganze Liste von oben nach unten und kopieren den Inhalt in eine Textdatei.
Zurücksetzen der innovaphone PBX
Sollte es aus irgendeinem Grund notwendig erscheinen die innovaphone PBX neuzustarten oder auf Werkseinstellung zurückzusetzten, zeigen wir ihnen hier wie das geht:
Neustart mit Erhalt der Konfigurationsdaten:
- Durch einen kurzen Reset wird das Gerät neu gestartet. Der Reset-Knopf darf dabei nicht länger als eine Sekunde gedrückt werden.
Neustart mit Rücksetzen der Konfiguration auf Werkseinstellungen:
- Hierzu wird ein langer Reset durchgeführt, wobei der Reset- Knopf länger als 20 Sekunden gedrückt wird.
Dadurch wird der Flash-Speicher des Gerätes gelöscht und dieses auf die Werkseinstellungen zurückgesetzt.
- Anschließend wechselt es in den TFTP-Modus. Je nach Größe und Nutzung des Flash-Speichers kann dieser Vorgang bis zu 60 Sekunden dauern.
Die LED des Geräts flackert solange, bis der Speicher komplett gelöschtwurde.
- Bitte führen Sie währenddessen keinen erneuten Reset durch und unterbrechen Sie die Stromversorgung nicht.
- Wenn das Flackern erloschen ist und die LED rot leuchtet, dann bitte kurz dasGerät von der Stromversorgung trennen.
- Das Gerät ist nun im Werkszustand und kann wieder über seine IP-Adresse oder die NetBIOS-Methode erreicht werden.
Wiederherstellen der Konfiguration
Wenn Sie über den Browser auf das Admin-UI zugreifen, gehen Sie bitte zu "Maintenance/Upload/Config" und laden Sie die Backup-Konfigurationsdatei hoch.
- Evtl. kommt eine Meldung, "Lines skipped", das können sie ignorieren.
Anschließend führen sie wie verlangt einen Reset der Box aus (Klick auf Reset Button).
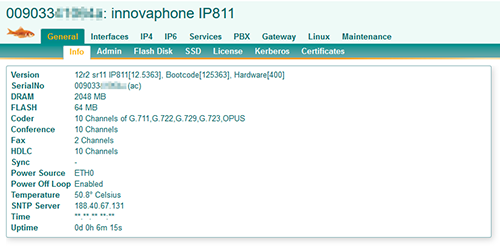
Nach dem Neustart hat die innovaphone PBX die wiederhergestellte Konfiguration.
Configuration (English)
Installation of innovaphone PBX
Connect the left ETH0 socket on the device to a PoE switch via an Ethernet cable. As soon as it is connected to the power supply, the unit is switched on and the LED marked Ready lights up.

Normally, the device will get an IP address assigned by the DHCP server in the network. To access the web user interface to configure the PBX, type in this IP address into your web browser and insert the username and password.
If you do not have a DHCP server in your network, you can access the device by typing in the MAC address into a browser (e.g. http: //0090331e16b8), or you factory reset the device. After the reset, both Ethernet ports will have static IP addresses (http: //192.168.0.1 (ETH0) or http: //192.168.1.1 (ETH1)).
Press the reset button with a pointed object (e.g. a ballpoint pen).
Network configuration
Under "IP4/ETH0/IP" you can change the network settings for the first network card ( ETH0 ).
To activate it, first deactivate "DHCP" under "IP4/ETH0/DHCP":
A reset is then necessary. This can be initiated under "Maintenance/Reset".
PBX License & Test mode
Before you can add new phones to your innovaphone PBX, you need to first activate your license or if you want to test it without a license, activate the test mode.
- To upload your license file or activate the test mode go to "General/License".
- If you have a license click on "Select file" and then on "upload".
- If you want to activate the test mode, press "Test Mode". In test mode the innovaphone PBX will accept registrations for 8 hours. After that, you will need to upload a license or activate the test mode again.
Adding new users
Go to "PBX/Ojects", select "User" and click on "show".
An overview list of all users (devices) appears.
Now click on "new" and the following window will appear:
 File:Snom WUI Identity innovaphone sm en.jpg
There are a few things to consider here:
- The "Name" field and the "Hardware ID" field must have the same value or content.
- The "Number" field contains the telephone number. This same number is used in the "Account Field" in the web interface (WUI) of your snom phone under "Identity 1".
- Please provide a strong enough password for the account.
Configuration of the Snom phone
Please make sure your phone is set up correctly.
- First of all, unpack your Snom Phone and put it on the table.
- To connect it use the enclosednetwork cable and connect the "Net" socket of your telephone to your network switch.
- To get power for your Snom Phone either a network switch with "POE" (Power over Ethernet) or a suitable Snom power supply unit
(usually 5V - No guarantee for damage when using an external power supply).
Please check in advance that your phone has the latest stable firmware version installed.
- Have a look on our Snom Wiki: http: //wiki.snom.com
Enter Snom Webinterface
Since auto provisioning is not supported by the innovaphone PBX, the Snom Phone needs to be set up using its web user interface (WUI).
To access the phone, type the IP address of your phone into your internet browser (e.g. http: //192.168.1.100).
To find out the IP address of your phone press the Configuration key (gear wheel symbol) ? "Information" ? "System information".
Register a SIP account
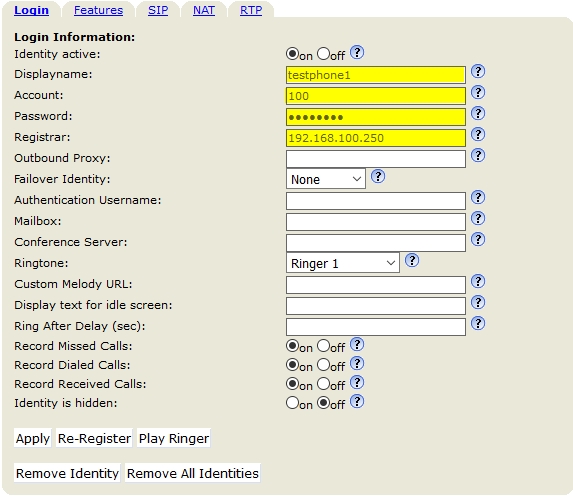
First select the " Identity 1 " menu item on the left-hand side and enter the user ID and password you entered into the innovaphone PBX.
- Displayname: testphone1
- Account: 100 (telephone number)
- Password: 123 (as assigned in the innovaphone)
- Registrar: 192.168.100.250 (IP Adress of the innovaphone)
Click on "apply " below.
The phone configuration is now complete. Your Snom phone is now successfully registered on the innovaphone PBX and can make and receive calls.
Please note the time limit of 8 hours if you are running in test mode. After this time the phone will be no longer registered.
Backup the configuration of the innovaphone PBX
You can export the configuration of your innovaphone PBX in a config file. Go to "Maintenance/Diagnostics/Config-Show". A complete list is displayed there. Select the whole list from top to bottom and copy the content into a text file.
Resetting the innovaphone PBX
If for any reason it seems necessary to restart the innovaphone PBX or reset it to factory settings, we will show you how to do this here:
Restart with receipt of the configuration data:
- A short reset restarts the device. The reset button must not be pressed for more than one second.
Restart with resetting the configuration to factory settings:
- For this purpose, a long reset is carried out, whereby the reset button is pressed for more than 20 seconds.
This erases the flash memory of the device and resets it to the factory settings.
- It then switches to TFTP mode. Depending on the size and use of the flash memory, this process can take up to 60 seconds.
The LED of the device flickers until the memory is completely erased.
- Please do not carry out another reset during this time and do not interrupt the power supply.
- If the flickering has gone out and the LED lights red, please disconnect the device from the power supply briefly.
- The device is now in factory state and can be accessed again via its IP address or the NetBIOS method.
Restore the configuration
If you access the admin UI via browser, please go to "Maintenance/Upload/Config" and upload the backup config file.
- You might see a message "Lines skipped". You can ignore that.
Then perform a reset of the box as requested (click on Reset button).
After the restart the innovaphone PBX will have the restored configuration.
Vendor
Snom Technology GmbH
Wittestraße 30 G
13509 Berlin, Germany
Phone: +49 30 39833-0
Fax: +49 30 39833-111
E-Mail: officemanagement@snom.com
Internet: www.snom.com

