Reference9:IQM Agent Help English: Difference between revisions
m (→Waiting queues) |
No edit summary |
||
| Line 451: | Line 451: | ||
The wrap-up time is taken from the first iQM Server, however an agent individual wrap-up time is possible. If a agent answer a call from the WQ he is logged out automatically in both in the first and in the second queue. The wrap-up time must be upheld in both groups; an extension or the forced logout after finishing also engages in both groups. For this purpose, the second queue is set to manual mode and the agent logged out. | The wrap-up time is taken from the first iQM Server, however an agent individual wrap-up time is possible. If a agent answer a call from the WQ he is logged out automatically in both in the first and in the second queue. The wrap-up time must be upheld in both groups; an extension or the forced logout after finishing also engages in both groups. For this purpose, the second queue is set to manual mode and the agent logged out. | ||
=Note *= | |||
(Assemblies 8.0.268 o maggiore) | |||
A click on the "waiting time" field opens and closes the note fields associated with the numbers. | |||
[[image:iQMCBRit_01.png]] | |||
These notes are private and saved exclusively on the local PC, therefore visible only on the local workstation. | |||
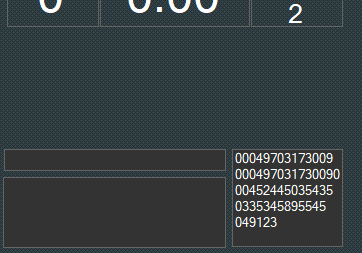
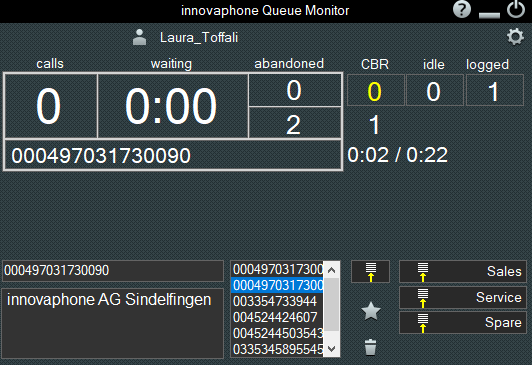
In the above example you will find 3 fields: the box on the right shows a list of numbers already saved previously; the empty field at the top left is meant to insert a new number; the empty box at the bottom left is meant for the text of the note. | |||
To enter a new number, simply click on the box. When you click, any other open iQM windows will close automatically. They will appear again as soon as the number/text input fields get closed. | |||
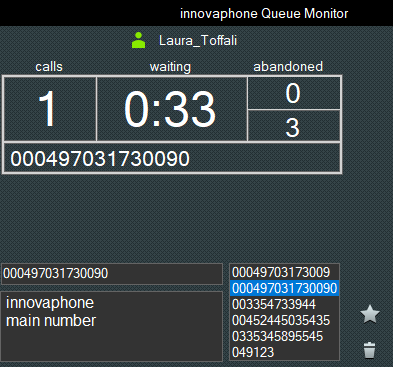
If the entered number contains any non-approved characters, it will be automatically normalized and the characters deleted as soon as you exit the field. For example, the number "a01234*56" will be transformed into "0123456". After entering the number, the "star" symbol (Favorites) will automatically appear on the right side, allowing you to save the number and the associated note. The "recycle bin" symbol allows to delete the entry. The example below illustrates the scenario before saving. | |||
[[image:iQMCBRen_02.png]] | |||
After having saved the number and related note, the note will be visible by clicking on the saved number in the right column. If the list of saved number becomes long, a scroll bar appears automatically as shown in the following examples. | |||
The number of an incoming or outgoing call can automatically be copied into the notes simply by clicking on the number displayed and a note can subsequently be added. | |||
If you click on an incoming or outgoing number and this number has already been saved in the note list, an automatic positioning is performed and the note appears as in the following example: | |||
[[image:iQMCBRen_03.png]] | |||
Simply click on the number at the top, i.e. the number of the active call, it is immediately returned to the note number field, the iQM performs a search and if it is already stored, the note text is immediately displayed. | |||
== Notes to CBR * == | |||
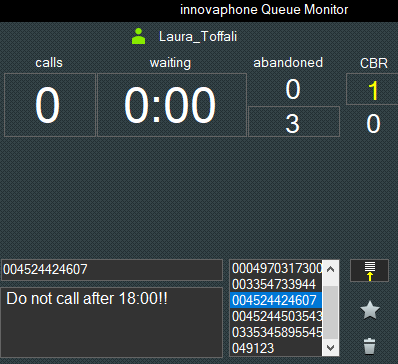
Notes can be saved locally, as explained in the previous point, but also sent to the list of Call Back Requests (CBR). For a description of the CBR service, see the following chapters. In the following example, we selected an entry that has already been saved in the note list. When the note is composed or edited, in addition to the symbol for saving the note, a new symbol appears for saving the notes in the callback request list. Sending the note into the CBR list is therefore an option and alternative to saving it in the private list. | |||
By clicking on the button with the list and arrow symbol pointing at the CBR counters, the number and text of the note are transmitted to the CBR list, which is shared with all agents. | |||
[[image:iQMCBRen_04.png]] | |||
After being shared with the CBR list, all agents can view the number and note shared. Notice that to transfer a number to the CBR list, with or without text, it is not necessary to save it first in the private list: if for example a customer calls, you can transfer the number with a click in the appropriate field and immediately transfer the number to the callback request list. | |||
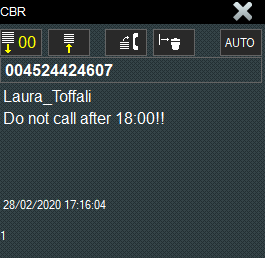
If an agent opens the note later on, he will see not only the number and text, but also the name of the agent who forwarded the request: | |||
[[image:iQMCBRen_05.png]] | |||
The example above shows the note after being shared with the CBR group. | |||
== Notes to other call groups * == | |||
Notes may also be sent to other groups of agents working on other queues. Up to 4 groups are possible, the corresponding buttons appear automatically when a dispatch is available. | |||
In the example, the incoming number with its commentary is already available in the personal notes. Notice that all possibilities are available, transfer it to the local callback request list or to the three remote lists by pressing the appropriate buttons. | |||
[[image:iQMCBRen_06.png]] | |||
Once the note is transferred to a CBR list, the fields are deleted. You can select the entry again, or re-enter it and then transfer it to a different list, which is not recommended. | |||
==CBR *== | |||
CBR stands for "Call Back Request", hereinafter for convenience we use the term "CBR". CBRs are dropped by callers who prefer to be called back, rather than waiting further in the queue. As explained in the previous chapter, it is also possible to fill the list manually by an operator who can also be part of a remote group. | |||
Remark: If the number of missed calls (users who have given up waiting and ended the call) is above 20, these missed calls can be merged into the CBR list, when properly configured by the system administrator. | |||
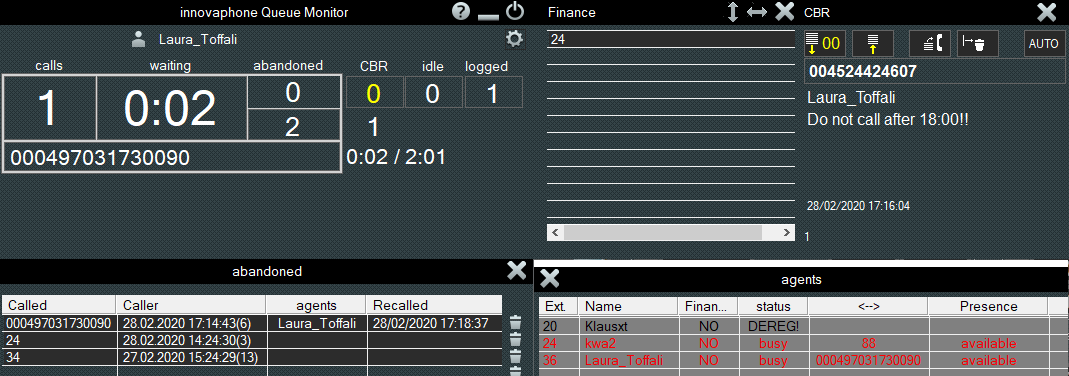
If the CBR service is active, a yellow counter is visible, as in the example below, showing the number of requests in the list with an additional counter right under the yellow one, which indicates how many requests are currently being processed (loaded) by agents. In the example below, there are 2 CBRs: one CBR loaded by an agent, one CBR still in the stack of unmanaged callbacks. To open the CBR window, click on the CBR number: | |||
[[image:iQMCBRen_07.png]] | |||
The CBR window is independent and can be moved as you wish, if you have set up automatic docking it will be arranged as in the example above on the right side of the main window; if you also open the queue window, the window will be arranged on the right side of the queue, if you are part of two queues on the left side. | |||
[[image:iQMCBRen_08.png]] | |||
If so set, you can minimize all windows in the taskbar, only the CBR window remains open. The CBR window can be closed by clicking on the "X" button, or again on the number of open requests, or on the setup menu. | |||
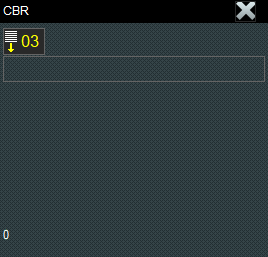
The possible actions in the CBR window appear automatically. Initially, by opening the window, It is indicated the number of open requests, in the example 3, at the bottom left is shown the number of requests being processed by agents, in the example 0: | |||
[[image:iQMCBRit_09.png]] | |||
By clicking on the number of open requests, a request is loaded from the stack and other possible commands are automatically displayed: | |||
[[image:iQMCBRit_10.png]] | |||
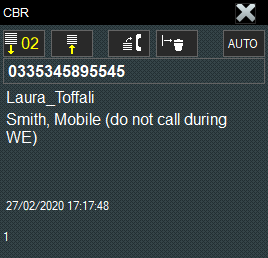
In the example above a request is loaded, the counter now indicates that there are still 2 requests in the stack, while the lower left counter indicates that a request is being processed. The loaded request is exclusive and cannot be loaded by any other agent until it is released back into the stack. In addition to the number to call back, the name of the agent who manually uploaded the request and the message is indicated. | |||
Typically a CBR is requested directly by a caller and in this case the operator and note fields are empty. In any case, the date on which the request was created, or rather the time when the system was taken over, is always displayed. | |||
With a loaded request as in the example above, the operator has several possibilities: | |||
• By clicking again on the number of requests the next request is loaded, while the current request is put back at the bottom of the stack. This can be practical, for example, if you do not want to take over a certain callback, or if you want to do so at a later time. | |||
• By clicking on the symbol with the stack and the yellow arrow upwards you can put the request back on the stack without loading a new request: you return to the initial situation with the empty window. | |||
• Click on the symbol with the telephone handset to call the number indicated. | |||
• Clicking on the basket symbol deletes the request and loads the next request automatically. | |||
If there are a lot of calls to be made, the usual procedure would be to switch from the call to the delete symbol until all requests are exhausted. If a user does not answer, or is busy, the request is put back on the stack. | |||
A request can also be deleted without redialing by pressing the delete key. | |||
All operations are tracked in a log file. | |||
Deleting the last request takes you back to the home page. | |||
With a loaded number as in the example above, you can start the automatic call mode by clicking on the "AUTO" button. The button starts flashing slowly in red to warn the activation of the service. To switch off the auto mode you need to click on the button again. | |||
If you launch the first call with the auto service active, as soon as it ends, the system deletes the request, loads the next request and calls. The operator then releases the call and immediately moves on to the next call until the CBR is exhausted. | |||
If you want to interrupt the service after having launched it, you must switch off the auto mode during the conversation and before releasing the active call. | |||
If you press the key to return the CBR to the stack, the request will return to the queue and the auto mode will be turned off. | |||
Auto mode is mainly used for outgoing call campaigns, which is a service described below. | |||
==Outbound *== | |||
In addition to receiving requests from callers and manual notes, the system can also load call campaigns. These are uploaded by the system administrator. The system displays a maximum of 99 numbers to call, although a campaign can contain an unlimited amount of numbers. If the campaign therefore contains more than 99 numbers, approximately 80 numbers will always be displayed and reloaded automatically. Also note that you can load multiple campaigns. However, the system will only start loading the next campaign when all numbers from the previous campaign are contacted and then exhausted. | |||
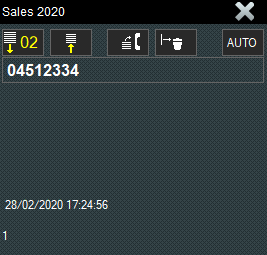
The name of the currently loaded campaign is displayed in the title of the CBR window: | |||
[[image:iQMCBRen_11.png]] | |||
In the example the name of the campaign is "Sales 2020". | |||
Especially in outbound campaigns, where you typically call a large number of people or companies, the "AUTO" mode helps to proceed quickly in the succession of calls. The operation is explained in the previous chapter. Note that calls are made as naturally as if they were made manually. It will result that there will be no holes, gaps or time spent waiting when the call is answered, defect which is typical of software and other systems, which anticipate the operator. | |||
==Related Articles== | ==Related Articles== | ||
Revision as of 12:34, 4 March 2020
iQM, or innovahone Queue Monitor, where the word Queue refers to a call waiting queue, is an application, which works altogether with a server program. Therefore, all the data will go up and forth the server and will be by it received and presented. Along this document, the iQM will be referred to as a Queue Monitor client or iQM Client, or simply client. The term “agent” or “agents” will be often used, with reference to a user of the iQM Client.
The agents are reunited in groups and the queue will redistribute the calls among the agents in the specified group. The agents can also decide whether to stay or to exit the group, which in practical terms means that the agent can decide whether or not receiving the calls. It is possible to log in/out the group via client, but also via an innovaphone telephone. It is also possible to create within the client an automatism, which automatically sets the agents in the group according to time or other kind of criteria.
As also other functions the group features, the behavior and the performance of the the client depend on one side on the configuration settings of the client and of the iQM server, on the other side on the telephone personal configuration of the customer. On the client itself it´s possible to create up to 50 different configurations, both regarding the functions and the layout (look).
The iQM product is a work in progress, which is constantly further developed, and for this reason it could happen that some of the images representing the iQM on the current document could not be up to the latest build; moreover more functionalities could be added by the time to the program but not simultaneously in the wiki. Though our best efforts to keep this document update, it is possible that some language versions could not respect the current iQM version.
Following this short introduction, the document will show a few typical configurations. Please, check out that the build number of your iQM is in compliance with this help page. Please, keep also in mind that the functions and the appearance rely on the settings and that might not be relevant for your specific scenario. Adjustable options, such as the layout, will be indicated with a (*). Example: „Status *“ indicates that this option/function is adjustable and it can be turned off, thus not visible in the window.
iQM main window
Settings, availability, such as symbols or counter where one triggers something by a single click, will be indicated by the cursor when the mouse sweeps over it (one source instead of an arrow). In addition, a tooltip will appear automatically for several elements of the iQM.
(*) This window will always be displayed, with the option „Always in foreground“. It is also possible eventually to open the windows „Queue“, „Agents“ and „Calls“ on top of other windows.
(*) If the configuration option "Pop-up/in foreground if alarm " is turned on and the window is minimized, the window will be automatically enlarged together with the already opened windows "Queue", "Agents" and "Calls", when a threshold value of the queue (number of calls, exceeded waiting time, or delay of abandoned calls) or the threshold of the recall list is exceeded (see description below).
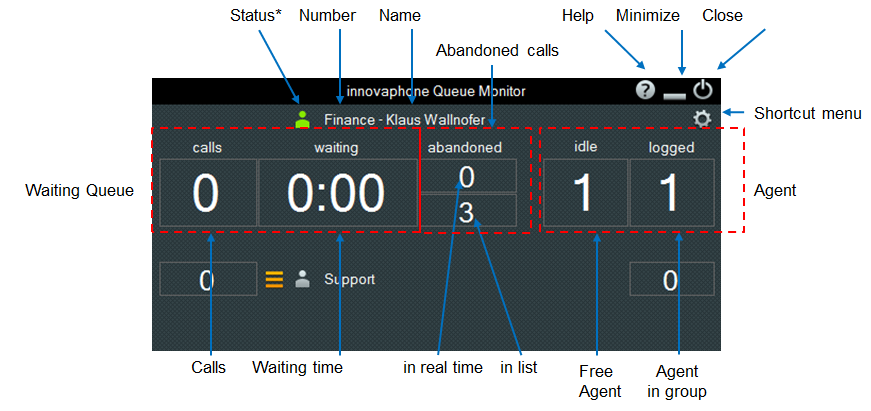
Status*: a green avatar is shown when the agent is logged into the group, a grey avatar is shown when the agent is logged out.
Number: Phone number of the agent, as indicated on the telephone
Name: Name of the agent, as saved and stored in the PBX
Help: the Help function links to a drop-down menu. When clicking on the Help symbol („?“) a menu will be displayed:
If the first entry is selected, the link will redirect to this document; the second entry „Info“ will show the version and the build number of the client. This description refers to the build 80123.
Minimize: The main window is minimized and displayed in the taskbar.
- According to the configuration settings, only this window is minimized or both this window and the window on hold (both windows with two queues), the window of the agents and the window of the abandoned calls.
Close: A dialoge window opens with the question whether the application should actually be closed or not . When closing the application, the client stores which windows were opened and their position. When the application is restarted, it opens the windows as they were in their previous positions.
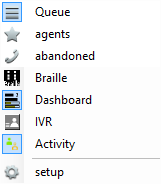
Similarly to the Help Menu, when clicking on the setup symbol, a drop-down menu is displayed:
The blue frame around the icon next to the name indicates if an option is selected, therefore if it is enabled or not.
In the example above, the "Queue" option is selected, the "Agents" option is not selected.
A click on "setup" opens the setup and settings of the client. The access to the configuration can be protected by a password; in this case, a window is displayed to enter a password. The configuration and help are available in english only.
The number of displayed menu items depend on the configuration and system settings. Below an example with several options turned on.
Most options in the shortcut menu can also be recalled in a different way, open and close. For example, you can open the "Queue" option (ie the representation of hold) by clicking on the counter of the calls. If an option or a window is opened or closed in another way, it follows the drop-down menu. Eg. Closing the window "Queue" leads to that option in the drop-down menu shown as not selected.
Calls
The calls counter displays how many calls are in the queue. Each new call increments the counter by one, while every answered call lowers the counter by one.
On the iQM Server, a warning threshold can be activated for a specific number of waiting calls; if this number is exceeded, the background color of the counter will become red:
In the above example, the threshold was set at two calls. If a call was answered, the counter would be displayed again with a gray background.
Exceeding the warning threshold has as unique effect the red background; however it is possible to set up on the server a separate alarm threshold, which leads eventually to logbook entries or email alerts.
Clicking on the counter opens the window on hold as in the Shortcut menu.
Waiting time
This counter shows the waiting time of the caller waiting the longest. If a call is answered or the caller is on, the time jumps to the waiting time of the next caller in the queue.
As for the call number, it is possible to set centrally on the iQM server a warning threshold (and alarm threshold) for the delay: when the waiting time is exceeded, the background of the counter turns red.
Abandoned calls
When a caller is on, but hung up before an agent can answer the call, this is referred to as a abandoned call. This is typically carried out while the call is still in the queue on hold. However, it may also happen that the call has already been assigned to an agent and the phone is ringing but the call could not be answered quickly enough.
You will see two counters, abandoned calls in real time and abandoned calls in list.
Abandoned calls in real time
This counter only shows a nonzero value when there are still calls in the queue. When there are no longer calls in the queue the value zero will be displayed. It reproduces the calls ongoing, therefore it displays only calls in real time and not "historical" events.
If no further calls are in the queue there is no information regarding an abandoned call; even though the agent is now free, this changes nothing. If, however, ther are still calls in the queue and the waiting time is probably too high, the agent should hurry.
Example: There are three calls on hold and only one agent is active, the call waiting the longest is ringing for the agent. The second caller quits, therefore there is an abandoned call in the display. The agent picks now up and thus speaks to the first caller; there is only one caller waiting (originally the third) in the queue. All counters go down to zero. Please note that callers who give up while the phone of the agent is ringing go in the historical call list of the agent's phone. However, callers who give up while they were still waiting in the queue, and have not been yet delivered to an agent, can not be displayed in the call list of the agent's phone.
As with Call, a warning threshold (and alarm threshold value) can be centrally set on the iQM Server for the Abandoned Call; when the number of calls abandoned is exceeded the background of the counter turns red.
Abandoned call list
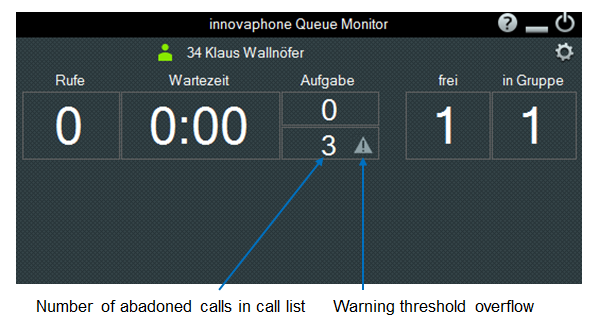
When there are abandoned calls, whether they have been already delivered to an agent or not, they will be redirected into a central call list (see description "task" below). This counter shows the number of non-recalled items. Callers who will give up more than once with the same phone number will appear as a singular entry. If an entry is deleted manually or if the caller who abandoned is recalled from the task table, the counter decreases by one. In the configuration of the client, a threshold for the non-recalled abandoned calls can be defined; when this is exceeded a warning triangle is shown.
Free Agents
This counter displays the number of free agents in the group: agents who perform no calls and are also logged in the call group. "Free" means therefore agents who "can be called from the waiting queue".
(*) If an agent availability (presence) is set (eg, "holiday") he will not appear as free. The presence can be switched off in the central iQM server, but this would not affect the indication of availability.
(*) If in the phone system a fixed call forwarding is switched on, it affects the availability of the agent. If this is the case, the agent, to whom the call forwarding is allocated, is not presented in this window as in the group and is shown as not free.
Clicking on the counter opens the window of the "agents" as in the Shortcut menu.
Agent in group
This counter shows the number of agents who are in the group, regardless of whether they are ringing, speaking free or are in a wrap up time.
(*) Similarly to counter of the free agent, this counter depends on the configuration of the presence: agents who have set a specific presence, they are arranged as " not in the group" on the system settings.
(*)If in the phone system a fixed call forwarding is switched on, it affects the availability of the agent. If this is the case, the agent, to whom the call forwarding is allocated, is not presented in this window as in the group and is shown as not free.
Clicking on the counter opens the window of the "agent" as in the drop-down menu.
(*) Note that the agents who are still in wrap up time or talking as group members are displayed as busy. Thus it does not show the technical agents belonging to the group, but instead the number of "working" agents.
Example: Three agents are in the group, an agent is currently in wrap up time, another is speaking and is automatically set busy by the system. There are three agents displayed in the group. At this point, if an agent for example decides to exit manually from the group, just the two remaining agents are displayed.
A more detailed view is carried out in the "Agents" window, see below.
Calls
Calls are displayed both on the phone and on the client
Calls from the Waiting Queue
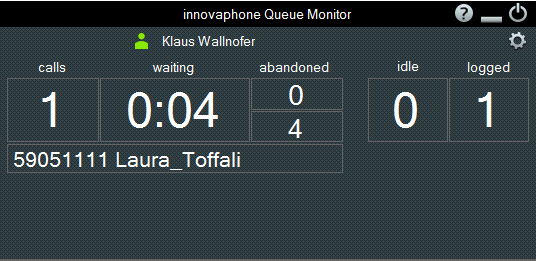
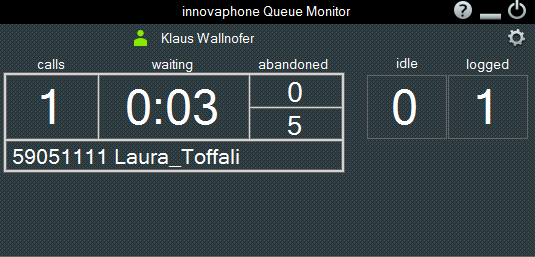
A call from the queue delivered to the agent, depending on the configuration, can be displayed either with or without the frame.
(*) If the "LDAP name resolution" is set on iQM server, the representation of the name is done, hence the number has been successfully resolved.
Call answering
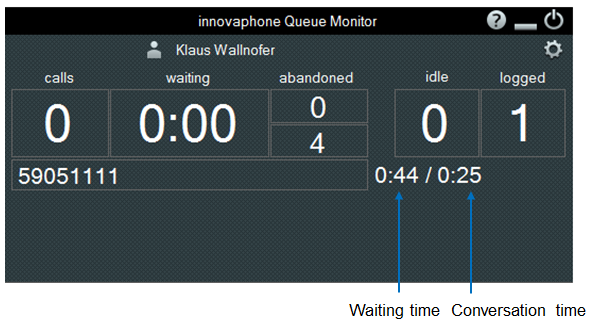
If the call is answered, the totale waiting time of this call as well the conversation time, will be shown:
In the example above, the caller has been waiting 44 seconds in the queue while the agent is in the conversation since 25 seconds.
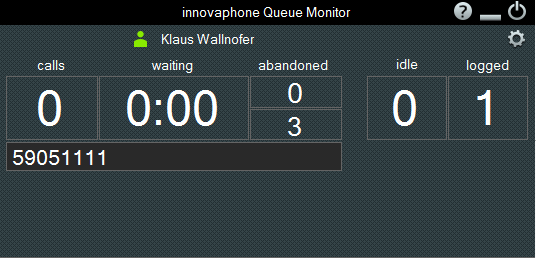
(*) If a call is answered and the agent is turned immediately into a busy status after logging out from the group. See the above example this and notice the gray avatar icon.
(*) A call can be answered directly on the PC keyboard using the backspace key when the focus is on the main window. In fact, this is a useful function in conjunction with a headset , since without headphones the call this way answered would be on the speakerphone.
Call ending
If the call is ended the display returns to the idle state. If there is no wrap up time turned on and there are calls in the queue, the subsequent call is delivered (accordingly the settings of the telephone system).
(*)If the focus is on the main window, the call may be terminated directly on the PC keyboard by pressing the escape key ("Esc").
Besides terminating the call, a call can of course also be transferred, see manual of the telephone set.
(*) Status
If the status indicator is activated, the client displays the presence status of the agent. Status refers thereby to the group membership. A green avatar indicates that the agent is in the group, a gray avatar indicated that he is not registered in the group (or a fixed call forwarding is switched on).
If the agent manually changes the configuration of the PBX, the group membership, or the presence with a function key on the telephone, the Avatar follows the change.
Clicking the avatar will change the current status, thus an agent can be manually exited from the group and derecognised. The corresponding function key on the telephone will follow the state when this is changed through the client.
(*) Wrap-up
The post or "wrap-up" time, is the period after a conversation within which no further calls are delivered to the agent.
A post-processing can be realized in an iQM scenario in several ways. Following, it is described the variant where the iQM server controls the post-processing.
The wrap-up time can be centrally changed or turned off by the supervisor on the iQM server for all the agents. In addition, the system administrator can set a different wrap-up time for each individual agent. This individual wrap up time can be turned on and off by the supervisor in favor of the general post-processing at any time.
Example: a general wrap-up time of 20 seconds is set for the agents. For the agent "A" the wrap up time is set to 15 seconds and for the agent "B" to 30 seconds. The agents "C" and "D" have no individual wrap-up time and thus have a 20 seconds wrap up time. After a conversation "A" has 15 seconds, "B" has 30 seconds, "C" and "D" have 20 seconds wrap-up time each. Thus, the individual setting has priority over the general post-processing time. However, the supervisor can turn on the iQM Server the individual settings to 20 seconds for all the agents’ post-processing. If the supervisor modifies the general wrap-up time from 20 to 10 seconds, this applies to all, except agents without individual settings, or even for these when the individual wrap-up is switched off.
Unless other options are activated, after the call has ended, the agent remains for the selected wrap-up time derecognized from the group. This status is recognizable by the gray avatar.
The wrap-up is available only for calls managed by the queue. E.g. the agent remains a group member during the call but after the call there will be no wrap-up time for from internal subscriber, or call from a queue not managed by iQM Server.
(*) Control wrap-up
An agent may shorten its wrap up time manually. If the agent wants to accept a call before the wrap-up time starts, he can log back into the group by clicking on the gray avatar.
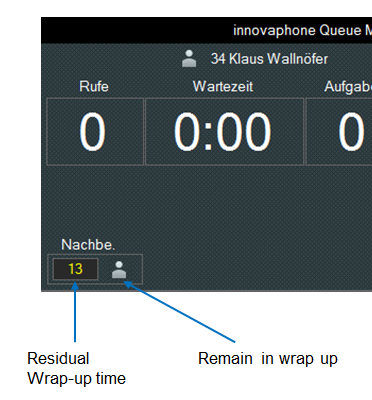
(*) Optionally, the wrap-up time can also be displayed on the client. If this option is turned on, the clients displayes a counter at the end of the call with the wrap-up time; this counts down and shows the remaining time in seconds. At zero, the agent is re-booked and the counter hidden. If the agent shortens the wrap-up time by himself manually, he logs back into the group, but the counter remains visible until its expiry.
(*) Extend wrap-up
The wrap-up time may be extended by the agent. By clicking on the counter, the wrap-up time is set back to its initial value.
For example, wrap-up time set to 30 seconds, 17 seconds are gone ( the counter indicates 13 seconds as remaining time), the agent clicks on the meter, this now will show again 30 seconds and begins with a new countdown. Overall, the agent remains 17 + 30 = 47 seconds in the post-processing.
The post-processing can be renewed indefinitely.
If the extension is made one or two seconds before the time ends, due to the transmission delay, the extension is no longer carried out.
(*) Remain in wrap-up
If the agent decide to leave his desk at the end of the conversation, this is only possible in a callable state: after the post-processing, the agent is logged again and receives immediately a new call. During this situation, the agent can manually log off (click on the avatar) and set the call back by pressing the release button on the phone, but some operations are to be required and the end of the wrap up time must be awaited.
With the function remain in wrap-up, an agent during the wrap-up can be permanently logged out of the group.
For this purpose, the agent clicks the gray avatar in the wrap-up time window and remains so fully unbooked even after the post-processing; the work can be immediately abandoned.
If the derecognised state is made one or two seconds before the time ends, due to the transmission delay, the change of status is no longer carried out.
Other calls
Calls which do not have precedence over the queue, eg calls from internal subscribers or calls that are coming through a dial directly to the agent, are displayed on a dark background:
A white frame is not shown in these calls, even if enabled in the configuration of the client.
When the frame is activated an additional easier recognition of the call type is given.
After picking up, the current call time is displayed, however, the count of the waiting period does not appear:
After ending the call the wrap-up time is not activated and eventually a pending call is delivered immediately.
Recall List
The the last 20 calls of a queue are stored centrally by the iQM Server in a recall list. This list is constantly updated with all agents’ calls. Through this list the callers can therefore be recalled. It does not matter whether the caller gave up while he was on hold, or the call had already been delivered to an agent. All agents have access to this list.
In addition, a threshold can be entered: when this is exceeded a warning triangle appears next to the counter.
In the example above, there are 3 calls in the call list and the threshold (three) is reached or exceeded. The threshold function can be switched off by a value greater than 20 if specified in the configuration of the client.
Pay attention the further reduced real-time counter of abandoned caller is displayed over the counter list.
As already explained in the section "Abandoned calls", the callback list contains both calls that were missed at the agent phone and calls that have abandoned the call in an arbitrary position in the queue.
The recall list can be opened via the drop-down menu or by clicking on the counter / the warning triangle.
The recall list includes up to 20 abandoned calls. If a caller abandons the call twice he will appear only once in the list, the number of missed attempts is shown in brackets after the date and time.
(*) In addition to the phone number, the name resolution is displayed if it is on the iQM Server:
A double-click on the phone number to start a recall. If there is jet a call on the phone of the agent, the selected calling partner is called back: so the recall has priority over an eventual ringing call.
If a calling partner is called back again, it will be centrally recorded in the call list with the number and name of the agent as well as the date and time. The list will be instantly at any agent refreshed changing its content, but there is no actual block: this means that each agent can at any time callback all entries, even those which have already been called back.
An entry can be deleted if, for example, the caller is known but not to be called back.
The list displays the oldest calls shown, filling it from the top to the bottom.
If the list is full, the already recalled positions are first used for new entries, the sorting is done automatically. Note that the called back partners remain stored in the telephone set (call list in the phone). If there are no longer a free positions, the oldest entry will be overwritten.
The column width can be changed; the client remembers the changed column width and sets them even after a restart again as adjusted.
With a tick next to the column label, the factory setting of the column width can be restored. The client remembers if the application of the callback list was opened and opens it at the next restart.
Calls with blocked caller ID are shown in brackets, so the number will be transmitted:
In the above example, the caller 36 has the function "calling line identification" turned off, the phone number is therefore shown in brackets. The caller can be called back anyway, but please note that this may can lead to surprising reactions when back called.
(*)With the option "Dock" activated, this window is docked together with the window of the queue and the agent in the main window. If you move the main window, the application follows all the other windows. Even when dock is switched on, the window can be individually positioned separately.
Queue
The display of the queue can be opened via the drop-down menu or by clicking on the counter of the calls:
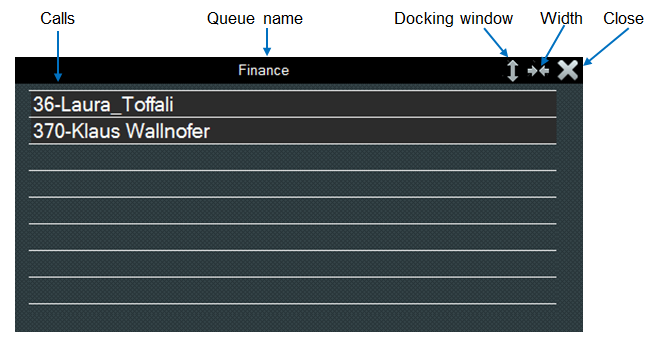
Calls: they do appear in their order in the queue, the waiting longest call is positioned above.
(*) When name resolution is enabled and the caller's name is recognized, it will be displayed next to the number.
Calls with caller ID blocked, even if the number is transferred, are still represented and placed in brackets. If no number is actually transmitted the text "Anonymous" will be shown instead of the number.
By double-clicking on an entry, the call can be picked. This is possible even if the agent is not registered in the group. If the agent has already another call allocated from the queue, this will be queued back. The selected call will be ringing on the phone of the agent and can be answered. Agents can, therefore, "pick" calls and giving in this way a preferential treatment.
Queue Name: The name that was assigned by the system administrator is displayed.
(*) Especially useful with two queues for immediate recognition.
If a threshold value (number of calls, waiting time or abandoned calls) is exceeded, the background changes from black to red.
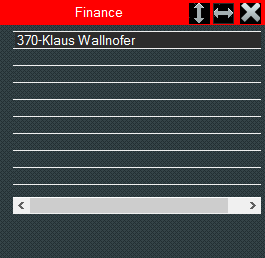
Window width: In the example above, the window is shown broad, long numbers and names can be recognized at a glance. In a narrow call window a scroll bar will appear for partially visible name:
The example above shows a narrow representation, where a threshold has been exceeded.
(*) When there are two queues configured, the second queue is shown always narrow. The automatically docking at the main window corresponds to the width of both window width below the docked callback list.
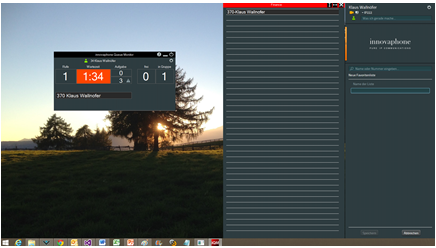
Docking windows: The window of the queue will be docked to the right of the screen. This is possible both with a narrow as well as a wider window view, the width setting is maintained. When clicking again on the symbol of the docked window, the window goes back to the original position.
If both with the short and the long docked window, the height of the window displaying all calls is insufficient, a vertical scroll bar appears.
With a short window, about 10 calls are visible at a glance without using the scroll bar, according to the screen height. At a resolution of 1920x1080 pixels, for example, more than 50 conversations can be shown. This is required in certain applications, where it is necessary to recognize immediately specific numbers when having several simultaneous calls.
If a computer has two screens and an extended desktop, the window will dock to the same screen where it was previously in the smaller representation. If you push the small window to the 2nd screen and click dock, the window will be docked on the right side of the second screen.
More than 2 screens are not supported.
If there is a program already docked to the screen, the iQM client will be docking on it:
In the example above, the window docks to an already docked myPBX.
(*)With the activated option "Dock", this window is docked together with the window of the queue and the agent in the main window. If you move the main window, it will be followed by all the other windows. Even when dock is switched on, the window can be moved individually and separately, but it will be docked back immediately when the main window is moved.
Agent
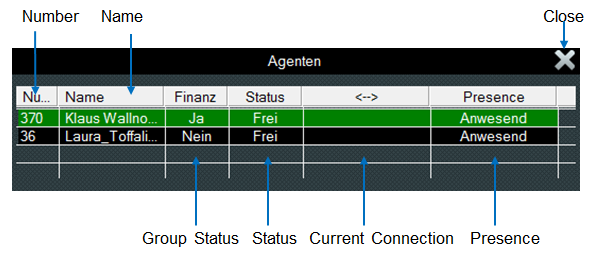
The display of the agent can be opened via the shortcut menu or by clicking on the counter displaying the free agent or the agents in the group:
The column width can be changed; the client remembers the changed column width and sets them even after a restart as it was adjusted.
Number: a double-click on the phone number allows to call the agent. During an active call this goes on hold and the agent is called.
(*) Group Status: double-click on the group status allows to change the status. A supervisor, or rather the agents, can manually log in the group. The name of the group can be defined in the iQM server; this action does not alter the name used in the PBX.
Status: Displays the current status of the agent (Free, Busy, Calling)
(*) Current Connection: presentation of the number of the caller; in this phase there is no name resolution
Presence: The presence is displayed in the local language.
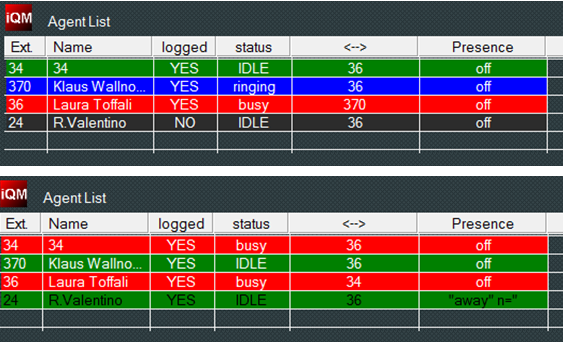
(*)The Agent table can also be displayed in colors:
The texts in white and the background are shown in different colors depending on their status:
• Green = free
• Blue = ringing
• Red = busy (in a call)
• Black = not in a call group
If an agent set himself as available, the text is switched from white to black.
Icons
In the taskbar, an active agent client displays a different symbol according to the status :
Description from left to right:
• No threshold is exceeded, agent in the group (green avatar)
• No threshold is exceeded, agent not in the group (gray avatar)
• threshold being exceeded, agent not the in group
• threshold being exceeded, agent in the group
By passing with the mouse over the icon, a tooltip is displayed according to the status.
2nd WQ *
In a scenario, two queues can be defined on the iQM server, but it is also possible to synchronize two iQM server mutually separated by 2 queues and to fully monitor. From the agent's perspective, there is an "own" queue (the "first") and a foreign or "second" queue.
An agent typically receives more calls from the own holding queue while calls from the second queue are only be delivered if certain conditions are met. This can be set in the configuration of the agent: such as number of calls in own and others' queue and the number of agents. Thus calls can also be delivered from the second queue of the agent, when the agent is logged in the respective group of the queue.
In the example below, the agent is registered in the first queue (green avatar), but he is not registered in the second queue (gray Avatar).
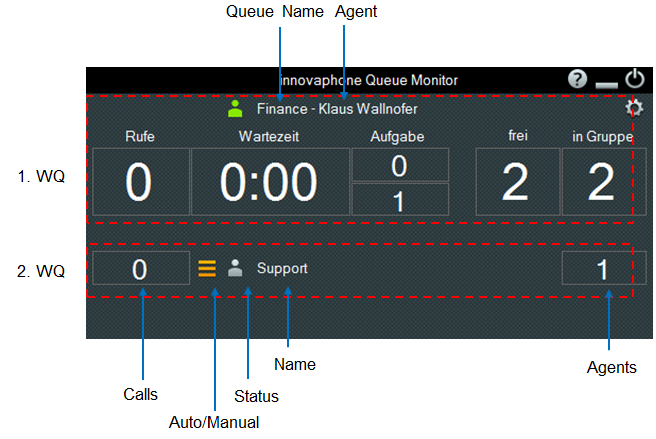
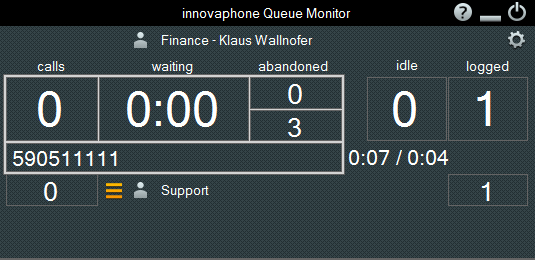
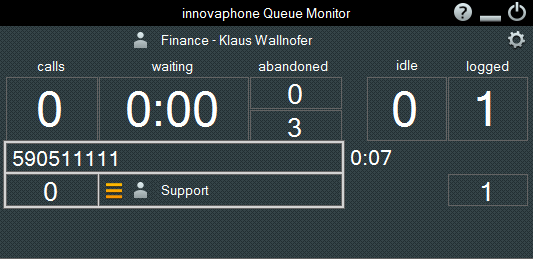
When a second queue is configured in the system, it is represented in the iQM client as follows:
Name: name of the first queue, separated by a hyphen in front of the name of the agent. The queue name is the one configured in the PBX; the system administrator can also define a name for the first (and second) queue in the configuration of the iQM Severs.
Clicking on the name changes the status of the agent (as a click on the avatar).
1st Queue / 2nd Queue: The upper part of the display relates to the first queue and the lower portion concerns the second queue.
Call: the number of the calls in the second queue is shown in real time.
Auto / Manual (*): The stack symbol indicates the operating mode:
Green = Automatic, the calls are allocated depending on the call distribution.
Grey = Manual, the agent can log on and off in the second group by clicking on the avatar.
Status: by clicking on the symbol of the avatar, the status can be switched. If this is done with the second queue in automatic mode, the respective status will be changed immediately if the current status contradicts the automatic settings. In order to be permanently logged in or out the second group, it is necessary to switch off the manual mode.
In the configuration of the agents, it is possible to set whether to start after starting the client in automatic or manual mode. In manual mode, when the application is closed the client saves the current status and restores it when a new session is opened.
Name: name of the second queue
Agents: number of agents in the second queue. This display is available only when a second iQM server is in operation.
Calls
Calls coming from the first queue are easily recognizable thanks to a frame if set in the configuration.
The waiting time is only displayed for agents who are booked in the first iQM Server. For the calls belonging to the second queue, the waiting time is not displayed.
Agent list
If a second queue is configured, the status of agents of both queues will be displayed. In the example below, the agent 370 is in the sales group but not in the support group, the agent 36 is the other way around.
(*) A double-click on the status of each group enables to change the status. Please note that under specific circumstances, the automatic threshold function will change the status once again.
Waiting queues
In both two queues, both queue windows are always displayed. However, the second queue does not display the width and no docking is provided on the screen. The agent can pick calls from the second queue to the first queue, giving preference to a call in the second queue compared to the other.
Wrap-up
The wrap-up time is taken from the first iQM Server, however an agent individual wrap-up time is possible. If a agent answer a call from the WQ he is logged out automatically in both in the first and in the second queue. The wrap-up time must be upheld in both groups; an extension or the forced logout after finishing also engages in both groups. For this purpose, the second queue is set to manual mode and the agent logged out.
Note *
(Assemblies 8.0.268 o maggiore)
A click on the "waiting time" field opens and closes the note fields associated with the numbers.
These notes are private and saved exclusively on the local PC, therefore visible only on the local workstation.
In the above example you will find 3 fields: the box on the right shows a list of numbers already saved previously; the empty field at the top left is meant to insert a new number; the empty box at the bottom left is meant for the text of the note.
To enter a new number, simply click on the box. When you click, any other open iQM windows will close automatically. They will appear again as soon as the number/text input fields get closed.
If the entered number contains any non-approved characters, it will be automatically normalized and the characters deleted as soon as you exit the field. For example, the number "a01234*56" will be transformed into "0123456". After entering the number, the "star" symbol (Favorites) will automatically appear on the right side, allowing you to save the number and the associated note. The "recycle bin" symbol allows to delete the entry. The example below illustrates the scenario before saving.
After having saved the number and related note, the note will be visible by clicking on the saved number in the right column. If the list of saved number becomes long, a scroll bar appears automatically as shown in the following examples.
The number of an incoming or outgoing call can automatically be copied into the notes simply by clicking on the number displayed and a note can subsequently be added.
If you click on an incoming or outgoing number and this number has already been saved in the note list, an automatic positioning is performed and the note appears as in the following example:
Simply click on the number at the top, i.e. the number of the active call, it is immediately returned to the note number field, the iQM performs a search and if it is already stored, the note text is immediately displayed.
Notes to CBR *
Notes can be saved locally, as explained in the previous point, but also sent to the list of Call Back Requests (CBR). For a description of the CBR service, see the following chapters. In the following example, we selected an entry that has already been saved in the note list. When the note is composed or edited, in addition to the symbol for saving the note, a new symbol appears for saving the notes in the callback request list. Sending the note into the CBR list is therefore an option and alternative to saving it in the private list.
By clicking on the button with the list and arrow symbol pointing at the CBR counters, the number and text of the note are transmitted to the CBR list, which is shared with all agents.
After being shared with the CBR list, all agents can view the number and note shared. Notice that to transfer a number to the CBR list, with or without text, it is not necessary to save it first in the private list: if for example a customer calls, you can transfer the number with a click in the appropriate field and immediately transfer the number to the callback request list.
If an agent opens the note later on, he will see not only the number and text, but also the name of the agent who forwarded the request:
The example above shows the note after being shared with the CBR group.
Notes to other call groups *
Notes may also be sent to other groups of agents working on other queues. Up to 4 groups are possible, the corresponding buttons appear automatically when a dispatch is available.
In the example, the incoming number with its commentary is already available in the personal notes. Notice that all possibilities are available, transfer it to the local callback request list or to the three remote lists by pressing the appropriate buttons.
Once the note is transferred to a CBR list, the fields are deleted. You can select the entry again, or re-enter it and then transfer it to a different list, which is not recommended.
CBR *
CBR stands for "Call Back Request", hereinafter for convenience we use the term "CBR". CBRs are dropped by callers who prefer to be called back, rather than waiting further in the queue. As explained in the previous chapter, it is also possible to fill the list manually by an operator who can also be part of a remote group.
Remark: If the number of missed calls (users who have given up waiting and ended the call) is above 20, these missed calls can be merged into the CBR list, when properly configured by the system administrator.
If the CBR service is active, a yellow counter is visible, as in the example below, showing the number of requests in the list with an additional counter right under the yellow one, which indicates how many requests are currently being processed (loaded) by agents. In the example below, there are 2 CBRs: one CBR loaded by an agent, one CBR still in the stack of unmanaged callbacks. To open the CBR window, click on the CBR number:
The CBR window is independent and can be moved as you wish, if you have set up automatic docking it will be arranged as in the example above on the right side of the main window; if you also open the queue window, the window will be arranged on the right side of the queue, if you are part of two queues on the left side.
If so set, you can minimize all windows in the taskbar, only the CBR window remains open. The CBR window can be closed by clicking on the "X" button, or again on the number of open requests, or on the setup menu.
The possible actions in the CBR window appear automatically. Initially, by opening the window, It is indicated the number of open requests, in the example 3, at the bottom left is shown the number of requests being processed by agents, in the example 0:
By clicking on the number of open requests, a request is loaded from the stack and other possible commands are automatically displayed:
In the example above a request is loaded, the counter now indicates that there are still 2 requests in the stack, while the lower left counter indicates that a request is being processed. The loaded request is exclusive and cannot be loaded by any other agent until it is released back into the stack. In addition to the number to call back, the name of the agent who manually uploaded the request and the message is indicated.
Typically a CBR is requested directly by a caller and in this case the operator and note fields are empty. In any case, the date on which the request was created, or rather the time when the system was taken over, is always displayed.
With a loaded request as in the example above, the operator has several possibilities:
• By clicking again on the number of requests the next request is loaded, while the current request is put back at the bottom of the stack. This can be practical, for example, if you do not want to take over a certain callback, or if you want to do so at a later time.
• By clicking on the symbol with the stack and the yellow arrow upwards you can put the request back on the stack without loading a new request: you return to the initial situation with the empty window.
• Click on the symbol with the telephone handset to call the number indicated.
• Clicking on the basket symbol deletes the request and loads the next request automatically.
If there are a lot of calls to be made, the usual procedure would be to switch from the call to the delete symbol until all requests are exhausted. If a user does not answer, or is busy, the request is put back on the stack.
A request can also be deleted without redialing by pressing the delete key.
All operations are tracked in a log file.
Deleting the last request takes you back to the home page.
With a loaded number as in the example above, you can start the automatic call mode by clicking on the "AUTO" button. The button starts flashing slowly in red to warn the activation of the service. To switch off the auto mode you need to click on the button again.
If you launch the first call with the auto service active, as soon as it ends, the system deletes the request, loads the next request and calls. The operator then releases the call and immediately moves on to the next call until the CBR is exhausted.
If you want to interrupt the service after having launched it, you must switch off the auto mode during the conversation and before releasing the active call.
If you press the key to return the CBR to the stack, the request will return to the queue and the auto mode will be turned off.
Auto mode is mainly used for outgoing call campaigns, which is a service described below.
Outbound *
In addition to receiving requests from callers and manual notes, the system can also load call campaigns. These are uploaded by the system administrator. The system displays a maximum of 99 numbers to call, although a campaign can contain an unlimited amount of numbers. If the campaign therefore contains more than 99 numbers, approximately 80 numbers will always be displayed and reloaded automatically. Also note that you can load multiple campaigns. However, the system will only start loading the next campaign when all numbers from the previous campaign are contacted and then exhausted.
The name of the currently loaded campaign is displayed in the title of the CBR window:
In the example the name of the campaign is "Sales 2020".
Especially in outbound campaigns, where you typically call a large number of people or companies, the "AUTO" mode helps to proceed quickly in the succession of calls. The operation is explained in the previous chapter. Note that calls are made as naturally as if they were made manually. It will result that there will be no holes, gaps or time spent waiting when the call is answered, defect which is typical of software and other systems, which anticipate the operator.
Related Articles
Howto:Queue_Monitor_-_Overview
Howto:Queue_Monitor_-_Setup_and_Localization
Howto:Additional_call-ID_information
Howto:IQM_IP-Phones_setup_and_iQM_Phone_Display_features
Howto:IQM_Second_Waiting_Queue
Howto:IQM_manipulative_behaviors
Howto:IQM_Statistical_Excel_Data_for_Agent_and_Queue
