Howto:Callback - MediaRunway - Partner App: Difference between revisions
No edit summary |
mNo edit summary |
||
| Line 6: | Line 6: | ||
<!-- Mandatory topic. --> | <!-- Mandatory topic. --> | ||
<!-- replace CompanyName & ProductName by real names and add URL to productpage --> | <!-- replace CompanyName & ProductName by real names and add URL to productpage --> | ||
MediaRunway | MediaRunway Callback | ||
==Certification Status== | ==Certification Status== | ||
| Line 47: | Line 47: | ||
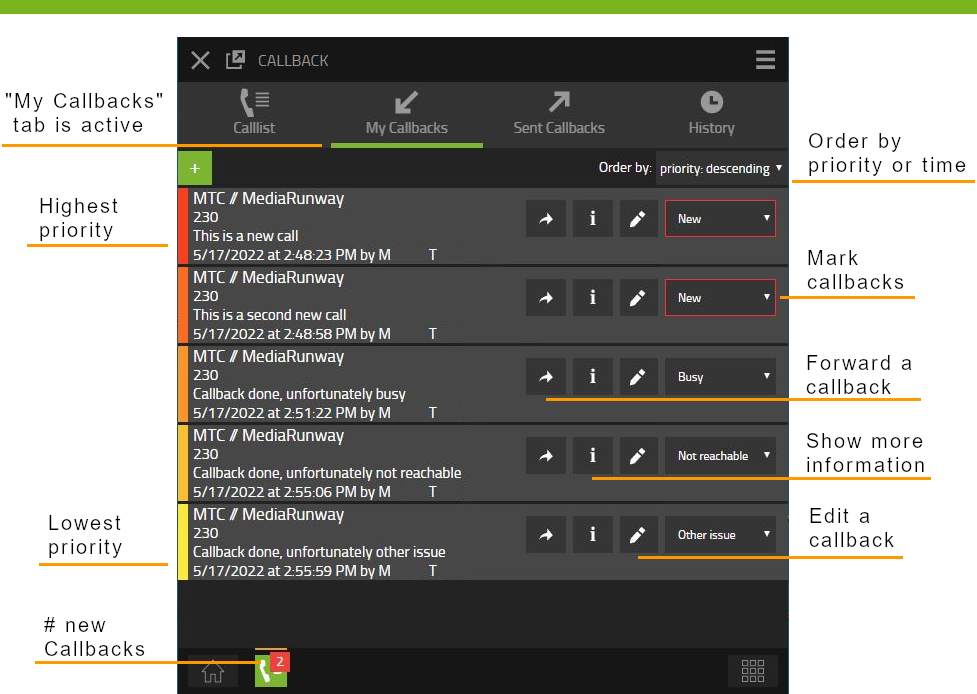
With Callback you have the possibility to organize your callbacks in this app instead of email, paper, etc. You can send callback requests or forward one of your callbacks to other licensed users. Tracking the status of a callback will help you gain the customer experience. | With Callback you have the possibility to organize your callbacks in this app instead of email, paper, etc. You can send callback requests or forward one of your callbacks to other licensed users. Tracking the status of a callback will help you gain the customer experience. | ||
<!-- Some formattings WikiMedia supports: | <!-- Some formattings WikiMedia supports: | ||
==Title2== | ==Title2== | ||
| Line 348: | Line 345: | ||
| Tel: +49 2183 80628-0 | | Tel: +49 2183 80628-0 | ||
|- | |- | ||
| Mail: [mailto: | | Mail: [mailto:innoapp-sales@mediarunway.com innoapp-sales@mediarunway.com] | ||
|- | |- | ||
|Website: [https://www.mediarunway.com/ MediaRunway.com] | |Website: [https://www.mediarunway.com/ MediaRunway.com] | ||
Revision as of 10:35, 25 May 2022
Product Name
MediaRunway Callback
Certification Status

App not yet available in innovaphone-appstore
Category
Computer Telephony Integration and Unified Messaging / Unified Communication
Vendor
MediaRunway is an ITC enterprise that provides its customers with contemporary IT services in all areas - Your business, our solution.
Description
With Callback you have the possibility to organize your callbacks in this app instead of email, paper, etc. You can send callback requests or forward one of your callbacks to other licensed users. Tracking the status of a callback will help you gain the customer experience.
Functions
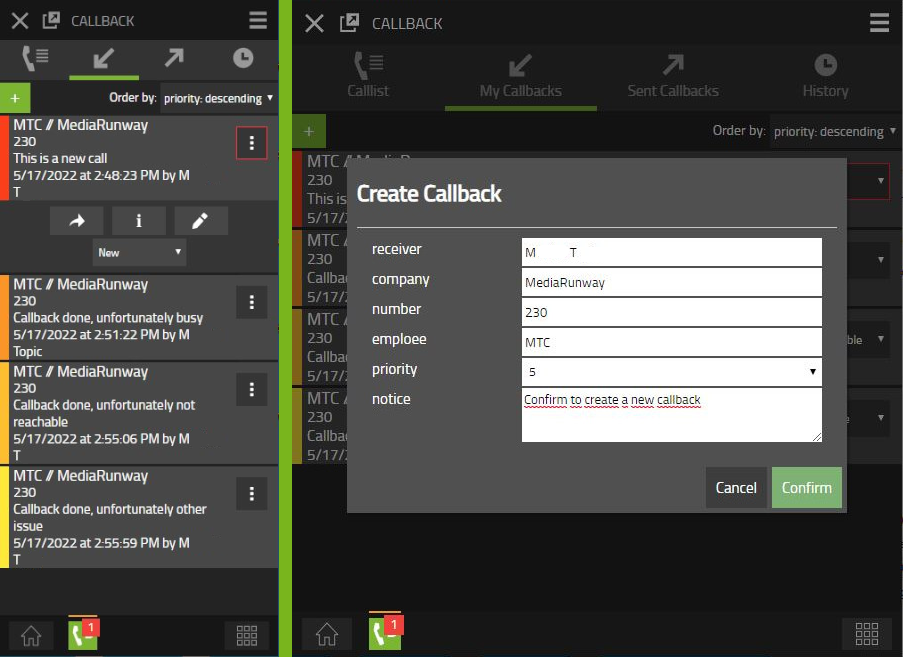
- Create, forward and edit callbacks according to your needs
- For yourself or other users
- Track which callbacks you have created and which you have forwarded
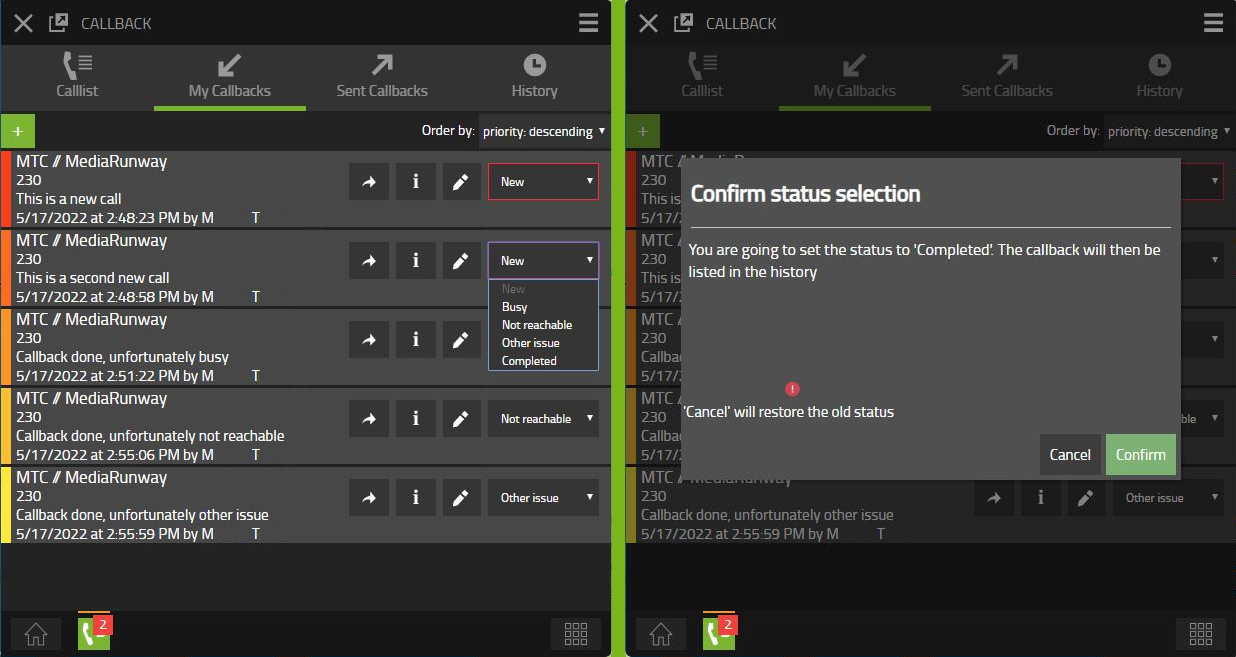
- Track a callbacks state or add additional information to a callback
- View your Callist and immediately create Callbacks from here
- Explore your history of callbacks
- Manage the backend of the app
Licensing
Licensing: One license per user with any number of devices. No floating licensing, only the users who got a configured license have access. For licensing and test licensing please contact innoapp-sales@mediarunway.com.
- Example: "Hello MediaRunway, we would like to purchase the Callback app. Here is our authentication key 1113335557. A one year license for 10 users would fullfill our needs. Please send us the license key as fast as possible. Best reagards"
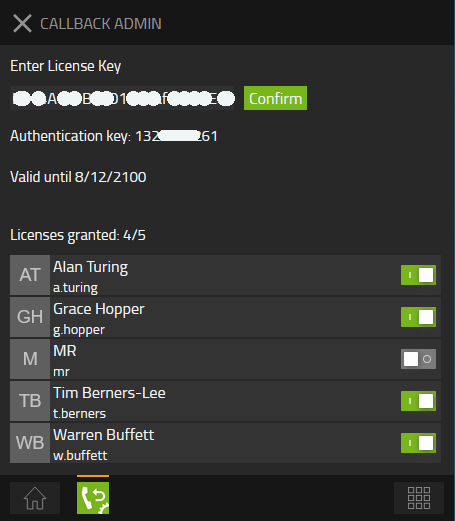
Enter license key and activate user license: Simply enter the license key that you received from us and press "Confirm". After that, you should see the valid date of your license and the number of available user licenses. Next to the desired user name, activate or deactivate the user's license.
Prerequisites
What you need is this Wiki article and a valid license. For a valid license please install the app and in the admin area of the app you will find the authentication key. Please send us this authentication key, together with the number of users and the desired license period to innoapp-sales@mediarunway.com.
Installation and configuration of the app will be described in the next sections.
Versions
- MediaRunway Callback 1.0
Compatible innovaphone firmware versions
- MediaRunway Callback 1.0
- innovaphone V13r2
Application versions used for interop testing
- MediaRunway Callback 1.0
- innovaphone IPVA V13r2sr12
- innovaphone IPVA V13r2sr11
- innovaphone IPVA V13r2sr10
Configuration
Configure Callback object rights
Here we will describe all necessary configuration steps to get the app running. After successfully installing the app, adding the app instance, and the app objects (see next sections for a HowTo), we still need 1st to assign the necessary permissions to the app object and 2nd enter our license information and assign licenses to the users.
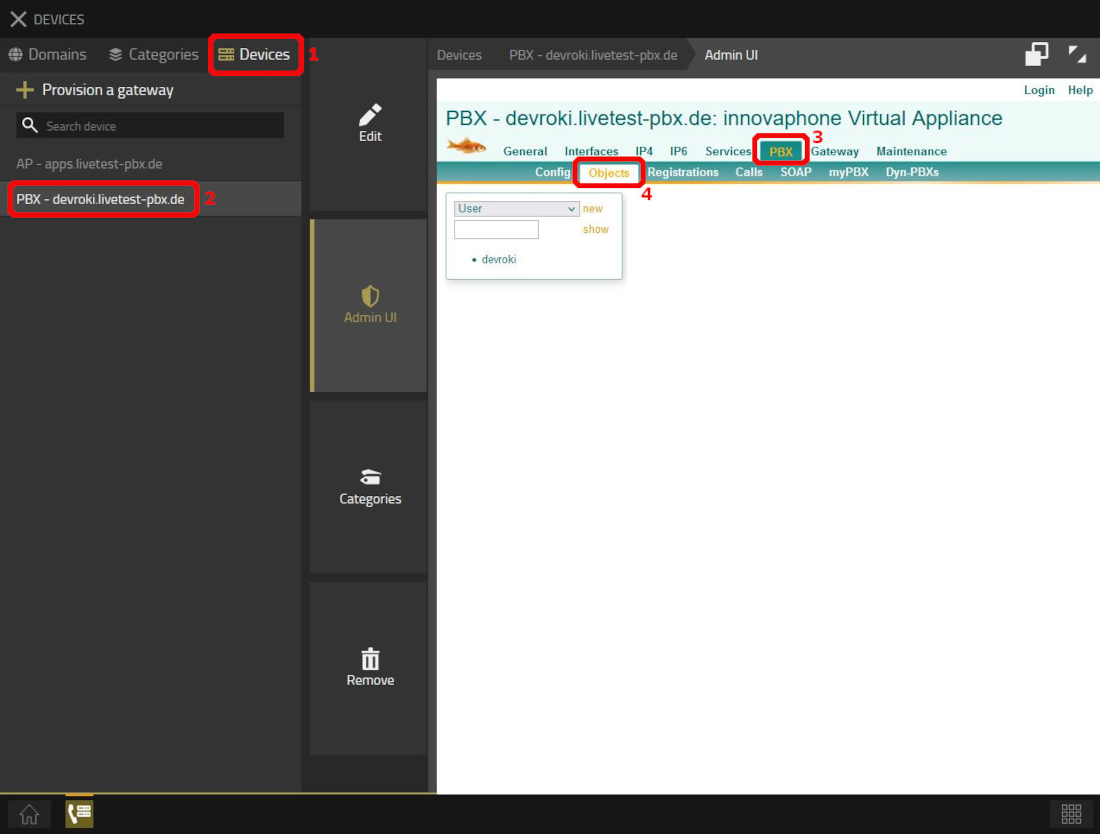
Open "Devices" app: The app object must be assigned a few permissions in order for the app to work correctly.
Navigate to the "PBX Objects" list: The Callback app object must be assigned a few permissions in order for the app to work correctly. Do get that done, we will open the "PBX Objects" with the "Admin UI" interface of our "Devices" app.
- "Devices" App -> Devices Tab -> click your PBX -> click "Admin UI" -> click "PBX" Tab -> click "Objects" Tab
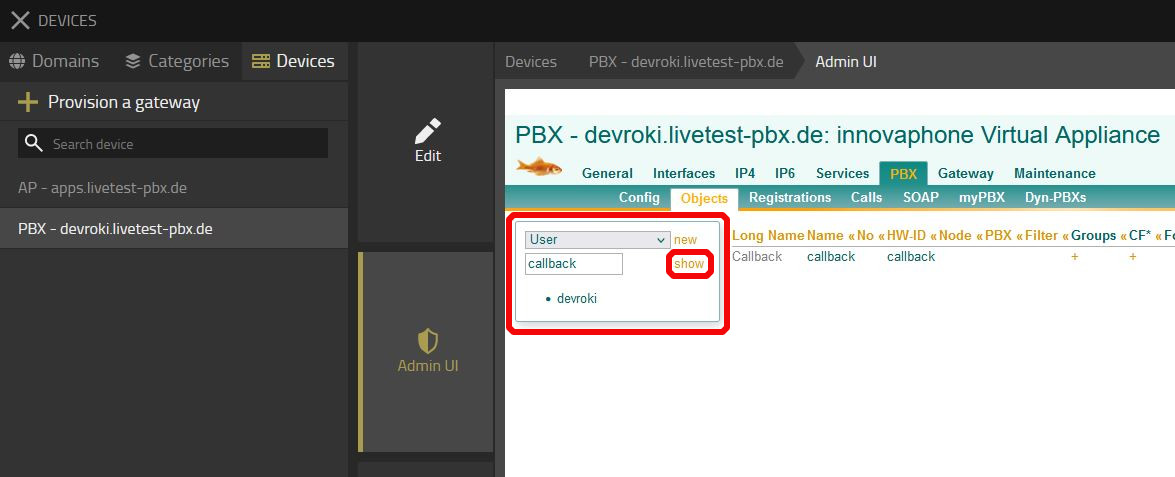
Search for our "Callback" object: Enter "callback" into the search mask and press "show". If pressing "show" without entering a text, you will get the hole list of objects from your PBX.
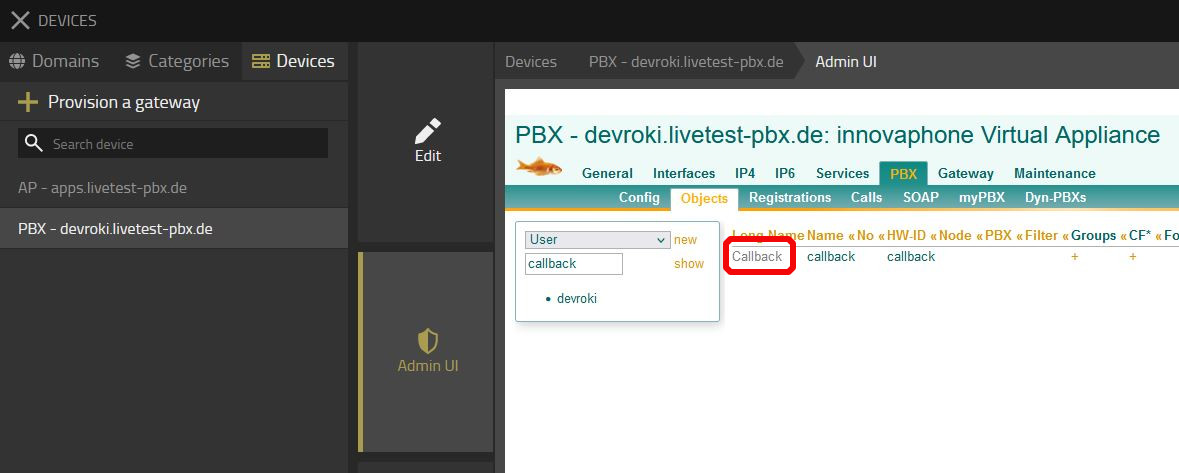
Open "Callback" object settings window: Click on your "Callback" Object.
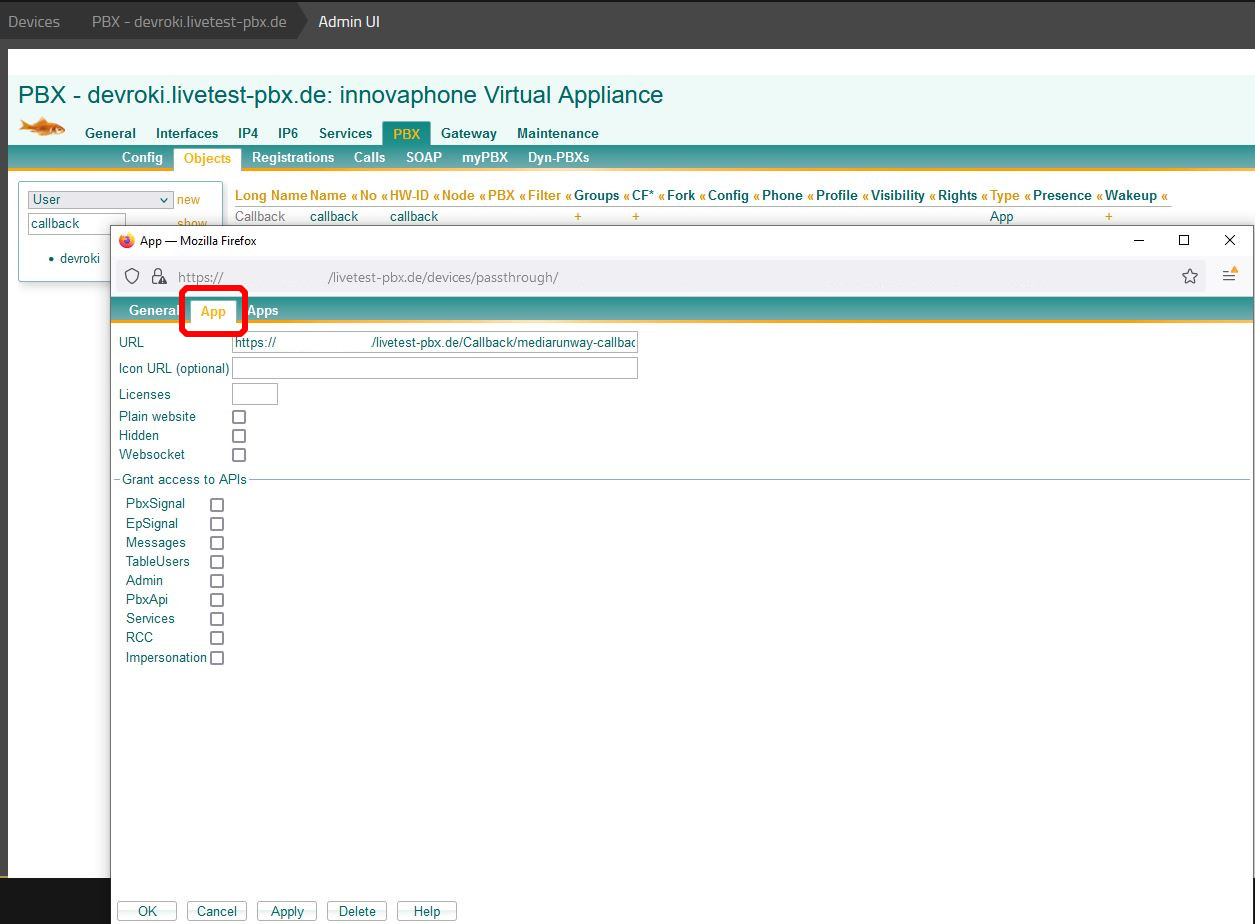
Open "App" tab in "Callback" object settings window: Click on "App" tab.
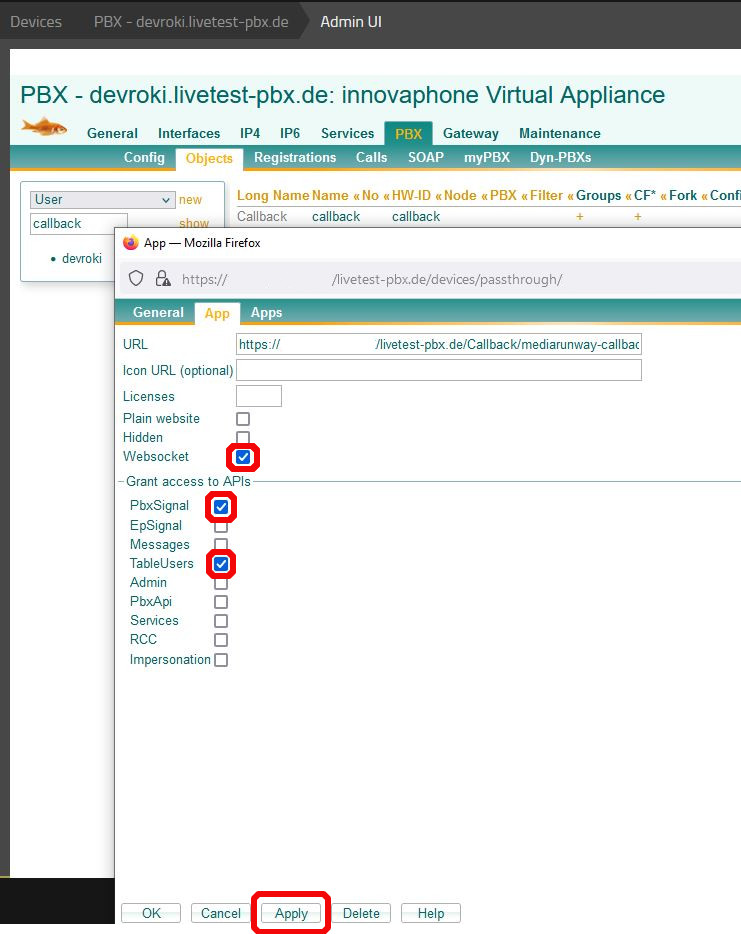
Set the rights for "Callback": Check mark as shown in the picture (Websocket, PbxSignal, TableUsers) and press "Apply" (more than once).
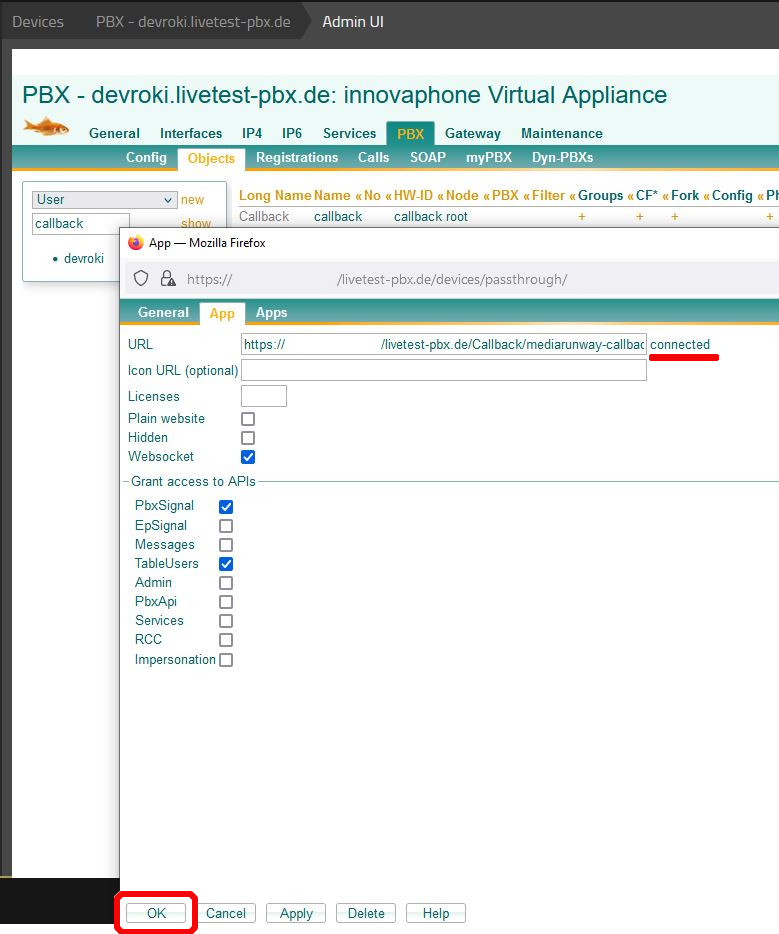
Close "Callback" object settings window: After pressing "Apply" you will see a "connected" next to the URL.
Enter licence key and activate user rights
As mentioned in the "License" and "Prerequisites" section you need a license key and set the users rights in the "Callback Admin" app. Simply enter the license key that you received from us and press "Confirm". After that, you should see the valid date of your license and the number of available user licenses. Next to the desired user name, activate or deacvtivate the user's license.
File:Callback admin set key and user.png
Install app from App Store
To get the steps done, log in to your PBX as admin.
Open "AP Manager":
After you have logged in to your PBX as admin, click on "AP Manager"
Go to the "App Store":
Inside the "AP Manager", next we click on "App Store"
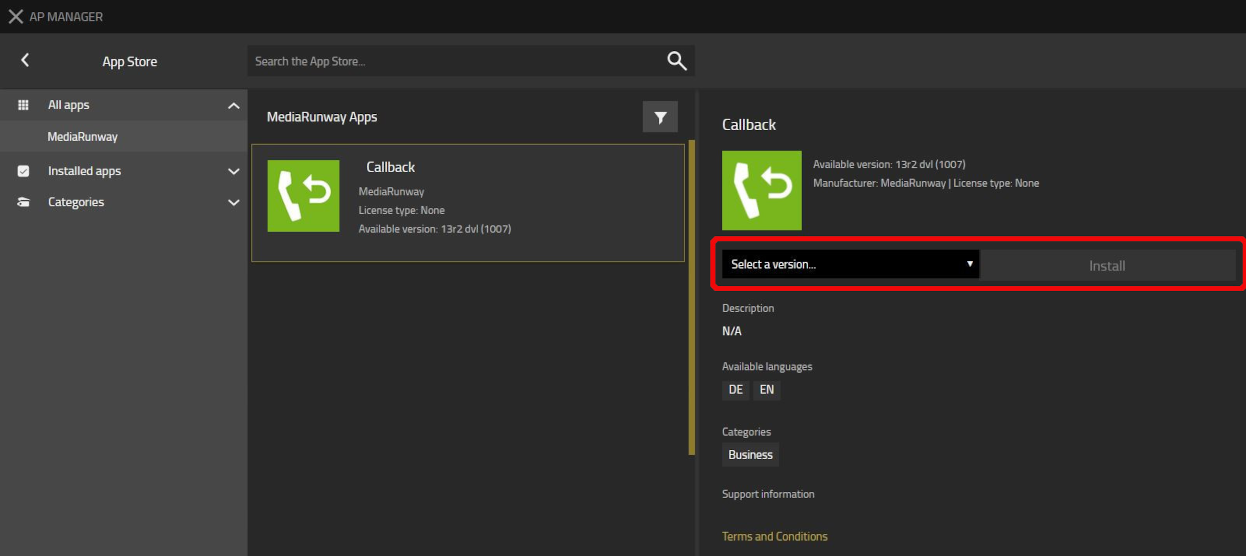
Select Callback App:
In the list of apps, one will find the Callback App
Select Callback Version:
Usually, we always select the latest version of the app and after that press the "Install" button
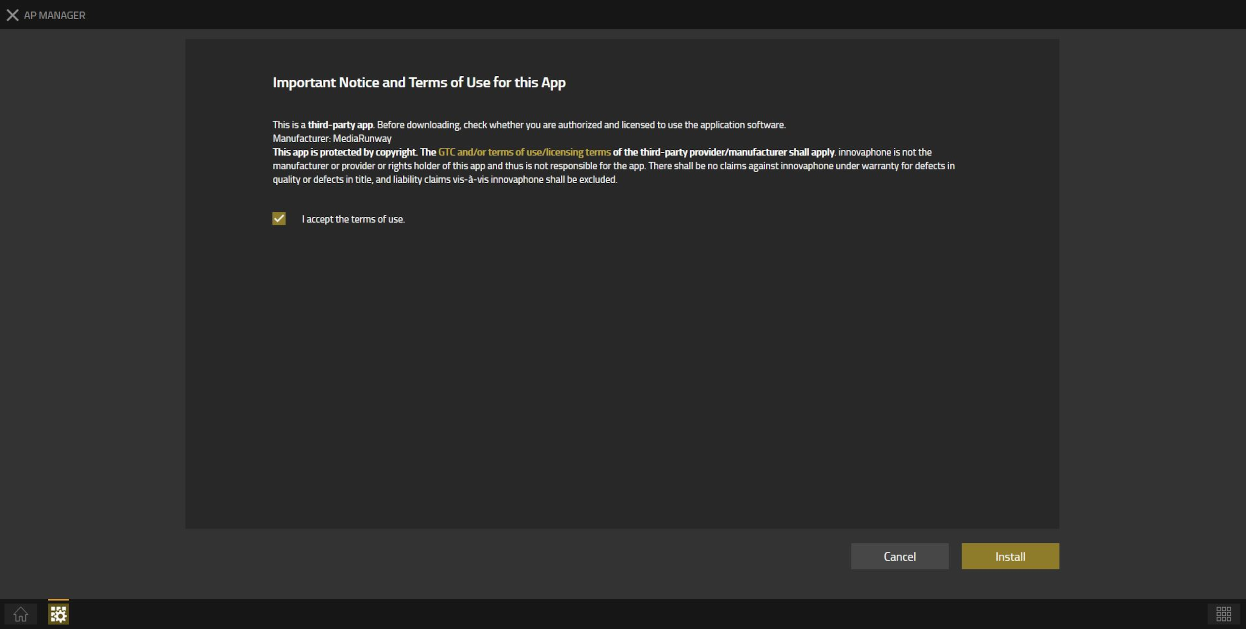
Confirm "Terms and Conditions":
Before installation starts, confirm the terms and conditions
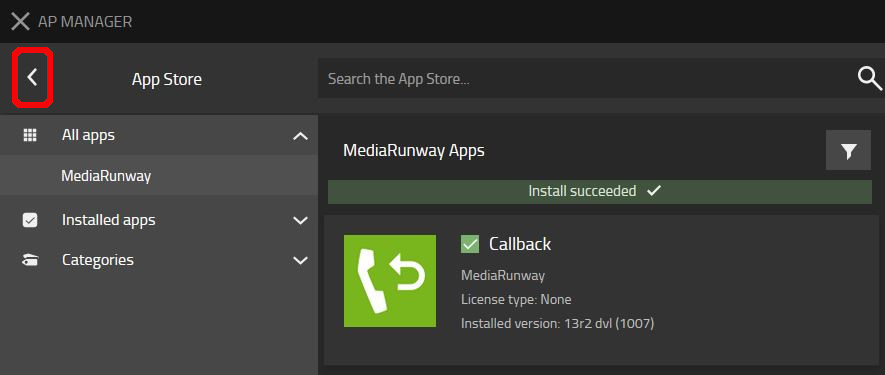
Wait for installation to finish:
Wait until installation has finished, and go back to main "AP Manager" view
Add an app instance
We have installed the app properly, now we will add an app instance.
Callback in "AP Manager":
In the list of "Installed apps" on the left side of the "AP Manager" manager, click on "Callback". Indicated by a "Play Sign" you can see that the app is installed and running.
What is your domain?: We see that our app is installed and runnning, but yet we have no instance of the app.
So in the next step we will add an app instance. To achieve this we need the Domain of your system which one can see for example in the "Contacts" app.
Add an instance: Now we know the domain and can go back to Callbacks view, in the list of apps click again on Callback.
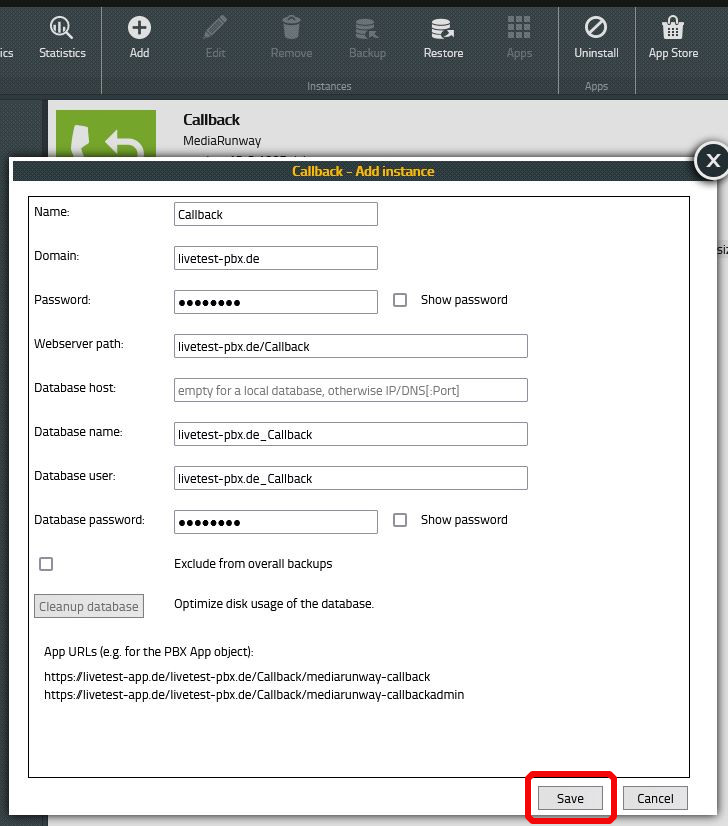
To add an app instance click the "Add" button, what will open the "Add instance" dialog
Add instance dialog: Inside the "Add instance" dialog, name your app instance "Callback", enter your domain and set the password for the app and the database user. The other input options will be filled automatically. We recommend to use different passwords here that you store inside your password management solution. After everything is filled up properly, press the "Save" button
Mark added Callback instance: After pressing the "Save" button, we can see in the Callbacks "AP Manager" view, that our app instance was added but is not yet running, indicated by a "Stop Sign". With a click on our freshly installed app instance we can mark it.
Start the app: To start our app instance, click on "Start" next
App running: Now you will see that your app instance is running, indicated by a "Play Sign"
We have successfully added a Callback app instance.
Next, we create the user and admin object that will allow access to the Callback instance we just created and assign the necessary permissions.
Add user object
The user object is the interface between the user - PBX - and the app platform. For this purpose, we switch to the "PBX Manager".
Open "PBX Manager": Go back to your home screen and click on "PBX Manager"
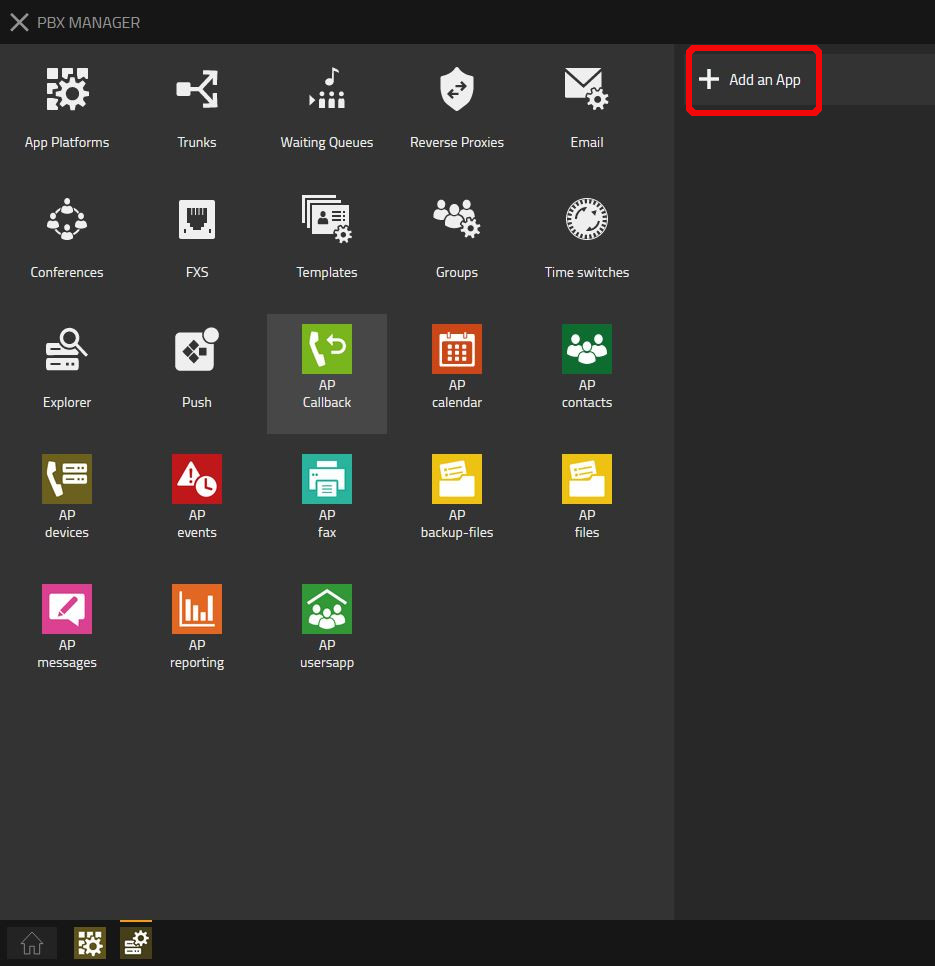
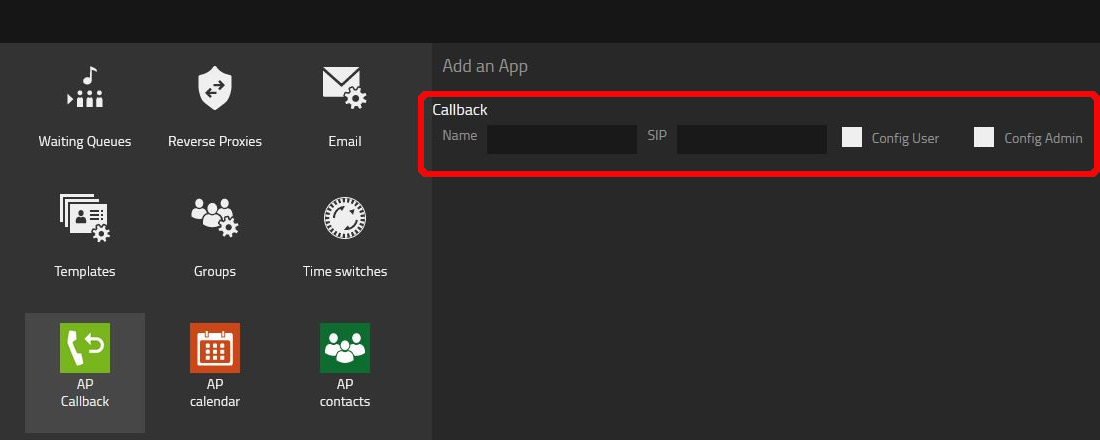
Go to app object area: With a click on "AP Callback" the "Add an App" button will appear on the right screen, click on it
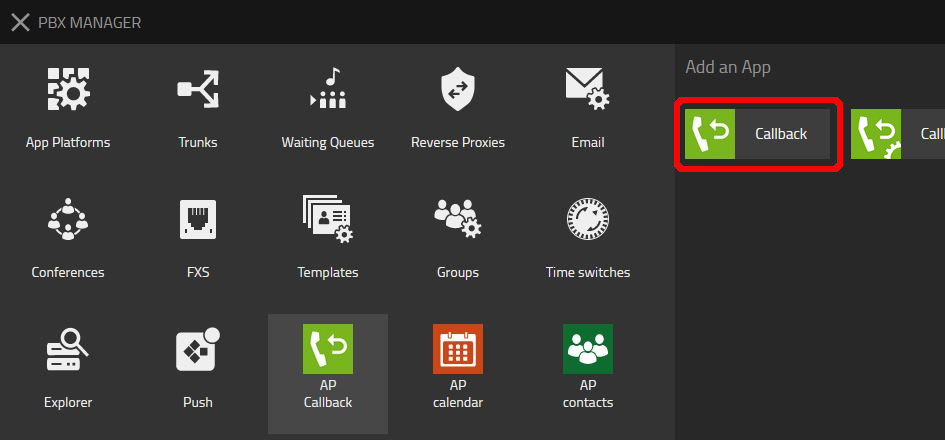
Callback user object: Now you can see "Callback" and "Callbackadmin", first we will add a "Callback" user object and after that we add a "Callbackadmin" admin object. The steps are the same, with different names for the object.
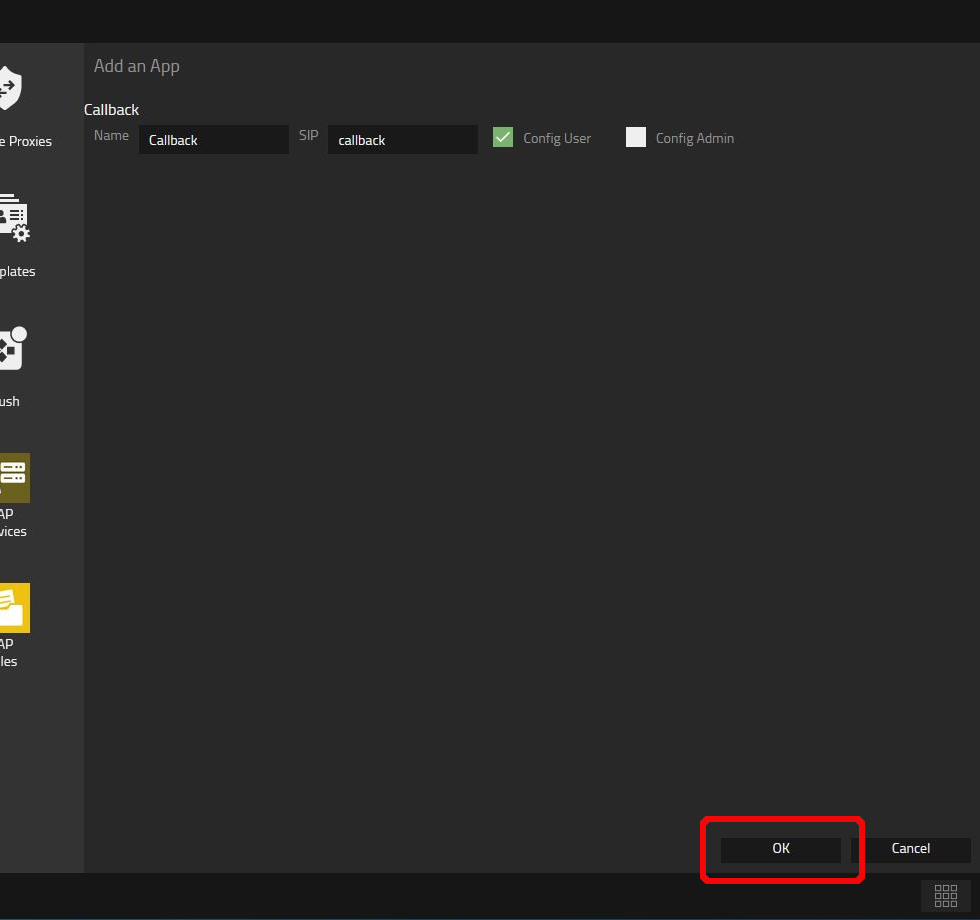
Callback user object configuration: For our Callback user object we need a unique name that will be "Callback", and a unique SIP "callback". We are adding a user object so we check mark "Config User"
Confirm object configuration: With a click on "OK" we confirm our settings
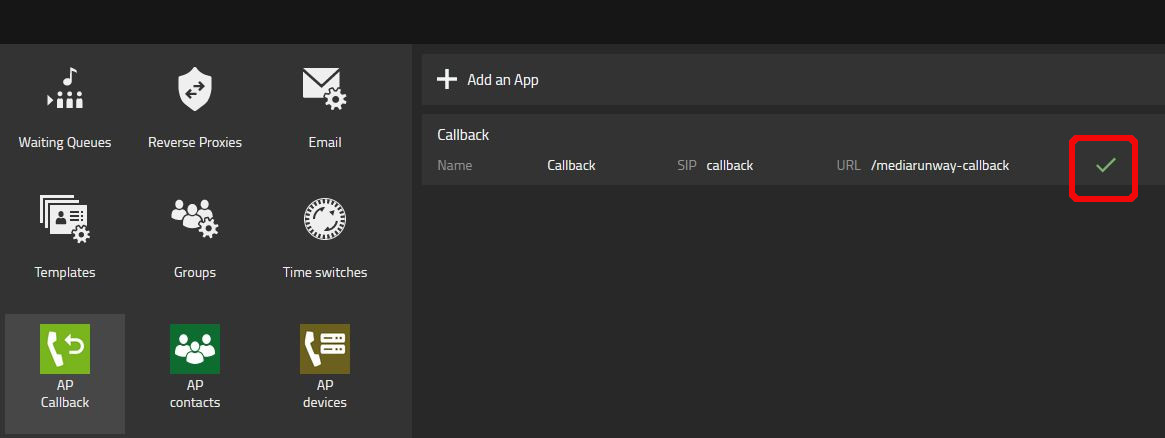
Object connected: Our Callback user object was added successfully
Add admin object
We need the "Callbackadmin" object too.
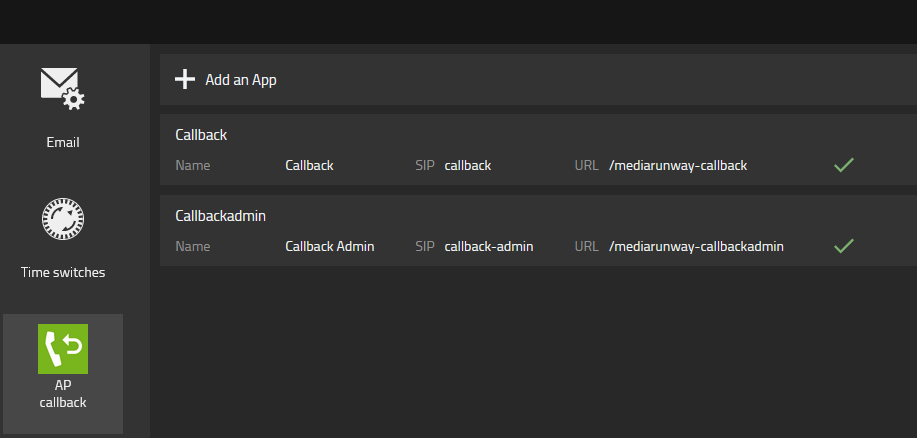
Callback admin object: Repeat steps from "Add user object" with the "Callbackadmin" object. For our Callbackadmin object we need a unique name that will be "Callback Admin", and a unique SIP "callback-admin". We are adding an admin object so we check mark "Config Admin" inside "Callbackadmin" object configuration.
Admin object connected: After succesfully done, our "AP Callback" looks like this:
We have successfully added a "Callback" user object and a "Callbackadmin" object.
After Installation
After successful installation of the app, the app instance and the user and admin object, we have to perform some configuration steps. Please see the Configuration section in this article
Contact
| MediaRunway GmbH & Co. KG |
| Venloer Str. 8 |
| D-41569 Rommerskirchen |
| Tel: +49 2183 80628-0 |
| Mail: innoapp-sales@mediarunway.com |
| Website: MediaRunway.com |
For any questions please refer to our contact page.

