Howto:Mobility GSM Client for Windows Mobile
This article is obsolete!
Read Howto:Configure Mobility for use with Opticaller for a GSM-based mobile client solution.
The GSM Client software is used for easy access to the mobility functions of V8 PBX from Windows Mobile phones. The GSM Client software is provided as a part of the gsm package which can be used to prepare Client configuration for transfer on the mobile device.
Applies To
This information applies to
- innovaphone PBX V8 hotfix6, Build 8050020 or later
- innovaphone gsm Package, Build 1045 or later
More Information
Requirements
On the Administrator's PC
- Operating System Windows XP, Windows Server 2003 or later
- .Net Framework 3.5
- ActiveSync 4.5 or later
- Firmware V8-based GSM Phone Client RC1 or later
On the Mobile Phone
The GSM Client software requires a Windows Mobile device. Create a backup of mobile device, before installing beta software!
- Windows Mobile 5.x, 6.x (OS Version at least 4.21)
- Smart Phone or Pocket PC
- .NET CF 2.0 SP2 installed
- Internet Access (optional)
The GSM Client software assumes that there are cursor keys available on the phone. Windows Mobile phones without hardware cursor keys are difficult to use with this software and thus not recommended.
On the PBX
- Firmware V8 hotfix6 or later
- GSM-1 Client Licenses installed
- Mobility-8 Licenses installed
Please note that only flat numbering plans (i.e. only root node) are supported by the configurator.
Overview
The GSM Client is an application that needs to be installed on the mobile phone. It replaces the standard phone application with a dedicated interface which converts the mobile phone in to a PBX Extension.
While this allows the client to provide PBX features in a useful way, it also has the drawback that the native phone application is no longer available. If this is not acceptable, there are other solutions available in the market which do not replace the native phone client, but add some functionality to it (cf. OptiCaller as an example). By design, such clients cannot offer the same functionality though.
The client assumes the existence and a specific configuration of the mobility functions in the PBX. It is therefore necessary to do the appropriate configuration on the PBX in order to use the GSM Client This configuration must be done using the PBX's standard administration facilities.
The GSM Client requires proper configuration to make the individual system characteristics (trunk lines, extensions ...) known to it. This configuration can be created automatically from the PBX data using the GSM-Client Configuration File Creator. This is a stand-alone PC application. It is intended to be used by the mobile phone administrator, end users will not need to work with the tool. The resulting configuration files are then transferred to the mobile phones using standard mechanisms provided by the phone's operating system (e.g. ActiveSync). The GSM-Client Configuration File Creator also greatly simplifies use of these mechanisms.
Once rollout to the mobile phone is done, configuration files have to be updated on the phones only rarely (e.g. if the trunk access changes). However, the PBX's extension list, which is also provided to the phone will obviously change more frequently. A mechanism to roll-out updates to this list is provided therefore.
The roll-out process for the GSM Client looks as follows thus
General preparation:
- download the latest gsm package from innovaphone's download page. It includes both the GSM-Client Configuration File Creator and the GSM Client for the platforms supported (currently Windows Mobile Smartphone and Windows Mobile PocketPC)
- install this package on the administrator's PC
- obtain and install mobility and gsm client licenses
- provide proper mobility objects configuration on the PBX
When this is done, rollout to the individual phones requires the following steps per phone
- add the individual mobile phone information to the user objects
- (re-)create GSM Client configuration files using the GSM-Client Configuration File Creator
- install the GSM Client program on the mobile phone
- install the configuration files created on the second step on the mobile phone
When the extension list has changed on the PBX, the following steps are required to update the mobile phones
- (re-)create GSM Client configuration files using the GSM-Client Configuration File Creator
- install the extension file created on the previous step on the mobile phone
All mobile phones share the same set of configuration files, so it is not necessary to create separate configurations for each individual phone.
PBX Configuration
The following configurations must be done on the PBX
- Creation of the mobility objects
- Creation of the DTMF features objects
- Attribution of the respective trunk line objects
- Installation of proper GSM-1 and Mobility-8 licenses
- Attribution of the respective user forking entries
Numbering Plan
Mobility is based on a number of feature codes which are used by the mobile phone to access the features. These codes are in fact objects in the PBX (Mobility and DTMF-Feature) which need to be called. As a result, these feature codes each require individual extensions in the PBX's numbering plan. To make things worse, the GSM network does not carry * or # digits in a called number, so the extensions to be used must be plain numbers.
You will need to reserve a number of extensions with a common prefix thus in your PBX's numbering plan. If this is not possible (e.g. because you reside in a country with a fixed numbering plan and you don't have a block large enough to allocate the numbers), you may revert to use a single extension in your numbering plan. Be aware though that this will result in
- cost charged by your mobile operator for invoking features (some of the features are normally invoked by calling an extension without accepting the call, which should be free. When using a single extension, all features are invoked by calling this number, accepting the call and then dialling the desired feature using in-band DTMF tones)
- longer execution time for most of the features invoked
You need thus determine an available prefix for the feature codes within you PBX's numbering plan (say 54).
For the remainder of this article, we will refer to this prefix as mobility-prefix.
Mobility Object
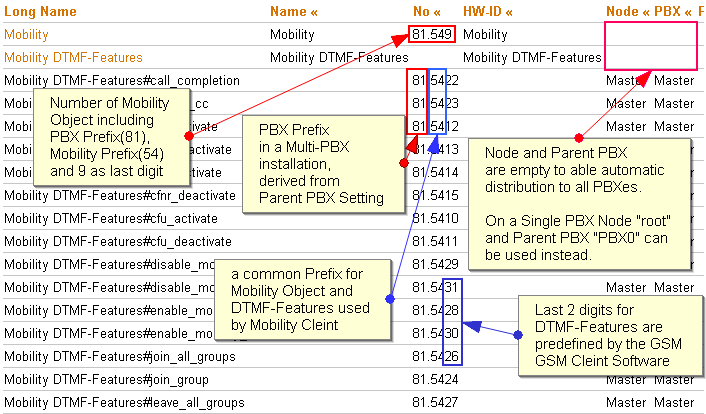
There must be a mobility object on each PBX system with a mobility enabled user (that is, a user with an integrated mobile phone). The easiest way to achieve this is to create a mobility object with Node and PBX left empty.
However, if there is only a single PBX that hosts mobility enabled users, you simply put the (single) mobility object into the root node.
The Number property of the mobility object must be set to the mobility-prefix chosen plus literal 9.
This will result in one mobility object per PBX which has the PBX's node number as a prefix. Assuming the PBX's node number is 81, the full number of the mobility object in our example would be 81549.
DTMF-Features Object
Again, there must be a DTMF-Features object on each PBX system with a mobility enabled user (that is, a user with an integrated mobile phone). The easiest way to achieve this is to create a DTMF-Features object with Node and PBX left empty.
The DTMF-Features object itself does not have a Number property. Instead, the individual features have one. The features must have fixed numbers according to the following table:
| CFU Activate | mobility-prefix10$# |
Deactivate | mobility-prefix11
|
| CFB Activate | mobility-prefix12$# |
Deactivate | mobility-prefix13
|
| CFNR Activate | mobility-prefix14$# |
Deactivate | mobility-prefix15
|
| Pickup Group | mobility-prefix16 |
Directed | mobility-prefix17$#
|
| Park | mobility-prefix18$ |
Unpark | mobility-prefix19$
|
| Park To | mobility-prefix20$(1)$# |
Unpark From | mobility-prefix21$(1)$#
|
| Call Completion Busy | mobility-prefix22$# |
Cancel | mobility-prefix23$#
|
| Join Group | mobility-prefix24$# |
Leave | mobility-prefix25$#
|
| Join All Groups | mobility-prefix26 |
Leave | mobility-prefix27
|
| Enable mobility | mobility-prefix28 |
Disable mobility | mobility-prefix29
|
| Enable mobility cw | mobility-prefix30 |
Disable mobility cw | mobility-prefix31
|
| Set presence | mobility-prefix32$(1)$(1) |
Unset presence | mobility-prefix33$(1)
|
In our example, the list of mobility related objects should look like this:
DTMF-Features#call_completion     81.5422
DTMF-Features#cancel_cc           81.5423
DTMF-Features#cfb_activate        81.5412
DTMF-Features#cfb_deactivate      81.5413
DTMF-Features#cfnr_activate       81.5414
DTMF-Features#cfnr_deactivate     81.5415
DTMF-Features#cfu_activate        81.5410
DTMF-Features#cfu_deactivate      81.5411
DTMF-Features#disable_mobility    81.5429
DTMF-Features#disable_mobility_cw 81.5431
DTMF-Features#enable_mobility     81.5428
DTMF-Features#enable_mobility_cw  81.5430
DTMF-Features#join_all_groups     81.5426
DTMF-Features#join_group          81.5424
DTMF-Features#leave_all_groups    81.5427
DTMF-Features#leave_group         81.5425
DTMF-Features#park                81.5418
DTMF-Features#park_to             81.5420
DTMF-Features#pickup_directed     81.5417
DTMF-Features#pickup_group        81.5416
DTMF-Features#set_presence        81.5432
DTMF-Features#unpark              81.5419
DTMF-Features#unpark_from         81.5421
DTMF-Features#unset_presence      81.5433
Mobility                          81.549
Trunk Lines
You do not need to create new trunk line objects for mobility. Instead, you need to attribute the existing objects to make their E.164 number known to the system.
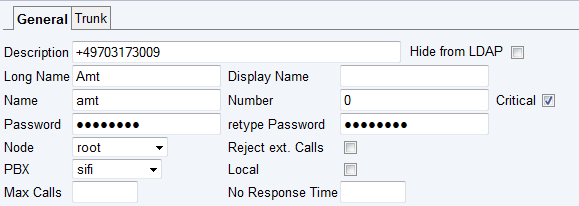
For this, you need to edit each trunk line and put the lines international number into its Description property. This must be done using the international number format, starting with +. Assuming the trunk line in our example has subscriber number 73009, area code 7031 and county code 49, you would specify +49703173009. Do not add your switchboard extension (usually 0 here!).
Users
To enable mobility for a user, you need to
- make sure you have both Mobility-8 and GSM-1 licenses available. As usual, test licenses are available from within my.innovaphone
- add a forking destination for each mobile phone the user wants to use with mobility
- make the users mobile phone numbers known to the system
- make the users mobile phone IMEI known to the system
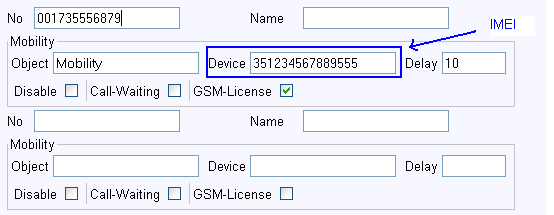
Put the phone's number into the No property. This number must be
specified exactly as it would be received by the PBX when this phone
calls in. That is, it is the number including GSM carrier prefix and
trunk prefix, no country code, no +. Assuming the users
mobile number is 017247110815 and the trunk line prefix in
your PBX is 0, you would specify
0017247110815.
Put the phone's IMEI into the Device property of the respective
forking entry. The IMEI will always be a 15-digit number, such as e.g.
354503021446625. If your IMEI is 17-digits instead, leave
out the last 2 digits simply. In Windows Mobile, you can find the
device's IMEI number in the Settings/System/Device Information
(Einstellungen/System/Geräte-Information). The IMEI may also be
display by dialling *#06# from within the phone's native
phone application.
Make sure the GSM-License check mark is ticked for the respective forking entry!
Configuration Generation
Download the gsm package from innovaphone's download page. Install pcsetup.msi and follow the instructions in Start/Applications/innovaphone/GSM Client/Readme.
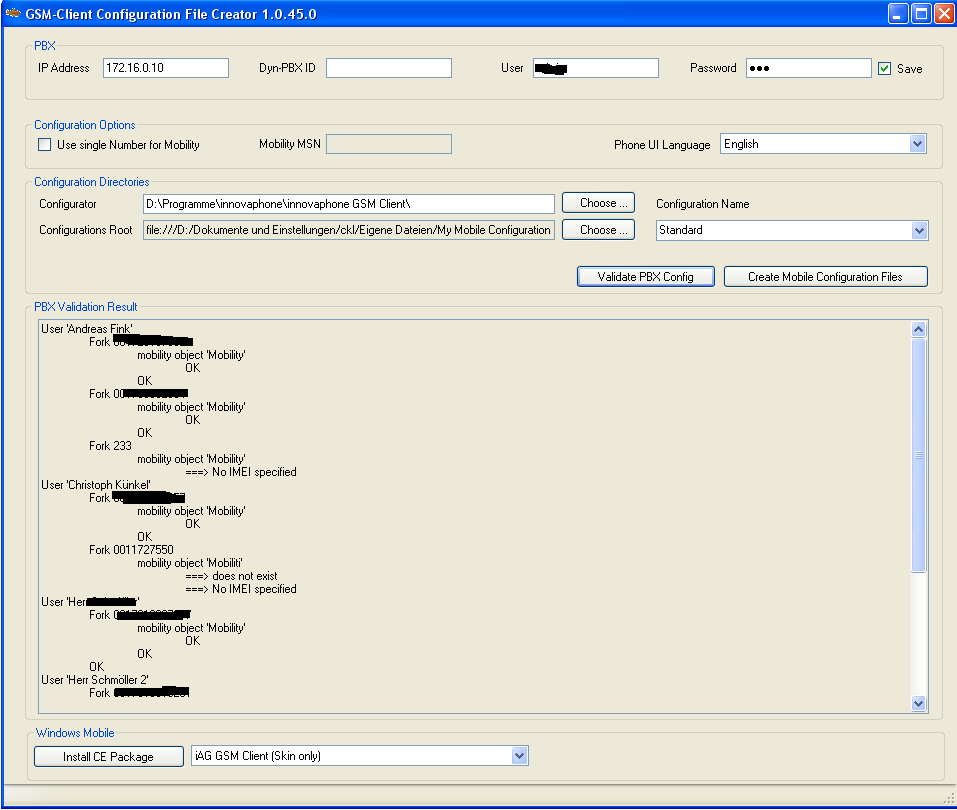
The GSM Client configuration files can be generated using the GSM-Client Configuration File Creator. It is available via Start/All Programs/innovaphone/GSM Client/Configuration Creator.
To create the configuration files, follow these steps:
- Enter your PBX address and credentials into the PBX field group. You can use either the administrator or viewer accounts or any PBX user with at least view rights. Please note that the program will not store the password you supply unless you tick the Save check mark
- Select appropriate options in the Configuration Options field group. Unless you have a single extension configuration (see above), the only thing you should change here is the desired phone user interface language
- Click the Validate PBX Config button in the Configuration Directories field group
- Verify the output in the PBX Validation Result box
- If the validation is OK, click the Create Mobile Configuration Files button
If everything went OK, the program will create all configuration files
and package them into Windows Mobile Cabinet (.cab) files.
You will find this in the directory specified in the Configurations
Root field in the Configuration Directories field group. However,
there is normally no need to access these files manually. The can be
installed semi-automatically (see below).
Validation Errors
The configuration program will do some efforts to detect inconsistencies in your PBX configuration. The configuration information found in the PBX as well as possibly detected errors are shown in the PBX Validation Result box. Be sure to scroll through the entire content and
- make sure all users and mobile phones you expect are listed
- no errors are reported
Errors are shown prefixed with ==> and should be self-explaining.
Multiple Configurations
If you want to maintain multiple configurations (e.g. to support multiple phone languages), you can use different names for them by putting them into the Configuration Name field in the' 'Configuration Directories field group.
They will be stored in subdirectories of the directory set in the Configurations Root field in the Configuration Directories field group.
Phone Installation
If you have an earlier version of the GSM client installed, you must remove it entirely before installing the new version
This can be done using the following steps
- connect your phone to ActiveSync
- in ActiveSync, uninstall all GSM client software from the phone
- open the phone's file system
- on the phone, remove all instances of
\Programme\SD\GSMoIP(Programme may be called Program Files or different on your phone depending on the OS language used). These might be present within the internal storage and on each of your extra memory cards (if you have such)
On each individual phone, you will need to install a number of so-called packages, which are available in the drop-down list next to the Install CE Package button.
To install the complete GSM-Client application on the phone, use the iAG GSM Client (full) package. This needs to be done once per phone. It needs to be re-done only if a new client software version is available.
To install only the skins used in the GSM-Client application on the phone, use the iAG GSM Client (Skin only) package. This will rarely or never used though, but is provided to allow installation of your own skin package (if you decide to create one).
To install only the application executable on the phone, use the iAG GSM Client (binaries only) package. This may be an option if a hotfix version needs to be installed which has no changes in the skin data, as it is much smaller and thus much faster to install.
During the beta phase, the installation packages will contain non-signed executables. These will normally neither install nor function. To work around this problem, the GSM Beta Patch package is provided. It will set some registry keys when installed which instruct windows mobile to skip the signature check. This should change with the release. You need to install this package once on your mobile and re-boot the mobile then.
To install the full configuration on the phone, use the Config Name (xx.xx.xx). The full configuration must be installed on the phone initially and must be updated whenever there are changes in
- the users own mobile phone data
- trunk line data
- pbx data
To install the current PBX extension table, use the Extension Name (xx.xx.xx) package. This needs to be done whenever there are new or changed extensions.
Name in the above configuration packages is the name you provided in the Configuration Name field of the Configuration Directories field group when creating the configuration. It is perfectly OK to always install the full Config ... package when the PBX configuration changes. Again, the Extensions subset will be much smaller (especially if there is a large number of mobile phones) and is provided for speed.
xx.xx.xx in the above configuration packages is the date you created the configuration package.
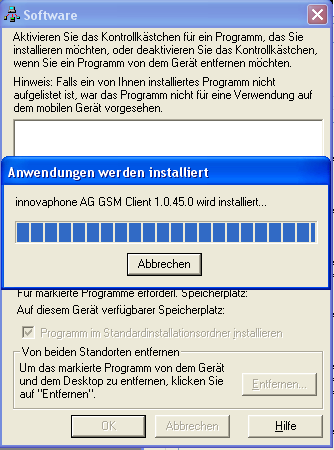
To install a package, select it in the dropdown and click the Install CE Package button on the lower left. This will launch Microsoft's ActiveSync utility to install the package on the mobile phone. Refer to the respective Microsoft documentation for detailed information on ActiveSync. Be sure the phone is connected.
When launched, ActiveSync will normally start the package installation on the phone right away:
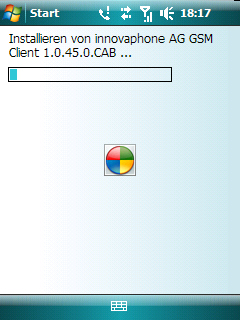
However, the installation process on the phone runs asynchronously, so you must check the phone itself too to see if the installation proceeds.
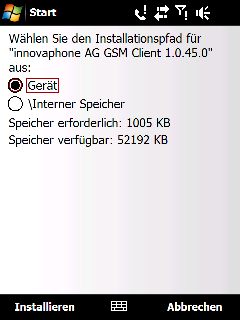
Also, the installer on the phone might ask some questions, e.g. where to install the package if you have additional internal or external memory cards on the phone.
If your phone asks for a destination, you must install all packages to the same destination always. Mixing destinations will result in a non-functional installation. if you need to move the installation from its original installation target (e.g. because you are running low on memory), you must de-install all the packages and then-reinstall to the new target.
If the phone is not connected or if the package was installed before but disabled, it might not be installed. You need to examine ActiveSyncs list of installed software when the phone is connected and use the software installation GUI then.
Setting CLIR on the Mobile Phone
The phone must identify itself to the PBX as a legible mobile device by providing the proper calling line ID. As a result, the phone must not be set into a CLIR (calling line identification restriction) mode as it will be rejected by the PBX then and no outgoing call through the PBX will thus be possible.
To hide your extension or subscriber number, use one of the respective call modes
- PBX Extension with CLIR
- Custom PBX Extension
- PBX Switchboard
Disabling mobile Carrier based Absence Message
Many mobile carriers will terminate calls to your mobile phone even though it is not reachable, for example because it is busy, not registered with the provider, switched off etc. This will happen for example if you have set a call forward (e.g. towards your mobile voice mail). But even if you have not set such a call forward, your carrier may terminate the call and play a message such as "The user is currently unavailable, do you want to be notified ...".
With mobility, this behaviour is evil. When your extension is called and the PBX forks the call to your mobile and the mobile is unavailable, the mobile carrier will take the call right away. To the PBX, the call is connected then and it will assume it was delivered to you successfully. In other words, you have no chance to take the call on your fixed phone. Also, if the PBX is configured to handle calls which cannot be delivered (e.g. by forwarding them to the switchboard operator or your PBX mailbox), this handling will not happen as the PBX assumes the call to be taken by you. For these reasons it is mandatory that you disable these mobile carrier features all together!
Unfortunately, there is no standard procedure to do so. You need to inquire with your mobile carrier. As an example, vodafone in Germany requires you to call a hotline number in order to disable what they call the Vodafone Anruf-Info.
Initial Settings to be done in the GSM Client
After installation of the software the following setting must be done in the client configuration (via Menü/Schnell or Menu/Quick
- Residencecountry or Aufenthaltsland
- This is the country the mobile phone is operated in. You should set it to the users country. By default, this is set to Germany
- Calldiversion or Rufumleitung
- This is the target number used when setting a an unspecified call diversion
Also, you might want to examine the following settings in the advanced settings (via Menü/Schnell/Menü/Einstellungen or Menu/Quick/Menu/Settings
- Language or Sprache
- The language of the user interface. Please note that this should rather be selected when generating the configuration files! In other words, you should create separate configuration packages for different languages
- Pin 5
- This defines your voice mail number and is used to set a call forwarding to voice mail or to call your voice mail
Please refer to the short user guide for more details on using the GSM client.
Windows CE CAB File Versioning
Windows CE apparently has no notion of a software version in its installer component. It assumes a cab file to install the same software only if it has the same Company Name and Application Name property. As a result, you cannot determine the version of an installed package. This is why we include the version (i.e. build) number in the Application Name property.
While this has the beauty that you easily determine the version of the installed software as well as the version of the installed configuration, it has the downside that Windows CE will install any update as if it were different software. This does no harm however as long as you do not uninstall one of the packages. As they in fact share all the same files, uninstalling one of them will actually uninstall all of them (although Windows CE wouldn't know). It is OK thus to install subsequent versions of a package as long as you do not get confused when Windows CE shows multiple version as installed. If you prefer, you can choose to always first uninstall the previous version of a package manually before installing the new version.
Also, you need to be aware that the packages provided overlap. That is for example, the iAG GSM Client (Skin only) is a subset of the iAG GSM Client (full) package. So if you uninstall Skin only the respective files are missing from the full package. Likewise, if you uninstall the full package, all the files from the Skin only package. Still, Windows CE will show the Skin only package as being installed.
Here are the relationships:
- full includes both Skin only and binaries only
- Config includes Extensions
Installing remotely
Windows CE cab files can be downloaded using its built-in web browser (Internet Explorer) and installed right away. Theoretically, all the packages can be installed this way, but we recommend installing the application and initial setup as described above and use the download method to provide updates to the extension list.
For this to work, you need to provide the respective packages as .cab files (e.g. on an intranet web server). These are available in the My mobile configurations and Windows Mobile Installation Files directories (shortcuts available in the Start/All Programs/innovaphone/GSM Client menu).
Here is how the .cab files map to the installation packages:
| Package | CAB |
| iAG GSM Client (full) | innoGSM.PPC.cab and innoGSM.SP.cab, depending on phone platform
|
| iAG GSM Client (binaries only) | innoGSMx.PPC.cab and innoGSMx.SP.cab, depending on phone platform
|
| GSM Beta Patch | WMRegBetaSecurityPatch.cab
|
| iAG GSM Client (Skin only) | innoCI.cab
|
| Config Name (xx.xx.xxxx) | fullSetup.cab
|
| Extensions Name (xx.xx.xxxx) | extSetup.cab
|
Providing your own Language
You can provide your own language. This is down by providing the following files
\Programme\SD\GSMoIP\Languages\language.xmlwhere language is the name of your language. This file needs to be copied into the program directory where the program is installed-to on the mobile phone. You can use one of the 3 files provided as a starterODF-Menues-language.xml,ODF-Menues-language-MSN.xmlandsymbols-language.xmlwhere language is the name of your language. These files are used by the configuration creator and are thus packaged into the fullSetup.cab file automatically
Working with fixed Numbering Plans
The dial plan used for the mobility and DTMF features objects assumes that you have an open numbering plan, that is, that you are able to call in to your PBX from the mobile to extensions of different length. For example, in our example these all share the common prefix 54. The mobility object's extension thus is 549, the extension of the join all groups DTMF feature is 5426.
In some countries however, the numbering plan is fixed, that is, it is not possible to call extensions of different length. If this is the case, you can create a configuration that only uses a single extension in your numbering plan for all mobility functions (see Numbering Plan above).
Additional Configuration in the PBX
In this case, you would configure the PBX objects as described. In addition, you would create a PBX MAP object which maps the externally visible extension you choose for mobility to the number configured for the mobility object. In our example, where the mobility object has extension 549, assuming your numbering plan is 2-digit (-00 to -99) and you have chosen extension 99, you would create a MAP which maps 99 to 549.
In case of multiple PBXes, you have also multiple Mobility objects with numbers containing PBX prefix, like 80.549 and 81.549 etc. Therefore multiple MAP objects must be created for every combination of externally visible extension and PBX prefix + Mobility object.
Creating the Configuration Files
In this case, you would tick the Use single number for mobility check mark in the Configuration Options field group. Also, you define the externally visible number of your mobility object in the Mobility MSN field. The format needs to be an international number, in our example (assuming the number is in Zürich and the subscriber number is 12345) this would be +41441234599.
Debugging
You can set the client into debug mode by calling the special extension 9**990. The client will then show the digits it would dial (bc = before connect, ac = after connect) but does not do so. You can turn off debug mode by calling 9##990.
Likewise, you can turn debugging for incoming calls on by calling 9**980 (9##980 turns off).
The program can be terminated quickly by calling 9##963.
Known Problems
- The Install CE Package ... button in the Configuration File Creator is greyed out
On systems up to and including Windows XP the reason is most probably that ActiveSync is not installed. To fix this, download and install ActiveSync.
On later systems where there is no ActiveSync available, the method to synchronize mobile phones is Windows Mobile Device Center. However, this might not be installed. To fix this, connect your mobile phone to the PC and Windows will automatically download the required components. If the installation fails, install all pending windows updates and try again.
- The GSM Client terminates during start-up showing an error message and a call stack trace (when clicking on Details)
This is most likely caused by a wrong PBX configuration resulting in wrong configuration files. Use the configuration creators Validate PBX Config button and make sure there are no errors shown. Review the configuration instructions above.
- Windows Mobile Installer says "This is not a valid Windows CE cab file"
This is most likely because the Windows Mobile Version is too old. The OS Version must be 4.21 or higher.
- Mobile phone always gets busy for outgoing calls through the PBX
The phone most likely fails to identify itself properly. This happens if the phone's number in the users Fork entry is incorrect (e.g. trunk prefix missing) or the phone is set to hide its own number (CLIR) on outgoing calls.
- Mobile phone may have problems to book into GSM network when connection was lost
When the phone looses connectivity to the GSM carrier, it may not re-register successfully. The client works normal (no freeze, no trap) but no incoming nor outgoing calls work. Also, if the client is terminated and the standard phone application is launched, still no calls are possible. A re-boot fixes this situation. This problem has been reported but we have not been able to reproduce it so far.
- CLIR modes do not work correctly
Call modes which result in a suppression of the calling party number for the outgoing call may result in strange outgoing numbers. This is a problem in the PBX firmware and is fixed in (upcoming) V8 hotfix 8
- Mobile Phone via PBX call mode does not work
This mode (which is rather strange anyway) requires some support by the PBX's gateway configuration. The client will send an outgoing call with its mobile phone number as calling line id. This may be interpreted as an extension and sent to the trunk line accordingly (that is, with PBX subscriber number prefixed), depending on the gateway level configuration used. This is probably not what is wanted. We recommend to not use this mode at all.
- The client shows distorted UI on some mobile phones
We have seen a phone with quadratic screen (300x300pix) which is a PocketPC but has a keypad too. On this phone, the UI shown is too large to be seen on the display and thus can't be used. This is under investigation.
- The call mode call through PBX but signal own mobile number does not work
Then again, this mode is rather obscure anyway.
- The configurator software unable to create configuration files if more than 1000 Mobility enabled users are configured in the PBX. The CABWiz Application crashes with instruction at xxxxx referenced memory at xxxxx. Memory could not be written. Message in this case. The workaround is to reduce the number of mobility enabled users.
- A bug in RC1 of the configurator detects wrong mobility prefix on standalone PBXes with all obejects in root Node. Fxed in following version.
When your mobile phone does not work as expected, open a support ticket as usual and make sure you include the complete configuration (best send a PBX configuration file and the fullSetup.cab cab file).
Related Articles
Reference8:GSM Client Short User Guide
A very useful tool to work with Windows Mobile Phones is MyMobiler which is sort of a remote access utility for your mobile phone. We strongly recommend to download and install this product before trying to install the GSM Client on a Windows Mobile Phone.
