Howto13r2:RecordingsApp: Difference between revisions
mNo edit summary |
mNo edit summary |
||
| Line 123: | Line 123: | ||
After this, the app is free to use. | After this, the app is free to use. | ||
=Using SSL Secure Sockets Layer = | |||
To send the CDR's and the Recordings PCAP via an encrypted connection, configure HTTPS instead of HTTP. | To send the CDR's and the Recordings PCAP via an encrypted connection, configure HTTPS instead of HTTP. | ||
*CDR's choose HTTPS as used protocol. | *CDR's choose HTTPS as used protocol. | ||
Revision as of 16:17, 14 October 2021
Setting up the Instance in the AP Manager
For the app to function, it must be downloaded. After that, an instance needs to be created and started with the correct information, or else it wont be usable.
- In this Step you're going to Setup the Instance of the Recordings App
- For this you need to download the app in the AP Manager Plugin.
- After installing the latest version, you need to add a new instance.
- You need to fill all the important information in the newly opened window.
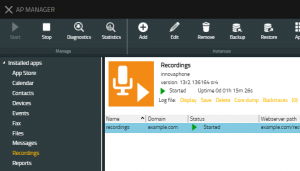
- After setting up the instance and starting it, it should look like the following:
Configuration in the PBX Manager Plugin
In this step, it is mandatory to insert two new objects into the AP and give the templates the needed licences and rights to use the app. Here you navigate to the AP Recordings, create two now objects and configure the templates.
Adding objects through the Recordings Plugin
- First you're going to add 2 new objects for the Recordings App to function.
- Here you need to add one object for "User" and one for "Admin".
- You have three fields to fill out.
- Name: Here youre going to name the App
- SIP: Here you need to name the SIP
- TYPE: Here you can choose what type this object is going to have.
Configuring Templates
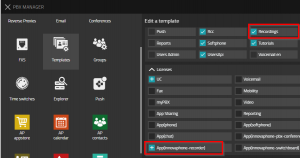
- For the app to work, you need to give out permissions and licences for the templates.
- Select the user template and give him the app permission and the licence.
- Select the admin template and give him the admin-app permission and also the licence.
- Now users with either template can use the appropiate apps.
Configuring the Recordings-App
The only change that needs to be done here is configuring the PBX name into the Admin-App, or else it wont correctly record the calls.
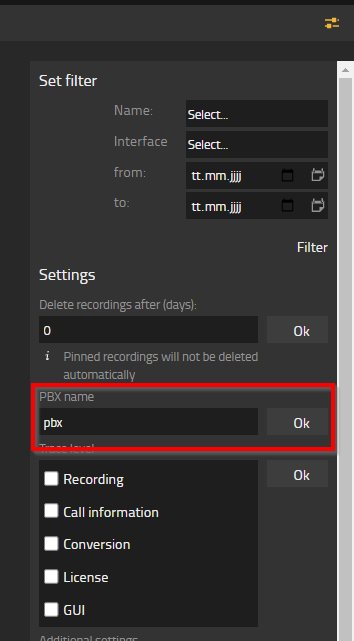
- Now you need to set the PBX name into the settings of the app, which is found in the RecordingsAdmin - app
- After opening the app, you can open a sidebar-menu with the upper right menu button.
- Below you see the setting which is called "PBX name". Here you set the name you gave the PBX.
Configuring the CDR settings of the PBX
For the PBX to fetch the data and create the CDR's, you need to check if it can create CDR's and where they get saved. For this, the Devices-Interface is used. After checking the checkbox for CDR's, you need to setup where it gets saved, and what type the CDR is going to be.
CDR Checkbox
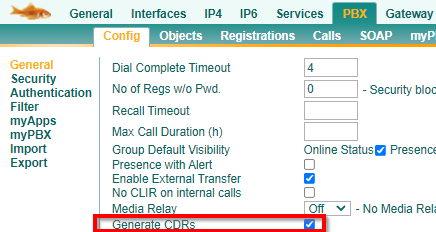
- To fully function, you need to activate the CDR option in the PBX.
- To do that, you need to select the PBX - Config tab
- Here you need to check the "Generate CDRs" checkbox.
- To do that, you need to select the PBX - Config tab
Configuring CDR
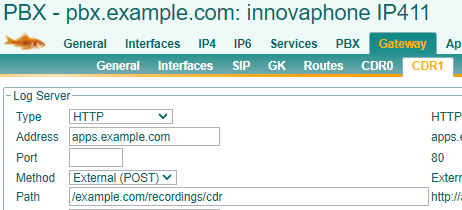
- In this step you are going to setup the CDR tab in the PBX
- Those settings you can find under Gateway - CDR1.
- The following settings need to be made:
- Type: HTTP
- Adress: here you need to either set the IP Adress of your application platform, or the name of it which is resolved from your DNS Server.
- Method: External (POST)
- Path: Here you need to put a case-sensitive URL: "/domain/recordings/cdr".
- The following settings need to be made:
- Those settings you can find under Gateway - CDR1.
Checking the Recordings-App object
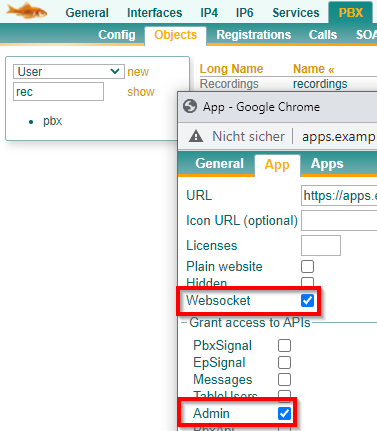
When you create the Recordings-Object, it could happen that the Websocket and Admin - checkbox isn't ticked, so navigating to the objects, selecting the "Recordings" - Object and check if the checkboxes are checked.
- It could happen that Websocket and Admin isn't ticked in "Objects".
- To check this, you need to navigate to PBX - Objects
- Here you select the Recordings object and select the first App tab.
- Both checkboxes should be ticked.
Configuring the VoIP-Interface through the Devices-Interface
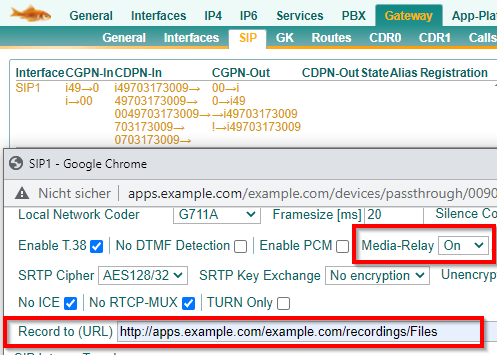
If you want the softphones to record too, then the SIP-Trunk needs the URL you inserted earlier too. Also, the Media-Relay checkbox needs to be checked.
- Since you also wanna record any call that goes through your SIP-trunk, you need to put a URL into the SIP.
- For this, you select the Gateway - SIP tab.
- Make sure that the URL is put correctly and also the Media-Relay is on.
- For this, you select the Gateway - SIP tab.
Configuring the Phones through the Devices-Interface
For the phones to actually start recording as soon as they make a call, you need to set them up. This is done in the phone settings through the Devices Interface. Here another URL is going to be set in, so it can store the recording, and configure it so it starts to record instantly
Setting up the URL
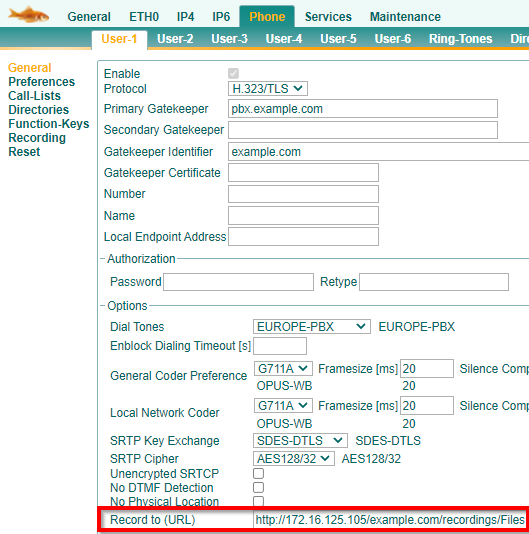
- To actually record the calls, the phones need to be set up correctly.
- Select a phone and go to the "Phone" tab.
- Down below, you again need to put a case-sensitive URL into the field, which follows the following rule:
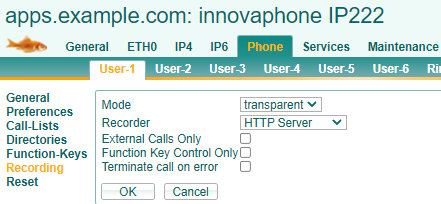
Setting up the Recording-Tab
- To fully function, the following changes need to be made in the Recording-Tab
- Mode: Transparent: This means that the call will be recorded instantly.
- Recorder: HTTP Server
After this, the app is free to use.
Using SSL Secure Sockets Layer
To send the CDR's and the Recordings PCAP via an encrypted connection, configure HTTPS instead of HTTP.
- CDR's choose HTTPS as used protocol.
- Recording URL, use HTTPS instead of HTTP.
- Make sure that the SSL certificates on the used devices match.
