Howto:XCAPI: Difference between revisions
m (→Introduction) |
|||
| (82 intermediate revisions by 8 users not shown) | |||
| Line 1: | Line 1: | ||
{{Template:3rd Party Input}} | <!-- {{Template:3rd Party Input}} --> | ||
==Applies To== | ==Applies To== | ||
This information applies to | This information applies to | ||
* | * Configuring the XCAPI with the innovaphone Gateways and innovaphone PBX | ||
Configuring the XCAPI with the innovaphone Gateways | |||
== Introduction == | == Introduction == | ||
This document is intended to support you with the integration of the XCAPI (version 3. | This document is intended to support you with the integration of the XCAPI (version 3.4.0.0) into an existing environment of | ||
current innovaphone gateways (Version 6 and following). In the following sections we describe the essential steps of configuration to allow for optimal cooperation of both the XCAPI and the innovaphone PBX/gateway. At this point, we suppose that the innovaphone PBX, the hardware the XCAPI is running on and both the XCAPI and your CAPI applications are already installed properly. For some extended information on installation procedures please refer to the respective manuals. A short installation manual for the XCAPI is available at the XCAPI Homepage (http://www.te-systems.de/community/index.php?L=0). | current innovaphone gateways (Version 6 and following). In the following sections we describe the essential steps of configuration to allow for optimal cooperation of both the XCAPI and the innovaphone PBX/gateway. At this point, we suppose that the innovaphone PBX, the hardware the XCAPI is running on and both the XCAPI and your CAPI applications are already installed properly. For some extended information on installation procedures please refer to the respective manuals. A short installation manual for the XCAPI is available at the XCAPI Homepage (http://www.te-systems.de/community/index.php?L=0). | ||
Both XCAPI and Innovaphone support H.323 and SIP and we can configure the Trunk between them using the Gateway/Relay or directly registering XCAPI on the PBX. | |||
<br> | |||
'''Important: ''However the only method recommended is registering XCAPI directly on the innovaphone PBX using SIP Protocol. All other setups are no longer supported thus''.''' | |||
=== Configuring the innovaphone === | |||
In this example, we are going to use one PBX gateway object (XCAPI-SIP-GW) and register XCAPI on this Object. | |||
==== | ==== Creating a Gateway Object in the PBX ==== | ||
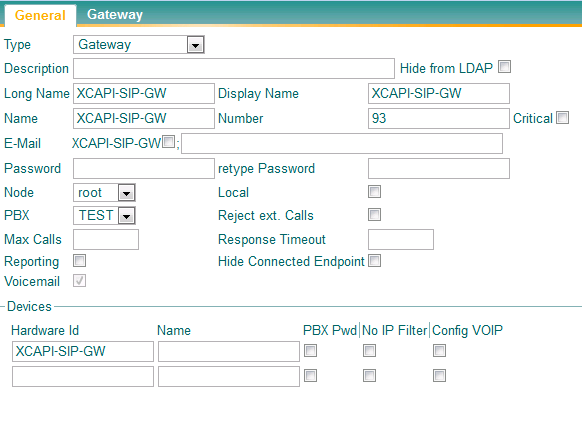
Log in to the PBX administration and create a new gateway object. The name of the object is "XCAPI-SIP-GW", and the number is 93 in this case. | |||
[[Image:2-pbx-gw-object-gw-4-config.PNG]] | |||
[[Image:XCAPI_no_iband_disconnect.PNG]] | |||
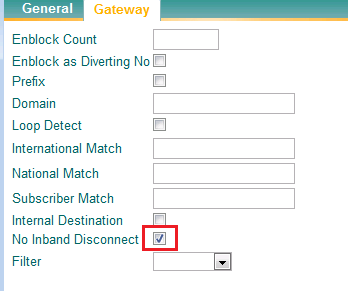
Note: At this Gateway Object we should select the option "No Inband Disconnect" to avoid issues with external call transfer that are rejected. | |||
=== XCAPI Configuration === | |||
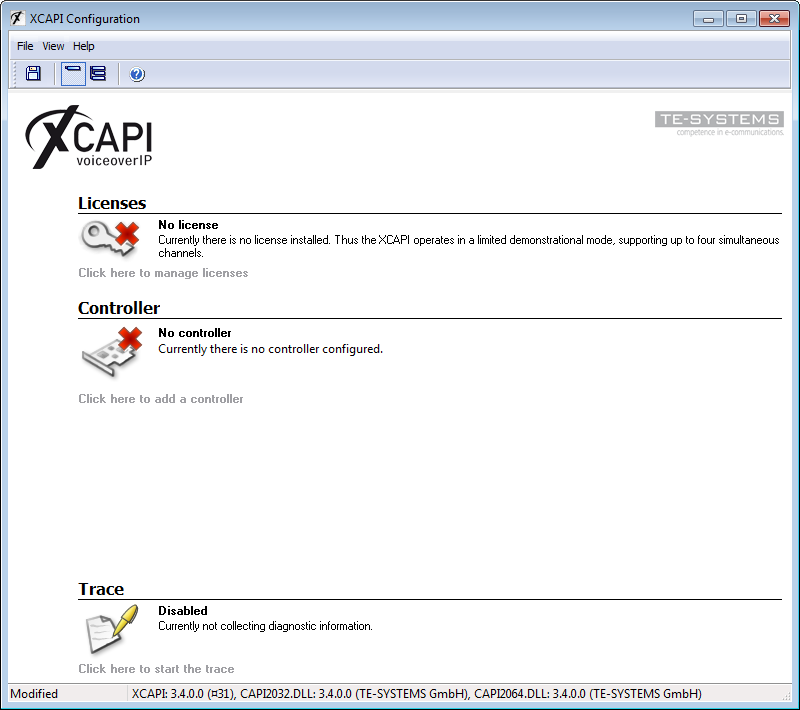
When the XCAPI configuration is started for the first time, there are no configured controllers. Use the link "Click here to add a controller" in the overview page to start the controller wizard. | |||
[[Image:controller-wizard-0.PNG]] | |||
==== Add new VoIP controller ==== | |||
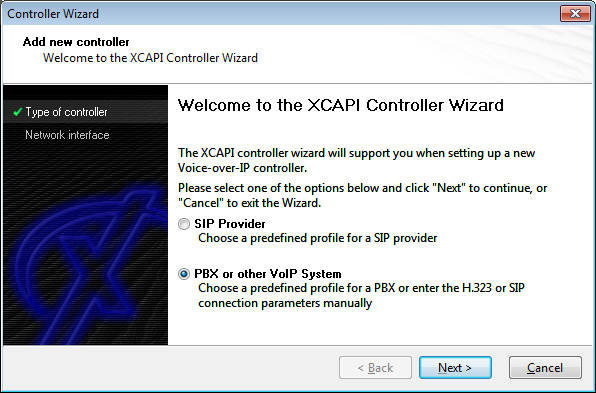
On the welcome page of the controller wizard, select to add a new VoIP controller. | |||
[[Image:controller-wizard-1.PNG]] | |||
==== Network Interface ==== | |||
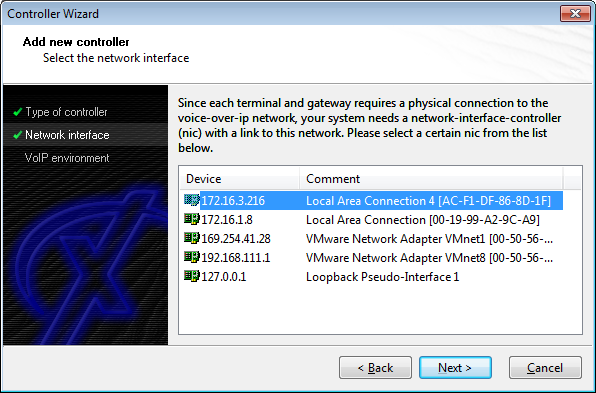
In the next dialog, select the network interface that you want to use for the SIP connection between the XCAPI and the innovaphone gateway. | |||
[[Image:controller-wizard-2.PNG]] | |||
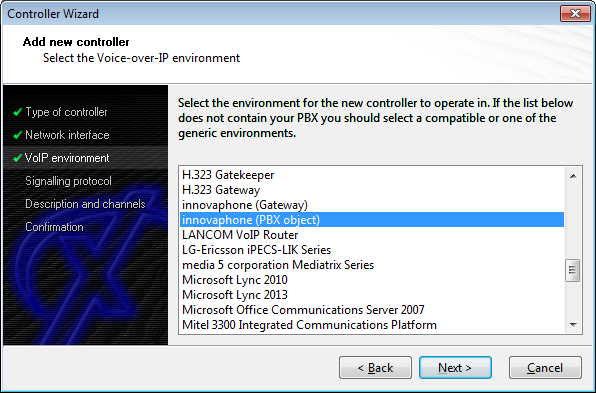
==== Select VoIP environment template ==== | |||
the | From the list of predefined VoIP environments, select a innovaphone (PBX object) template. | ||
[[Image:controller-wizard-3.PNG]] | |||
==== Signalling Protocol ==== | |||
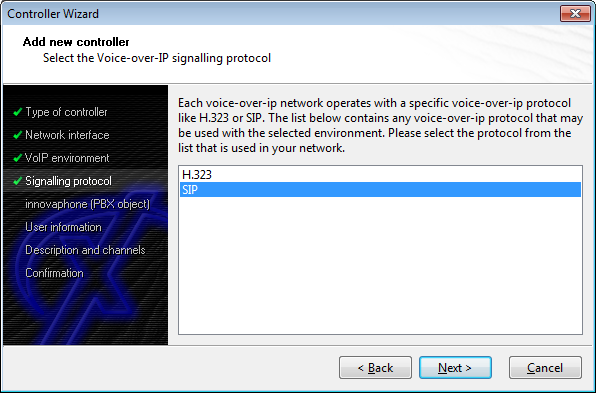
We must select SIP as protocol to be used by XCAPI. | |||
[[Image:controller-wizard-4.PNG]] | |||
==== innovaphone (PBX Object) ==== | |||
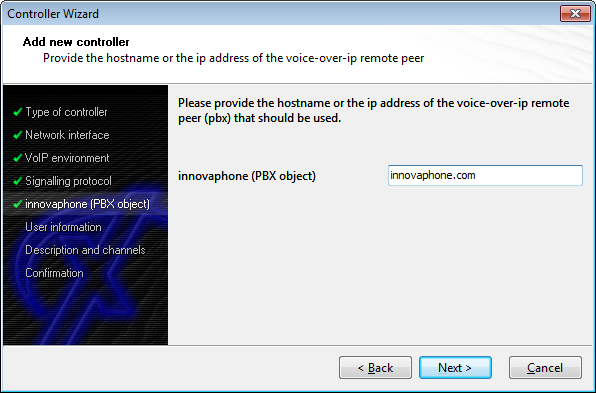
Here we must insert the innovaphone PBX System Name or IP address. This will depend on the option "Use as Domain" at PBX->Config. | |||
If we have "Use as Domain" we insert the system name of the PBX: | |||
[[Image:controller-wizard-5a.PNG]] | |||
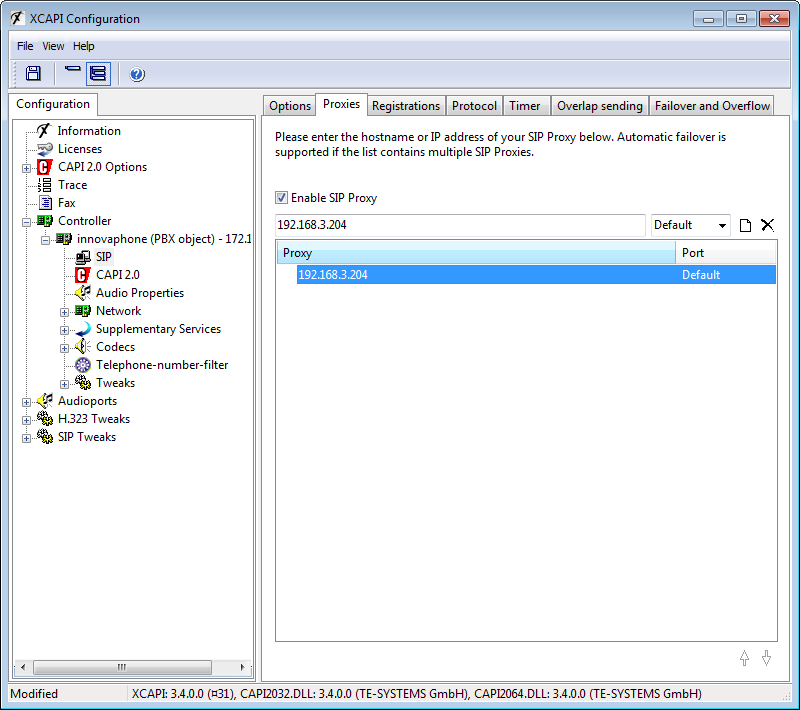
Then if the System name it's not resolved by DNS we need to configure SIP Proxy in the XCAPI Configuration after we finish the Wizard: | |||
[[Image:controller-wizard-5b.PNG]] | |||
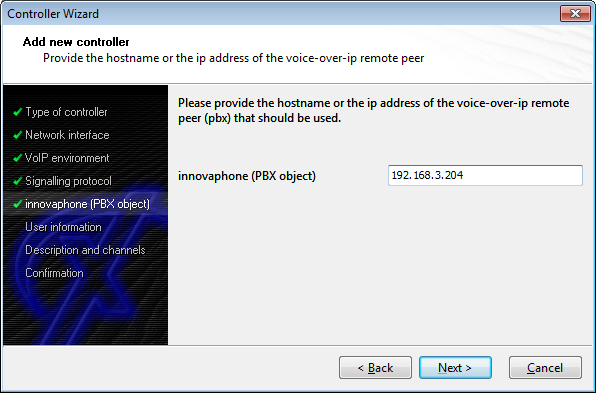
If there is no "Use as Domain" we configure the IP address of the PBX: | |||
[[Image:controller-wizard-5.PNG]] | |||
==== User Information ==== | |||
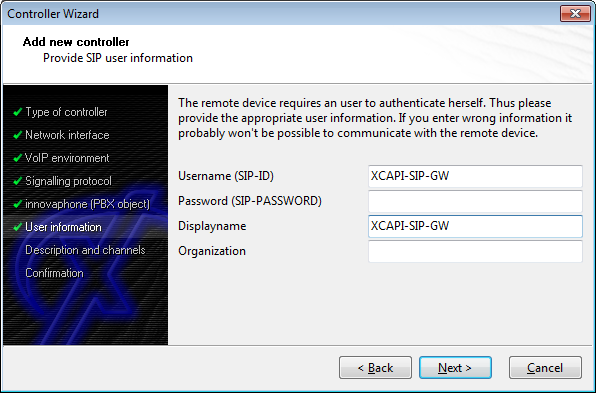
Here we insert the GW Object Name previously created at "Username" field, the use of password it's optional. | |||
[[Image:controller-wizard-6.PNG]] | |||
==== Description and channels ==== | |||
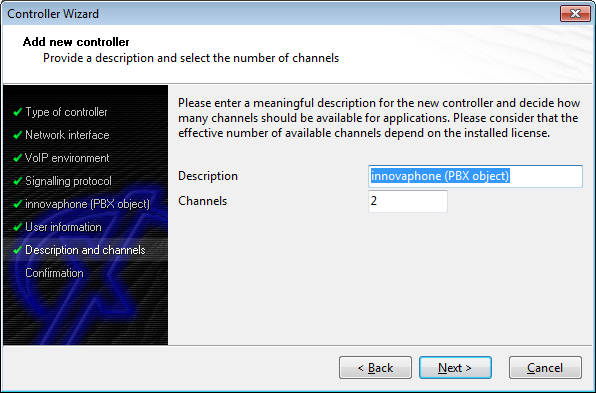
Enter a meaningful description and the number of lines that the XCAPI can use to communicate with the innovaphone gateway simultaneously. | |||
[[Image:controller-wizard-7.PNG]] | |||
==== | ==== Confirmation ==== | ||
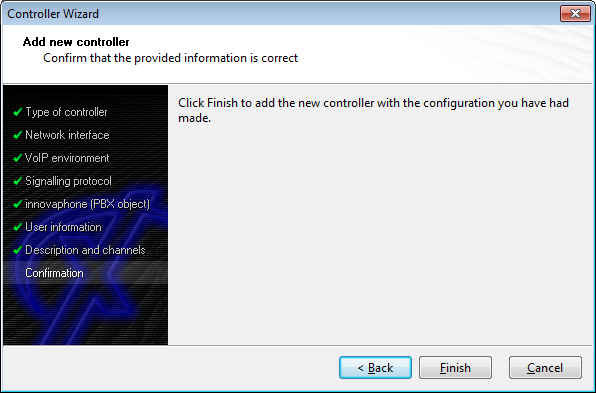
Check if all necessary information has been entered correctly (green symbols on the left) and confirm all data by clicking Finish. | |||
[[Image:controller-wizard-8.PNG]] | |||
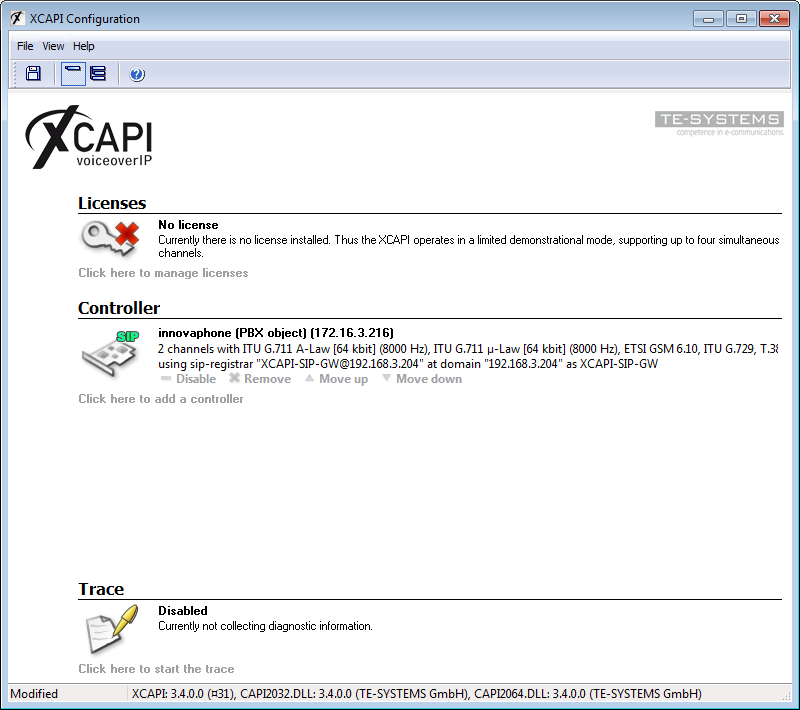
Then the new controller appears in the XCAPI configuration. Save the changes and stop all running CAPI applications before restarting them. | |||
[[Image:controller-wizard-9.PNG]] | |||
==== | == Known Problems == | ||
=== No MOH === | |||
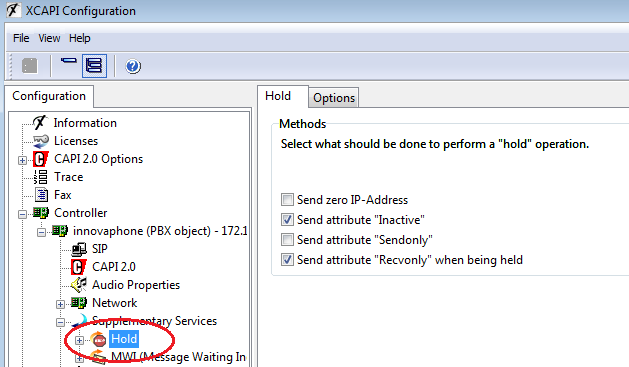
* In XCAPI version 3.3.249 when XCAPI puts call on hold it uses media attribute "send-only", this could affect some call scenarios by not providing MOH to the held party. In order to PBX provide the MOH the hold must be set with media attribute "inactive" instead. In future releases of XCAPI it's planned that "inactive" will be set already in the template for innovaphone PBX meanwhile you can edit in the configuration this option like the image bellow shows. Also other option that should be enable it's "Send attribute "Recvonly" when being held" for the cases that XCAPI it's put on hold. | |||
[[Image: | [[Image:controller-wizard-10.PNG]] | ||
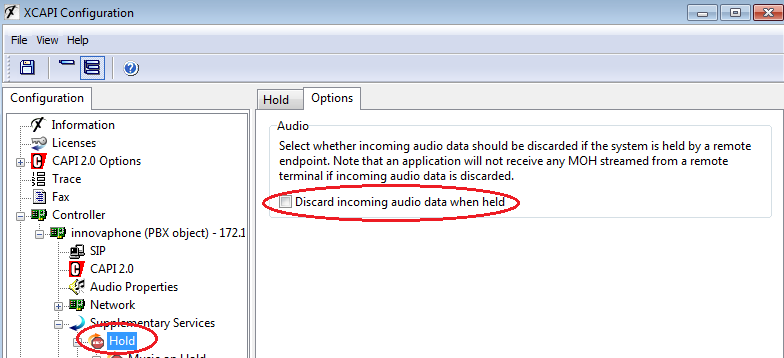
* If you perform a consultation transfer with XCAPI (example using Voxtron Agent hold incoming PSTN call and does consultation transfer with alerting to another agent) and the held party doesn't hear the MOH/Alerting from the PBX then the reason could be the default option in XCAPI configuration to "Discard incoming audio data when held". | |||
[[Image:controller-wizard-11.PNG]] | |||
=== Failure on Registration due missing Username === | |||
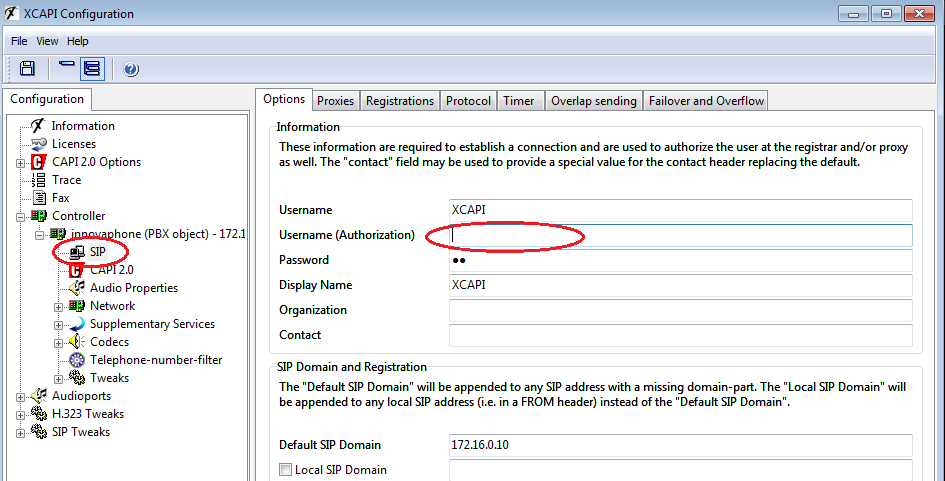
* Gateway Object with Password requires extra step of configuration on XCAPI settings after XCAPI wizard it's finished. For that reason we need to insert the Name/Number for registration at field "Username(Authorization)" at XCAPI SIP Settings. | |||
[[Image: | [[Image:controller-wizard-12.PNG]] | ||
PBX | === Incoming call declined by PBX === | ||
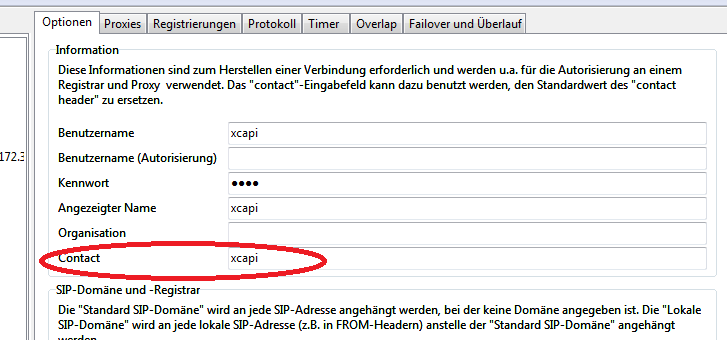
*If the registration is successful but an incoming call is declined by the PBX due to an unknown contact header you should enter the xcapi object name as contact parameter in the XCAPI configuration. | |||
Notice: When using MWI by SIP notify, the Contact Header of the SIP Notify must be identical to the Contact Header of the SIP Registration. The Contact for the Registration will be create automatically. Perhaps a registration by number would be a solution. Normally, the Contact field must be left blank. | |||
[[Image: Xcapi-contact.png]] | |||
- On v10sr8/V10sr9 the previous behaviour was fixed so the Contact Info should have no value, if you set value like the example this will cause problems with the SIP Register after a restart of the Gateway. | |||
- On v10sr10 there is a fix for the SIP Register issue, so you can set a name on the Contact Info or leave it blank both methods will work. | |||
=== | === One way audio using SRTP === | ||
XCapi does not support SRTP unless the optional XSSA Module is installed. If SRTP is used anyway, one-way-audio may occur (from XCapi to innovaphone endpoint). | |||
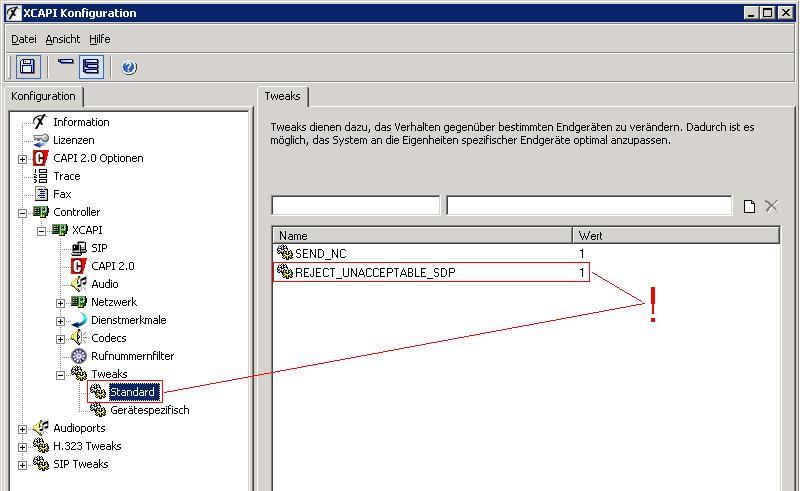
If you do not want to install XSSA (and thus use un-encrypted RTP to the XCapi), you may (from XCAPI Version 3.4.x on) enable the XCAPI Tweak <''REJECT_UNACCEPTABLE_SDP''> to reject calls with unsupported SAVP (i.e. SRTP) media requests. | |||
[[Image:XCAPI_Tweak_reject_unacceptable_SDP.jpg]] | |||
The calling innovaphone device will then re-initiate the call w/o SRTP. | |||
The | |||
For more information about XSSA please contact TE-Systems. | |||
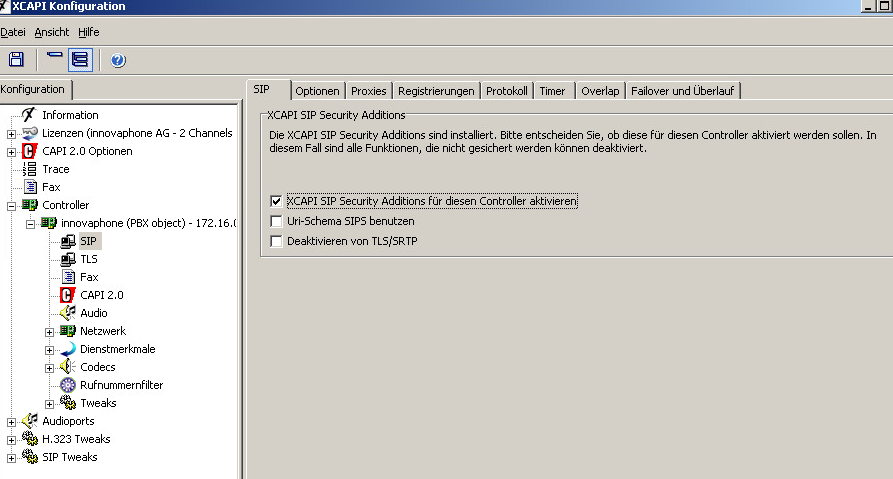
If the SIP Security Additions are available, the enable "SIP Security Addittions" should be activated to have SRTP like in the picture bellow: | |||
[[Image:XCAPI_SIP_SIPSecurity.png]] | |||
=== | === T38 / Fax failed === | ||
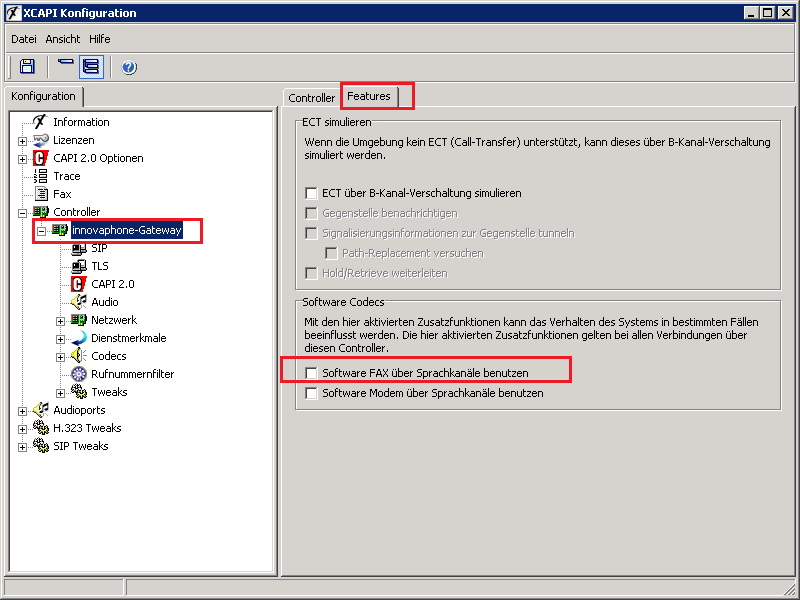
T38 will not supported if the option "Software Fax über Sprachkanäle benutzen" is enabled. If required disable this option. | |||
[[Image:Xcapi_controller_features_softax.png]] | |||
=== Screenshots of a example XCAPI configuration === | |||
PBX V9/V10 - Xcapi 3.5.31.0 | |||
Changes which are different to the config of the Wizard are highlighted. | |||
[[Media:XCAPI_Config.zip]] | |||
=== MWI is not working when XCAPI is connected via GK-Interfaces === | |||
You must set "Interworking/QSIG" in the route from the XCAPI GK-Interface to the PBX-Registration | |||
===Support of DTLS=== | |||
At the moment(Summer 2015) XCAPI does not support DTLS. So please make sure that you are not using DTLS only at phones calling the XCAPI. This may change in the future. | |||
== Related Articles == | == Related Articles == | ||
Latest revision as of 10:04, 10 April 2020
Applies To
This information applies to
- Configuring the XCAPI with the innovaphone Gateways and innovaphone PBX
Introduction
This document is intended to support you with the integration of the XCAPI (version 3.4.0.0) into an existing environment of current innovaphone gateways (Version 6 and following). In the following sections we describe the essential steps of configuration to allow for optimal cooperation of both the XCAPI and the innovaphone PBX/gateway. At this point, we suppose that the innovaphone PBX, the hardware the XCAPI is running on and both the XCAPI and your CAPI applications are already installed properly. For some extended information on installation procedures please refer to the respective manuals. A short installation manual for the XCAPI is available at the XCAPI Homepage (http://www.te-systems.de/community/index.php?L=0).
Both XCAPI and Innovaphone support H.323 and SIP and we can configure the Trunk between them using the Gateway/Relay or directly registering XCAPI on the PBX.
Important: However the only method recommended is registering XCAPI directly on the innovaphone PBX using SIP Protocol. All other setups are no longer supported thus.
Configuring the innovaphone
In this example, we are going to use one PBX gateway object (XCAPI-SIP-GW) and register XCAPI on this Object.
Creating a Gateway Object in the PBX
Log in to the PBX administration and create a new gateway object. The name of the object is "XCAPI-SIP-GW", and the number is 93 in this case.
Note: At this Gateway Object we should select the option "No Inband Disconnect" to avoid issues with external call transfer that are rejected.
XCAPI Configuration
When the XCAPI configuration is started for the first time, there are no configured controllers. Use the link "Click here to add a controller" in the overview page to start the controller wizard.
Add new VoIP controller
On the welcome page of the controller wizard, select to add a new VoIP controller.
Network Interface
In the next dialog, select the network interface that you want to use for the SIP connection between the XCAPI and the innovaphone gateway.
Select VoIP environment template
From the list of predefined VoIP environments, select a innovaphone (PBX object) template.
Signalling Protocol
We must select SIP as protocol to be used by XCAPI.
innovaphone (PBX Object)
Here we must insert the innovaphone PBX System Name or IP address. This will depend on the option "Use as Domain" at PBX->Config.
If we have "Use as Domain" we insert the system name of the PBX:
Then if the System name it's not resolved by DNS we need to configure SIP Proxy in the XCAPI Configuration after we finish the Wizard:
If there is no "Use as Domain" we configure the IP address of the PBX:
User Information
Here we insert the GW Object Name previously created at "Username" field, the use of password it's optional.
Description and channels
Enter a meaningful description and the number of lines that the XCAPI can use to communicate with the innovaphone gateway simultaneously.
Confirmation
Check if all necessary information has been entered correctly (green symbols on the left) and confirm all data by clicking Finish.
Then the new controller appears in the XCAPI configuration. Save the changes and stop all running CAPI applications before restarting them.
Known Problems
No MOH
- In XCAPI version 3.3.249 when XCAPI puts call on hold it uses media attribute "send-only", this could affect some call scenarios by not providing MOH to the held party. In order to PBX provide the MOH the hold must be set with media attribute "inactive" instead. In future releases of XCAPI it's planned that "inactive" will be set already in the template for innovaphone PBX meanwhile you can edit in the configuration this option like the image bellow shows. Also other option that should be enable it's "Send attribute "Recvonly" when being held" for the cases that XCAPI it's put on hold.
- If you perform a consultation transfer with XCAPI (example using Voxtron Agent hold incoming PSTN call and does consultation transfer with alerting to another agent) and the held party doesn't hear the MOH/Alerting from the PBX then the reason could be the default option in XCAPI configuration to "Discard incoming audio data when held".
Failure on Registration due missing Username
- Gateway Object with Password requires extra step of configuration on XCAPI settings after XCAPI wizard it's finished. For that reason we need to insert the Name/Number for registration at field "Username(Authorization)" at XCAPI SIP Settings.
Incoming call declined by PBX
- If the registration is successful but an incoming call is declined by the PBX due to an unknown contact header you should enter the xcapi object name as contact parameter in the XCAPI configuration.
Notice: When using MWI by SIP notify, the Contact Header of the SIP Notify must be identical to the Contact Header of the SIP Registration. The Contact for the Registration will be create automatically. Perhaps a registration by number would be a solution. Normally, the Contact field must be left blank.
- On v10sr8/V10sr9 the previous behaviour was fixed so the Contact Info should have no value, if you set value like the example this will cause problems with the SIP Register after a restart of the Gateway.
- On v10sr10 there is a fix for the SIP Register issue, so you can set a name on the Contact Info or leave it blank both methods will work.
One way audio using SRTP
XCapi does not support SRTP unless the optional XSSA Module is installed. If SRTP is used anyway, one-way-audio may occur (from XCapi to innovaphone endpoint).
If you do not want to install XSSA (and thus use un-encrypted RTP to the XCapi), you may (from XCAPI Version 3.4.x on) enable the XCAPI Tweak <REJECT_UNACCEPTABLE_SDP> to reject calls with unsupported SAVP (i.e. SRTP) media requests.
The calling innovaphone device will then re-initiate the call w/o SRTP.
For more information about XSSA please contact TE-Systems.
If the SIP Security Additions are available, the enable "SIP Security Addittions" should be activated to have SRTP like in the picture bellow:
T38 / Fax failed
T38 will not supported if the option "Software Fax über Sprachkanäle benutzen" is enabled. If required disable this option.
Screenshots of a example XCAPI configuration
PBX V9/V10 - Xcapi 3.5.31.0
Changes which are different to the config of the Wizard are highlighted.
MWI is not working when XCAPI is connected via GK-Interfaces
You must set "Interworking/QSIG" in the route from the XCAPI GK-Interface to the PBX-Registration
Support of DTLS
At the moment(Summer 2015) XCAPI does not support DTLS. So please make sure that you are not using DTLS only at phones calling the XCAPI. This may change in the future.
