Howto:Spoken Presence with VoiceMail XML Script: Difference between revisions
m (New page: ==Summary== Some customers like to automatically transmit a memo to callers. In traditional PBX when a system phone or an operator calls a telephone, where the absence memo is enabled, o...) |
|||
| (35 intermediate revisions by 3 users not shown) | |||
| Line 1: | Line 1: | ||
==Summary== | ==Summary== | ||
“Spoken presence” means that you can take your smart phone and set an activity (busy, vacation, meeting, lunch etc.) and time (when you are back). | |||
This information will be replicated to the voicemail, so when your number is called, the caller will get a spoken message when the person is back again. This is useful because you then always know what the person is doing and when he or she will be back again. This info is nice to have in a business context. | |||
This script was tested with the ''Opticaller Client inputs'' but could be used without Opticaller also. Its only needed to send the right DTMF inputs. | |||
==Applies To== | ==Applies To== | ||
This information applies to | This information applies to | ||
* All | * All V9 PBX platforms | ||
<!-- Keywords: enter keywords, foreign translations and/or synoyms not appearing in the article here for better search results --> | <!-- Keywords: enter keywords, foreign translations and/or synoyms not appearing in the article here for better search results --> | ||
| Line 19: | Line 16: | ||
==More Information== | ==More Information== | ||
===Problem Details=== | ===Problem Details=== | ||
The ''Opticaller GSM client'' permits us to set the presence status using a defined softkey. Additionally it can send a DTMF value to the PBX, containing a ''time'' or ''date'', selected from the ''Opticaller GSM client''. | |||
This function should change the user ''presence status'' and ''note'' at the innovaphone PBX. Additionally it provides a voice prompt to people that try to reach this user afterwards, giving the time/date when he will be available and optionally(if configured) transfer the caller to a voicemail box. | |||
Note: This script could be used even without the ''Opticaller Client'', the user only needs to call the spokenpresence VM object and dial the DTMF code manually. | |||
===System Requirements=== | ===System Requirements=== | ||
The feature is based on | |||
The feature is based on a XML script, typically installed on the Compact Flash card of a device. Of course it will work also on external Webserver server. | |||
===Installation=== | ===Installation=== | ||
The | The installation is based on two steps, the first is to copy the right files and the second one is to set up the innovaphone PBX. Here is how: | ||
Connect the CF as a network drive using the normal explorer option. | |||
Make a new directory in your CF (ie. spokenpresence). | |||
Copy all XML files and the sound files ([[Howto:Spoken_Presence_with_VoiceMail_XML_Script#Download|Download]])in this directory. | |||
Now create a new voicemail object (ie. ''Vm_SpokenPresence'') in your PBX and assign this object a number (i.e. ''830''). This number will be the access code for the innovaphone Spoken Presence (the number to set the presence status and define the VoicePrompts). Insert the path of your previously created directory and the name of the XML File in the Script URL (spoken_presence.XML). | |||
Example: http://172.16.0.10/DRIVE/CF0/spokenpresence/spoken_presence.xml | |||
In the example the created directory is spokenpresence (like the XML file name). | |||
Next, we need to create a second voicemail object (ie. Vm_SpokenPrompts) and give it a number (i.e. ''831''). This object is the CFU destination of the first script in case that presence is set. It provides the ''presence status'' voice prompts and additionally can transfer the call to a voicemail box. Insert the path of your previously created directory and the name of the XML file in the Script URL (spoken_prompts.XML). | |||
Example: http://172.16.0.10/DRIVE/CF0/spokenpresence/spoken_prompts.xml | |||
Then we have to edit the ''spoken_presence.xml'' file and set the number of the ''Vm_SpokenPrompts'' voicemail object created before. We insert this in the line shown below: | |||
<syntaxhighlight lang="html5"> | |||
<!-- Insert value with number of spoken_prompts.xml vm object below Ex:831--> | |||
<assign out="$spokenprompt" value="831"/> | |||
</syntaxhighlight> | |||
Finally we have optionally the possibility to transfer the call to the users voicemail box, instead of disconnecting the call after the voice prompt. For this we need to edit the ''spoken_prompts.xml'' and insert two values at the end of the script: | |||
* $vmnumber - Here we insert as value the innovaphone voicemail object number(change the 0). | |||
* $vmredirect - Here we insert as value the name of a Dummy User Object we should create (change the vm_spoken_vmredirect). | |||
<syntaxhighlight lang="html5"> | |||
<!--Transfer to Innovaphone Voicemail after Prompt | |||
Change $vmnumber value to the Innovaphone VM Box number and $vm_redirect value to the name of the VM Dummy User Object created | |||
--> | |||
<assign out="$vmbox" value=""/> | |||
<assign out="$vmnumber" value="0"/> | |||
<assign out="$vm_redirect" value="vm_spoken_vmredirect"/> | |||
<switch var="$vmnumber"> | |||
<case not-equal="0"> | |||
<lib-strcat out-string="$vmbox" string="$vmnumber" string2="$leg2"/> | |||
<pbx-upd-obj name="$vm_redirect" type="cfu" value="$vmbox"/> | |||
<pbx-xfer name="$vm_redirect" /> | |||
<pbx-upd-obj name="$vm_redirect" type="cfu" value=""/> | |||
</case> | |||
</switch> | |||
<pbx-disc/> | |||
</syntaxhighlight> | |||
===Feature description for user=== | ===Feature description for user=== | ||
To | * To use this manually we must call the ''Spoken VM'' object. The call will be connected in silence and then the user should dial the DTMF code to set the presence ''type'', plus the time/date info. In total it will be a 7 digit code. | ||
Codes: | |||
= | 100 - Clear Presence | ||
101 - Set Away (time) | |||
102 - Set Busy (time) | |||
103 - Set Lunch (time) | |||
104 - Set meeting (time) | |||
105 - Set vacation (date) | |||
7 digit input to be accepted (code + Time hh:mm / Date mm:dd). Example: Set away = 1011900 | |||
101 Set Away state, 19:00 will be the time. Note/Voice Prompt: I'm away until 19:00. | |||
To clear presence should be 100XXXX (X any digit, ie: 1000000). | |||
* The use this with the Opticaller client, we should configure the presence keys with the codes as follows: | |||
Set Clear Presence | |||
[[Image:Spoken_Presence_with_VoiceMail_XML_Script_4.png]] | |||
Set Away Presence with Time | |||
[[Image:Spoken_Presence_with_VoiceMail_XML_Script_1.png]] | |||
Set Vacation Presence with Date | |||
[[Image:Spoken_Presence_with_VoiceMail_XML_Script_3.png]] | |||
Final | |||
[[Image:Spoken_Presence_with_VoiceMail_XML_Script_2.png]] | |||
Note: We can create more codes with new activities easily. Edit the ''VoicePrompts'' and notes. | |||
===Known Problems=== | ===Known Problems=== | ||
* When calling to the ''spoken_presence.xml'' VM object, it's important to send 7 digits. The call will be not disconnected until 7 digits have been dialled. | |||
* When setting the presence status, the call must come from the same User as the one where the presence is changed. For example if we call using Opticaller we are using mobility to reach the VM object number. This way the caller name it's the PBX user we want to set the presence status. | |||
* When setting the date on the Opticaller client, it asks the user to insert the year but that value it's not send by DTMF to the PBX. As a result, that value will be not set on the presence status. Opticaller should do a small fix to send the year too by DTMF. | |||
* When setting the Redirection to the innovaphone Voicemail box and the called user doesn't have VM box, the caller receives a voice message saying that. However the call it's not disconnected, but the calling user must disconnect the call manually. | |||
== Download == | == Download == | ||
*[http:// | *[http://wiki.innovaphone.com/index.php?title=Howto:Wiki_Sources#spokepre Download] the complete file package of scripts and files described in this article. | ||
Latest revision as of 12:47, 10 May 2023
Summary
“Spoken presence” means that you can take your smart phone and set an activity (busy, vacation, meeting, lunch etc.) and time (when you are back).
This information will be replicated to the voicemail, so when your number is called, the caller will get a spoken message when the person is back again. This is useful because you then always know what the person is doing and when he or she will be back again. This info is nice to have in a business context.
This script was tested with the Opticaller Client inputs but could be used without Opticaller also. Its only needed to send the right DTMF inputs.
Applies To
This information applies to
- All V9 PBX platforms
More Information
Problem Details
The Opticaller GSM client permits us to set the presence status using a defined softkey. Additionally it can send a DTMF value to the PBX, containing a time or date, selected from the Opticaller GSM client.
This function should change the user presence status and note at the innovaphone PBX. Additionally it provides a voice prompt to people that try to reach this user afterwards, giving the time/date when he will be available and optionally(if configured) transfer the caller to a voicemail box.
Note: This script could be used even without the Opticaller Client, the user only needs to call the spokenpresence VM object and dial the DTMF code manually.
System Requirements
The feature is based on a XML script, typically installed on the Compact Flash card of a device. Of course it will work also on external Webserver server.
Installation
The installation is based on two steps, the first is to copy the right files and the second one is to set up the innovaphone PBX. Here is how:
Connect the CF as a network drive using the normal explorer option.
Make a new directory in your CF (ie. spokenpresence).
Copy all XML files and the sound files (Download)in this directory.
Now create a new voicemail object (ie. Vm_SpokenPresence) in your PBX and assign this object a number (i.e. 830). This number will be the access code for the innovaphone Spoken Presence (the number to set the presence status and define the VoicePrompts). Insert the path of your previously created directory and the name of the XML File in the Script URL (spoken_presence.XML).
Example: http://172.16.0.10/DRIVE/CF0/spokenpresence/spoken_presence.xml
In the example the created directory is spokenpresence (like the XML file name).
Next, we need to create a second voicemail object (ie. Vm_SpokenPrompts) and give it a number (i.e. 831). This object is the CFU destination of the first script in case that presence is set. It provides the presence status voice prompts and additionally can transfer the call to a voicemail box. Insert the path of your previously created directory and the name of the XML file in the Script URL (spoken_prompts.XML).
Example: http://172.16.0.10/DRIVE/CF0/spokenpresence/spoken_prompts.xml
Then we have to edit the spoken_presence.xml file and set the number of the Vm_SpokenPrompts voicemail object created before. We insert this in the line shown below:
 <!-- Insert value with number of spoken_prompts.xml vm object below Ex:831-->
		<assign out="$spokenprompt" value="831"/>
Finally we have optionally the possibility to transfer the call to the users voicemail box, instead of disconnecting the call after the voice prompt. For this we need to edit the spoken_prompts.xml and insert two values at the end of the script:
- $vmnumber - Here we insert as value the innovaphone voicemail object number(change the 0).
- $vmredirect - Here we insert as value the name of a Dummy User Object we should create (change the vm_spoken_vmredirect).
	   <!--Transfer to Innovaphone Voicemail after Prompt
		    Change $vmnumber value to the Innovaphone VM Box number and $vm_redirect value to the name of the VM Dummy User Object created
		-->
		<assign out="$vmbox" value=""/>
		<assign out="$vmnumber" value="0"/>
		<assign out="$vm_redirect" value="vm_spoken_vmredirect"/>

		<switch var="$vmnumber">
			<case not-equal="0">
				<lib-strcat out-string="$vmbox" string="$vmnumber" string2="$leg2"/>
				<pbx-upd-obj name="$vm_redirect" type="cfu" value="$vmbox"/>
				<pbx-xfer name="$vm_redirect" />
				<pbx-upd-obj name="$vm_redirect" type="cfu" value=""/>
			</case>

		</switch>

		<pbx-disc/>
Feature description for user
- To use this manually we must call the Spoken VM object. The call will be connected in silence and then the user should dial the DTMF code to set the presence type, plus the time/date info. In total it will be a 7 digit code.
Codes:
100 - Clear Presence
101 - Set Away (time)
102 - Set Busy (time)
103 - Set Lunch (time)
104 - Set meeting (time)
105 - Set vacation (date)
7 digit input to be accepted (code + Time hh:mm / Date mm:dd). Example: Set away = 1011900
101 Set Away state, 19:00 will be the time. Note/Voice Prompt: I'm away until 19:00.
To clear presence should be 100XXXX (X any digit, ie: 1000000).
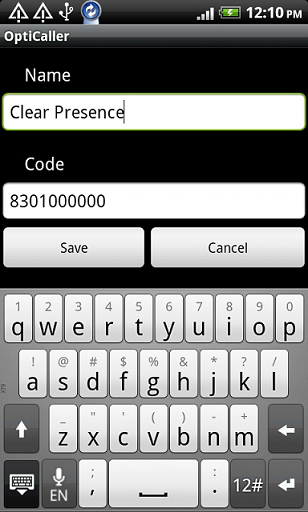
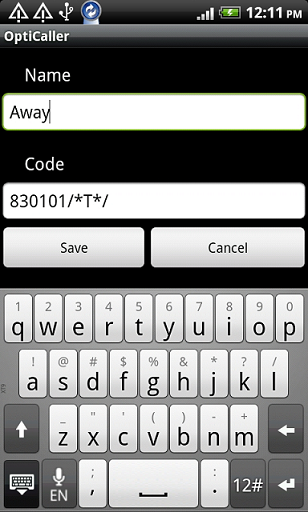
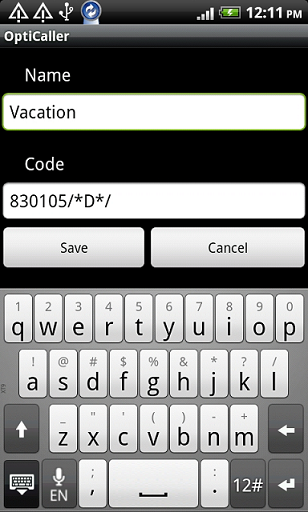
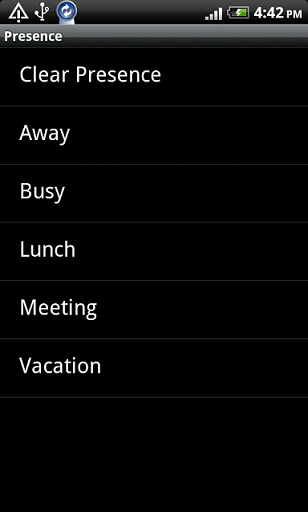
- The use this with the Opticaller client, we should configure the presence keys with the codes as follows:
Set Clear Presence
Set Away Presence with Time
Set Vacation Presence with Date
Final
Note: We can create more codes with new activities easily. Edit the VoicePrompts and notes.
Known Problems
- When calling to the spoken_presence.xml VM object, it's important to send 7 digits. The call will be not disconnected until 7 digits have been dialled.
- When setting the presence status, the call must come from the same User as the one where the presence is changed. For example if we call using Opticaller we are using mobility to reach the VM object number. This way the caller name it's the PBX user we want to set the presence status.
- When setting the date on the Opticaller client, it asks the user to insert the year but that value it's not send by DTMF to the PBX. As a result, that value will be not set on the presence status. Opticaller should do a small fix to send the year too by DTMF.
- When setting the Redirection to the innovaphone Voicemail box and the called user doesn't have VM box, the caller receives a voice message saying that. However the call it's not disconnected, but the calling user must disconnect the call manually.
Download
- Download the complete file package of scripts and files described in this article.


