Howto:Hosting with V10: Difference between revisions
m (→Update Server) |
m (→CPE) |
||
| (127 intermediate revisions by 11 users not shown) | |||
| Line 1: | Line 1: | ||
'''Since V12 and introduction of [[Course12:Advanced_-_Reverse_Proxy | Reverse Proxy functionality]] the below described method is depracted.''' | |||
This document describes general recommendations for setting up a „hosted PBX“-environment. It is based on a reference implementation done early 2013. Everything said in this article is merely a recommendation and you may deviate from it for real-life projects. However, it may still serve as a guideline of “what to think of”. | |||
There are no specific configurations given throughout the article. As such, it targets an iCE with some decent knowledge about innovaphone products as an audience. | |||
<!-- Keywords: centrex --> | |||
=== Overview === | |||
Each customer receives a dedicated PBX (best run as IPVA). So no “dynamic PBX”s are used. Each customer has exactly one such PBX. So no Slave- (as they do not seem to make sense) and no Standby-PBX (as this is better implemented using VMware tools such as High Availability or Fault Tolerance). This article does explicitly not deal with mixed environments where some PBXs are hosted and some on-premise. | |||
Further services (apart from the basic PBX) such as e.g. fax are provided by multi-tenant capable applications. How many customers and/or users (i.e. extensions) can be served by a single such application is for further study. However, from an administration point-of-view, it seems to be easier calculating the same application-server to number-of-customers ratio for all the applications, as it allows organizing the whole setups in clusters where a specific set of customers is associated to a specific set of application servers. | |||
In a real-life setup, there may or probably will be a central management server which may run software to simplify the management of the whole setup as well as provide an end customer portal. This server, called ‘’Management Server‘‘ in the overview graph is thought to be specific to the PBX hosting provider and is thus – although it has an important impact – not discussed in this document. | |||
[[Image:Cloudkom-grobuebersicht1.png]] | [[Image:Cloudkom-grobuebersicht1.png]] | ||
Most of the hosted services, as well the customer-PBXs and the shared services, will be located in a private network run by the hosting provider. This is to make sure they cannot be easily attacked and also to save on publicly available IP addresses (which may be a scarce resource). As a result, from a TCP/IP point-of-view, these services are not reachable from the customers own private network. Also, to save on resources and reduce complexity, no VPN is set up between the customer and the hosting provider. To implement the required customer access to these services, there are 2 extra services which need to have an additional external IP address (“dual homed”). These are called “Frontend” and “Media-PBX”. | |||
The Frontend provides: | |||
* Proxy registration of customers terminal devices (e.g. phones) located on premise to the customer PBX | |||
* | : Terminals in fact register with the Frontend which in turn entertains a proxy-registration to the customer PBX for each endpoint | ||
* inbound NAT with port maps for selected protocols (such as e.g. HTTPS/443 und LDAPS/636,714) | |||
The Media-PBX | |||
* provides a reachable media endpoint for media data provided or consumed by services within the hosting providers private newtork | |||
: This includes e.g. ''music on hold'', locally generated calling tones, Voicemail, multi-party conferences and fax | |||
This architecture ensures that the hosting providers network topology is invisible to 3rd parties (including possible attackers). Furthermore, the hosting provider only needs 2*n+1 public IP Addresses (where ''n'' is the number of ''shared service'' groups). | |||
The “dual homed” gateways must be configured to have ETH0 (default interface) connected to the ''public network'' and ETH1 connected to the ''hoster network''. | |||
[[Image:Cloudkom-netzuebersicht1.png]] | [[Image:Cloudkom-netzuebersicht1.png]] | ||
| Line 25: | Line 37: | ||
<!-- [[Media:CloudKom-Übersicht.png|Design Overview]] --> | <!-- [[Media:CloudKom-Übersicht.png|Design Overview]] --> | ||
==== | ==== SIP Provider ==== | ||
Each customer has its own SIP trunk, configured on the according customer IPVA. The SIP trunk must be configured without using MediaRelay. As a result, if a customer makes a call to the PSTN(SIP provider), the RTP-stream goes end-to-end - between the SIP-provider and the phone at the customer site. Since the customer phone is behind a NAT router, the SIP provider must support NAT traversal. | |||
In general a [[:Category:3rdParty SIP Provider|certified SIP-provider]] can be used, if the provider passed the interop-test for [[Howto:SIP_Interop_Test_Description#NAT_Detection.28Important.29 | NAT Traversal]], [[Howto:SIP_Interop_Test_Description#Fax_using_T.38.28Important.29 | T.38]], [[Howto:SIP_Interop_Test_Description#T.38_Transcoding_by_the_provider.28Important.29 | T.38 Transoding]], [[Howto:SIP_Interop_Test_Description#Reverse_Media_Negotiation.28Important.29 | Reverse Media Negotiation]] and doesn't require MediaRelay to be enabled. | |||
: | |||
: | |||
: | |||
The SIP trunk to the SIP Provider must use Registration, we don't support SIP Trunk without Registration in this scenario. | |||
==== Passwords ==== | |||
Throughout the system, a number of passwords are used in various places. It is critical to use as less passwords as possible to make day-to-day administration easy and as much passwords as necessary to keep things secure. So here is an overview: | |||
* Admin passwords | |||
: Admin user authentication is based on Keberos. Each admin thus can and should have individual accounts and passwords (referred to as ''individual admin password'') | |||
: all devices shall have a "local admin" passsword which should be kept secret and not be known by normal administrators and should normally never be used. This is referred to as ''system-wide admin password'' | |||
* PBX passwords | |||
: PBX passwords needs to be the same in all oft the hosting providers PBXs (and do not need to be typed-in anywhere except during a PBXs initial configuration) . The are referred to as ''PBX password'' | |||
* Object password. There are 2 kinds: | |||
** Passwords, which need to be known to the customer. Registration passwords for terminal devices would be an example. Those are referred to as ''customer registration password''). Another example are initial passwords for myPBX (that is, user passwords). They are referred to as ''customer login password''. For each customer (not for each line), a distinct ''customer registration password'' is defined, which normally never changes. Furthermore, another ''customer login password'' is generated, which is used initially for all user objects but will be changed by the end users. | |||
** Password which are not disclosed to the customer. These are used for internal registrations, e.g. a local interface or gateway registering at the customer PBX. For this, the '' pbx password'' will always be used | |||
* Kerberos DB password | |||
: The ''PBX password'' shall be used for encryption of the Kerberos database (as it does make no sense to use a different password here) | |||
Unfortunately, the Linux AP has no support for Kerberos so separate admin password are required. We distinguish passwords used during daily administration and those which are not. | |||
* Linux Admin password | |||
:this is the password used in day-to-day administration, referred to as ''Linux Admin password''. It is used as ''web server credentials'', ''webdav access credentials'', ''application access credentials'', 'innovaphone Reporting access credentials'', ''innovaphone Fax access credentials'' etc. | |||
* Linux System password | |||
: the password that is used as ''root credentials''. For this, the ''PBX password'' shall be used | |||
: The database passwords (e.g. ''postgresql admin password'') can be left as by default, as the DB server is accessible from 127.0.0.1 only anyway | |||
==== Customer-ID ==== | |||
Each customer should have a unqiue ''customer id''. It should be “safe” (that is, no umlaut, no spaces, no obscure special characters). Something like e.g. <code>Kuenkel0001</code> will do. | |||
==== NTP ==== | ==== NTP ==== | ||
All devices require correct time setting. They all must have be a working NTP time source configured (and probably also a working alternate). | |||
The ''dual-homed'' devices (see above) shall use 2 reliable time sources (either run by the hosting provider or from the internet). All other devices shall use "their" own Frontend as NTP Server (a backup time source is not strictly required here as these devices are anyway unusable for customers when the Frontend is down). | |||
=== | === Certificates === | ||
The entire HTTP and LDAP traffic from and to the customers network is encrypted. This affects for example a customers access to the PBX (e.g. if the customer is granted (limited) access to the PBX config or for myPBX), as well as access to the reporting service. | |||
To facilitate access to these devices without any warnings issued by the clients (e.g. browser security alerts) all devices require suitable certificates (that is, the host name and IP address must be noted in the certificate and they must be derived from a single signing authority so that end-users only need to import a single root certificate in order to accept all of these device certificates. | |||
The devices built-in certifcates cannot be used as they only refer to the devices NetBIOS name (e.g. IPVA-a8-5a-38) which will not be used to access the devices. Also, in the case of IPVA, the default certificate is self-signed as opposed to being derived from the aforementioned uniform root certificate. | |||
To derive device-certificates which all inherit from the same root certificate, a so-called ''RootCA'' is needed. | |||
There are multiple ways to implement this. Although there are better schemes available, one way to do it that requires no 3rd party gear is to generate a RootCA (in ''General/Certificates/RootCA'') on a dedicated IPVA. This RootCA then can be used to generate all of the other certificates. They are stored in the IPVA’s virtual CF card (<code>/DRIVE/CF0/CA/certs/</code>) and can be exported to the other devices from there. | |||
==== RootCA ==== | ==== RootCA ==== | ||
For the RootCA, we use the IPVA that also implements the central Kerberos server. Unfortunately, with the current firmware each generated device certificate will also replace the IPVA’s own device certificate. This is of course somewhat unfortunate, however, it is not really an issue as no end-customer will ever access the Kerberos IPVA anyway. The Kerberos server itself does not rely on the device certificate. | |||
You first generate a RootCA on the RootCA-IPVA ('General/Kerberos''). The following data must be used: | |||
C=Germany, O=''hoster'', CN=''hoster'' Device Certification Authority, Key-length 4096, | C=''your-country (e.g. Germany) '', O=''hoster'', CN=''hoster'' Device Certification Authority, Key-length 4096, lifetime 20 years | ||
This new RootCA (which is now the IPVA’s device certificate) needs to be trusted on the IPVA (''General/Admin''). | |||
==== Device Certificates ==== | ==== Device Certificates ==== | ||
To create individual device certificates, use the RootCA created and use the following data: | |||
Key 4096, Common Name=''devices NetBIOS Name, Organization=''hoster'', Country=''your-country (e.g. Germany) '', DNS Name 1=''devices external IP address'', DNS Name 2=''devices internal IP address'', IP Address 1=''devices external IP address '', IP Address 2=''devices internal IP address '' | |||
For devices with an internal IP address only, it is important to specify the IP address of the NAT router used to access the device as external IP address (e.g. for a customer PBX, this will be the Frontend used). You specify the IP address only, not the port map. | |||
If you intend to assign real DNS names to your devices, you may of course specify these as ''DNS Name 3'' too. | |||
In order to be able to export the new certificate to the target device, you need to make sure you tick the ''Backup on CF'' check-mark, so it is saved on the CF as ''serialno''<code>.pem</code>. To transfer the new certificate to the target device, take note of the serial number and download the respective certificate file from <code>/DRIVE/CF0/CA/certs/</code>''serialno''<code>.pem</code>. This file can then be uploaded to the target device (''General / Certificates / Device certificate / Upload''). | |||
===== Device Certificates & DNS ===== | |||
If external access(customer using myPBX) should use DNS names, certificates issued for the DNS-name of the frontend must be used. In this case, the certificate doesn't need an ''Alternate Name'' for the public IP-address of the frontend (but it doesn't hurt either). | |||
The [http://en.wikipedia.org/wiki/Fully_qualified_domain_name FQDN] used in the myPBX-config (PBX/Config/myPBX) must point to the public IP of the frontend. For myPBX, the frontend will forward incoming HTTPS-requests to the customer IPVA or the reporting server, depending on the port the clients sends its request to and the ''Port specific forwardings'' configured at the frontend. The customer IPVA and the reporting server must have a certificate issued for the FQDN of the frontend. As a result, all IPVAs and Linux-APs in a frontend cluster must use the same certificate - the one issued for the frontend. | |||
If there is a wildcard certificate for the hoster domain, it can be used for all devices in the frontend cluster. | |||
If you want to use HTTPS also for internal HTTP connections (this would be only administration of IPVAs by using their internal IPs), you must have as additional ''Alternate Name'' the internal IP address of the IPVA/LinuxAP or live with a warning message displayed in the browser. In case that you cannot live with the warning message, each IPVA/LinuxAP must have its own certificate (since the private IP has to be different in each certificate). The resulting certificate would be still issued for the FQDN of the frontend but would have as ''Alternate Name'' the internal IP address of the IPVA/LinuxAP. | |||
==== Browser Installation of the Root Certificate ==== | |||
To get rid of the browser security alerts when accessing devices with e.g. HTTPS, the public key of the root certificate must be trusted by the browser. For this, it needs to be exported in to a file (you can best do this from the RootCA’s trust list in ''General/Certificates/Download/PEM'' into <code>certificate.crt</code>). | |||
It must then be imported to the browser. This needs to be done once by both administrators and customers. | |||
'''Firefox''' | '''Firefox''' | ||
* ''Extras / Einstellungen / Erweitert / Zertifikate anzeigen / Zertifizierungsstellen / Importieren'' | * ''Extras / Einstellungen / Erweitert / Zertifikate anzeigen / Zertifizierungsstellen / Importieren'' | ||
* | * import the .crt file | ||
* ''Dieser CA vertrauen, um Websites zu identifizieren'' | * tick ''Dieser CA vertrauen, um Websites zu identifizieren'' | ||
'''Internet Explorer''' | '''Internet Explorer''' | ||
* ''Extras / Internetoptionen / Inhalte / Zertifikate / Beabsichtigter Zweck Clientauthentifizierung / Vertrauenswürdige Stammzertifizierungsstellen / Importieren'' | * ''Extras / Internetoptionen / Inhalte / Zertifikate / Beabsichtigter Zweck Clientauthentifizierung / Vertrauenswürdige Stammzertifizierungsstellen / Importieren'' | ||
* | * import the .crt file | ||
=== Kerberos === | === Kerberos === | ||
Kerberos is used to implement authentication for all devices. This includes both devices in the PBX hosting provider’s infrastructure and the CPE. For this to work, all devices must subscribe to the Kerberos realm. The PBX hosting provider’s DNS domain (e.g. ‘’hoster’’<code>.tld</code>) should be used as Kerberos domain name. This way, Kerberos can be found using DNS SRV records. | |||
The IPVA used as RootCA can be used as master kerberos service too. A stand-alone Kerberos server (that is, the one that is implemented in the ''Gateway'' level) is being used. The (probably limited) number of admin accounts is maintained manually. | |||
In fact, if the PBX hosting provider uses an active directory service to manage employee accounts, an AD-replicated PBX run on the central Kerberos IPVA is also a viable option. | |||
Either way, a standby Kerberos server should be setup as a separate IPVA and can be replicated from the master kerberos as usual. | |||
Unless an active directory is used, no trust relationships are required. If so, the ''system-wide admin password'' should be used as shared secret. | |||
The devices which rely on kerberos for authentication (that is, all devices!) locate the Kerberos servers using DNS SRV records. Devices within the hosting provider’s private network use the internal IP address for this; external (e.g. CPE) devices use their respective Frontend. For this to work, each Frontend needs some UDP NAT maps as follows: | |||
<pre> | <pre> | ||
Protocol Port Address Int. Port | |||
UDP 7465 kerbhost-dup 464 delete | |||
UDP 7464 kerbhost 464 delete | |||
UDP 7089 kerbhost-dup 88 delete | |||
UDP 7088 kerbhost 88 delete | |||
</pre> | |||
Instead of relying on the PBX hosting provider’s DNS server, the SRV records can be set in the devices during staging. This way, each device can be configured to use its associated Frontend only: | |||
<pre> | |||
config change DNS0 /a-name kerberos1i.#(h-domain) | |||
/a-addr #(h-kerberos1ip) /a-name kerberos2i.#(h-domain) | |||
/a-addr #(h-kerberos2ip) /a-name sbc#(h-sbcindex).#(h-domain) | |||
/a-addr #(h-sbcextip) | |||
/srv-name _kerberos._udp.#(h-domain) /srv-target kerberos1i.#(h-domain) /srv-port 88 /srv-prio 0 /srv-weight 0 | |||
/srv-name _kerberos._udp.#(h-domain) /srv-target kerberos2i.#(h-domain) /srv-port 88 /srv-prio 5 /srv-weight 0 | |||
/srv-name _kerberos._udp.#(h-domain) /srv-target sbc#(h-sbcindex).#(h-domain) /srv-port 7088 /srv-prio 10 /srv-weight 0 | |||
/srv-name _kerberos._udp.#(h-domain) /srv-target sbc#(h-sbcindex).#(h-domain) /srv-port 7089 /srv-prio 12 /srv-weight 0 | |||
/srv-name _kpasswd._udp.#(h-domain) /srv-target kerberos1i.#(h-domain) /srv-port 464 /srv-prio 0 /srv-weight 0 | |||
/srv-name _kpasswd._udp.#(h-domain) /srv-target sbc#(h-sbcindex).#(h-domain) /srv-port 7464 /srv-prio 10 /srv-weight 0 | |||
</pre> | |||
With this setup, all devices will prefer the internal IP addresses. External (e.g. CPE) devices will of course not be able to reach these internal addresses, but they will succeed with one of the Frontends. Thus CPE devices will use any of the available Frontends, not necessarily their own. This will work as all Frontends ultimately NAT to the same Kerberos server. | |||
SRV | Note: The ''_kpasswd._udp'' SRV entry should point only to the primary Kerberos Server (i.e. either external NAT-map or internal IP-address), since the ''_kpasswd._udp'' is used to join devices to the Kerberos-Realm. It is only possible to join a realm on the master-Kerberos server, not on the standby. As a result, if the Master-Kerberos server is down, it is not possible to join/unjoin device to the Kerberos-Realm. | ||
==== Kerberos User ==== | |||
In addition to the accounts for the administrators, there must be a service account <code>paccess</code> used for programmatic access to the devices. This will for example be used by the Metadir server to access the Frontend (and can also be used by a hosting provider specific administration software). In addition to that, this account is to be configured under ''Services/HTTP/Client'' for URLs <code>https://</code> and <code>http://</code> on the Frontend, Media-PBX and customer PBXs. This allows all these device to access all other devices using HTTP/S. | |||
The credential for this account need to be kept securely, as they allow admin access to all devices in the infrastructure! | |||
To facilitate automatic join into the kerberos domain during staging, there needs to be an additional special account with ''Join Realm'' rights only: : <code>joiner, joiner</code>. This account is not particularly relevant from a security point of view, as aside from adding or removing devices from a realm nothing relevant can be done on behalf of it. | |||
</ | |||
=== Licenses === | |||
It is in the PBX hosting provider’s best interest to implement a centralized license management. A central licensing server instance is needed thus. This can be run on the master and standby Kerberos server. All licenses purchased by the PBX hosting provider are installed here. The license server runs a PBX. The only task for this PBX is to host the licenses and distribute them to the Frontend and Media PBXs, which are registered as ''License only'' slaves and will further distribute the licenses to the customer PBXs (which are in turn registered as ''License only'' slaves to their respective Media-PBX). | |||
See [[Howto:License_Master]] | |||
If you choose to use a PBX based Kerberos server (see above), this same PBXs can be used. | |||
The license server PBXs will have the PBX hosting provider’s domain name as ''System Name'' (e.g. <code>hoster.tld</code>) and <code>.</code> as ''PBX Name''. | |||
=== | === Frontend === | ||
The Frontend | |||
* accepts external registrations from customer CPE | |||
* provides a central (virtual) CF-card storage for non-sensitive data (e.g. firmware files) | |||
* supports mutliple customer PBXs. The exact number is yet ffs., however, we estimate no more than 135 currently. Frontends will simply be numbered (<code>sb1</code>, <code>sb2</code> etc.) | |||
* The Frontend being a “dual homed” gateway, must have ETH0 (default interface) connected to the ''public network'' and ETH1 connected to the ''hoster network'', this was the tested setup during our tests so it's the recommended configuration. | |||
==== NAT ==== | |||
* The Frontend will provide inbound NAT mappings for HTTPS and LDAPS. This allows for controlled access to the IPVAs within the PBX hosting provider’s private network from external. Each customer PBX uses its associated Frontend for NAT, that is, each Frontend provides NAT for all customers that have it associated as Frontend. The number of customers per Frontend is limited by the number of NAT maps that can be created, which in turn depends on the length of the resulting config file line. Currently, there is a limit of approximately 290 maps per Frontend. 2 distinctive maps are needed per customer | |||
* Additionally, some maps shared by all customers (e.g. for services like Metadir, FaxServer, Reporting) are required. About 20 maps should be reserved for this | |||
* So we end up with the aforementioned number of 135 customers per Frontend | |||
* It is recommended to use a kind of syntax that allows the admin to deduce from the external port number the service type and the associated private IP. For example use 4-digit external ports, the first digit represents the service type(e.g.8 for HTTPS to the PBX, 9 for LDAPS to the PBX), the following 3 digits the associated IP-address(e.g. 007 for internal IP 10.0.0.7). In our example the external port 9007 would be mapped to the internal IP 10.0.0.7 port 636. | |||
* since the Frontend is also used as NAT-router for UDP-messages(i.e. SIP signalling from the customer PBX to the SIP provider), an ''UDP-NAT port-range''(IP4/General/Settings) must be configured. The size of the port-range should be at least as large as the number of customer PBXs served by the Frontend, each SIP Trunk requires one (external, public) port in the defined range. By default the UDP-NAT port-range is ''0'', so no UDP NAT is possible. You must use a port range that does not conflict with other used ports on the Frontend (e.g. UDP-RTP Port-Range by default 16384 / 32767). | |||
=== | ==== PBX ==== | ||
* ''System Name'' is the PBX hosting provider’s domain name (e.g. <code>hoster.tld</code>) | |||
* ''PBX Name'' is <code>sb</code>''n'' | |||
* ''Prefix for Intl/Ntl/Subscriber'' depending on Customers national numbering plan (e.g. for Germany and Trunk Prefix 0: <code>000, 00, 0</code>) | |||
* registers as ''Slave PBX'' with the central license server PBX (''License Only'') | |||
* receives required licenses from the central license server thus | |||
===== Customer related Configuration ===== | |||
* One ''Session Border'' object for each (potential) terminal registration to a customer PBX | |||
* ''Long Name'' as well as ''Registration to internal PBX/Name'' set tot he ''CPE-ID'' (see below) | |||
* ''Password'' set to the ''customer registration password'' | |||
* ''Registration from external/Name'' set to the CPE’s hardware-ID (NetBIOS name) ''PBX Password'' ticked | |||
See also [[#Configuration of customer related objects in the customer’s PBX and Frontend]] | |||
=====Alternate RAS port===== | |||
End-customer phones register to the PBX using H.323. Some CPE Routers (such as Linksys) are known to mess around with H.323 packets (namely RAS) may inhibit registration. To avoid this problem, the phones and Frontend should be configured to use an alternate port for RAS signalling. At the phone the RAS - port must be changed using the command <code>config add H323 /ras-port xxxx</code> , the Frontend must be configured to listen for RAS packets also on an alternate port using the command <code> config add H323 /ras-port-alt xxxx</code>. | |||
The alternate RAS port configuration should be distributed to the phones in the staging section of the initial update-server configuration. | |||
In few cases, the NAT router will still detect RAS-messages sent via an alternate RAS port. The NAT router will therefore do its faulty H323-NAT-entries in the RAS messages. As a result, phones behind the NAT-router will not be able to register at the Frontend. | |||
Assuming that you configured the usage of an alternate RAS port and double-checked that the entered password (at the phone and Frontend) is correct/matching, you can enable the logging of H323-Registrations(Maintenance/Diagnostics/Logging) and look for a ''REGISTER-REJ'' message having the additional information ''Reason=Authentication failed'' | |||
REGISTER-REJ(200.205.64.202:9198),H323=IP200A-10-10-b4,Reason=Authentication failed | |||
= | Since the password is correct, the Reason=Authentication failed indicates that the NAT router is still doing H323-NAT. To solve this problem, H323-NAT must be turned off on the NAT-router located at the customer site. | ||
==== | ==== Security ==== | ||
Keep in mind that the frontend is exposed to any attack from the wild, deep space in internet. As such, you should take utmost care of any security related settings (you may want to review the ''security'' lesson in your latest advanced training). In particular, as you will never want to allow registrations w/o password on a frontend, make sure to set ''No of Regs w/o Pwd.'' to <code>0</code> (zero) in any frontend PBX configuration. | |||
=== | === Media-PBX === | ||
==== Services ==== | ==== Services ==== | ||
* The media-PBX needs to have http access to the customer PBXs in order to play e.g. announcements or voice-mails. This is why the HTTP client credentials for URLs <code>http://</code> and <code>https://</code> via <code>paccess@hoster.tld</code> have to be set as explained above. | |||
* The media-PBX, must be configured to have ETH0 (default interface) connected to the ''public network'' and ETH1 connected to the ''hoster network'', this was the tested setup during our tests so it's the recommended configuration. | |||
==== PBX ==== | ==== PBX ==== | ||
* PBX | * One PBX-type object per customer. Both ''Name'' and ''Long Name'' set to the ''customer id'', “Number” set to <code>#</code>+''uniq number out of customer id''. | ||
* Gateway | * One Gateway-type object <code>HTTP-EXT</code> with no number. This takes registrations from customer PBXs to for media data | ||
* | * User-type object <code>MOH</code> with number <code>###10</code>. This is to register the MoH source | ||
* | * User-type object <code>TONE</code> with number <code>###11</code>. This is to register the <code>TONE</code> interface. Make sure that you cut off the <code>###11</code> in the route to the TONE interface. | ||
* | * User-type object <code>HTTP-OUT</code> with number <code>###12</code>. This is to register the media-PBX’s local <code>HTTP</code> interface to offload media data such as WQ announcements and voicemail | ||
=== | === Customer PBX === | ||
Each customer has a unique ''customer-id'' which is used to derive various names and identifiers (see above). It is derived from (part of) the customer’s name and a sequential number. Something like e.g. <code>Kuenkel00001</code>. | |||
The customer PBX is located within the private part of the PBX hosting provider’s network. Because of this, it cannot send media data to the CPE (which is the end customer’s private network). Media has to be sent via the associated Media-PBX thus, as this is ''dual-homed''. | |||
:* | :* the associated Frontend is used as ''Time Server'' | ||
:* ''Unknown Registrations'' | :* ''Unknown Registrations'' is turned on with ''With PBX Pwd only''. This is to enable ZCD (Zero Configuration Deployment) for CPE | ||
:* ''System Name'' set to the customers email domain (even if it is <code>googlemail.com</code> or <code>yahoo.de</code> as it does not need to be unique. Therefore it's necessary to set the customer PBX’ ''Master GK-ID'' property to the value of the media-PBX’ ''System Name'' property. | |||
:* ''PBX Name'' set to the ''customer ID'' | |||
==== | ==== Handling of calls to MOH, TONE or HTTP-interface ==== | ||
===== default | As explained in the previous section, the customer PBX cannot send media data to the CPE but must use the respective resources on the associated Media-PBX. Calls to the Media-PBX are routed using GW-interfaces (i.e. Relay) on the customer PBX. Therefore the first step is to register a GW-interface (e.g. <code>GW1</code>) to the <code>HTTP-EXT</code> on the Media-PBX. | ||
* | =====MOH===== | ||
* Go to PBX/Config/General an enter as "External Music On Hold" the name of a non-exisiting object (e.g.<code>_customer_moh_</code>) | |||
* Go to Gateway/GK an register a GW-interface (e.g. <code>GW2</code>) to this non-exisiting object (e.g.<code>_customer_moh_</code>). The registration will be accepted, in the PBX you will see a PBX-object called <code>_MOH_</code> | |||
* Assuming that you followed the examples before, <code>GW1</code> would be the GW-interface registered at the Media-PBX. In the routing table (Gateway/Routes) configure a route from <code>GW2</code> to <code>GW1</code> and prepend the number used for the MOH-object on the Media-PBX(e.g. <code>###10</code>). The Route in our example would be <code>GW2 -> ###10 GW1</code> | |||
* If you want to play a custom MOH, additionally enter the MOH-URL in the "Music On Hold URL" field(PBX/Config/General). The URL will be retrieved by the Media-PBX, as a result it must be retrievable by the Media-PBX (e.g. 127.0.0.1 in the URL will be the local-host address of the Media-PBX) | |||
=====TONE===== | |||
* to use the TONE interface of the Media-PBX, route calls to the GW-interface registered at the Media-PBX and prepend the number used for the TONE-object on the Media-PBX(e.g. <code>###11</code>). | |||
* since the Media-PBX has only one TONE interface, it will generate the same TONE for all customer-PBX using it. If a customer-PBX needs a different TONE-interface, you have to create am additional Media-PBX. | |||
=====HTTP===== | |||
* the HTTP - interface is needed when an HTTP-URL is retrieved an played as an announcement. The "Extern Name/No" field at the respective PBX-objects (e.g. WaitingQueue) is used to offload the playing of the announcement to the Media-PBX. | |||
* at the customer PBX create a Gateway-type object <code>HTTP-IN</code> with no number. This takes registrations from a a GW-interface (e.g. <code>GW3</code>) at the customer PBXs | |||
* when configuring an announcement URL (e.g. at a WaitingQueue), enter as "Extern Name/No" <code>HTTP-IN</code>. The URL will be retrieved by the Media-PBX, as a result it must be retrievable by the Media-PBX (e.g. 127.0.0.1 in the URL will be the local-host address of the Media-PBX) | |||
* In the routing table (Gateway/Routes) configure a route from <code>GW3</code> to <code>GW1</code> and prepend the number used for the MOH-object on the Media-PBX(e.g. <code>###12</code>). The Route in our example would be <code>GW3 -> ###12 GW1</code> | |||
==== Waiting Queue ==== | |||
The WaitingQueue does not only play announcements via the offloaded HTTP-interface but has also handles incoming DTMF tones according to its DTMF-Maps. Since innovaphone devices will by default send DTMF tones as RTP-events(RFC 2833), the DTMF information will be sent to the HTTP - interface running on the Media-PBX. | |||
If the Announcement URL ends with the parameter '''uui-dtmf=on''' and the [[Reference10:PBX/Objects/Waiting_Queue#Support_for_RTP-DTMF | Support for RTP-DTMF]] option is activated at the WaitingQueue, the remote HTTP - interface will send the received DTMF tones as H323 messages to the WaitingQueue-object. By this the WaitingQueue can interpret the DTMF tones according to its DTMf-Maps. | |||
An example for such an announcement URL is: | |||
https://10.30.0.3/DRIVE/CF0/WQ/de_menu_voicebox.$coder?coder=g711a,g729&uui-dtmf=on | |||
==== Global Objects in the Customer-PBX ==== | |||
===== <code>default</code> Template===== | |||
* ''Config Template''-type object with ''Name'' <code>default</code> | |||
* ''Hide from LDAP'' und ''Critical'' | * ''Hide from LDAP'' und ''Critical'' | ||
* ''Store Phone Config'' | * ''Store Phone Config'' | ||
* | * all check-marks ticked in the ''License'' tab | ||
* | * the ''Access'' column needs an entry for <code>@</code>''customer.tld'' (this is the ''System Name'' from the PBX configuration) with all check-marks ticked | ||
* | * within the ''Config'' column, there is only a setting for LDAP Config (''Directories'') as follows: | ||
<code xml> | <code xml> | ||
<phone> | <phone> | ||
<loc cc=' | <loc cc='country-code' ac='area-code' ntp='0' itp='00' pbx='subscriber-number'/> | ||
<ldap id='2' | <ldap id='2' | ||
tls='1' port='ldap-port-map-to-pbx-on- | tls='1' port='ldap-port-map-to-pbx-on-sb, e.g. 9004'/> | ||
<ldap id='3' | <ldap id='3' | ||
enable='1' tls='1' mode='basic' | enable='1' tls='1' mode='basic' | ||
addr=' | addr='sb-ip-address' port='ldap-port-map-to-metadir-on-sb, e.g. 9007' | ||
dn='PBX Name' pw='??' base='dc=PBX Name' | dn='PBX Name' pw='??' base='dc=PBX Name' | ||
attr='sn,givenName,company' phone='telephoneNumber:D,mobile:M,:@'/> | attr='sn,givenName,company' phone='telephoneNumber:D,mobile:M,:@'/> | ||
</phone> | </phone> | ||
</code> | </code> | ||
'''pw for ldap id 3 is critical: this allows everyone access to the customer directory data via LDAP. If this is not acceptable, the password needs to be removed from the template and configured manually by the end customer''' | |||
==== Configuration of customer related objects in the customer’s PBX and Frontend ==== | |||
From an administrative point of view, no configuration specific to the individual device should be necessary for registration of a CPE. The default NetBIOS name (e.g. <code>IP232-01-02-03</code>) is used as registration name thus. This must be used as ''Registration from external'' in the corresponding SessionBorder object thus (for each potential CPE, there must be one SessionBorder object on the associated Frontend, see above). | |||
The registration password used by the CPE and thus the ''Password'' in the SessionBorder object must be set to the ''customer registration password'' (which is specific to this customer, not to the CPE). | |||
The ''Long Name'' as well as the ''Name'' for ''Registration to internal PBX'' in the SessionBorder object (hence the registration name for the CPE set in the customer PBX’s user-type object) is a combination of the ''customer ID'' and a sequential ''customer CPE ID'', e.g. . <code>Kuenkel00001-001</code>. The ''customer CPE ID'' starts with 0 for each customer. This allows for more meaningful data when viewing traces from e.g. the Frontend. Moreover, this scheme allows for nice filtering the object view on the PBX by customer name. | |||
The password to register the SessionBorder objects from the Frontend to the customer PBX is always the globally used ''PBX password''. Hence the ''PBX Password'' check-mark must be ticked in the ''Registration to internal PBX'' area of the SessionBorder object on the Frontend and the ''PBX Pwd'' check-mark in the ''Devices'' area of the user object in the customer PBX. Initially though, no ''Devices'' shall be present in the user object, as this allows ZCD for the CPE. | |||
[[Image:SB_registration.png|center|thumb|600px|Click for larger image: SB-registration]] | |||
=== Update Server === | === Update Server === | ||
Tasks: | |||
* Staging ( | * Staging (e.g. installation of suitable trust list for HTTPS) | ||
* | * Firmware update | ||
* | * Backup of configuration data for CPE and customer PBX | ||
Backup of CPE data is done to the virtual CF card of the customer PBX. Backup of customer PBX data is done to its Frontend. | |||
There is no device or device-type specific update script. | |||
Structure on the customer PBX | |||
<pre> | <pre> | ||
/DRIVE/CF0/ | /DRIVE/CF0/ | ||
update/ | update/ | ||
backup/ | backup/ | ||
backup-mac- | backup-mac-date.txt | ||
</pre> | </pre> | ||
The backup folder on the customer PBX (<code>/DRIVE/CF0/update/backup/</code>) must be set writable but not readable under ''Services/HTTP/Public compact flash access'' so that CPEs can write their backup. | |||
Firmware files are stored on a folder of the associated Frontend. Although this implies that they need to be duplicated to all Frontends, it simplifies the configuration and distributes load. | |||
The generic update scripts are stored in (<code>/DRIVE/CF0/update</code>) on the Frontend. <code>staging.txt</code> is the CPE staging code, <code>update.txt</code> the regular update script. Both scripts make extensive use of [[Reference10:Concept_Update_Server#Setvar_command| update variables]]. | |||
Staging proceeds in 3 steps: | |||
* CPE is configured to use the generic hosting staging interface (http://config.innovaphone.com/init) as ''Update-URL'' | |||
: This is a publicly available web service, (this service is currently experimental!) relates a requesting device to the hosting provider and customer pbx based on the serial number. If the device can be identified, the update server URL is rewritten to the PBX hosting provider’s appropriate Frontend (based on data that is defined in my.innovaphone). For more information, see [[Reference10:Concept Provisioning]. | |||
* CPE executes the Frontend-wide staging script (<code>staging.txt</code>). This performs some init-only tasks | |||
* CPE executes the Frontend-wide update script (<code>update.txt</code>). This performs day-to-day tasks (such as backup) | |||
File structure on Frontend | |||
<pre> | <pre> | ||
/DRIVE/CF0/ | /DRIVE/CF0/ | ||
update/ | update/ | ||
staging.txt - | staging.txt - staging script | ||
update.txt - | update.txt - regular update script | ||
global.txt - overrides | global.txt - overrides for global settings | ||
local.txt - overrides | local.txt - overrides for Frontend-local settings | ||
set-customerid.txt - overrides für | set-customerid.txt - overrides für customer specific settings | ||
staging/ - | staging/ - special staging scripts | ||
global.txt - settings | global.txt - overrides for global settings | ||
local.txt - settings | local.txt - overrides for Frontend-local settings | ||
set-customerid.txt - settings | set-customerid.txt - overrides für customer specific settings | ||
dev-IPxxx.txt - settings | dev-IPxxx.txt - device type specific settings | ||
cfg-phone.txt - settings | cfg-phone.txt - device class specific settings | ||
cfg-gateway.txt - | cfg-gateway.txt - ditto | ||
firm/ - firmware | firm/ - firmware | ||
nnnnnn/ | nnnnnn/ | ||
| Line 303: | Line 356: | ||
</pre> | </pre> | ||
In order to be accessible during firmware updates, the drive (<code>/DRIVE/CF0/update/firm/</code>) must have read (and only read) access on the Frontend under ''Services/HTTP/Public compact flash access''. In order to be accessible from the devices, drive <code>/DRIVE/CF0/update</code>) needs to be readable (and only readable). Both can be achieved with a single <code>/DRIVE/CF0/update/</code> entry. | |||
Assigning the initial update URL (<code> http://145.253.157.5/redirect.php </code>) to CPE is for further study. It can be done as usual (DHCP), but this requires co-operation by the end-customer which may be a problem. Of course it can also be pre-configured by the hosting provider. In the latter case, the URL must be configured to the device after any long reset (factory settings). | |||
==== Update | ===== Update Script Security ===== | ||
Update scripts may include registration password (although encrypted) to facilitate automatic registration with almost no user intervention (cf. set-''customerid''.txt above). By definition, staging scripts are readable by everyone (as they are used to configure otherwise unconfigured devices, so no kwowledge of credentials can be assumed). There is no easy way around this. One option would be to define a password for the web site hosting the scripts. This would then imply that the password needs to be configured to the CPE, which is undesirable from an administrative point-of-view. Moreover, with innovaphone gear (that is, when a web server internal to an innovaphone device is used), the only way to secure the scripts with a password would imply to use an admin account and password – clearly unacceptable from a security point-of-view. | |||
To secure the update scripts, a mechanism based on innivaphone's device certificates must be employed. See [[Reference10:Concept Provisioning]] for more details. | |||
==== Deployment ==== | |||
===== Initial ===== | |||
* | Create once-only services | ||
* Kerberos and Kerberos Backup | |||
* | * Create a new account for the PBX hosting provider in my.innovaphone (if the generic staging is to be used, see above) | ||
* cfg- | ===== Shared Services ===== | ||
* | Create services shared by a set of customers: | ||
* Frontend | |||
* Media-PBX | |||
* Metadir | |||
* Reporting LinuxAP | |||
* Fax Linux-AP | |||
* copy update/staging scripts (global.txt, cfg-*.txt, dev-*.txt) tot he Frontend drives (those are identical on all Frontends) | |||
* create appropriate local.txt on Frontend | |||
* | ===== New Customer ===== | ||
* | * create IPVA with customer PBX | ||
* create appropriate <code>set-</code>''customer-ID''<code>.txt</code> on Frontend | |||
* create appropriate user objects on customer PBX as well as corresponding SessionBorder objects on Frontend | |||
* create project for customer in my.innovaphone, set ''URL'' to the PBX hosting provider’s <code>staging.txt</code> on the appropriate Frontend (e.g. https://212.124.38.120/DRIVE/CF0/update/staging.txt) and the encoded public key of the hosting providers RootCA as ''Trust'' (as taken from a config file) | |||
* | ===== CPE ===== | ||
* | * Add device tot the customer project in my.innovaphone | ||
* factory reset (optional, of course) | |||
* set <code>http://145.253.157.4/redirect.php</code> as ''Command File URL'' in ''Services/Update'' | |||
* wait for or force poll | |||
* CPE registers with the Frontend and customer PBX as <code>_UNKNOWN_</code> | |||
=== On-Site (Customer) Support / Debugging === | |||
* | ==== Alarms and Events ==== | ||
* local. | * Alarms, events should be saved centrally on the Frontend, this way the admin has a full picture of all events and syslog in a Frontend-cluster. The CPE devices are configured by the staging script to send their events/alarms via HTTPS to the Frontend server. | ||
* | ** incoming Alarms/Events should be authenticated by the Frontend server, the CPEs must be configured (during staging) with the appropriate HTTP-client credentials. The account used for the HTTP-login must be configured with ''Viewer'' rights on the Kerberos - server. | ||
* | ** the received Alarms/Events can be further forwarded by the Frontend server to a Syslog-server. The received events can be then written in a database/text-file and used for further evaluation. | ||
** the local event and alarm list is always kept in local Flash memory. The number of entries to keep can be configured in the Services/Logging tab. Since your Frontend-Server should not generate a large amount of events/alarms, you can use the default values(last 50 local events are stored in Flash memory). | |||
==== Syslog ==== | |||
* the CPEs should not create logs, all relevant information(i.e. state of user-registrations) is retrieved from the Event/Alarm-list | |||
* IPVAs(e.g. customer PBX) should generate logs and store them locally on their CF-card | |||
** the recommended Syslog settings are ''PBX calls'' and ''Gateway calls'' | |||
** depending on the amount of generated logs (i.e. the size of your Customer PBX), the [[Reference9:Services/Logging | Max File Size]] should be set accordingly. You should capture at least 4 days of log information(e.g. allowing to inspect log information created before a weekend) | |||
* if its required that CPE devices generate logs, it will be necessary to store the log-information on a central server(e.g. Frontend server). However incoming Logs cannot be authenticated by the Frontend server, since this function is not implemented in the innovaphone LOG-server. If incoming Logs should be authenticated, a Linux-AP should be used as central Log-server (the Linux-AP offers the possibility to authenticate incoming logs) | |||
==== Config backup ==== | |||
* Phone configuration is backed up to the customer PBX CF, using the Update Server mechanism. | |||
* the configuration of devices in the Hoster-network( e.g. Media-PBX, etc.) are saved on the CF-card of the Frontend-server | |||
==== | ====Accessing the web-interfaces of devices==== | ||
* All devices (including CPE) have joined the Kerberos domain. As a result, all administrators are able to log in (provided they have access to the customers network, TeamViewer is an option) | |||
=== | === Reporting (Multiple PBX) === | ||
==== | |||
NEEDS TO BE UPDATED (TLE) | |||
The LinuxAP VM for reporting needs to have quite a large CF to be able to store all CDR data for a reasonable time period. | |||
* VMWare disk size should be 50GB initially. This is based on a rough estimate of 200 customers and a time frame of 1 year | |||
: rough estimate. Time will tell | |||
* RAM 1GB | |||
==== Naming Conventions ==== | |||
To grant access for customers (and reseller) to the Reporting login page (https://Reporting-IP-Adress/apps/innovaphone-reporting/user/login.php), it's nessesary to create a cdr filter called "base filter" and a user login which is bound to this base filter. | |||
These logins and filters can only be edited and created by the hoster (i.e. cloudkom). | |||
Since the customer can't change his credentials we use the "customer ID" and the "customer registration password" for further steps. | |||
As we mentioned in chapter [[#Customer_PBX|Customer PBX]] each customer needs a uniqe PBX name, but different customers may share the same "System Name". | |||
For this reason it's nessasary to set the Grouping-ID in the Reporting application to ''PBX Name'' (as set in ''Config/PBX''). | |||
Never change this setup because filters are depending on the Grouping ID! | |||
'''Filter parameters for customers:''' | |||
* Base Filter: <leave it empty> | |||
* | * Filter Name: ''customer ID'' (which is the ''PBX Name'', i.e <code>Kuenkel00001</code>) | ||
* | * PBX Name: ''customer ID'' (which is the ''PBX Name'', i.e <code>Kuenkel00001</code>) | ||
'''User configuration for customers:''' | |||
* Name: <customer ID> | |||
* Password: ''customer registration password'' | |||
* Base Filter(s): ''customer filter name'' | |||
For reasons of billing (or whatever) it could be fine for resellers to have a filter for all of -his- sold PBXs | |||
'''Possible filter parameters for reseller:''' | |||
: | (in fact, the reseller id is a customer id, because the only difference is the filter content) | ||
* Base Filter: <leave it empty> | |||
* Filter Name: ''reseller ID'' (i.e. innovaphone00001) | |||
* PBX Name: ''customer ID'' + | |||
* PBX Name: ''customer ID'' + | |||
* PBX Name: ''customer ID'' ... | |||
'''User configuration for reseller:''' | |||
* | * Name: ''reseller ID'' | ||
* | * Password: ''reseller registration password'' | ||
* Base Filter(s): ''reseller filter name'' | |||
==== | ====Configuration Reporting ==== | ||
* PBX-Name | * Grouping ID: PBX-Name | ||
* | * Create filter and user logins for the customer | ||
* LDAP? | |||
* Report Mails? | |||
* | |||
* | |||
==== | ====Configuration Customer-PBX ==== | ||
===== Gateway / CDR0 ===== | ===== Gateway / CDR0 ===== | ||
* ''Type'' <code>Remote-AP-S</code> | * ''Type'' <code>Remote-AP-S</code> | ||
* ''Address'' | * ''Address'' ''Reporting Linux-AP IP address'' | ||
* ''Port'' <code>443</code> | * ''Port'' <code>443</code> | ||
===== PBX / myPBX / Call List Service ===== | ===== PBX / myPBX / Call List Service ===== | ||
* ''Type'' <code>Remote-AP | * ''Type'' <code>Remote-AP</code> | ||
* ''Host'' | * ''Host'' ''Frontend-IP-addr:HTTPS-Portmap-on-Frontend-to-Reporting-App'' | ||
* ''User'' <code>innovaphone-reporting</code> ????? | * ''User'' <code>innovaphone-reporting</code> ????? | ||
pass: | * ''pass'' <code>reporting</code> | ||
In contrast to the CDR0 interface, the Call-List-Service doesn't offer the possibility to choose the ''Type'' <code>Remote-AP-S</code>. The myPBX client decides which protocol to use (HTTP or HTTPS) depending on the URL (http or https)used to connect to the PBX. So if myPBX uses HTTPS to connect to the PBX, it will use also HTTPS to connect to the Reporting-App. | |||
===== Services/HTTP/Client ===== | |||
* enter Authenticated URL & webserver credentials of Linux-AP. It is important that the port used is in the URL. | |||
E.g. for the Authenticated URL: http://10.30.253.2:80/ap/cdr.fcgi. | |||
=== Fax Server === | === Fax Server === | ||
The [[Reference10:Concept Faxserver |innovaphone Fax Server]] can be used in a hosting scenario. | |||
The fax server will provide T.38 based fax support for customers. That is, it will be able to send G3 fax to and receive G3 fax from T.38 compliant remote parties. It will not be able to support remote parties which provide G.711 (a.k.a. ''transparent mode (T30/G.711) fallback'' or ''software fax'') based fax only. If G711 fall-back is needed, please contact presales@innovaphone.com to discuss possible solutions. | |||
==== Overview ==== | |||
NEEDS TO BE UPDATED (afI) | |||
A LinuxAP VMware disk size of 50GB should be sufficient. Configure the size of the virtual drive before starting the Linux installation for the first time. | |||
Since the FAX-Interface must be reachable from the public network, it must be offloaded from the Customer VM to the Media Gateway. The SOAP connection from the Faxserver application will be still directed to the Customer VM/PBX. | |||
[[Image:Routing_fax.png ]] | [[Image:Routing_fax.png ]] | ||
On the customer VM we have to configure a Gateway Object and routes to and from GWxx which is registered on the Media Relay instance. We reuse HTTP-EXT registration at this point to send Fax calls to Media. | |||
* | ====Customer PBX Settings for Faxserver==== | ||
* | ** Gateway Object Name= <code>Fax</code>, Number= <code>some prefix number used for Fax extensions</code>, Option "Prefix" activated | ||
* | ** add the Gateway Object to the SOAP/TAPI group, in order it is visible for SOAP applications connecting to this PBX | ||
** Prepare User Objects for Fax usage: | |||
*** Fax License must be assigned | |||
*** E-Mail must be configured and must match the sender address | |||
====Customer Gateway Settings for Faxserver==== | |||
** Fax GWxx, Register as Gateway, 127.0.0.1, Name= <code>Fax</code> | |||
** Route GWxx (Fax) --> ###13 GWyy (HTTP-EXT) | |||
** Route GWyy (HTTP-EXT) --> GWxx (Fax) | |||
For multiple customer PBXes we define a single Gateway with FAX Interface: | |||
====Media PBX==== | |||
** Gateway Object Name= <code>fax</code>, Number= <code>###13</code> | |||
====Media Gateway==== | |||
** Interface FAX, Internal Registration, 127.0.0.1, Name= <code>fax</code>, Coder G711,20 , "Enable T.38" | |||
** HTTP-Client must be configured to use [[Howto:Hosting#Kerberos_User|credentials for programmatic access]] to be able to read and write to WebDAV Server on LinuxAP with Faxserver application. | |||
====Faxserver Instance==== | |||
For each Customer VM an own Faxserver instance on the LinuxAP must be configured (one LinuxAP, multiple Faxserver instances for every Customer). | |||
==== | ** SOAP connection must be configured to point at the PBX running on the Customer VM | ||
** E-Mail Account configuration is important to be able to deliver E-Mails to the Faxserver via SMTP | |||
*** The E-Mail account, configured at the Faxserver instance, will be used at teh Customers Mailserver to authenticate against the Mailserver on Faxserver | |||
=== Directories === | |||
There are 2 services provided to customers: | |||
# the PBX directory | |||
# an optional company-wide directory (external LDAP) | |||
==== PBX Directory (extensions) ==== | |||
* one NAT port map is to be created per customer on the Frontend for port LDAPS (TCP source port xxx to target Port 636) | |||
:This port can be used in the phone’s ''Port'' field in the ''PBX'' area in ''Phone/User/Directories/PBX''. The PBX LDAP server’s IP address is implied from the registration data. This way, the CPE will in fact access the customer PBX’s LDAP server as opposed to the Frontend’s one | |||
* LDAPS can be used safely, as the CPE’s LDAP client does not verify the certificate anyway (although it would be trusted as it is derived from the PBX hosting provider’s RootCA) | |||
====External Directory ==== | |||
=====Estos Metadir===== | =====Estos Metadir===== | ||
* | *there is one Metadir server per Frontend which serves all customers associated with this Frontend. Hence there is one inbound NAT port map that maps one port to the Metadir server’s LDAPS port. This map is used from all customers. Customer specific directories are implemented as logical views in the Metadir LDAP server, not as separate servers | ||
* | *there is thus one distinct LDAP node (dc=''customer-ID'') per customer | ||
** | * there is also one distinct replicator for each customer (which is used to import the customers directory data in to the Metadir) | ||
*** | **Replicator | ||
*** | *** The customer would provide its contact database as „comma separated CSV (Windows)“ file (e.g. as exported from Outlook) | ||
*** The file must have the columns ''"Surname","Firstname","Company","Busines Phone ","Mobile Phone"'' | |||
*** All numbers must be in E164 format, e.g. +49703173009123 | |||
*** File name is <code>contacts.csv</code> | |||
*** The file is uploaded to the Frontend’s CF-file system | |||
*** Each customer has its own directory (<code>https://212.124.38.120/DRIVE/CF0/directory/</code>''customer-ID'') on the Frontend. This is the place <code>contacts.csv</code> has to be uploaded to. For this to work, the path must be set to write-only on the Frontend! | |||
*** Customers can use e.g. [http://curl.haxx.se/dlwiz/?type=bin&os=Win32&flav=-&ver=2000%2FXP curl]. Syntax: <code>curl --verbose -k https://212.124.38.120/DRIVE/CF0/directory/customer-ID/ -T contacts.csv</code>. Note that standard WebDAV clients will probably not work due to the fact that this directory is write-only. | |||
Structure on Frontend | |||
<pre> | <pre> | ||
/DRIVE/CF0/ | /DRIVE/CF0/ | ||
directory/ - | directory/ - write-only w/o authentication | ||
customer-ID/ | |||
contacts.csv | contacts.csv | ||
</pre> | </pre> | ||
* | * Metadir has a duplicate of the Frontend’s directory structure | ||
<pre> | <pre> | ||
C:\directory\ | C:\directory\ | ||
script.bat - script | script.bat - script that retrieves customer directory data <code>contacts.csv</code> from the Frontend, called by replicator | ||
contacts.csv - | contacts.csv - sample | ||
customer-ID\ | |||
contacts.csv | contacts.csv - customer data | ||
</pre> | </pre> | ||
* | * Metadir’s per-customer replicator imports the local contacts.csv when run. Before doing so, it calls script.bat which retrieves the appropriate contacts.csv from the FrontEnd (this behaviour needs to be configured in Metadir, ''Database Wizard'', '' Zusätzliche Anwendungen(additional applications)''). | ||
: script.bat copies the then-current customer’s contact.csv from the Frontend using curl (curl - syntax: <code>curl --verbose -k -u user:password https://10.30.255.0/DRIVE/CF0/directory/%1/contacts.csv -o c:\directory\%1\contacts.csv</code> | |||
<code>curl --verbose -k -u user:password https://10.30.255.0/DRIVE/CF0/directory/%1/contacts.csv -o c:\directory\%1\contacts.csv</code | : user:password in script.bat are administrator credentials valid on the Frontend (as contact.csv files are read-only, see above) | ||
user:password in | * Each replicator will be run every 3 hours | ||
: The replicator can also be triggered from the cmd-line (calling e.g. <code>TextReplicator.exe </code> as found in the Metadir installation directory. Start a replicator from the GUI and have a look at lastreplicator.bat in the install directory). This may be useful if the PBX hosting provider has implemented a user portal to upload the contact data. | |||
* The replicator is created using the ''Replicator-Wizard'' and associates the .csv columns to the respective LDAP attributes/DB field names. A combination of all attributes is used as primary key | |||
: [[Media:Cloudkom-Metadir-Replikator.png | Replicator Overview]] | |||
[[Media:Cloudkom-Metadir-Replikator.png | | *LDAP-nodes: | ||
*LDAP- | ** LDAP node access authentication is based on distinct, per-customer users, username (=''customer ID''), password(=''customer registration password''). No IP address restriction is used. | ||
** | ** profile is ''Default'' always, no customer specific profile is required (this is handled using the phone’s ''Dialing Location'') | ||
** | ** [[Media:metadir-LDAP-Knoten-config.png | Settings]] can be seen in the screenshot | ||
** | Here is how to export contact data from Outlook 2010: | ||
** as far as we know it is only possible to export your own contact list. In case that all users use a global contact list, this list has to be copied first into your own contact entry list.(select [Global List](e.g. IP Kontakte) -> right click -> copy -> choose own contacts) | |||
** | ** From Outlook ''File -> Open -> Import -> Export to file -> comma separated values (Windows) -> (select contact folder) -> "Map custom fields"(german: Benutzerdefinierte Felder zuordnen) -> choose "Surname","Firstname","Company","Busines Phone","Mobile Phone"-> Finish'' | ||
** | |||
*LDAPS | *LDAPS | ||
** | ** Just any certificate will do on the Metadir, as the LDAP client does not validate the certificate | ||
** Metadir | ** Metadir uses port 714 for LDAPS, Frontend needs an appropriate NAT Map | ||
=====LDAP-Client===== | =====LDAP-Client===== | ||
* | * directory settings should be set in a PBX ''Config template''-type object in the customer PBX and applied to all user objects there | ||
: [[Media: Cloudkom-Metadir-Ldapclient.png | Phone/User/Directories/External LDAP Server Settings]] | |||
: ''Dialing Location'' settings need to be done according to the customers trunk line settings | |||
=====myPBX===== | =====myPBX===== | ||
* | * external directory lookups for myPBX are done by the PBX rather than by the myPBX client itself. The directory configuration is taken from the users phone configuration (as stored in the PBX). This of course presents a problem as the phone configuration will use the external Frontend NAT map data for the Metadir, whereas the PBX itself – sitting in the PBX hosting providers private network – needs to use Metadirs private address. There is a special configuration parameter for the PBX which sets the LDAP configuration used for any directory lookup performed for myPBX: | ||
<code>config add PBX0 /ldap-default-addr | : <code>config add PBX0 /ldap-default-addr local-ip-addr-of-metadir /ldap-default-port 714</code> (714 is Metadirs LDAPS port) | ||
=== Voicemail === | === Voicemail === | ||
Voicemail is run on the customers PBX as usual. However, as discussed before, the Webmedia (a.k.a <code>HTTP</code>) interface on the media PBX must be used. VM xml script and recorded voice mail files are stored on the customer PBX’s CF card as usual though. The trick is to have a registration to the customer PBX’s voice mail object. If this is present, voice mail will use this registrations to terminate media data rather than the local Webmedia (which is the default). | |||
The registration on the local VM object needs to connect calls to the remote HTTP interface on the media PBX. This is implemented using a GWx interface in the customer PBX’s gateway level which registers to the VM object. There is a route from this GWx to the GWy which in turn registers with the media PBXs <code>HTTP-EXT</code> object (there are no calls to the VM object ever). | |||
==== PBX ==== | ==== PBX ==== | ||
* voicemail-object | * voicemail-object | ||
** Hardware-ID = <code>vmrelay</code> | ** Hardware-ID = <code>vmrelay</code> | ||
** Script-URL ( | ** Script-URL (installed on local CF Card as usual) = <code>https://customer-PBX-IP-address (not 127.0.0.1!)/DRIVE/CF0/vm-de/vm.xml?$_divconn=false</code> (this URL will be evaluated on the media PBX, this is why 127.0.0.1 will not work!) | ||
** | ** suitable extension depending on customers numbering plan | ||
==== Gateway ==== | ==== Gateway ==== | ||
| Line 504: | Line 616: | ||
==== MWI ==== | ==== MWI ==== | ||
Simpkly works as is. | |||
==== Mail MWI ==== | ==== Mail MWI ==== | ||
Mails are sent through the PBX hosting provider’s own mail server. This may require authenticated SMTP. This needs to be configured in each <code>email.xml</code> in the customer PBX’s voice mail installation: | |||
* message sender | * message sender | ||
* | * Subject of MWI mail | ||
* mail server | * mail server | ||
* | * credentials | ||
Apart from the mail subject (which is language dependant), this is identical for all customers, so it can be done once and copied then. | |||
User Email addresses must currently be set in each user object’s ''URL'' attribute (or in a separate file in the user directory). | |||
=== Operator === | === Operator === | ||
to be updated | |||
innovaphone Operator v10 can be installed in local client location and connects directly to client IPVA using HTTP-SOAP connection using the same Port used for HTTP management defined on the FrontEnd. | |||
All SOAP communication goes through this HTTP connection so all features will be available and working properly. The LDAP configuration of the Operator v10 is similar to the one performed in the IP Phones. | |||
=== iQM === | |||
to be updated | |||
=== Mobility === | |||
Mobility needs access to DTMF tones and thus to the RTP media stream. As the customer-PBX has no public IP address, again, the media for all mobility calls must be routed through the media-PBX linked to the customer PBX. | |||
In the media-PBX, we need a ''media-relay-loop'' gateway-type object (no ''Prefix'' check-mark ticked) with a gateway GWx interface registered to it. On the media's gateway level, there is a route that routes calls to this interface directly back to that interface. This GWx interface used must have the ''Media-Relay'' check-mark ticked. Calls to the media-PBX's ''media-relay-loop'' object are thus echoed straight back to the PBX. However, the media-stream will be terminated on the media, so that it is available from the media's public IP address. | |||
On the customer-PBX, a gateway-type object is created that sends calls to the media's ''media-relay-loop''. | |||
For incoming mobility calls to work, they must be recognized within the gateway level (that is, the mobility object's extension must be known) and routed through the aforementioned media-loop before it ends up in the client-PBX's mobility object. | |||
For outgoing calls, the fork destination must be set such that the outgoing mobility calls are first sent through the media's ''media-relay-loop'' before they end up in the client PBX's trunk. | |||
=== DECT === | |||
to be updated | |||
=== Backup === | |||
''Disaster recovery'' backup ist o be done by the operator of the VMware infrastructure. | |||
User data (PBX config, CPE configuration) is backed up by the update server as outlined above. | |||
=== UI/Portal === | |||
Innovaphone does not supply a dedicated UI for hosting scenarios (neither for the PBX hosting provider nor for the end customer). It is envisaged that hosting providers will craft their own tool for this, as this is highly related to the provider’s business model. | |||
===Special scenarios=== | |||
* Customer-setups where the phones are in separated private networks, e.g. home-office without VPN to LAN of main-office. In this case the phones in different private networks can not send RTP-packets to each other. To overcome this problem, the media-relay option at the SessionBorder object must be enabled for those SessionBorder objects that have registration from "foreign" networks. If the Frontend is used as RTP-endpoint(i.e. by activating the media-relay option), the UDP-RTP port-range(by default 16384 / 32767) must be configured. In case that mediarelay is used, video calls (e.g. using myPBX) will not work since mediarelay is done only for the audio stream. | |||
===Limitations=== | |||
* Customers-setups with Master-Slave PBXs are not supported. The problem here is that the Master & Slave PBX are within the hosting provider’s private network and some PBX mechanism (e.g Registration-Redirection, Soap) would return IP-addresses with IP-addresses from the provider’s private network to device at the customer site. (e.g. a phone registering at a PBX might get an indication to register at another PBX - however the IP-address in this Redirection is in the hosting provider’s private network, therefore unknown to the phone). | |||
== | = Related Articles = | ||
* [[Howto:A rough estimate of IPVA Performance]] | |||
* [[Reference10:Concept Provisioning]] | |||
<!-- Keywords: SBC session border --> | |||
Latest revision as of 09:01, 10 July 2017
Since V12 and introduction of Reverse Proxy functionality the below described method is depracted.
This document describes general recommendations for setting up a „hosted PBX“-environment. It is based on a reference implementation done early 2013. Everything said in this article is merely a recommendation and you may deviate from it for real-life projects. However, it may still serve as a guideline of “what to think of”.
There are no specific configurations given throughout the article. As such, it targets an iCE with some decent knowledge about innovaphone products as an audience.
Overview
Each customer receives a dedicated PBX (best run as IPVA). So no “dynamic PBX”s are used. Each customer has exactly one such PBX. So no Slave- (as they do not seem to make sense) and no Standby-PBX (as this is better implemented using VMware tools such as High Availability or Fault Tolerance). This article does explicitly not deal with mixed environments where some PBXs are hosted and some on-premise.
Further services (apart from the basic PBX) such as e.g. fax are provided by multi-tenant capable applications. How many customers and/or users (i.e. extensions) can be served by a single such application is for further study. However, from an administration point-of-view, it seems to be easier calculating the same application-server to number-of-customers ratio for all the applications, as it allows organizing the whole setups in clusters where a specific set of customers is associated to a specific set of application servers.
In a real-life setup, there may or probably will be a central management server which may run software to simplify the management of the whole setup as well as provide an end customer portal. This server, called ‘’Management Server‘‘ in the overview graph is thought to be specific to the PBX hosting provider and is thus – although it has an important impact – not discussed in this document.

Most of the hosted services, as well the customer-PBXs and the shared services, will be located in a private network run by the hosting provider. This is to make sure they cannot be easily attacked and also to save on publicly available IP addresses (which may be a scarce resource). As a result, from a TCP/IP point-of-view, these services are not reachable from the customers own private network. Also, to save on resources and reduce complexity, no VPN is set up between the customer and the hosting provider. To implement the required customer access to these services, there are 2 extra services which need to have an additional external IP address (“dual homed”). These are called “Frontend” and “Media-PBX”.
The Frontend provides:
- Proxy registration of customers terminal devices (e.g. phones) located on premise to the customer PBX
- Terminals in fact register with the Frontend which in turn entertains a proxy-registration to the customer PBX for each endpoint
- inbound NAT with port maps for selected protocols (such as e.g. HTTPS/443 und LDAPS/636,714)
The Media-PBX
- provides a reachable media endpoint for media data provided or consumed by services within the hosting providers private newtork
- This includes e.g. music on hold, locally generated calling tones, Voicemail, multi-party conferences and fax
This architecture ensures that the hosting providers network topology is invisible to 3rd parties (including possible attackers). Furthermore, the hosting provider only needs 2*n+1 public IP Addresses (where n is the number of shared service groups). The “dual homed” gateways must be configured to have ETH0 (default interface) connected to the public network and ETH1 connected to the hoster network.

SIP Provider
Each customer has its own SIP trunk, configured on the according customer IPVA. The SIP trunk must be configured without using MediaRelay. As a result, if a customer makes a call to the PSTN(SIP provider), the RTP-stream goes end-to-end - between the SIP-provider and the phone at the customer site. Since the customer phone is behind a NAT router, the SIP provider must support NAT traversal.
In general a certified SIP-provider can be used, if the provider passed the interop-test for NAT Traversal, T.38, T.38 Transoding, Reverse Media Negotiation and doesn't require MediaRelay to be enabled.
The SIP trunk to the SIP Provider must use Registration, we don't support SIP Trunk without Registration in this scenario.
Passwords
Throughout the system, a number of passwords are used in various places. It is critical to use as less passwords as possible to make day-to-day administration easy and as much passwords as necessary to keep things secure. So here is an overview:
- Admin passwords
- Admin user authentication is based on Keberos. Each admin thus can and should have individual accounts and passwords (referred to as individual admin password)
- all devices shall have a "local admin" passsword which should be kept secret and not be known by normal administrators and should normally never be used. This is referred to as system-wide admin password
- PBX passwords
- PBX passwords needs to be the same in all oft the hosting providers PBXs (and do not need to be typed-in anywhere except during a PBXs initial configuration) . The are referred to as PBX password
- Object password. There are 2 kinds:
- Passwords, which need to be known to the customer. Registration passwords for terminal devices would be an example. Those are referred to as customer registration password). Another example are initial passwords for myPBX (that is, user passwords). They are referred to as customer login password. For each customer (not for each line), a distinct customer registration password is defined, which normally never changes. Furthermore, another customer login password is generated, which is used initially for all user objects but will be changed by the end users.
- Password which are not disclosed to the customer. These are used for internal registrations, e.g. a local interface or gateway registering at the customer PBX. For this, the pbx password will always be used
- Kerberos DB password
- The PBX password shall be used for encryption of the Kerberos database (as it does make no sense to use a different password here)
Unfortunately, the Linux AP has no support for Kerberos so separate admin password are required. We distinguish passwords used during daily administration and those which are not.
- Linux Admin password
- this is the password used in day-to-day administration, referred to as Linux Admin password. It is used as web server credentials, webdav access credentials, application access credentials, 'innovaphone Reporting access credentials, innovaphone Fax access credentials etc.
- Linux System password
- the password that is used as root credentials. For this, the PBX password shall be used
- The database passwords (e.g. postgresql admin password) can be left as by default, as the DB server is accessible from 127.0.0.1 only anyway
Customer-ID
Each customer should have a unqiue customer id. It should be “safe” (that is, no umlaut, no spaces, no obscure special characters). Something like e.g. Kuenkel0001 will do.
NTP
All devices require correct time setting. They all must have be a working NTP time source configured (and probably also a working alternate).
The dual-homed devices (see above) shall use 2 reliable time sources (either run by the hosting provider or from the internet). All other devices shall use "their" own Frontend as NTP Server (a backup time source is not strictly required here as these devices are anyway unusable for customers when the Frontend is down).
Certificates
The entire HTTP and LDAP traffic from and to the customers network is encrypted. This affects for example a customers access to the PBX (e.g. if the customer is granted (limited) access to the PBX config or for myPBX), as well as access to the reporting service.
To facilitate access to these devices without any warnings issued by the clients (e.g. browser security alerts) all devices require suitable certificates (that is, the host name and IP address must be noted in the certificate and they must be derived from a single signing authority so that end-users only need to import a single root certificate in order to accept all of these device certificates.
The devices built-in certifcates cannot be used as they only refer to the devices NetBIOS name (e.g. IPVA-a8-5a-38) which will not be used to access the devices. Also, in the case of IPVA, the default certificate is self-signed as opposed to being derived from the aforementioned uniform root certificate.
To derive device-certificates which all inherit from the same root certificate, a so-called RootCA is needed.
There are multiple ways to implement this. Although there are better schemes available, one way to do it that requires no 3rd party gear is to generate a RootCA (in General/Certificates/RootCA) on a dedicated IPVA. This RootCA then can be used to generate all of the other certificates. They are stored in the IPVA’s virtual CF card (/DRIVE/CF0/CA/certs/) and can be exported to the other devices from there.
RootCA
For the RootCA, we use the IPVA that also implements the central Kerberos server. Unfortunately, with the current firmware each generated device certificate will also replace the IPVA’s own device certificate. This is of course somewhat unfortunate, however, it is not really an issue as no end-customer will ever access the Kerberos IPVA anyway. The Kerberos server itself does not rely on the device certificate.
You first generate a RootCA on the RootCA-IPVA ('General/Kerberos). The following data must be used:
C=your-country (e.g. Germany) , O=hoster, CN=hoster Device Certification Authority, Key-length 4096, lifetime 20 years
This new RootCA (which is now the IPVA’s device certificate) needs to be trusted on the IPVA (General/Admin).
Device Certificates
To create individual device certificates, use the RootCA created and use the following data:
Key 4096, Common Name=devices NetBIOS Name, Organization=hoster, Country=your-country (e.g. Germany) , DNS Name 1=devices external IP address, DNS Name 2=devices internal IP address, IP Address 1=devices external IP address , IP Address 2=devices internal IP address
For devices with an internal IP address only, it is important to specify the IP address of the NAT router used to access the device as external IP address (e.g. for a customer PBX, this will be the Frontend used). You specify the IP address only, not the port map.
If you intend to assign real DNS names to your devices, you may of course specify these as DNS Name 3 too.
In order to be able to export the new certificate to the target device, you need to make sure you tick the Backup on CF check-mark, so it is saved on the CF as serialno.pem. To transfer the new certificate to the target device, take note of the serial number and download the respective certificate file from /DRIVE/CF0/CA/certs/serialno.pem. This file can then be uploaded to the target device (General / Certificates / Device certificate / Upload).
Device Certificates & DNS
If external access(customer using myPBX) should use DNS names, certificates issued for the DNS-name of the frontend must be used. In this case, the certificate doesn't need an Alternate Name for the public IP-address of the frontend (but it doesn't hurt either).
The FQDN used in the myPBX-config (PBX/Config/myPBX) must point to the public IP of the frontend. For myPBX, the frontend will forward incoming HTTPS-requests to the customer IPVA or the reporting server, depending on the port the clients sends its request to and the Port specific forwardings configured at the frontend. The customer IPVA and the reporting server must have a certificate issued for the FQDN of the frontend. As a result, all IPVAs and Linux-APs in a frontend cluster must use the same certificate - the one issued for the frontend.
If there is a wildcard certificate for the hoster domain, it can be used for all devices in the frontend cluster.
If you want to use HTTPS also for internal HTTP connections (this would be only administration of IPVAs by using their internal IPs), you must have as additional Alternate Name the internal IP address of the IPVA/LinuxAP or live with a warning message displayed in the browser. In case that you cannot live with the warning message, each IPVA/LinuxAP must have its own certificate (since the private IP has to be different in each certificate). The resulting certificate would be still issued for the FQDN of the frontend but would have as Alternate Name the internal IP address of the IPVA/LinuxAP.
Browser Installation of the Root Certificate
To get rid of the browser security alerts when accessing devices with e.g. HTTPS, the public key of the root certificate must be trusted by the browser. For this, it needs to be exported in to a file (you can best do this from the RootCA’s trust list in General/Certificates/Download/PEM into certificate.crt).
It must then be imported to the browser. This needs to be done once by both administrators and customers.
Firefox
- Extras / Einstellungen / Erweitert / Zertifikate anzeigen / Zertifizierungsstellen / Importieren
- import the .crt file
- tick Dieser CA vertrauen, um Websites zu identifizieren
Internet Explorer
- Extras / Internetoptionen / Inhalte / Zertifikate / Beabsichtigter Zweck Clientauthentifizierung / Vertrauenswürdige Stammzertifizierungsstellen / Importieren
- import the .crt file
Kerberos
Kerberos is used to implement authentication for all devices. This includes both devices in the PBX hosting provider’s infrastructure and the CPE. For this to work, all devices must subscribe to the Kerberos realm. The PBX hosting provider’s DNS domain (e.g. ‘’hoster’’.tld) should be used as Kerberos domain name. This way, Kerberos can be found using DNS SRV records.
The IPVA used as RootCA can be used as master kerberos service too. A stand-alone Kerberos server (that is, the one that is implemented in the Gateway level) is being used. The (probably limited) number of admin accounts is maintained manually.
In fact, if the PBX hosting provider uses an active directory service to manage employee accounts, an AD-replicated PBX run on the central Kerberos IPVA is also a viable option.
Either way, a standby Kerberos server should be setup as a separate IPVA and can be replicated from the master kerberos as usual.
Unless an active directory is used, no trust relationships are required. If so, the system-wide admin password should be used as shared secret.
The devices which rely on kerberos for authentication (that is, all devices!) locate the Kerberos servers using DNS SRV records. Devices within the hosting provider’s private network use the internal IP address for this; external (e.g. CPE) devices use their respective Frontend. For this to work, each Frontend needs some UDP NAT maps as follows:
Protocol	Port	Address	Int. Port
UDP	7465	kerbhost-dup	464	delete
UDP	7464	kerbhost	464	delete
UDP	7089	kerbhost-dup	88	delete
UDP	7088	kerbhost	88	delete
Instead of relying on the PBX hosting provider’s DNS server, the SRV records can be set in the devices during staging. This way, each device can be configured to use its associated Frontend only:
config change DNS0 /a-name kerberos1i.#(h-domain)
	/a-addr #(h-kerberos1ip) /a-name kerberos2i.#(h-domain)
	/a-addr #(h-kerberos2ip) /a-name sbc#(h-sbcindex).#(h-domain)
	/a-addr #(h-sbcextip)
	/srv-name _kerberos._udp.#(h-domain) /srv-target kerberos1i.#(h-domain) /srv-port 88 /srv-prio 0 /srv-weight 0
	/srv-name _kerberos._udp.#(h-domain) /srv-target kerberos2i.#(h-domain) /srv-port 88 /srv-prio 5 /srv-weight 0
	/srv-name _kerberos._udp.#(h-domain) /srv-target sbc#(h-sbcindex).#(h-domain) /srv-port 7088 /srv-prio 10 /srv-weight 0
	/srv-name _kerberos._udp.#(h-domain) /srv-target sbc#(h-sbcindex).#(h-domain) /srv-port 7089 /srv-prio 12 /srv-weight 0
	/srv-name _kpasswd._udp.#(h-domain) /srv-target kerberos1i.#(h-domain) /srv-port 464 /srv-prio 0 /srv-weight 0
	/srv-name _kpasswd._udp.#(h-domain) /srv-target sbc#(h-sbcindex).#(h-domain) /srv-port 7464 /srv-prio 10 /srv-weight 0
With this setup, all devices will prefer the internal IP addresses. External (e.g. CPE) devices will of course not be able to reach these internal addresses, but they will succeed with one of the Frontends. Thus CPE devices will use any of the available Frontends, not necessarily their own. This will work as all Frontends ultimately NAT to the same Kerberos server.
Note: The _kpasswd._udp SRV entry should point only to the primary Kerberos Server (i.e. either external NAT-map or internal IP-address), since the _kpasswd._udp is used to join devices to the Kerberos-Realm. It is only possible to join a realm on the master-Kerberos server, not on the standby. As a result, if the Master-Kerberos server is down, it is not possible to join/unjoin device to the Kerberos-Realm.
Kerberos User
In addition to the accounts for the administrators, there must be a service account paccess used for programmatic access to the devices. This will for example be used by the Metadir server to access the Frontend (and can also be used by a hosting provider specific administration software). In addition to that, this account is to be configured under Services/HTTP/Client for URLs https:// and http:// on the Frontend, Media-PBX and customer PBXs. This allows all these device to access all other devices using HTTP/S.
The credential for this account need to be kept securely, as they allow admin access to all devices in the infrastructure!
To facilitate automatic join into the kerberos domain during staging, there needs to be an additional special account with Join Realm rights only: : joiner, joiner. This account is not particularly relevant from a security point of view, as aside from adding or removing devices from a realm nothing relevant can be done on behalf of it.
Licenses
It is in the PBX hosting provider’s best interest to implement a centralized license management. A central licensing server instance is needed thus. This can be run on the master and standby Kerberos server. All licenses purchased by the PBX hosting provider are installed here. The license server runs a PBX. The only task for this PBX is to host the licenses and distribute them to the Frontend and Media PBXs, which are registered as License only slaves and will further distribute the licenses to the customer PBXs (which are in turn registered as License only slaves to their respective Media-PBX).
If you choose to use a PBX based Kerberos server (see above), this same PBXs can be used.
The license server PBXs will have the PBX hosting provider’s domain name as System Name (e.g. hoster.tld) and . as PBX Name.
Frontend
The Frontend
- accepts external registrations from customer CPE
- provides a central (virtual) CF-card storage for non-sensitive data (e.g. firmware files)
- supports mutliple customer PBXs. The exact number is yet ffs., however, we estimate no more than 135 currently. Frontends will simply be numbered (
sb1,sb2etc.) - The Frontend being a “dual homed” gateway, must have ETH0 (default interface) connected to the public network and ETH1 connected to the hoster network, this was the tested setup during our tests so it's the recommended configuration.
NAT
- The Frontend will provide inbound NAT mappings for HTTPS and LDAPS. This allows for controlled access to the IPVAs within the PBX hosting provider’s private network from external. Each customer PBX uses its associated Frontend for NAT, that is, each Frontend provides NAT for all customers that have it associated as Frontend. The number of customers per Frontend is limited by the number of NAT maps that can be created, which in turn depends on the length of the resulting config file line. Currently, there is a limit of approximately 290 maps per Frontend. 2 distinctive maps are needed per customer
- Additionally, some maps shared by all customers (e.g. for services like Metadir, FaxServer, Reporting) are required. About 20 maps should be reserved for this
- So we end up with the aforementioned number of 135 customers per Frontend
- It is recommended to use a kind of syntax that allows the admin to deduce from the external port number the service type and the associated private IP. For example use 4-digit external ports, the first digit represents the service type(e.g.8 for HTTPS to the PBX, 9 for LDAPS to the PBX), the following 3 digits the associated IP-address(e.g. 007 for internal IP 10.0.0.7). In our example the external port 9007 would be mapped to the internal IP 10.0.0.7 port 636.
- since the Frontend is also used as NAT-router for UDP-messages(i.e. SIP signalling from the customer PBX to the SIP provider), an UDP-NAT port-range(IP4/General/Settings) must be configured. The size of the port-range should be at least as large as the number of customer PBXs served by the Frontend, each SIP Trunk requires one (external, public) port in the defined range. By default the UDP-NAT port-range is 0, so no UDP NAT is possible. You must use a port range that does not conflict with other used ports on the Frontend (e.g. UDP-RTP Port-Range by default 16384 / 32767).
PBX
- System Name is the PBX hosting provider’s domain name (e.g.
hoster.tld) - PBX Name is
sbn - Prefix for Intl/Ntl/Subscriber depending on Customers national numbering plan (e.g. for Germany and Trunk Prefix 0:
000, 00, 0) - registers as Slave PBX with the central license server PBX (License Only)
- receives required licenses from the central license server thus
- One Session Border object for each (potential) terminal registration to a customer PBX
- Long Name as well as Registration to internal PBX/Name set tot he CPE-ID (see below)
- Password set to the customer registration password
- Registration from external/Name set to the CPE’s hardware-ID (NetBIOS name) PBX Password ticked
See also #Configuration of customer related objects in the customer’s PBX and Frontend
Alternate RAS port
End-customer phones register to the PBX using H.323. Some CPE Routers (such as Linksys) are known to mess around with H.323 packets (namely RAS) may inhibit registration. To avoid this problem, the phones and Frontend should be configured to use an alternate port for RAS signalling. At the phone the RAS - port must be changed using the command config add H323 /ras-port xxxx , the Frontend must be configured to listen for RAS packets also on an alternate port using the command config add H323 /ras-port-alt xxxx.
The alternate RAS port configuration should be distributed to the phones in the staging section of the initial update-server configuration.
In few cases, the NAT router will still detect RAS-messages sent via an alternate RAS port. The NAT router will therefore do its faulty H323-NAT-entries in the RAS messages. As a result, phones behind the NAT-router will not be able to register at the Frontend. Assuming that you configured the usage of an alternate RAS port and double-checked that the entered password (at the phone and Frontend) is correct/matching, you can enable the logging of H323-Registrations(Maintenance/Diagnostics/Logging) and look for a REGISTER-REJ message having the additional information Reason=Authentication failed
REGISTER-REJ(200.205.64.202:9198),H323=IP200A-10-10-b4,Reason=Authentication failed
Since the password is correct, the Reason=Authentication failed indicates that the NAT router is still doing H323-NAT. To solve this problem, H323-NAT must be turned off on the NAT-router located at the customer site.
Security
Keep in mind that the frontend is exposed to any attack from the wild, deep space in internet. As such, you should take utmost care of any security related settings (you may want to review the security lesson in your latest advanced training). In particular, as you will never want to allow registrations w/o password on a frontend, make sure to set No of Regs w/o Pwd. to 0 (zero) in any frontend PBX configuration.
Media-PBX
Services
- The media-PBX needs to have http access to the customer PBXs in order to play e.g. announcements or voice-mails. This is why the HTTP client credentials for URLs
http://andhttps://viapaccess@hoster.tldhave to be set as explained above. - The media-PBX, must be configured to have ETH0 (default interface) connected to the public network and ETH1 connected to the hoster network, this was the tested setup during our tests so it's the recommended configuration.
PBX
- One PBX-type object per customer. Both Name and Long Name set to the customer id, “Number” set to
#+uniq number out of customer id. - One Gateway-type object
HTTP-EXTwith no number. This takes registrations from customer PBXs to for media data - User-type object
MOHwith number###10. This is to register the MoH source - User-type object
TONEwith number###11. This is to register theTONEinterface. Make sure that you cut off the###11in the route to the TONE interface. - User-type object
HTTP-OUTwith number###12. This is to register the media-PBX’s localHTTPinterface to offload media data such as WQ announcements and voicemail
Customer PBX
Each customer has a unique customer-id which is used to derive various names and identifiers (see above). It is derived from (part of) the customer’s name and a sequential number. Something like e.g. Kuenkel00001.
The customer PBX is located within the private part of the PBX hosting provider’s network. Because of this, it cannot send media data to the CPE (which is the end customer’s private network). Media has to be sent via the associated Media-PBX thus, as this is dual-homed.
- the associated Frontend is used as Time Server
- Unknown Registrations is turned on with With PBX Pwd only. This is to enable ZCD (Zero Configuration Deployment) for CPE
- System Name set to the customers email domain (even if it is
googlemail.comoryahoo.deas it does not need to be unique. Therefore it's necessary to set the customer PBX’ Master GK-ID property to the value of the media-PBX’ System Name property. - PBX Name set to the customer ID
Handling of calls to MOH, TONE or HTTP-interface
As explained in the previous section, the customer PBX cannot send media data to the CPE but must use the respective resources on the associated Media-PBX. Calls to the Media-PBX are routed using GW-interfaces (i.e. Relay) on the customer PBX. Therefore the first step is to register a GW-interface (e.g. GW1) to the HTTP-EXT on the Media-PBX.
MOH
- Go to PBX/Config/General an enter as "External Music On Hold" the name of a non-exisiting object (e.g.
_customer_moh_) - Go to Gateway/GK an register a GW-interface (e.g.
GW2) to this non-exisiting object (e.g._customer_moh_). The registration will be accepted, in the PBX you will see a PBX-object called_MOH_ - Assuming that you followed the examples before,
GW1would be the GW-interface registered at the Media-PBX. In the routing table (Gateway/Routes) configure a route fromGW2toGW1and prepend the number used for the MOH-object on the Media-PBX(e.g.###10). The Route in our example would beGW2 -> ###10 GW1 - If you want to play a custom MOH, additionally enter the MOH-URL in the "Music On Hold URL" field(PBX/Config/General). The URL will be retrieved by the Media-PBX, as a result it must be retrievable by the Media-PBX (e.g. 127.0.0.1 in the URL will be the local-host address of the Media-PBX)
TONE
- to use the TONE interface of the Media-PBX, route calls to the GW-interface registered at the Media-PBX and prepend the number used for the TONE-object on the Media-PBX(e.g.
###11). - since the Media-PBX has only one TONE interface, it will generate the same TONE for all customer-PBX using it. If a customer-PBX needs a different TONE-interface, you have to create am additional Media-PBX.
HTTP
- the HTTP - interface is needed when an HTTP-URL is retrieved an played as an announcement. The "Extern Name/No" field at the respective PBX-objects (e.g. WaitingQueue) is used to offload the playing of the announcement to the Media-PBX.
- at the customer PBX create a Gateway-type object
HTTP-INwith no number. This takes registrations from a a GW-interface (e.g.GW3) at the customer PBXs - when configuring an announcement URL (e.g. at a WaitingQueue), enter as "Extern Name/No"
HTTP-IN. The URL will be retrieved by the Media-PBX, as a result it must be retrievable by the Media-PBX (e.g. 127.0.0.1 in the URL will be the local-host address of the Media-PBX) - In the routing table (Gateway/Routes) configure a route from
GW3toGW1and prepend the number used for the MOH-object on the Media-PBX(e.g.###12). The Route in our example would beGW3 -> ###12 GW1
Waiting Queue
The WaitingQueue does not only play announcements via the offloaded HTTP-interface but has also handles incoming DTMF tones according to its DTMF-Maps. Since innovaphone devices will by default send DTMF tones as RTP-events(RFC 2833), the DTMF information will be sent to the HTTP - interface running on the Media-PBX. If the Announcement URL ends with the parameter uui-dtmf=on and the Support for RTP-DTMF option is activated at the WaitingQueue, the remote HTTP - interface will send the received DTMF tones as H323 messages to the WaitingQueue-object. By this the WaitingQueue can interpret the DTMF tones according to its DTMf-Maps.
An example for such an announcement URL is:
https://10.30.0.3/DRIVE/CF0/WQ/de_menu_voicebox.$coder?coder=g711a,g729&uui-dtmf=on
Global Objects in the Customer-PBX
default Template
- Config Template-type object with Name
default - Hide from LDAP und Critical
- Store Phone Config
- all check-marks ticked in the License tab
- the Access column needs an entry for
@customer.tld (this is the System Name from the PBX configuration) with all check-marks ticked - within the Config column, there is only a setting for LDAP Config (Directories) as follows:
<phone>
 <loc cc='country-code' ac='area-code' ntp='0' itp='00' pbx='subscriber-number'/>
 <ldap id='2'
   tls='1' port='ldap-port-map-to-pbx-on-sb, e.g. 9004'/>
 <ldap id='3'
   enable='1' tls='1' mode='basic'
   addr='sb-ip-address' port='ldap-port-map-to-metadir-on-sb, e.g. 9007'
   dn='PBX Name' pw='??' base='dc=PBX Name'
   attr='sn,givenName,company' phone='telephoneNumber:D,mobile:M,:@'/>
</phone>
pw for ldap id 3 is critical: this allows everyone access to the customer directory data via LDAP. If this is not acceptable, the password needs to be removed from the template and configured manually by the end customer
From an administrative point of view, no configuration specific to the individual device should be necessary for registration of a CPE. The default NetBIOS name (e.g. IP232-01-02-03) is used as registration name thus. This must be used as Registration from external in the corresponding SessionBorder object thus (for each potential CPE, there must be one SessionBorder object on the associated Frontend, see above).
The registration password used by the CPE and thus the Password in the SessionBorder object must be set to the customer registration password (which is specific to this customer, not to the CPE).
The Long Name as well as the Name for Registration to internal PBX in the SessionBorder object (hence the registration name for the CPE set in the customer PBX’s user-type object) is a combination of the customer ID and a sequential customer CPE ID, e.g. . Kuenkel00001-001. The customer CPE ID starts with 0 for each customer. This allows for more meaningful data when viewing traces from e.g. the Frontend. Moreover, this scheme allows for nice filtering the object view on the PBX by customer name.
The password to register the SessionBorder objects from the Frontend to the customer PBX is always the globally used PBX password. Hence the PBX Password check-mark must be ticked in the Registration to internal PBX area of the SessionBorder object on the Frontend and the PBX Pwd check-mark in the Devices area of the user object in the customer PBX. Initially though, no Devices shall be present in the user object, as this allows ZCD for the CPE.

Update Server
Tasks:
- Staging (e.g. installation of suitable trust list for HTTPS)
- Firmware update
- Backup of configuration data for CPE and customer PBX
Backup of CPE data is done to the virtual CF card of the customer PBX. Backup of customer PBX data is done to its Frontend. There is no device or device-type specific update script. Structure on the customer PBX
/DRIVE/CF0/
  update/
    backup/
      backup-mac-date.txt
The backup folder on the customer PBX (/DRIVE/CF0/update/backup/) must be set writable but not readable under Services/HTTP/Public compact flash access so that CPEs can write their backup.
Firmware files are stored on a folder of the associated Frontend. Although this implies that they need to be duplicated to all Frontends, it simplifies the configuration and distributes load.
The generic update scripts are stored in (/DRIVE/CF0/update) on the Frontend. staging.txt is the CPE staging code, update.txt the regular update script. Both scripts make extensive use of update variables.
Staging proceeds in 3 steps:
- CPE is configured to use the generic hosting staging interface (http://config.innovaphone.com/init) as Update-URL
- This is a publicly available web service, (this service is currently experimental!) relates a requesting device to the hosting provider and customer pbx based on the serial number. If the device can be identified, the update server URL is rewritten to the PBX hosting provider’s appropriate Frontend (based on data that is defined in my.innovaphone). For more information, see [[Reference10:Concept Provisioning].
- CPE executes the Frontend-wide staging script (
staging.txt). This performs some init-only tasks - CPE executes the Frontend-wide update script (
update.txt). This performs day-to-day tasks (such as backup)
File structure on Frontend
/DRIVE/CF0/
    update/
      staging.txt           - staging script
      update.txt            - regular update script
      global.txt            - overrides for global settings
      local.txt             - overrides for Frontend-local settings
      set-customerid.txt    - overrides für customer specific settings
      staging/              - special staging scripts
        global.txt            - overrides for global settings
        local.txt             - overrides for Frontend-local settings
        set-customerid.txt    - overrides für customer specific settings
        dev-IPxxx.txt         - device type specific settings
        cfg-phone.txt         - device class specific settings
        cfg-gateway.txt       - ditto
      firm/                 - firmware
        nnnnnn/
          bootxxx.bin
          ipxxx.bin
In order to be accessible during firmware updates, the drive (/DRIVE/CF0/update/firm/) must have read (and only read) access on the Frontend under Services/HTTP/Public compact flash access. In order to be accessible from the devices, drive /DRIVE/CF0/update) needs to be readable (and only readable). Both can be achieved with a single /DRIVE/CF0/update/ entry.
Assigning the initial update URL ( http://145.253.157.5/redirect.php ) to CPE is for further study. It can be done as usual (DHCP), but this requires co-operation by the end-customer which may be a problem. Of course it can also be pre-configured by the hosting provider. In the latter case, the URL must be configured to the device after any long reset (factory settings).
Update Script Security
Update scripts may include registration password (although encrypted) to facilitate automatic registration with almost no user intervention (cf. set-customerid.txt above). By definition, staging scripts are readable by everyone (as they are used to configure otherwise unconfigured devices, so no kwowledge of credentials can be assumed). There is no easy way around this. One option would be to define a password for the web site hosting the scripts. This would then imply that the password needs to be configured to the CPE, which is undesirable from an administrative point-of-view. Moreover, with innovaphone gear (that is, when a web server internal to an innovaphone device is used), the only way to secure the scripts with a password would imply to use an admin account and password – clearly unacceptable from a security point-of-view.
To secure the update scripts, a mechanism based on innivaphone's device certificates must be employed. See Reference10:Concept Provisioning for more details.
Deployment
Initial
Create once-only services
- Kerberos and Kerberos Backup
- Create a new account for the PBX hosting provider in my.innovaphone (if the generic staging is to be used, see above)
Create services shared by a set of customers:
- Frontend
- Media-PBX
- Metadir
- Reporting LinuxAP
- Fax Linux-AP
- copy update/staging scripts (global.txt, cfg-*.txt, dev-*.txt) tot he Frontend drives (those are identical on all Frontends)
- create appropriate local.txt on Frontend
New Customer
- create IPVA with customer PBX
- create appropriate
set-customer-ID.txton Frontend - create appropriate user objects on customer PBX as well as corresponding SessionBorder objects on Frontend
- create project for customer in my.innovaphone, set URL to the PBX hosting provider’s
staging.txton the appropriate Frontend (e.g. https://212.124.38.120/DRIVE/CF0/update/staging.txt) and the encoded public key of the hosting providers RootCA as Trust (as taken from a config file)
CPE
- Add device tot the customer project in my.innovaphone
- factory reset (optional, of course)
- set
http://145.253.157.4/redirect.phpas Command File URL in Services/Update - wait for or force poll
- CPE registers with the Frontend and customer PBX as
_UNKNOWN_
On-Site (Customer) Support / Debugging
Alarms and Events
- Alarms, events should be saved centrally on the Frontend, this way the admin has a full picture of all events and syslog in a Frontend-cluster. The CPE devices are configured by the staging script to send their events/alarms via HTTPS to the Frontend server.
- incoming Alarms/Events should be authenticated by the Frontend server, the CPEs must be configured (during staging) with the appropriate HTTP-client credentials. The account used for the HTTP-login must be configured with Viewer rights on the Kerberos - server.
- the received Alarms/Events can be further forwarded by the Frontend server to a Syslog-server. The received events can be then written in a database/text-file and used for further evaluation.
- the local event and alarm list is always kept in local Flash memory. The number of entries to keep can be configured in the Services/Logging tab. Since your Frontend-Server should not generate a large amount of events/alarms, you can use the default values(last 50 local events are stored in Flash memory).
Syslog
- the CPEs should not create logs, all relevant information(i.e. state of user-registrations) is retrieved from the Event/Alarm-list
- IPVAs(e.g. customer PBX) should generate logs and store them locally on their CF-card
- the recommended Syslog settings are PBX calls and Gateway calls
- depending on the amount of generated logs (i.e. the size of your Customer PBX), the Max File Size should be set accordingly. You should capture at least 4 days of log information(e.g. allowing to inspect log information created before a weekend)
- if its required that CPE devices generate logs, it will be necessary to store the log-information on a central server(e.g. Frontend server). However incoming Logs cannot be authenticated by the Frontend server, since this function is not implemented in the innovaphone LOG-server. If incoming Logs should be authenticated, a Linux-AP should be used as central Log-server (the Linux-AP offers the possibility to authenticate incoming logs)
Config backup
- Phone configuration is backed up to the customer PBX CF, using the Update Server mechanism.
- the configuration of devices in the Hoster-network( e.g. Media-PBX, etc.) are saved on the CF-card of the Frontend-server
Accessing the web-interfaces of devices
- All devices (including CPE) have joined the Kerberos domain. As a result, all administrators are able to log in (provided they have access to the customers network, TeamViewer is an option)
Reporting (Multiple PBX)
NEEDS TO BE UPDATED (TLE)
The LinuxAP VM for reporting needs to have quite a large CF to be able to store all CDR data for a reasonable time period.
- VMWare disk size should be 50GB initially. This is based on a rough estimate of 200 customers and a time frame of 1 year
- rough estimate. Time will tell
- RAM 1GB
Naming Conventions
To grant access for customers (and reseller) to the Reporting login page (https://Reporting-IP-Adress/apps/innovaphone-reporting/user/login.php), it's nessesary to create a cdr filter called "base filter" and a user login which is bound to this base filter. These logins and filters can only be edited and created by the hoster (i.e. cloudkom). Since the customer can't change his credentials we use the "customer ID" and the "customer registration password" for further steps.
As we mentioned in chapter Customer PBX each customer needs a uniqe PBX name, but different customers may share the same "System Name". For this reason it's nessasary to set the Grouping-ID in the Reporting application to PBX Name (as set in Config/PBX). Never change this setup because filters are depending on the Grouping ID!
Filter parameters for customers:
- Base Filter: <leave it empty>
- Filter Name: customer ID (which is the PBX Name, i.e
Kuenkel00001) - PBX Name: customer ID (which is the PBX Name, i.e
Kuenkel00001)
User configuration for customers:
- Name: <customer ID>
- Password: customer registration password
- Base Filter(s): customer filter name
For reasons of billing (or whatever) it could be fine for resellers to have a filter for all of -his- sold PBXs
Possible filter parameters for reseller: (in fact, the reseller id is a customer id, because the only difference is the filter content)
- Base Filter: <leave it empty>
- Filter Name: reseller ID (i.e. innovaphone00001)
- PBX Name: customer ID +
- PBX Name: customer ID +
- PBX Name: customer ID ...
User configuration for reseller:
- Name: reseller ID
- Password: reseller registration password
- Base Filter(s): reseller filter name
Configuration Reporting
- Grouping ID: PBX-Name
- Create filter and user logins for the customer
- LDAP?
- Report Mails?
Configuration Customer-PBX
Gateway / CDR0
- Type
Remote-AP-S - Address Reporting Linux-AP IP address
- Port
443
PBX / myPBX / Call List Service
- Type
Remote-AP - Host Frontend-IP-addr:HTTPS-Portmap-on-Frontend-to-Reporting-App
- User
innovaphone-reporting????? - pass
reporting
In contrast to the CDR0 interface, the Call-List-Service doesn't offer the possibility to choose the Type Remote-AP-S. The myPBX client decides which protocol to use (HTTP or HTTPS) depending on the URL (http or https)used to connect to the PBX. So if myPBX uses HTTPS to connect to the PBX, it will use also HTTPS to connect to the Reporting-App.
Services/HTTP/Client
- enter Authenticated URL & webserver credentials of Linux-AP. It is important that the port used is in the URL.
E.g. for the Authenticated URL: http://10.30.253.2:80/ap/cdr.fcgi.
Fax Server
The innovaphone Fax Server can be used in a hosting scenario.
The fax server will provide T.38 based fax support for customers. That is, it will be able to send G3 fax to and receive G3 fax from T.38 compliant remote parties. It will not be able to support remote parties which provide G.711 (a.k.a. transparent mode (T30/G.711) fallback or software fax) based fax only. If G711 fall-back is needed, please contact presales@innovaphone.com to discuss possible solutions.
Overview
NEEDS TO BE UPDATED (afI)
A LinuxAP VMware disk size of 50GB should be sufficient. Configure the size of the virtual drive before starting the Linux installation for the first time.
Since the FAX-Interface must be reachable from the public network, it must be offloaded from the Customer VM to the Media Gateway. The SOAP connection from the Faxserver application will be still directed to the Customer VM/PBX.

On the customer VM we have to configure a Gateway Object and routes to and from GWxx which is registered on the Media Relay instance. We reuse HTTP-EXT registration at this point to send Fax calls to Media.
Customer PBX Settings for Faxserver
- Gateway Object Name=
Fax, Number=some prefix number used for Fax extensions, Option "Prefix" activated - add the Gateway Object to the SOAP/TAPI group, in order it is visible for SOAP applications connecting to this PBX
- Prepare User Objects for Fax usage:
- Fax License must be assigned
- E-Mail must be configured and must match the sender address
- Gateway Object Name=
Customer Gateway Settings for Faxserver
- Fax GWxx, Register as Gateway, 127.0.0.1, Name=
Fax - Route GWxx (Fax) --> ###13 GWyy (HTTP-EXT)
- Route GWyy (HTTP-EXT) --> GWxx (Fax)
- Fax GWxx, Register as Gateway, 127.0.0.1, Name=
For multiple customer PBXes we define a single Gateway with FAX Interface:
Media PBX
- Gateway Object Name=
fax, Number=###13
- Gateway Object Name=
Media Gateway
- Interface FAX, Internal Registration, 127.0.0.1, Name=
fax, Coder G711,20 , "Enable T.38" - HTTP-Client must be configured to use credentials for programmatic access to be able to read and write to WebDAV Server on LinuxAP with Faxserver application.
- Interface FAX, Internal Registration, 127.0.0.1, Name=
Faxserver Instance
For each Customer VM an own Faxserver instance on the LinuxAP must be configured (one LinuxAP, multiple Faxserver instances for every Customer).
- SOAP connection must be configured to point at the PBX running on the Customer VM
- E-Mail Account configuration is important to be able to deliver E-Mails to the Faxserver via SMTP
- The E-Mail account, configured at the Faxserver instance, will be used at teh Customers Mailserver to authenticate against the Mailserver on Faxserver
Directories
There are 2 services provided to customers:
- the PBX directory
- an optional company-wide directory (external LDAP)
PBX Directory (extensions)
- one NAT port map is to be created per customer on the Frontend for port LDAPS (TCP source port xxx to target Port 636)
- This port can be used in the phone’s Port field in the PBX area in Phone/User/Directories/PBX. The PBX LDAP server’s IP address is implied from the registration data. This way, the CPE will in fact access the customer PBX’s LDAP server as opposed to the Frontend’s one
- LDAPS can be used safely, as the CPE’s LDAP client does not verify the certificate anyway (although it would be trusted as it is derived from the PBX hosting provider’s RootCA)
External Directory
Estos Metadir
- there is one Metadir server per Frontend which serves all customers associated with this Frontend. Hence there is one inbound NAT port map that maps one port to the Metadir server’s LDAPS port. This map is used from all customers. Customer specific directories are implemented as logical views in the Metadir LDAP server, not as separate servers
- there is thus one distinct LDAP node (dc=customer-ID) per customer
- there is also one distinct replicator for each customer (which is used to import the customers directory data in to the Metadir)
- Replicator
- The customer would provide its contact database as „comma separated CSV (Windows)“ file (e.g. as exported from Outlook)
- The file must have the columns "Surname","Firstname","Company","Busines Phone ","Mobile Phone"
- All numbers must be in E164 format, e.g. +49703173009123
- File name is
contacts.csv - The file is uploaded to the Frontend’s CF-file system
- Each customer has its own directory (
https://212.124.38.120/DRIVE/CF0/directory/customer-ID) on the Frontend. This is the placecontacts.csvhas to be uploaded to. For this to work, the path must be set to write-only on the Frontend! - Customers can use e.g. curl. Syntax:
curl --verbose -k https://212.124.38.120/DRIVE/CF0/directory/customer-ID/ -T contacts.csv. Note that standard WebDAV clients will probably not work due to the fact that this directory is write-only.
- Replicator
Structure on Frontend
/DRIVE/CF0/
    directory/                  - write-only w/o authentication
      customer-ID/
        contacts.csv
- Metadir has a duplicate of the Frontend’s directory structure
    C:\directory\
      script.bat                - script that retrieves customer directory data <code>contacts.csv</code>  from the Frontend, called by replicator
      contacts.csv              - sample
      customer-ID\
        contacts.csv           - customer data
- Metadir’s per-customer replicator imports the local contacts.csv when run. Before doing so, it calls script.bat which retrieves the appropriate contacts.csv from the FrontEnd (this behaviour needs to be configured in Metadir, Database Wizard, Zusätzliche Anwendungen(additional applications)).
- script.bat copies the then-current customer’s contact.csv from the Frontend using curl (curl - syntax:
curl --verbose -k -u user:password https://10.30.255.0/DRIVE/CF0/directory/%1/contacts.csv -o c:\directory\%1\contacts.csv - user:password in script.bat are administrator credentials valid on the Frontend (as contact.csv files are read-only, see above)
- Each replicator will be run every 3 hours
- The replicator can also be triggered from the cmd-line (calling e.g.
TextReplicator.exeas found in the Metadir installation directory. Start a replicator from the GUI and have a look at lastreplicator.bat in the install directory). This may be useful if the PBX hosting provider has implemented a user portal to upload the contact data.
- The replicator is created using the Replicator-Wizard and associates the .csv columns to the respective LDAP attributes/DB field names. A combination of all attributes is used as primary key
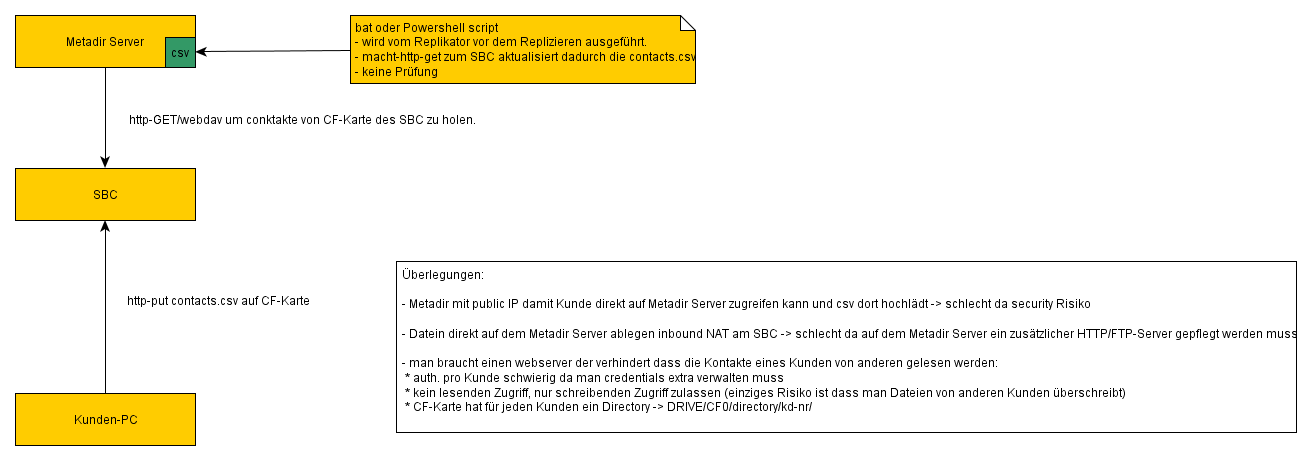
- LDAP-nodes:
- LDAP node access authentication is based on distinct, per-customer users, username (=customer ID), password(=customer registration password). No IP address restriction is used.
- profile is Default always, no customer specific profile is required (this is handled using the phone’s Dialing Location)
- Settings can be seen in the screenshot
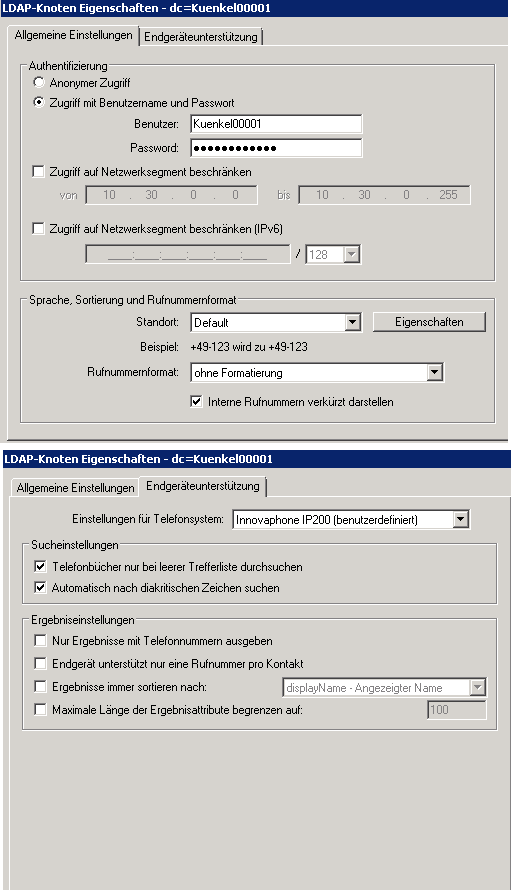
Here is how to export contact data from Outlook 2010:
- as far as we know it is only possible to export your own contact list. In case that all users use a global contact list, this list has to be copied first into your own contact entry list.(select [Global List](e.g. IP Kontakte) -> right click -> copy -> choose own contacts)
- From Outlook File -> Open -> Import -> Export to file -> comma separated values (Windows) -> (select contact folder) -> "Map custom fields"(german: Benutzerdefinierte Felder zuordnen) -> choose "Surname","Firstname","Company","Busines Phone","Mobile Phone"-> Finish
- LDAPS
- Just any certificate will do on the Metadir, as the LDAP client does not validate the certificate
- Metadir uses port 714 for LDAPS, Frontend needs an appropriate NAT Map
LDAP-Client
- directory settings should be set in a PBX Config template-type object in the customer PBX and applied to all user objects there
- Phone/User/Directories/External LDAP Server Settings
- Dialing Location settings need to be done according to the customers trunk line settings
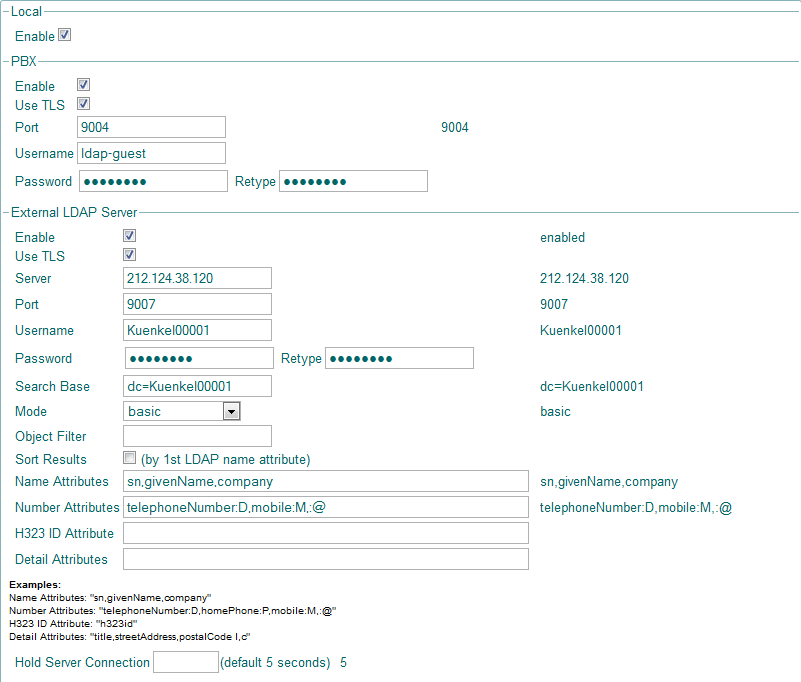
myPBX
- external directory lookups for myPBX are done by the PBX rather than by the myPBX client itself. The directory configuration is taken from the users phone configuration (as stored in the PBX). This of course presents a problem as the phone configuration will use the external Frontend NAT map data for the Metadir, whereas the PBX itself – sitting in the PBX hosting providers private network – needs to use Metadirs private address. There is a special configuration parameter for the PBX which sets the LDAP configuration used for any directory lookup performed for myPBX:
config add PBX0 /ldap-default-addr local-ip-addr-of-metadir /ldap-default-port 714(714 is Metadirs LDAPS port)
Voicemail
Voicemail is run on the customers PBX as usual. However, as discussed before, the Webmedia (a.k.a HTTP) interface on the media PBX must be used. VM xml script and recorded voice mail files are stored on the customer PBX’s CF card as usual though. The trick is to have a registration to the customer PBX’s voice mail object. If this is present, voice mail will use this registrations to terminate media data rather than the local Webmedia (which is the default).
The registration on the local VM object needs to connect calls to the remote HTTP interface on the media PBX. This is implemented using a GWx interface in the customer PBX’s gateway level which registers to the VM object. There is a route from this GWx to the GWy which in turn registers with the media PBXs HTTP-EXT object (there are no calls to the VM object ever).
PBX
- voicemail-object
- Hardware-ID =
vmrelay - Script-URL (installed on local CF Card as usual) =
https://customer-PBX-IP-address (not 127.0.0.1!)/DRIVE/CF0/vm-de/vm.xml?$_divconn=false(this URL will be evaluated on the media PBX, this is why 127.0.0.1 will not work!) - suitable extension depending on customers numbering plan
- Hardware-ID =
Gateway
- vmrelay GWxx, Register as Gateway, 127.0.0.1, Name=
vmrelay - Route GWxx (vmrelay) --> ###12 GWyy (HTTP-EXT)
- vmrelay GWxx, Register as Gateway, 127.0.0.1, Name=
MWI
Simpkly works as is.
Mail MWI
Mails are sent through the PBX hosting provider’s own mail server. This may require authenticated SMTP. This needs to be configured in each email.xml in the customer PBX’s voice mail installation:
- message sender
- Subject of MWI mail
- mail server
- credentials
Apart from the mail subject (which is language dependant), this is identical for all customers, so it can be done once and copied then.
User Email addresses must currently be set in each user object’s URL attribute (or in a separate file in the user directory).
Operator
to be updated
innovaphone Operator v10 can be installed in local client location and connects directly to client IPVA using HTTP-SOAP connection using the same Port used for HTTP management defined on the FrontEnd.
All SOAP communication goes through this HTTP connection so all features will be available and working properly. The LDAP configuration of the Operator v10 is similar to the one performed in the IP Phones.
iQM
to be updated
Mobility
Mobility needs access to DTMF tones and thus to the RTP media stream. As the customer-PBX has no public IP address, again, the media for all mobility calls must be routed through the media-PBX linked to the customer PBX.
In the media-PBX, we need a media-relay-loop gateway-type object (no Prefix check-mark ticked) with a gateway GWx interface registered to it. On the media's gateway level, there is a route that routes calls to this interface directly back to that interface. This GWx interface used must have the Media-Relay check-mark ticked. Calls to the media-PBX's media-relay-loop object are thus echoed straight back to the PBX. However, the media-stream will be terminated on the media, so that it is available from the media's public IP address.
On the customer-PBX, a gateway-type object is created that sends calls to the media's media-relay-loop.
For incoming mobility calls to work, they must be recognized within the gateway level (that is, the mobility object's extension must be known) and routed through the aforementioned media-loop before it ends up in the client-PBX's mobility object.
For outgoing calls, the fork destination must be set such that the outgoing mobility calls are first sent through the media's media-relay-loop before they end up in the client PBX's trunk.
DECT
to be updated
Backup
Disaster recovery backup ist o be done by the operator of the VMware infrastructure.
User data (PBX config, CPE configuration) is backed up by the update server as outlined above.
UI/Portal
Innovaphone does not supply a dedicated UI for hosting scenarios (neither for the PBX hosting provider nor for the end customer). It is envisaged that hosting providers will craft their own tool for this, as this is highly related to the provider’s business model.
Special scenarios
- Customer-setups where the phones are in separated private networks, e.g. home-office without VPN to LAN of main-office. In this case the phones in different private networks can not send RTP-packets to each other. To overcome this problem, the media-relay option at the SessionBorder object must be enabled for those SessionBorder objects that have registration from "foreign" networks. If the Frontend is used as RTP-endpoint(i.e. by activating the media-relay option), the UDP-RTP port-range(by default 16384 / 32767) must be configured. In case that mediarelay is used, video calls (e.g. using myPBX) will not work since mediarelay is done only for the audio stream.
Limitations
- Customers-setups with Master-Slave PBXs are not supported. The problem here is that the Master & Slave PBX are within the hosting provider’s private network and some PBX mechanism (e.g Registration-Redirection, Soap) would return IP-addresses with IP-addresses from the provider’s private network to device at the customer site. (e.g. a phone registering at a PBX might get an indication to register at another PBX - however the IP-address in this Redirection is in the hosting provider’s private network, therefore unknown to the phone).
Related Articles