Howto:MEET - Fermax - 3rd Party Product: Difference between revisions
No edit summary |
|||
| Line 33: | Line 33: | ||
In offices and enterprises, it is common to connect the video door entry panel to the telephone switchboard in order to receive the call on a specific extension, simplifying the work of the employees. For this purpose, a telephone interface is used that connects the outdoor panel to an analogue input of the switchboard. With the evolution of PBXs, and their deployment in the cloud, a world of previously unimaginable advantages is now available, such as receiving the call on any extension located in different locations or even on a smartphone, and receiving video on the call, which is not available on an analogue telephone interface. You therefore have the same features as in a video door entry monitor if the terminal receiving the call has a screen: two-way conversation, visualisation of the visit and door unlock. The Fermax outdoor panel has also evolved to adapt to this environment, and a clear example is the MEET panel, with IP technology, which supports SIP protocol, necessary in this type of integration. In this application, the outdoor panel must register in the SIP switchboard with a username and password and route calls to the required extension(s). In the specific case of the Innovaphone SIP PBX, let's see how to configure the MEET outdoor panel and the Innovaphone PBX so that they can work together. This document explains how to set up the Innovaphone PBX for any model (cloud, on premises, physical), as the user interface is practically the same, except for some slight differences. Innovaphone provides a softphone in their My Apps application suite for desktop (Windows) that allows the implementation of a SIP client. | In offices and enterprises, it is common to connect the video door entry panel to the telephone switchboard in order to receive the call on a specific extension, simplifying the work of the employees. For this purpose, a telephone interface is used that connects the outdoor panel to an analogue input of the switchboard. With the evolution of PBXs, and their deployment in the cloud, a world of previously unimaginable advantages is now available, such as receiving the call on any extension located in different locations or even on a smartphone, and receiving video on the call, which is not available on an analogue telephone interface. You therefore have the same features as in a video door entry monitor if the terminal receiving the call has a screen: two-way conversation, visualisation of the visit and door unlock. The Fermax outdoor panel has also evolved to adapt to this environment, and a clear example is the MEET panel, with IP technology, which supports SIP protocol, necessary in this type of integration. In this application, the outdoor panel must register in the SIP switchboard with a username and password and route calls to the required extension(s). In the specific case of the Innovaphone SIP PBX, let's see how to configure the MEET outdoor panel and the Innovaphone PBX so that they can work together. This document explains how to set up the Innovaphone PBX for any model (cloud, on premises, physical), as the user interface is practically the same, except for some slight differences. Innovaphone provides a softphone in their My Apps application suite for desktop (Windows) that allows the implementation of a SIP client. | ||
<!-- Some formattings WikiMedia supports: | <!-- Some formattings WikiMedia supports: | ||
==Title2== | ==Title2== | ||
| Line 48: | Line 47: | ||
* Bullet-point | * Bullet-point | ||
--> | --> | ||
==Functions== | ==Functions== | ||
Revision as of 13:20, 11 January 2024
Product Name
Fermax MEET
Certification Status
Category
Vendor
FERMAX is a leading video door phone manufacturer, based in Spain. We also manufacture Access Control. We do have a broad portfolio of connected outdoor panels, phones and video door phones that can solve any project with basic and advanced functionalities. FERMAX is a major player in IP video door phones integration. Always at the forefront of innovation.
Description
MEET IP is a FULL IP system SIP compatible. In this integration case it will be described how calls can be done from the outdoor intercom panel to a SIP Client registered in INNOVAPHONE SIP server or unified communication system.
In offices and enterprises, it is common to connect the video door entry panel to the telephone switchboard in order to receive the call on a specific extension, simplifying the work of the employees. For this purpose, a telephone interface is used that connects the outdoor panel to an analogue input of the switchboard. With the evolution of PBXs, and their deployment in the cloud, a world of previously unimaginable advantages is now available, such as receiving the call on any extension located in different locations or even on a smartphone, and receiving video on the call, which is not available on an analogue telephone interface. You therefore have the same features as in a video door entry monitor if the terminal receiving the call has a screen: two-way conversation, visualisation of the visit and door unlock. The Fermax outdoor panel has also evolved to adapt to this environment, and a clear example is the MEET panel, with IP technology, which supports SIP protocol, necessary in this type of integration. In this application, the outdoor panel must register in the SIP switchboard with a username and password and route calls to the required extension(s). In the specific case of the Innovaphone SIP PBX, let's see how to configure the MEET outdoor panel and the Innovaphone PBX so that they can work together. This document explains how to set up the Innovaphone PBX for any model (cloud, on premises, physical), as the user interface is practically the same, except for some slight differences. Innovaphone provides a softphone in their My Apps application suite for desktop (Windows) that allows the implementation of a SIP client.
Functions
MEET IP system is a 100% full IP video intercom system that is SIP compatible. Therefore it is possible to call a SIP extension registered in a SIP server. For that the IP outdoor panel can be registered (not mandatory) in a SIP server. The call to a SIP terminal can be combined in parallel with calls to FERMAX MEET indoor monitor stations, or FERMAX MEET ME app, so it is really flexible.
It is not the main purpose of this article, but MEET outdoor panels can also call direct to an IP of a SIP client since it is Peer to Peer compatible.
Supported Codecs
Version
Product versions used for interop testing: FERMAX MEET v3.0
innovaphone V13r3
Configuration
Required equipment
Any Fermax MEET outdoor panel can be used for this integration, as all of them support SIP protocol. If you want to call a single extension, it is advisable to use the one-way MILO panel (a single push button). If you want to call different extensions to locate different people, you can use the MILO panel or, if an electronic directory is required, the KIN or MARINE panel. The outdoor panel may require a power supply if it does not support PoE, as well as the electric strike. To connect to the cloud version of the PBX, an internet connection with sufficient bandwidth (10Mbit minimum) will be required to access it.
Basic Scheme
Installation
Once the outdoor panel is installed, it must be connected to a switch or directly to the installation's router. The connection of the electric lock release will be wired to the outdoor panel or, if maximum security is required, a reference 1490 module with 2 relays will be used to open the door from indoors, wiring the module to the panel using 3 wires (Cat-5 recommended). Finally, the panel is wired to the power supply. It is possible to connect a MEET monitor to simultaneously receive the call inside the office, as a backup to the call through the PBX.
Innovaphone Configuration
Innovaphone PABX MEET PANEL MEET PANEL Once we have a PBX, either by means of a licence or a physical PBX, we must access to configure it through its web server using a browser: http://PBX_IP/admin.xml?xsl=admin.xsl
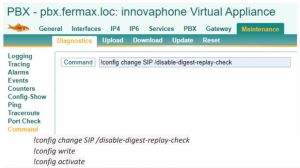
1) First of all, 'config disable digest' must be activated. To do this, go to Maintenance>Diagnostics>Command and enter the following commands:
They must be entered one after the other and the Command button must be pressed each time.
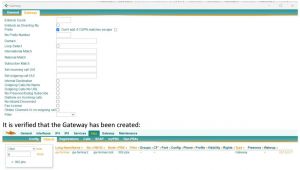
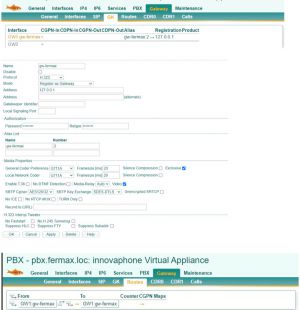
2) Next, a Gateway must be created to be able to display the video correctly on the Innovaphone softphone. If softphone is not used, this step is not necessary. In this example, the Gateway is assigned the number 2, which means that the calls to be routed through the Gateway must be prefixed with
2. Option PBX>Objects>new user
It must then be configured as follows:
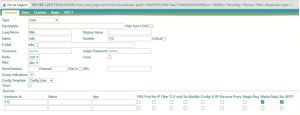
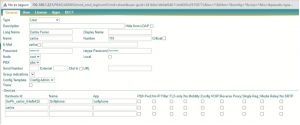
3) The devices are then added. Option PBX>Objects>new user
* For MEET outdoor panel
It is important to assign an extension number (Number) and password for later configuration in the entrance panel.
* For the softphone
You are also assigned an extension number and password. A MEET monitor can be also integrated into the control unit as we did with the panel or left as a Meet device. The devices that have been registered are checked:
Outdoor panel configuration
To configure the entrance panel, use a browser and access the IP address assigned to the entrance panel, by default 10.1.0.1 (building entrance panel) or 10.1.1.2 (single line panel) and enter the user admin and default password 123456. The following steps will be followed:
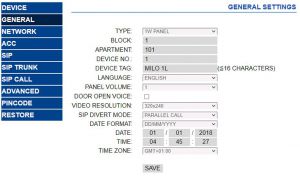
- 1) GENERAL CONFIGURATION
a. OUTDOOR PANEL 1 PUSHBUTTON (MILO 1W)
You must configure the panel as an Individual Panel, assign a block (default 1), a dwelling (default is 101), and a panel number (default 1). The Device Tag is important to identify the origin of the call on SIP extensions. The resolution of the camera shall be adjusted to the needs of the terminals used to receive the call.
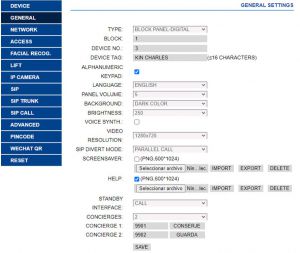
b. OUTDOOR PANEL WITH MULTICALL KEYPAD (KIN/MARINE/MILO)
In this example we have used a KIN building entrance panel. The panel must be configured as a Block Panel, assigned a block (default 1) and a panel number (default 1). The Device Tag is important to identify the origin of the call on SIP extensions. The resolution of the camera shall be adjusted to the needs of the terminals used to receive the call.
In case of calling more than one extension at the same time, it must be indicated whether the call will be made in parallel or sequentially, calling the next extension if the previous one is not answered within 30 seconds.
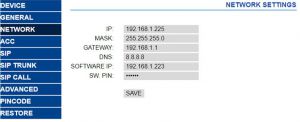
- 2) NETWORK SETTINGS
An IP address compatible with the installation's LAN will be assigned and the gateway or router address will be indicated to access the Internet. A DNS server is necessary to be defined. The IP of the software will be left as the default because in this case it is not going to be used unless it is required to manage access control registrations and cancellations for employees (proximity cards or facial recognition). In this case, the IP address of the computer that has the MEET management software (MMS) installed shall be indicated.
- 3) INNOVAPHONE SIP PBX SETTINGS
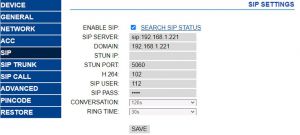
In the SIP Configuration section, indicate the IP of the assigned Innovaphone PBX, as shown in the screen below (192.168.1.221). Enter the user (extension number) and the password assigned to the outdoor panel extension (registration password). Next, check if the panel is correctly configured in the switchboard by clicking on the VIEW SIP STATUS link. If REGISTERED does not appear, check the information entered.
In the console of the SIP PBX the extension of the MEET panels will appear as registered in PBX>Registrations:
- 4) CALL EXTENSIONS CONFIGURATIONS
   a. OUTDOOR PANEL 1 PUSHBUTTON (MILO 1W)
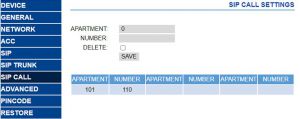
   Go to the 'SIP CALL' tab and enter the apartment number indicated in the 'GENERAL' section (101 in our example) and as NUMBER the SIP extension you want to call (110 in the example) and click on 'SAVE'.
    b. OUTDOOR PANEL WITH MULTICALL KEYPAD (KIN/MARINE/MILO)
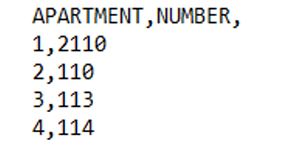
    A CSV file will be configured with the assignment of call codes to the extensions to be called. The CSV file format can be downloaded from the SIP CALL section of the panel’s web server, EXPORT option.
    An example is the following:
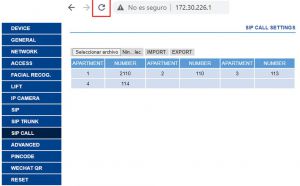
The code to be dialled is indicated first and separated by a comma, the extension of the switchboard that is to receive the call when this dialling code is dialled. In the example, dialling 1 will call the softphone with extension 110 through the gateway. Dialling 2 will call the same softphone without going through the gateway. It is possible to call more than one extension by listing multiple extensions in the same row separated by semicolons. One of these extensions can be a MeetMe licence to be able to call a smartphone via the MeetMe application. This allows you to call a smartphone outside the local network, including video. To load the CSV file on the panel, select the file created and click on the IMPORT button. The list of calls of the file will appear on the screen. Sometimes it is necessary to refresh the browser screen by clicking on the corresponding icon:
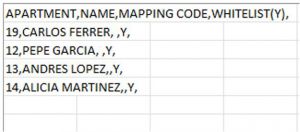
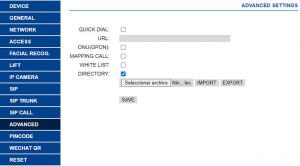
If we want to be able to call via the agenda in the case of a KIN panel, the agenda will be created in a CSV file (different from the previous one). The CSV file format can be downloaded from the ADVANCED section of the panel’s web server, EXPORT option. One row is filled in per phonebook item, indicating the call code, Name to appear, blank, Y,. Example:
The file is loaded using the IMPORT option:
The DIRECTORY option is enabled so that this option appears on the panel.
Operation
To call a specific extension, press the call button (one-way panel) or enter the associated call code (building panel) and confirm with the bell button (Milo, Marine) or the off-hook icon (KIN). In the case of the KIN or MARINE panel, you also have the option of making the call via the agenda, by searching for the name of the receiver and pressing on it.
The panel will generate the call :
The called extension will receive the ringing tone and call origin information showing the name assigned in the PBX and the camera image (depending on whether the receiving device has a video option). The call will ring for a maximum of 30 seconds. When the call is accepted, two-way audio communication shall be established and may last up to a maximum of 120 seconds. You have the option of opening the door by pressing the '*' or '#' key on the keypad, which will activate the internal relay of the panel and also first external relay of ref. 1490 (if installed). The '0' key activates only the second relay of ref. 1490.
Summary
For more info check https://meet.fermax.com
Contact
| FERMAX |
| Carlos Ferrer |
| Avda. Tres Cruces 133 Valencia (Spain) |
| 46017 |
| +34 96 317 80 00 |
| +34 96 317 80 00 |
| cferrer@fermax.com |
For any questions please refer to meet.fermax.com.


