Howto:MyApps Cloud - connecting 2N-Intercom: Difference between revisions
Jump to navigation
Jump to search
No edit summary |
No edit summary |
||
| (7 intermediate revisions by 4 users not shown) | |||
| Line 1: | Line 1: | ||
__toc__ | __toc__ | ||
=Applies To= | =Applies To= | ||
| Line 8: | Line 7: | ||
* myApps Cloud v13 | * myApps Cloud v13 | ||
==The article describes how to configure a 2N Intercom | |||
==The article describes how to configure a 2N Intercom to register and connect to a myApps Cloud PBX== | |||
For a better overview, the necessary configuration is divided in 2 parts: | |||
* The first part covers the respective PBX object | |||
* The second part describes the configuration of the 2N Intercom device. | |||
==Disclaimer== | ==Disclaimer== | ||
2N is a 3rd party brand. As such innovaphone is not liable for any malfunction of the 2N firmware itself, or malfunction caused through or due to changes in the 2N firmware. | 2N is a 3rd party brand. As such, innovaphone is not liable for any malfunction of the 2N firmware itself, or malfunction caused through or due to changes in the 2N firmware. | ||
== Considerations for this example configuration== | == Considerations for this example configuration== | ||
The parameters below are innovaphone default settings. These settings might be different in | The parameters below are innovaphone default settings. These settings might be different in the specific cloud environment. Thus, please check your documentation and take a note of the corresponding parameters of your specific cloud instance. | ||
* | * 2N does not deploy device certificates on its devices. Thus, secure TLS connections to the myApps Cloud platform are not possible.<br />Due to this reason, this example uses a connection via SIP/TCP. | ||
* The system name (devices domain name) of the PBX in this example is: company25.org | * The system name (devices domain name) of the PBX in this example is: company25.org | ||
* The URL or the respective PBX in this example is: 01234-pbx.innovaphone.com | * The URL or the respective PBX in this example is: 01234-pbx.innovaphone.com | ||
== Part 1 - Configuration on the myApps Cloud PBX == | == Part 1 - Configuration on the myApps Cloud PBX == | ||
=== Step 1 - Setting of the PBX User Object === | === Step 1 - Setting of the PBX User Object === | ||
[[Image: inno-PBX-object_01.png|thumb|upright=1.0|right|Part 1, Step 1]] | |||
* Open the PBX User Object, of the respective 2N Intercom User | * Open the PBX User Object, of the respective 2N Intercom User | ||
* Define a secure password | * Define a secure password | ||
| Line 38: | Line 38: | ||
== Part 2 - Configuration of the 2N Intercom == | == Part 2 - Configuration of the 2N Intercom == | ||
[[Image: 2N-IP-Intercom_01a.png|thumb|upright=1.0|right|Part 2, Step 1a]] | |||
* Prior to proceed with the configuration of the 2N device, please make sure the device contains the most recent Firmware. | * Prior to proceed with the configuration of the 2N device, please make sure the device contains the most recent Firmware. | ||
=== Step 1 - Tab: Services > Phone === | === Step 1 - Tab: Services > Phone === | ||
<ol type="a"> | |||
<li> The basic SIP parameters to register on the PBX</li> | |||
* Phone Number (ID): the PBX extension of the Intercom | * Phone Number (ID): the PBX extension of the Intercom | ||
* Domain: The system name (devices domain name) of the PBX | * Domain: The system name (devices domain name) of the PBX | ||
* Authentication ID: The name of the user object in the PBX | * Authentication ID: The name of the user object in the PBX | ||
* Password: The name of the password, defined in the respective user object | * Password: The name of the password, defined in the respective user object | ||
* Proxy Address: The URL of the PBX [[Image: 2N-IP-Intercom_01b.png|thumb|upright=1.0|right|Part 2, Step 1b]] | |||
<li> In the following, lets SIP Registrar</li> | |||
* Registration Enabled: 'on' | |||
* Registrar Address: The URL of the PBX | |||
* Registration State: 'REGISTERED' should appear, as soon as the Intercom device successfully registered on the PBX | |||
[[Image: 2N-IP-Intercom_01c.png|thumb|upright=1.0|right|Part 2, Step 1c]] <li>Configure the Intercom's'' 'external' ''IP address</li> | |||
* '' 'External' ''IP Address: IP address, through which the device is reachable. | |||
* '''Known issue:''' | |||
** As described above, 2N requires the 'Media Relay' checkbox in the PBX user object for audio. | |||
** But for video, 2N does not perform a media relay. | |||
** 2N only transparently forwards the video SDP to the remote endpoint. | |||
** '''Video''' is therefore only possible if both endpoints are '''on the same LAN'''. | |||
** Consequently, to make VoIP communication possible on the same LAN, this address has to be configured on the device. | |||
** Please make sure, the entered IP address is a fixed, an not a dynamic IP address. | |||
* ''Clarification'': | |||
** As 2N Intercom devices do no support STUN, the device itself does not know the'' 'external' '''public''' '' IP address, through which it is reachable (''WAN''). | |||
</ol> | |||
[[Image: 2N-IP-Intercom_02.png|thumb|upright=1.0|right|Part 2, Step 2]] | |||
=== Step 2 - Tab: Directory > Users === | === Step 2 - Tab: Directory > Users === | ||
The Users list contains user information, relevant for the quick dialing. | |||
Register Username and extension number, of the person who shall answer the Intercom. | * Register Username and extension number, of the person who shall answer the Intercom. | ||
[[Image: 2N-IP-Intercom_03.png|thumb|upright=1.0|right|Part 2, Step 3]] | |||
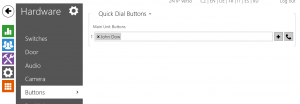
=== Step 3 - Tab: Hardware > Buttons === | === Step 3 - Tab: Hardware > Buttons === | ||
* Here you have to assign the previously defined user to the Intercoms quick dial buttons. | |||
* Skipping this step, the Intercom will not dial the PBX. | |||
== Part 3 - Testing == | |||
* Initiate a Test Call to verify your configuration... | |||
[[Category:myApps_Cloud|Connecting|{{PAGENAME}}]] | |||
Latest revision as of 14:01, 14 November 2023
Applies To
This information applies to
- Howto connect a 2N Intercom device to a myApps Cloud PBX
- myApps Cloud v13
The article describes how to configure a 2N Intercom to register and connect to a myApps Cloud PBX
For a better overview, the necessary configuration is divided in 2 parts:
- The first part covers the respective PBX object
- The second part describes the configuration of the 2N Intercom device.
Disclaimer
2N is a 3rd party brand. As such, innovaphone is not liable for any malfunction of the 2N firmware itself, or malfunction caused through or due to changes in the 2N firmware.
Considerations for this example configuration
The parameters below are innovaphone default settings. These settings might be different in the specific cloud environment. Thus, please check your documentation and take a note of the corresponding parameters of your specific cloud instance.
- 2N does not deploy device certificates on its devices. Thus, secure TLS connections to the myApps Cloud platform are not possible.
Due to this reason, this example uses a connection via SIP/TCP. - The system name (devices domain name) of the PBX in this example is: company25.org
- The URL or the respective PBX in this example is: 01234-pbx.innovaphone.com
Part 1 - Configuration on the myApps Cloud PBX
Step 1 - Setting of the PBX User Object
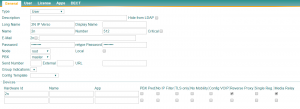
- Open the PBX User Object, of the respective 2N Intercom User
- Define a secure password
- In the section Devices, please fill the fields as following:
- TLS only: 'off'
- Reverse Proxy: 'on'
- Media Relay: 'on'
Part 2 - Configuration of the 2N Intercom
- Prior to proceed with the configuration of the 2N device, please make sure the device contains the most recent Firmware.
Step 1 - Tab: Services > Phone
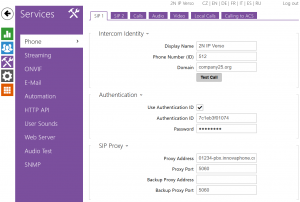
- The basic SIP parameters to register on the PBX
- Phone Number (ID): the PBX extension of the Intercom
- Domain: The system name (devices domain name) of the PBX
- Authentication ID: The name of the user object in the PBX
- Password: The name of the password, defined in the respective user object
- Proxy Address: The URL of the PBX
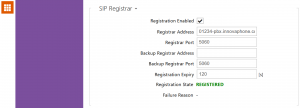
- In the following, lets SIP Registrar
- Registration Enabled: 'on'
- Registrar Address: The URL of the PBX
- Registration State: 'REGISTERED' should appear, as soon as the Intercom device successfully registered on the PBX
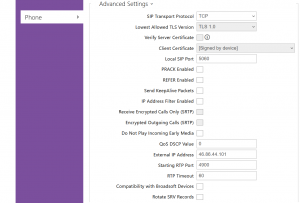
- Configure the Intercom's 'external' IP address
- 'External' IP Address: IP address, through which the device is reachable.
- Known issue:
- As described above, 2N requires the 'Media Relay' checkbox in the PBX user object for audio.
- But for video, 2N does not perform a media relay.
- 2N only transparently forwards the video SDP to the remote endpoint.
- Video is therefore only possible if both endpoints are on the same LAN.
- Consequently, to make VoIP communication possible on the same LAN, this address has to be configured on the device.
- Please make sure, the entered IP address is a fixed, an not a dynamic IP address.
- Clarification:
- As 2N Intercom devices do no support STUN, the device itself does not know the 'external' public IP address, through which it is reachable (WAN).
Step 2 - Tab: Directory > Users
The Users list contains user information, relevant for the quick dialing.
- Register Username and extension number, of the person who shall answer the Intercom.
Step 3 - Tab: Hardware > Buttons
- Here you have to assign the previously defined user to the Intercoms quick dial buttons.
- Skipping this step, the Intercom will not dial the PBX.
Part 3 - Testing
- Initiate a Test Call to verify your configuration...
