Reference10:Player Voice Recording: Difference between revisions
mNo edit summary |
mNo edit summary |
||
| Line 35: | Line 35: | ||
[[Image:P1035_04.png]] | [[Image:P1035_04.png]] | ||
The player works also if minimized in the taskbar. A typical example is the remote control of the player directly from the reporting. | |||
[[Image:P1035_05.png]] | |||
If a CDR ticket has a voice record a play symbol is displayed, and as tooltip the basic player elements (play/pause/stop) appears. | |||
A click on those elements controls the player even if minimized. | |||
==Headline== | |||
The following picture shows the headline elements described form left to right. | |||
[[Image:P1035_06.png]] | |||
The lock symbol is only shown if the player has one or two User password. A click in the lock will lock the player; the result is shown in the picture. If the player is locked a click on the lock symbol will open on the left side of the headline an input box for the password. If there are two passwords defined in the setup after the first one the second one has to be entered (4 eyes principle). | |||
The setup icon opens a menu, the options “Beep at end” and “Transcription” will be shown only if enabled in the setup. If the option “Beep at end” is switched on (the icon has a border like in the left menu shown) the PC reproduce a ”beep” at the end of the reproduction of a track if the repeat play function (described further on) is switched on. Particularly usefully if more tracks are play from a playlist (described further on). | |||
The transcription feature can be switched on and off, the relative window and control elements on the player will appear. This feature is described further on. | |||
If the setup is protected by a password you must enter the password on the left side of the headline to access. | |||
The Help Button will open online this document, the about shows software and build information. | |||
The minimized button puts the Player in the taskbar. | |||
The exit button will show a dialog box. | |||
== Search == | == Search == | ||
Revision as of 11:10, 25 August 2016
THIS ARTICLE IS IN REVIEW!
This is a layout of the innovaphone voice recording Player Build 1135.
The figures in the descriptions maybe slightly different, but the functions are equal.
Note that this help shows all options enabled, your setup could hide some functions
The innovaphone voice recording software is intended for professional use.
It is presumed that the solution is operated only by trained personnel. Setup and servicing is reserved to skilled technicians.
General
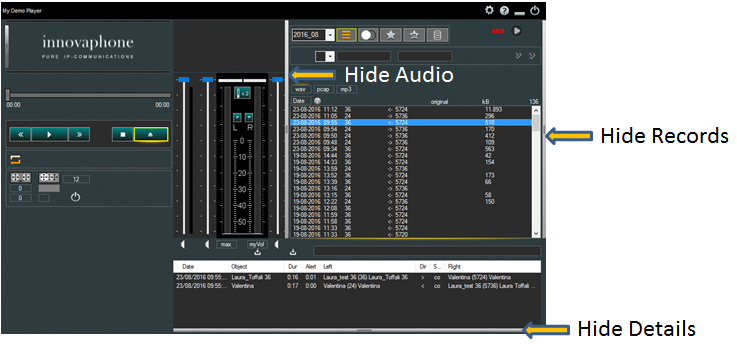
The following picture shows the 3 main sections of the player and on the right side the record view items.
All sections and items are described further on.
Views
The Player functions can be limited in the setup, the following picture shows a player with all options switched of in the player setup, note the difference to the picture above.
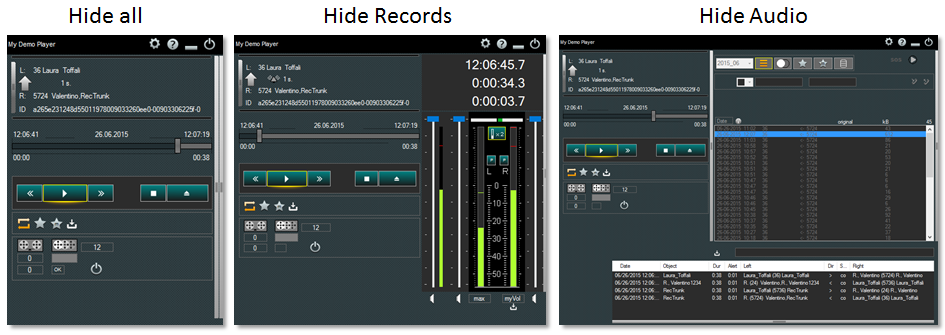
On top of the possible limitations in views and features fixed in the setup also the user can minimize views clicking on the relative sliders:
The following picture shows some possible views:
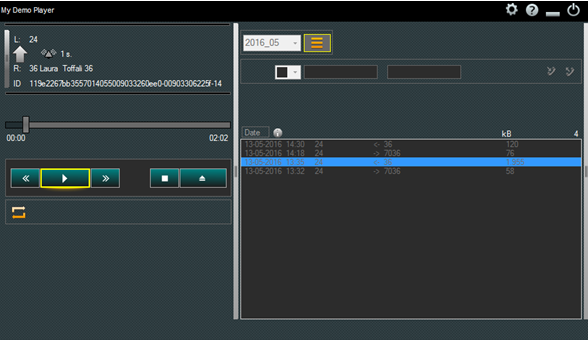
The player works also if minimized in the taskbar. A typical example is the remote control of the player directly from the reporting.
If a CDR ticket has a voice record a play symbol is displayed, and as tooltip the basic player elements (play/pause/stop) appears. A click on those elements controls the player even if minimized.
Headline
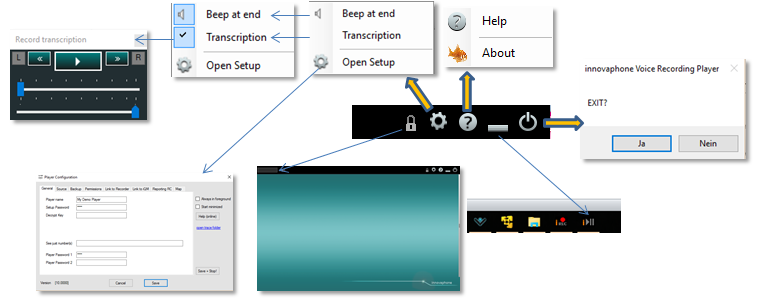
The following picture shows the headline elements described form left to right.
The lock symbol is only shown if the player has one or two User password. A click in the lock will lock the player; the result is shown in the picture. If the player is locked a click on the lock symbol will open on the left side of the headline an input box for the password. If there are two passwords defined in the setup after the first one the second one has to be entered (4 eyes principle).
The setup icon opens a menu, the options “Beep at end” and “Transcription” will be shown only if enabled in the setup. If the option “Beep at end” is switched on (the icon has a border like in the left menu shown) the PC reproduce a ”beep” at the end of the reproduction of a track if the repeat play function (described further on) is switched on. Particularly usefully if more tracks are play from a playlist (described further on).
The transcription feature can be switched on and off, the relative window and control elements on the player will appear. This feature is described further on.
If the setup is protected by a password you must enter the password on the left side of the headline to access.
The Help Button will open online this document, the about shows software and build information.
The minimized button puts the Player in the taskbar.
The exit button will show a dialog box.
Search
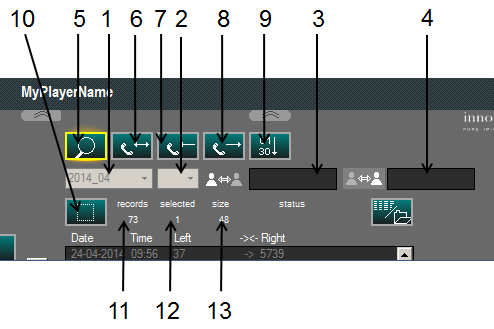
<1> Basic Year/Month filter <2> Day of the month filter <3> Internal number filter (could be fix), wildcard possible <4> External number filter, wildcard possible <5> Show immediately records on/off <6> show any call direction <7> show just incoming calls <8> show just outgoing calls <9> order (form oldest to newest or vice versa) <10> select/deselect all <11> number of matching records <12> number of marked records <13> file size
Operation mode
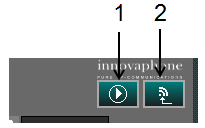
<1> switches between Media player and Recording player <2> Last record on top, show just essential commands (rescue mode)
Record handling
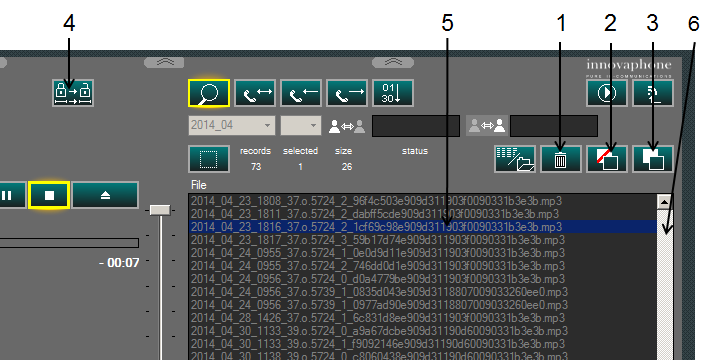
<1> Delete Record <2> Move Record <3> Copy Record <4> Export loaded Record <5> Selected Record, double click = play <6> scroll bar will appear automatically if necessary
Play
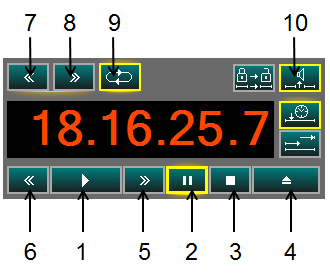
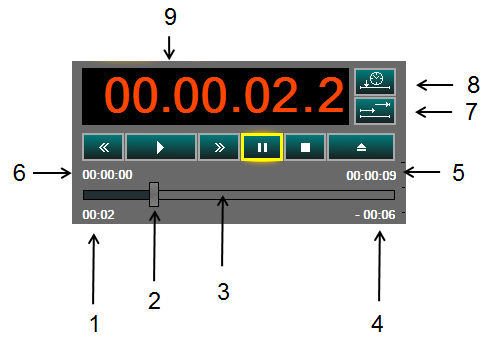
<1> Play <2>Pause <3> Stop <4> Eject <5> Jump forward <6> Jump backward <7> Play next Record in list <8> Play previous Record in list <9> Continuous Play, in Playlist play all Records <10> Beep between records
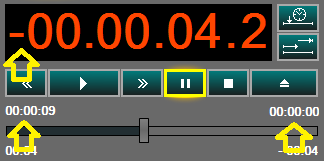
<1> Duration starting from beginning <2> Reproduction position, can be moved to any position <3> expired and remaining time graphically <4> Missing time to end <5> Duration, Start or stop time <6> Duration, Start or stop time <7> Show expired or countdown time <8> Show historic timestamp
Show Countdown
Show historic timestamp
<1> internal user <2> external user <3> call direction <4> Start Date and time of the recording <5> ringing time, time to answer <6> call ID <7> system status <8> local remote control on
Playlist
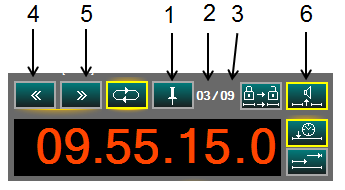
If in the search files more than one record is marked and the play key is pressed, the selected records are stored in a playlist und reproduced one after the other if continues play is activated.
<1>Mark Record in Playlist, all other records are canceled in the playlist and the selected one is marked in the search window <2> Actual record in playlist <3> Number of records in playlist (max.99) <4> Jump to next record in playlist <5> Jump to previous record in playlist
Record Details
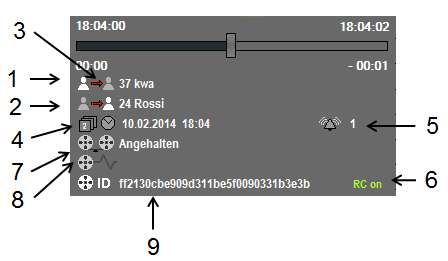
<1> Internal User <2> External User <3> Call direction <4> Timestamp Start recording <5> Time to answer (ring duration) <6> Reporting Remote Control on <7> Player status <8> System status <9> Call UID
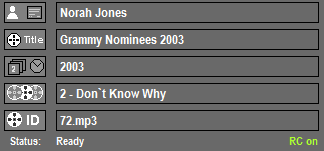
In case of mp3 records an ID3v1 Header is decoded. Artist, Title, Edition, track number an title is displayed automatically.
Call details
<1> - <2> Timestamp <3> Object from the PBX point of view <4> duration <5> altert time <6> User A from the PBX point of view <7> direction <8> state (see tooltip explanation) <9> User B from the PBX point of view <10> Call detail display, scrollbar appears automatically if necessary <11> tooltip explaining abbreviations
Memory
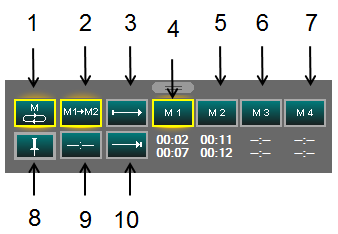
Up to 4 clips (form position – to position)can be selected and stored for each record.
<1> Loop in actual memory <2> Loop in all memory clips <3> mark start/form position <4> memory clip 1 <5> memory clip 2 <6> memory clip 3 <7> memory clip 4 <8> save memory clips for this record <9> clear memory clip <10> stop/to position
Volume
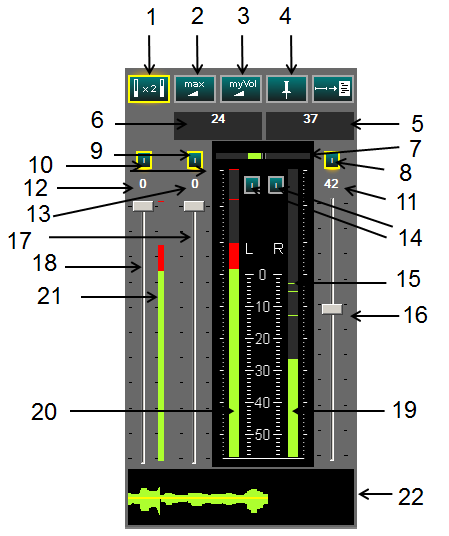
<1> peak indicator sensitive <2> volume, left and right channel on maximum <3> switch to saved volume setup <4> save volume my volume setup <5> Number and name of user on left channel <6> Number and name of user on right channel <7> Shows difference between channels (L-R and R-L) <8> Mute right channel <9> Mute left channel <10> mute <11> attenuation right channel <12> attenuation <14> Meter integration or peak attenuation <15> last peak values <16> Volume right channel <17> Volume left channel <18> Volume <19> right channel metering <20> left channel metering <21> metering <22> last 5 seconds meter history
Transcription
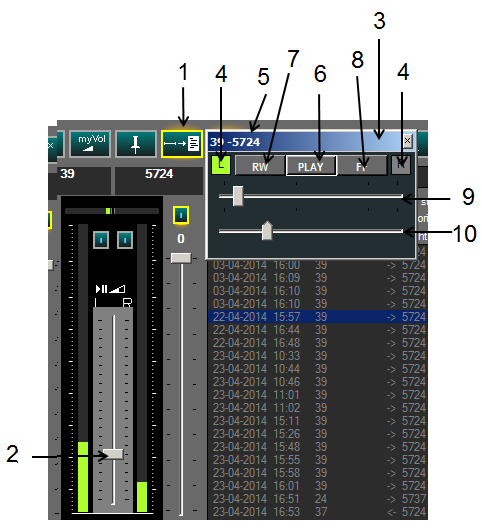
The transcription tools are used if a transcription of the conversation (for example on a Word document) is required.
The Autostop function will stop the player automatically each time the actual not talking party volume threshold is reached.
<1> Transcription ON/OFF <2> Slider to adjust Autostop Level
<3> If Transcription is switched on a independent small player control window appears. This allows a remote control of the player and is always hold in foreground. The player can be minimized if required.
<4> Indicate the last talking User <5> User (numbers+names) in conversation <6> Pause/Play <7> Jump back <8> Jump forward <9> Progress indicator and slider <10> Autostop level
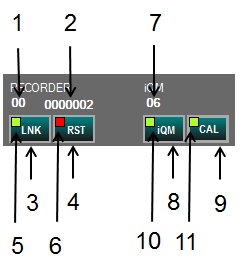
Link Recorder/iQM
RECORDER
<1> Channels under control <2> Number of stored records <3> Start link manually <4> Remote reset error in recorder <5> Status link to Recorder, red= down, green=up
IQM
<7> Number of unanswered calls in list <8> Start link manually <9> Open/close iQM Window <10> Status link to iQM server, green =up, red=down <11> iQM window open/closed
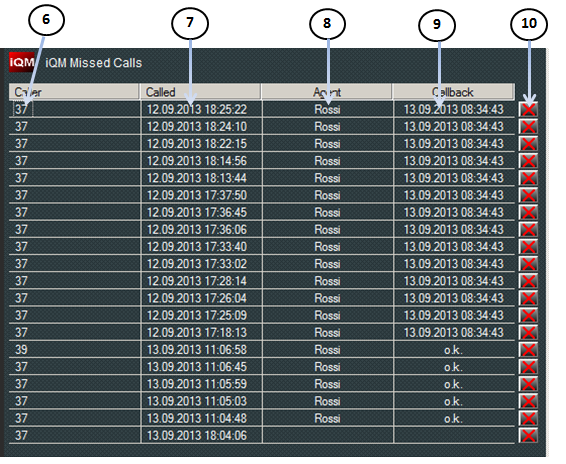
iQM integration (missed calls)
<6> caller to recall, double click call <7> missed call timestamp <8> recalled or canceled from agent <9> timestamp recall or quit

