Reference9:Concept Operator
Applies To
This information applies to
- innovaphone Operator V9
Requirements
To give an orientation, the requirements for the Operator application will be mirrored here simply as the minimum requirements for the Windows Aero window manager[1]:
- Windows Vista (Windows XP may work)
- 1 GHz CPU (32-bit, or 64-bit)
- 1 GB of RAM
- 128 MB graphics card
- DirectX 9 capable
- Hardware Pixel Shader 2.0
- 32bits per Pixel
More Information
This article is a beta article for the innovaphone Operator 9 application in its current beta state. For functionalities inherited from and concerning the innovaphone Operator 8 the following link guides towards the respective article:
The innovaphone Operator 9 succeeds the innovaphone Operator 8. A busy lamp field(busy field, BF) is the main addendum to the application.
The BF's features:
- Condensed user information: Display Name, Number, PBX
- An entry's context menu allows to reveal detailed user informations for an entry
- Colored User status: available(registered & not engaged in a call), engaged in a call, not registered
- Symbolized presence status: presence activity, presence note(as tooltip)
- Display options for the BF window
- within the main window
- within a separate window
- within a separate window on a 2nd monitor
- Two different entry layouts can be selected in three different sizes(small, medium, large)
- Freely placeable labels
Download
- The beta can be downloaded from the unoffical builds section: http://download.innovaphone.com/ice/download/p/published/Operator%20Version%209/
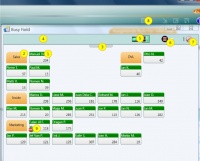
Busy-Field
Layout
- 1)BF entry
- 2)BF label
- 3)Thumb for menu panel
- 4)Menu panel(slid out)
- 5)Selector for BF display as separate window or within main window
- 6)Selector for the layout of BF entries
- 7)Erase button for selected BF entries/labels
- 8)Button to initially show the BF
- 9)Example of a BF entry with a presence symbol
Arranging Entries
- Create a free line
- Select 2x entries
- Drag the selected entries onto some other entries
- All entries within the target line and all lines below are going to be moved downwards.
- Adding a label
- Right-Click into a free location
- A context menu appears - select Add Label
- A label is going to be placed.
- Left-Click into the label, in order to edit the label's text.
- Changing the position of a single entry
- Left-Click the entry and keep the left mouse button pressed.
- Drag the entry into its new position.
- Drop the entry by releasing the mouse button.
In case of an entry already occupying the new position, the two entries are going to exchange their positions.
- Changing the position of multiple entries
- Left-Click into a free position and keep the left mouse button pressed.
- Open up a selection rectangle. Entries intersecting with the rectangle are going to be selected.
- Release the left mouse button.
- Left-Click onto one of the selected entries and keep the left mouse button pressed.
- Drag the entries into their new position.
- Drop the entries by releasing the mouse button.
In case of one or more entries already occupying the new position, the entire lines containing those entries and the lines below are going to be moved downwards.
