Howto14r1:RecordingsApp
Applies To
This information applies to
- RecordingsApp V14r1
More information
This article describes how to set up the RecordingsApp.
System Requirements
- innovaphone PBX
- innovaphone AppPlatform
- RecordingsApp
- ReportingsApp
- App(innovaphone-recorder) licenses per User
Configuration
Setting up the Instance in the AP Manager
In order for the app to work, it must be downloaded. An instance must then be created and launched with the correct information, otherwise it won't work.
- In this step, you'll set up the instance of the RecordingsApp.
- To do this, you will need to download the app in the AP Manager plugin.
- Once you have installed the latest version, you will need to add a new instance.
- You need to fill in all the important information in the newly opened window.
Configuration in the PBX Manager Plugin
In this step, it is mandatory to add two new objects to the PBX and grant the necessary licenses and permission to the templates to use the application. In the PBX Manager navigate to AP Recordings, create two new objects and configure the templates.
Adding objects using the Recordings Plugin
- First, you'll need to add 2 new objects for the RecordingsApp to work.
- You need to add an object for "User" and one for "Admin".
- You have five fields to fill in.
- Name: This is the name of the application.
- SIP: This is the SIP entry for the object.
- TYPE: Here you can choose what type this object will be. (User, or admin)
- Delete mode: Here you can choose if you want to have a recycle bin or not, or if you want to deny users from being able to delete recordings.
- Reporting: Here you have to select the reporting instance that provides the call information.
Access list configuration through the Recordings Plugin
- Access list is a User type of app that allows the access to other user's records. Access list is useful to scale th access rights of the system records.
- Here you need to add another object for the Access List.
- You have five fields to fill in.
- Name: This is the name of the application.
- SIP: This is the SIP entry for the object.
- TYPE: Here you can choose what type this object will be. (User, or admin)
- Delete mode: Here you can choose if you want to have a recycle bin or not, or if you want to deny users from being able to delete recordings.
- Reporting: Here you have to select the reporting instance that provides the call information.
- Access list: Enter a number in each field. The number (e164) of the user who will use the application and the number (e164) for the user whose recordings will be accessed.
Hint: Do not forget to give the access rights of the app to the users via the template configuration
Configuring Templates
- You need to grant permissions and licenses for the app to work. You can use templates for this.
- Select the user template and grant the app permission and license.
- Select the admin template and grant the admin-app permission and also the license.
- Now users with either template can use the appropriate apps.
Configuring the Recordings-App
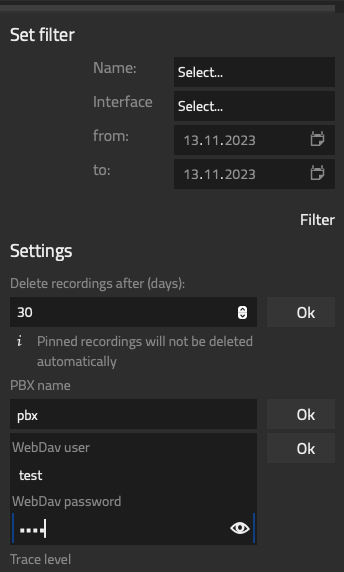
The only change that needs to be done here is configuring the PBX name inside the Admin-App, otherwise it won't correctly record the calls.
- Follow the steps inside the RecordingsAdmin - app
- After opening the app, you can open a sidebar-menu with the upper right menu button.
- Below you see the needed setting called "PBX name". Here, you enter the name of the PBX.
Configuring WebDav credentials in RecordingsAdmin
With 14r1, WebDav credentials can be configured in RecordingsAdmin. With this credentials it is possible to get Access to the original .pcap Files. In RecordingsAdmin, user and password can be configured.
Please note that all Devices which should be recorded, will need to authenticate if this is configured.
For Softphones, fill out the appropriate fields at Advanced-UI --> PBX --> Config --> myApps --> Recording Username / Recording Password.
In order to not display the user and password to the end-user, you can hide the Record-to-URL by activating the hide setting at: Advanced-UI --> PBX --> Config --> myApps --> Recording URL in softphone app hidden
For Hardphones and Gateways, you can also add the user and password to the URL or go to Advanced-UI --> Services --> HTTP --> Client and configure the Record-to-URL as Authenticated URL by using the previously configured user and password.
Configuring CDR
- The CDRs are fetched from the ReportingsApp.
- Make sure that there is a correctly configured Reportings-Instance and that the pbx sends the CDRs into this instance.
- For the Recordings-Users, no Reportings-License is necessary.
- The correct Reportings-Instance should be selected in the apps tab in the Recordings-Object.
Checking the Recordings-User-App object
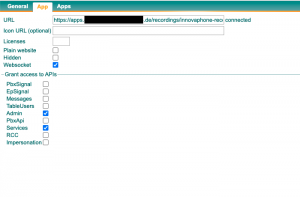
It could happen that Websocket, Admin and Services aren't ticked in "Objects" , but this is necessary.
- To check this, you need to navigate to PBX - Objects
- Select the Recordings object and navigate to the App tab.
- All three above mentioned checkboxes should be ticked.
Checking the Reporting-App object
You need to make sure, that Websocket is ticked in the App tab and that the object is connected, otherwise, Recordings is not able to fetch any data from the App Service "Reports".
Record-to-URL
The Record-to-URL is composed by the following information:
https://<App platform DNS>/<domain>/<instance name>/Files
Be aware: The Record-to-URL always has to be used case sensetive!
VoIP-Interface / Softphone / Phone configuration
Configuring the VoIP-Interface through the Devices-Interface
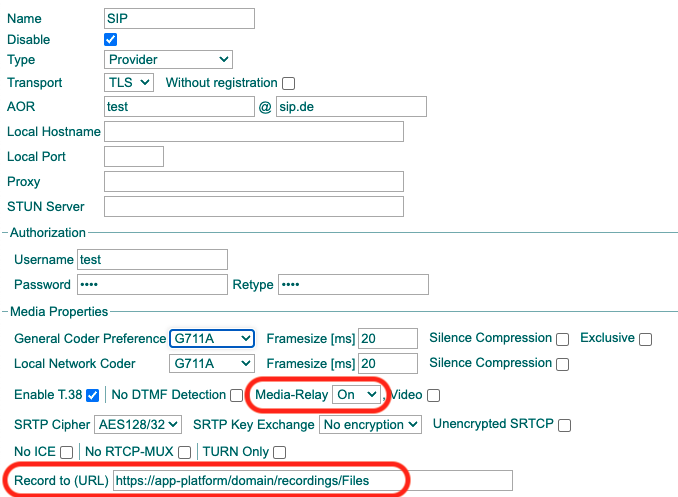
If you want all external calls to be recorded, then the SIP-Trunk needs to know the Record-to-URL, you inserted earlier too. Also, the Media-Relay checkbox needs to be checked.
- Since you also want to record any call that goes through your SIP-trunk, you need to insert the Record-to-URL into the SIP.
- For this, you select the Gateway --> SIP tab.
- Make sure that the URL is configured correctly and also the Media-Relay is activated.
- For this, you select the Gateway --> SIP tab.
Configuring the Softphones
Please note that the recordings-config for softphones is only available, if the softphone user has the correct licence App(innovaphone-recorder) assigned.
Also, the recordings-config distributed by the PBX will not take effect if the user has no license.
For the softphones, the Record-to-URL must be inserted via the SoftphoneApp - Burger Menu. In addition, you can configure whether to record automatically every call or whether to record only external calls.
Config distribution via PBX
The Record-to-URL can also be configured via the Advanced-UI --> PBX --> Config --> myApps.
Configuring the Phones through the DevicesApp
- Go to Devices and select the proper Domain.
- Create within this Domain an additional Provisioning Category with a meaningful name like "Phones with Recording"
- Create within this Domain an additional Device Configuration from type [Phone] with a meaningful name like "Phone configuration for recording" and assign it to the Category "Phones with Recording".
- Add the Recording URL
- Create within this Domain an additional Device Configuration from the type [Expert configuration] with a meaningful name like "Record Transparant" and assign it to the Category "Phones with Recording"
- Add the following Expert Mode commands:
mod cmd PHONE/CONF-UI reg-edit-rec /cmd reg-edit-rec /id 0 /rec.mode transparent /rec.to p /rec.e164 /rec.h323 /op OK
config write
config activate
iresetn
- In the Devices Tab, select the desired IP Phone(s) and add these to the Category "Phones with Recording". Be aware, you can have only one Provisioning Category assigned, so de-assign the excisting one.
- Run the Expert Configuration.
The IP Phone will show shortly the message Software Update 1%.
After the change, check the changed configuration.
Configuring the Phones through the Advanced-UI
For the phones to actually start recording as soon as they make a call, you need to set up a few things. This is done in the phones Advanced-UI settings, for example by using Devices-App.
Setting up the Record-to-URL
- To enable call recording, you need to set up the following values:
- At the Advanced-UI, select the "Phone" tab.
- Down below, you again need to insert a case-sensitive Record-to-URL into the field, which follows the following rule:
Setting up the Recording-Tab
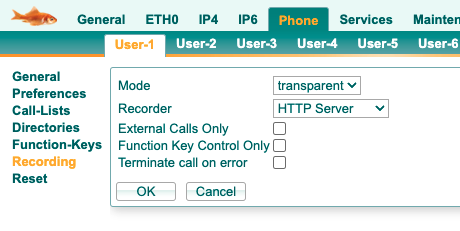
- To fully function, the following changes need to be made in the Recording-Tab
- Mode: Transparent: This means that the call will be recorded instantly.
- Recorder: HTTP Server
Related Articles
http://wiki.innovaphone.com/index.php?title=Reference14r1:Concept_App_Service_Recordings


