Howto:Billboard - Wecom - Partner App: Difference between revisions
mNo edit summary |
No edit summary Tag: 2017 source edit |
||
| Line 49: | Line 49: | ||
=== Users App === | === Users App === | ||
==== 1. Accessing a Group ==== | |||
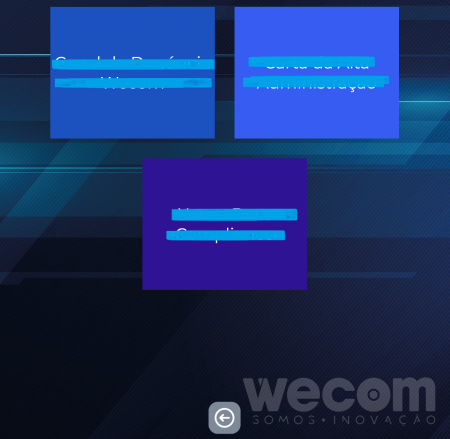
# On the main page, you can see all the groups you are part of. | |||
# To enter a group, simply click on the desired group. | |||
[[File:Billboard Users Groups Page.png|none|thumb|450x450px|Users App main page with every group you are on]] | |||
==== 2. Viewing a Post ==== | |||
# Inside a group, posts are displayed as cards.[[File:2. Billboard Posts Page (of a Group).png|none|thumb|450x450px|Posts inside a group]] | |||
# Inside a group, | #* If you are an Editor, the post will also show the visibility period on the bottom of the card. | ||
# | #* Unread posts display a red '''NEW''' label in the top-left corner of the card. | ||
# | #** The label disappears as soon as the post is opened.[[File:2.5. Billboard New Post Card Editor View.png|none|thumb|350x350px|New post with visibility period]] | ||
# Click on a post to open its details.[[File:3. Billboard Open Post.png|none|thumb|Open post with information and description]] | |||
# The post view shows: | |||
#* Type (External or Internal) | |||
#* Creator's name | |||
#* Start and end dates of visibility | |||
# To close the post, click the '''X''' button in the top right corner. | |||
==== | ==== 3. Creating a Group (Admins only) ==== | ||
==== | # If you have admin privileges in the Users App, you will see an '''Add+''' button on the group screen.[[File:4. Billboard Users Groups Page Button Outlined.png|none|thumb|450x450px|Groups page with "+ Add" button outlined]] | ||
Posts can | # Click '''Add+''' to open the group creation modal. | ||
# Fill in: | |||
#* '''Name of the Department''' | |||
#* Select users and define their roles: | |||
#** '''Viewer''' – Can access the group and read posts. | |||
#** '''Editor''' – Can view, create, edit, and delete posts, and see view history. | |||
# Select a color (optional). | |||
# Click '''Insert''' to create the group.[[File:5. Billboard Group Creation Modal.png|none|thumb|450x450px|Group creation modal with roles selection, color picking and name input]] | |||
==== 4. Creating a Post ==== | |||
# You must be an '''Editor''' in a group to create a post, you will see an '''+ Add''' button on the screen of a group.[[File:6. Billboard Posts Page with Add Card.png|none|thumb|450x450px|Posts on a group with Editor view, with "+ Add" card]] | |||
# Inside the group, click the '''+Add''' button to open the post creation modal. | |||
# Fill in the following: | |||
#* '''Title''' (top input) | |||
#* '''Description''' (main text area) | |||
#* '''Start and end dates'''[[File:6.1. Billboard Post Start and End Date Picking.png|none|thumb|350x350px|Post start and end date time picking]] | |||
#* '''Type''' (Internal or External)[[File:6.2. Billboard Post Type Drop Down Select.png|none|thumb|300x300px|Type drop down selection]] | |||
#* '''Color''' (default is black if not selected)[[File:6.3. Billboard Post Color Picker.png|none|thumb|300x300px|Post and group color picker]] | |||
# Click '''Insert''' to save or '''Close''' to cancel.[[File:7. Billboard Post Creation Modal.png|none|thumb|400x400px|Post creation and editing modal]] | |||
==== 5. Editing or Deleting a Post ==== | |||
* If you are the creator or an editor of the group: | |||
# Click on the post. | |||
# On the right, you'll see icons to: | |||
#* Edit: opens the same modal with pre-filled data. | |||
#* Delete: immediately removes the post.[[File:8. Billboard Post View as Editor Actions Outlined.png|none|thumb|400x400px|Post view as Editor with actions outlined]] | |||
==== 6. Viewing Post History ==== | |||
# On the open post, click on the "clock" icon to view who accessed each post and when. | |||
#* This info is shown in the post view and the icon is replaced with an arrow icon to go back to the main information.[[File:9. Billboard Post History.png|none|thumb|350x350px|Post history of who has viewed and when]] | |||
==== 7. Managing Groups (Editor role) ==== | |||
* If you are an editor in a group, the bottom menu will have extended options.[[File:10. Billboard Posts Page with Bottom Menu Outlined.png|none|thumb|Posts on a group as an Editor with bottom menu outlined]] | |||
# Click the trash icon to delete the group. | |||
# Click the clock icon to access post history. | |||
#* You can filter posts: | |||
#** By time period (Today, Last 7 days, Custom...) | |||
#** By deleted or active status[[File:11. Billboard Posts Time Filter Drop Down.png|none|thumb|Group's posts history drop down time filter]][[File:12. Billboard Posts Time Filter Custom.png|none|thumb|Group's posts history time filter with custom period time picking]] | |||
# Click the gear icon to edit group settings: | |||
#* Change the name or color | |||
#* Modify members and their roles[[File:13. Billboard Group Editing.png|none|thumb|Group editing modal with users and their roles that were previous selected ]] | |||
=== Admin App === | === Admin App === | ||
Revision as of 17:31, 27 June 2025
| FIXME: Work in progress, still incomplete |
| Partner App Info | |
|---|---|
 | |
| Name | Billboard |
| Company | Wecom |
| Version | 1.0 |
| License | Via Innovaphone Pricelist |
| Languages | Czech, English, Estonian, French, German, Italian, Polish, Portuguese, Slovenian, Spanish |
Product Name
Billboard Link
Certification Status
Space dedicated to Billboard certification information.
Category
Space dedicated to Billboard category information.
Vendor

Wecom
Description
Billboard is a Partner App developed by Wecom to modernize internal communications by digitizing traditional bulletin boards. Through a user-friendly interface integrated into Innovaphone’s myApps workspace, departments (referred to as "groups" within the app) can publish announcements with scheduled validity, targeted visibility, and interaction tracking.
Main components:
- Users App – For general users to access and interact with department posts.
- Admin App – For administrators to manage groups, posts, and licensing.
Functions
Users App
1. Accessing a Group
- On the main page, you can see all the groups you are part of.
- To enter a group, simply click on the desired group.

2. Viewing a Post
- Inside a group, posts are displayed as cards.
Posts inside a group - If you are an Editor, the post will also show the visibility period on the bottom of the card.
- Unread posts display a red NEW label in the top-left corner of the card.
- The label disappears as soon as the post is opened.

New post with visibility period
- The label disappears as soon as the post is opened.
- Click on a post to open its details.
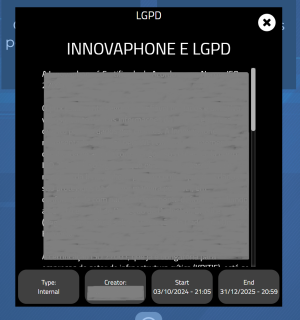
Open post with information and description - The post view shows:
- Type (External or Internal)
- Creator's name
- Start and end dates of visibility
- To close the post, click the X button in the top right corner.
.png)


3. Creating a Group (Admins only)
- If you have admin privileges in the Users App, you will see an Add+ button on the group screen.

Groups page with "+ Add" button outlined - Click Add+ to open the group creation modal.
- Fill in:
- Name of the Department
- Select users and define their roles:
- Viewer – Can access the group and read posts.
- Editor – Can view, create, edit, and delete posts, and see view history.
- Select a color (optional).
- Click Insert to create the group.
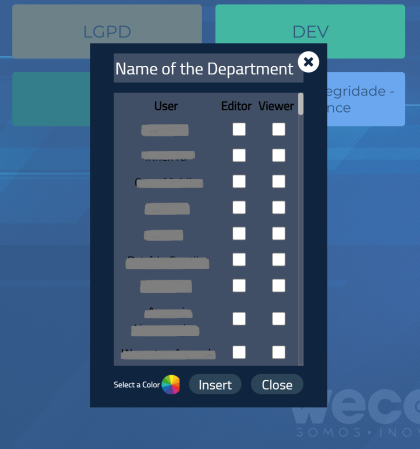
Group creation modal with roles selection, color picking and name input


4. Creating a Post
- You must be an Editor in a group to create a post, you will see an + Add button on the screen of a group.

Posts on a group with Editor view, with "+ Add" card - Inside the group, click the +Add button to open the post creation modal.
- Fill in the following:
- Title (top input)
- Description (main text area)
- Start and end dates

Post start and end date time picking - Type (Internal or External)

Type drop down selection - Color (default is black if not selected)

Post and group color picker
- Click Insert to save or Close to cancel.
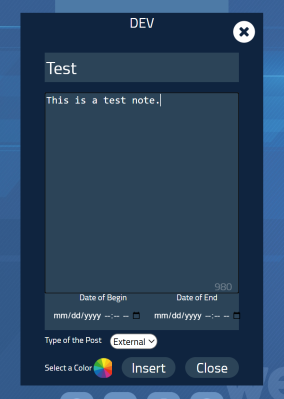
Post creation and editing modal


5. Editing or Deleting a Post
- If you are the creator or an editor of the group:
- Click on the post.
- On the right, you'll see icons to:
- Edit: opens the same modal with pre-filled data.
- Delete: immediately removes the post.

Post view as Editor with actions outlined

6. Viewing Post History
- On the open post, click on the "clock" icon to view who accessed each post and when.
- This info is shown in the post view and the icon is replaced with an arrow icon to go back to the main information.
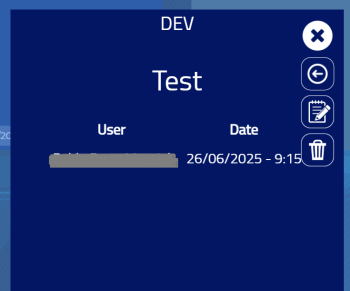
Post history of who has viewed and when
- This info is shown in the post view and the icon is replaced with an arrow icon to go back to the main information.

7. Managing Groups (Editor role)
- If you are an editor in a group, the bottom menu will have extended options.
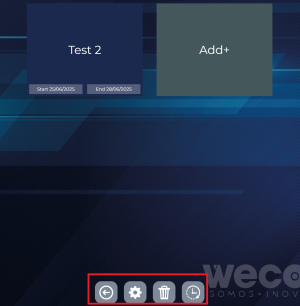
Posts on a group as an Editor with bottom menu outlined

- Click the trash icon to delete the group.
- Click the clock icon to access post history.
- You can filter posts:
- By time period (Today, Last 7 days, Custom...)
- By deleted or active status
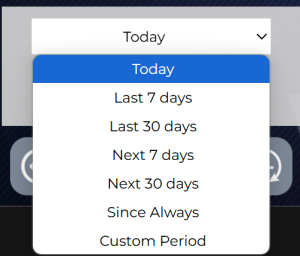
Group's posts history drop down time filter 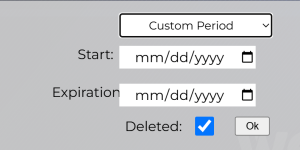
Group's posts history time filter with custom period time picking
- You can filter posts:
- Click the gear icon to edit group settings:
- Change the name or color
- Modify members and their roles
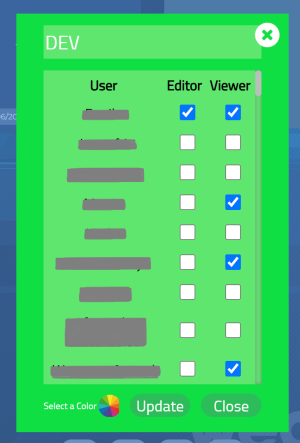
Group editing modal with users and their roles that were previous selected


Admin App
Administrators can:
- Assign who can create groups.
- View and edit all posts and groups.
- Monitor licensing.
Admin Post Management
All posts (including deleted) can be edited:
- Title, content, date range, color.
Group Management
Admins can:
- View all groups (even deleted ones).
- Edit names, colors, users, and their roles.
Component Diagram
The diagrams below illustrate the architecture of the Billboard application and its interaction with the Innovaphone platform, as well as the various components involved.
User and Admin Interaction Flow
Flow Overview:
- ADMIN: The administrator has the ability to manage groups and posts across the system, including controlling visibility and user access.
- DEPARTMENT (Group): Represents different groups (like IT and HR), each having specific announcements and user interactions.
- NOTES: Each group can have specific notes (e.g., IT or HR), which are shown to relevant users.
- USERS: Users from various groups (IT, HR, and General) can access posts that are published within their allowed groups.
Application Architecture
Flow Overview:
- PBX Platform: Interacts with the Billboard App, managing internal communication and service integration.
- APP Platform: Hosts the Billboard Service, which manages posts and user interactions, and communicates with the database.
- Service DWC: Responsible for managing the backend services for the Billboard app, providing routes to interact with both the database and the PBX platform.
This architecture shows how the components integrate within the Innovaphone ecosystem, allowing for seamless communication between groups and users through the Billboard app.
Licensing
Billboard is licensed via the Innovaphone Pricelist.
License type: Innovaphone Pricelist License model: One license per user Trial: 30 days temporary license available after installation
Prerequisites
System Requirements
- Innovaphone firmware:
14r1or later - Innovaphone App Platform with myApps
- PBX Manager for app registration
Licensing Activation
- Requires license token and file provided by Wecom
- Insert into Admin interface for activation
Versions
- Current version: 1.0
- Latest release:
1010 final - Release date: November 11, 2024
- Innovaphone compatibility: Yes
- Architectures supported:
arm,x86_64,arm64
Installation
Option 1: App Store
- Open AP Manager
- Click the yellow App Store button
- Search and install "Billboard"
Option 2: Manual Upload
- Download package from Wecom
- Upload via "App Upload" in AP Manager
Register in PBX Manager
- Open PBX Manager
- Go to "Apps"
- Add and configure:
- Billboard Users App
- Billboard Admin App
Copyright
Space dedicated to Flowe copyright information.
Contact
- PORTO ALEGRE - RS
Av. Carlos Gomes, 466 / 401
Boa Vista - CEP 90480-000
Tel: +55 51 3079.5000
- FLORIANÓPOLIS - SC
SC 401, 8600 - Room 7
Corporate Park - Block 2
Santo Antônio de Lisboa
CEP 88050-001
Tel: +55 48 3112.6200
Mail: comercial@wecom.com.br
Support: suporte@wecom.com.br
Website: wecom.com.br
For any questions please refer to our contact page.