Howto:Integrating Shelly IoT Devices with the innovaphone Buttons App: Difference between revisions
Created page with "'''DRAFT''' Shelly, a European (Bulgarian) manufacturer, offers a wide range of Internet of Things (IoT) sensors and actuators. This article will guide you through setting up and using Shelly digital inputs (contacts) to interact seamlessly with the innovaphone Buttons App. The possibilities are truly endless! Imagine triggering a phone call when a door contact closes, sending an instant message, initiating time tracking, or even setting up complex conditional actions...." |
mNo edit summary |
||
| Line 2: | Line 2: | ||
Shelly, a European (Bulgarian) manufacturer, offers a wide range of Internet of Things (IoT) sensors and actuators. This article will guide you through setting up and using Shelly digital inputs (contacts) to interact seamlessly with the innovaphone Buttons App. | Shelly, a European (Bulgarian) manufacturer, offers a wide range of Internet of Things (IoT) sensors and actuators. This article will guide you through setting up and using Shelly digital inputs (contacts) to interact seamlessly with the innovaphone Buttons App. | ||
The possibilities are truly endless! Imagine triggering a phone call when a door contact closes, sending an instant message, initiating time tracking, or even setting up complex conditional actions. That's because the innovaphone Buttons App allows you to assign a series of parallel actions to any specific event. | The possibilities are truly endless! Imagine triggering a phone call when a door contact closes, sending an instant message, initiating time tracking, or even setting up complex conditional actions. That's because the innovaphone Buttons App allows you to assign a series of parallel actions to any specific event. | ||
In this document, we'll walk you through every step of integrating your Shelly devices with the Buttons App. It's surprisingly straightforward - let's get started! | In this document, we'll walk you through every step of integrating your Shelly devices with the Buttons App. It's surprisingly straightforward - let's get started! | ||
| Line 28: | Line 30: | ||
These devices are typically powered by hazardous voltages (usually 220V in Europe). Installing a residual current device (RCD), also known as a ground-fault circuit interrupter (GFCI) in some regions, upstream in the electrical circuit is highly recommended and, in some countries, legally required. | These devices are typically powered by hazardous voltages (usually 220V in Europe). Installing a residual current device (RCD), also known as a ground-fault circuit interrupter (GFCI) in some regions, upstream in the electrical circuit is highly recommended and, in some countries, legally required. | ||
=== | ===Overview=== | ||
=== | The Buttons App is an innovaphone application that lets you link specific input events to various output actions. Examples of input events include calls, function keys on innovaphone IP phones, and other applications, as well as the messages received from Shelly devices. Output actions can be calls, notifications, chats, messages, or applications. | ||
=== | |||
For a comprehensive description of the Buttons App itself and a complete list of supported input and output devices, refer to the concept article (link at the end of this document). | |||
===Electrical Connections=== | |||
The Shelly models discussed in this article are powered by 110 to 240 Volt AC, 50/60 Hz. Please be aware that these voltages are hazardous. Never work on electrical networks without a residual current device (RCD/GFCI) installed. Before mounting or connecting any device, ensure that all wires (not just the live wire, but also the neutral) are disconnected. | |||
Some models can also be powered by 12V or 24-48V DC. We have not tested this setup and will not describe it in this guide. | |||
Third-generation Shelly devices feature polarity protection on the AC side. This means the Shelly will function correctly even if the live (L) and neutral (N) wires are inverted. | |||
'''Important Note''': In networks with delta connections, both wires carry voltage. | |||
For intrinsic safety reasons, it's often common practice to switch the neutral wire, which typically carries no voltage during normal operation. The drawback of this approach is that troubleshooting a potential interruption becomes more difficult (whereas with the live wire, a simple voltage tester suffices to follow the line). Both wiring variants are functional. | |||
'''Note''': Shelly devices typically have the wiring diagram silk-screened directly on them, as shown in this example for the Shelly i4: | |||
[[Image:Sh01.png]] | |||
It represents the connections to the outside world, not the internal operation of the device, as further highlighted in the instructions: | |||
[[Image:Sh02.png]] | |||
'''Note''': As per the diagram, the Live (L) phase is connected to the output towards the contacts. If installed within the same electrical network, it's also possible to power the inputs directly from the live phase, rather than using the Shelly's output. However, in this case, ensure the polarity matches the diagram (L and N as shown). If inverted, you'll need to switch the neutral. | |||
'''Note''': On Shelly Pro devices, the silk-screened diagram corresponds exactly to what's detailed in the instructions. | |||
[[Image:Sh03.png]] | |||
===Contacts=== | |||
Shelly devices are incredibly versatile, reacting to both the '''closing and opening''' of a contact. What's more, they send messages for various interactions like a quick '''click''' (fast open-close), '''double-click''', '''triple-click''', and even a '''prolonged closure''' (a "Long" press). This "Long" event is also sent for a static closure after a timeout, making it perfect for sustained button presses. The Buttons App can handle all these event types, individually or in combination, giving you immense flexibility. | |||
In safety circuits, contacts are typically normally closed and open in the event of an alarm. This design ensures that a broken wire will also trigger a detection, enhancing safety. | |||
Both Shelly and the Buttons App can be used with circuits featuring: | |||
• Normally open contacts that close and remain closed. | |||
• Normally closed contacts that open and remain open. | |||
• Momentary contacts that close or open (like a push-button). | |||
All transitions, meaning the change from one state to another, will be signaled and can be utilized for various actions. | |||
If a Shelly device restarts, its current status is immediately reported to the Buttons App. Should the contact state change during a restart or while the device is powered off, this new state will be transmitted to the Buttons App, which will then react accordingly. | |||
===Mounting=== | |||
For their "home" models, which are designed for installation in standard electrical boxes (typically for light switches), Shelly offers a DIN rail adapter. This allows for easy mounting in electrical cabinets: | |||
[[Image:Sh04.png]] | |||
The adapter features an opening on the back, allowing access to the reset button. | |||
'''Keep in min'''d: You can only press this button if no other devices are installed close by on the DIN rail. The adapter can be mounted 180 degrees, making the reset button accessible from either the right or left side. Once configured, you typically won't need to use the physical reset button, as a reset can also be performed via the app or web interface if the device is reachable by IP. After a restart, the device's status is also refreshed. | |||
In contrast, '''Pro models''' are designed exclusively for DIN rail mounting and have their reset button conveniently located on the front, accessible even with the cover closed. They also offer options to customize the behavior of the reset button. | |||
[[Image:Sh05.png]] | |||
Here's a refined and improved English version of the entire text you provided, covering initial setup, connection details, and specific Shelly models, along with debugging. | |||
===Configuration=== | ===Configuration=== | ||
===Known Problems=== | ===Known Problems=== | ||
== Related Articles == | == Related Articles == | ||
[[Reference15r1:Concept_Buttons_App]] | |||
[[Category:Howto| | [[Category:Howto|Integrating_Shelly_IoT_Devices_with_the_innovaphone_Buttons_App]] | ||
Revision as of 15:31, 16 July 2025
DRAFT
Shelly, a European (Bulgarian) manufacturer, offers a wide range of Internet of Things (IoT) sensors and actuators. This article will guide you through setting up and using Shelly digital inputs (contacts) to interact seamlessly with the innovaphone Buttons App.
The possibilities are truly endless! Imagine triggering a phone call when a door contact closes, sending an instant message, initiating time tracking, or even setting up complex conditional actions. That's because the innovaphone Buttons App allows you to assign a series of parallel actions to any specific event.
In this document, we'll walk you through every step of integrating your Shelly devices with the Buttons App. It's surprisingly straightforward - let's get started!
Applies To
• myApps V15r3 or higher
• Buttons App V15r4 or higher
Note: Tests with Shelly devices were conducted using Shelly firmware version 1.6.2.
Introduction
This article provides a straightforward explanation of the basic concepts needed to integrate Shelly devices with the innovaphone Buttons App.
Please note: We are not Shelly specialists. For detailed information, consult the manufacturer's documentation, as well as the many forums and videos available online on this topic.
In this guide, we will specifically cover the integration of digital inputs (contacts) for the Shelly i4, Shelly Plus1, and Shelly Pro2 models.
While motion sensors and the Shelly USB dongle can also be integrated, they are not covered in this article. However, as Shelly products share similar characteristics, you'll likely find useful insights applicable to other models as well.
Each Shelly device comes with its own mounting instructions; here, we will only briefly touch upon a few key details.
It is crucial to read and strictly adhere to all safety guidelines.
These devices are typically powered by hazardous voltages (usually 220V in Europe). Installing a residual current device (RCD), also known as a ground-fault circuit interrupter (GFCI) in some regions, upstream in the electrical circuit is highly recommended and, in some countries, legally required.
Overview
The Buttons App is an innovaphone application that lets you link specific input events to various output actions. Examples of input events include calls, function keys on innovaphone IP phones, and other applications, as well as the messages received from Shelly devices. Output actions can be calls, notifications, chats, messages, or applications.
For a comprehensive description of the Buttons App itself and a complete list of supported input and output devices, refer to the concept article (link at the end of this document).
Electrical Connections
The Shelly models discussed in this article are powered by 110 to 240 Volt AC, 50/60 Hz. Please be aware that these voltages are hazardous. Never work on electrical networks without a residual current device (RCD/GFCI) installed. Before mounting or connecting any device, ensure that all wires (not just the live wire, but also the neutral) are disconnected.
Some models can also be powered by 12V or 24-48V DC. We have not tested this setup and will not describe it in this guide.
Third-generation Shelly devices feature polarity protection on the AC side. This means the Shelly will function correctly even if the live (L) and neutral (N) wires are inverted.
Important Note: In networks with delta connections, both wires carry voltage.
For intrinsic safety reasons, it's often common practice to switch the neutral wire, which typically carries no voltage during normal operation. The drawback of this approach is that troubleshooting a potential interruption becomes more difficult (whereas with the live wire, a simple voltage tester suffices to follow the line). Both wiring variants are functional.
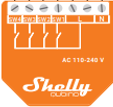
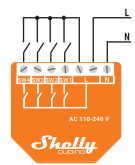
Note: Shelly devices typically have the wiring diagram silk-screened directly on them, as shown in this example for the Shelly i4:
It represents the connections to the outside world, not the internal operation of the device, as further highlighted in the instructions:
Note: As per the diagram, the Live (L) phase is connected to the output towards the contacts. If installed within the same electrical network, it's also possible to power the inputs directly from the live phase, rather than using the Shelly's output. However, in this case, ensure the polarity matches the diagram (L and N as shown). If inverted, you'll need to switch the neutral.
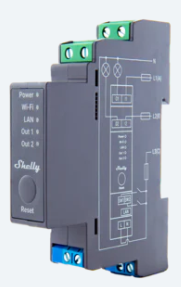
Note: On Shelly Pro devices, the silk-screened diagram corresponds exactly to what's detailed in the instructions.
Contacts
Shelly devices are incredibly versatile, reacting to both the closing and opening of a contact. What's more, they send messages for various interactions like a quick click (fast open-close), double-click, triple-click, and even a prolonged closure (a "Long" press). This "Long" event is also sent for a static closure after a timeout, making it perfect for sustained button presses. The Buttons App can handle all these event types, individually or in combination, giving you immense flexibility.
In safety circuits, contacts are typically normally closed and open in the event of an alarm. This design ensures that a broken wire will also trigger a detection, enhancing safety.
Both Shelly and the Buttons App can be used with circuits featuring:
• Normally open contacts that close and remain closed.
• Normally closed contacts that open and remain open.
• Momentary contacts that close or open (like a push-button).
All transitions, meaning the change from one state to another, will be signaled and can be utilized for various actions.
If a Shelly device restarts, its current status is immediately reported to the Buttons App. Should the contact state change during a restart or while the device is powered off, this new state will be transmitted to the Buttons App, which will then react accordingly.
Mounting
For their "home" models, which are designed for installation in standard electrical boxes (typically for light switches), Shelly offers a DIN rail adapter. This allows for easy mounting in electrical cabinets:
The adapter features an opening on the back, allowing access to the reset button.
Keep in mind: You can only press this button if no other devices are installed close by on the DIN rail. The adapter can be mounted 180 degrees, making the reset button accessible from either the right or left side. Once configured, you typically won't need to use the physical reset button, as a reset can also be performed via the app or web interface if the device is reachable by IP. After a restart, the device's status is also refreshed.
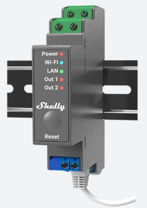
In contrast, Pro models are designed exclusively for DIN rail mounting and have their reset button conveniently located on the front, accessible even with the cover closed. They also offer options to customize the behavior of the reset button.
Here's a refined and improved English version of the entire text you provided, covering initial setup, connection details, and specific Shelly models, along with debugging.


