Howto:Gcalendar - Wecom - Partner App: Difference between revisions
Creation of page due to app name change |
→Users App: Notification badge for ongoing meetings section Tag: 2017 source edit |
||
| (29 intermediate revisions by 3 users not shown) | |||
| Line 1: | Line 1: | ||
{| | {{FIXME|reason=Work in progress, still incomplete}} | ||
[[Image:Logo 2 Wecom.png||200px|right]] | |||
== Product Name == | == Product Name == | ||
[[File:Gcalendar icone.png|none|thumb|Gcalendar Icon]] | |||
[[File:Gcalendar icone admin.png|none|thumb|Gcalendar Admin Icon]] | |||
Wecom [https://wecom.com.br/ Gcalendar] | |||
== Certification Status ==<!--Do not remove comment. Will be added by | == Certification Status == | ||
<!--Do not remove comment. Will be added by innovaphone upon document check & app availablity on app store.--> | |||
''Space dedicated to Gcalendar certification information.'' | ''Space dedicated to Gcalendar certification information.'' | ||
== Category ==<!--Do not change this section and do not remove comments. Will be set by Innovaphone upon document check.--> | == Category == | ||
<!--Do not change this section and do not remove comments. Will be set by Innovaphone upon document check.--> | |||
[[Category:Partner_Apps|{{PAGENAME}}]] | |||
[[Category:3rdParty CTI and integrations|{{PAGENAME}}]] | |||
{{Category:3rdParty CTI and integrations}} | {{Category:3rdParty CTI and integrations}} | ||
== Vendor == | == Vendor == | ||
[[ | [[Image:Logo 2 Wecom.png|150px]] | ||
Wecom | |||
Wecom are integrators, maintainers, and distributors of unified communications systems. | |||
Aimed at the corporate market, our focus is on promoting digital transformation for the businesses we advise, presenting the best mobility and collaboration tools available on the market. We are partners with leading brands and distributors in Brazil. With a solid portfolio of clients in a wide range of segments, our activities include consulting, project development, implementation and maintenance of communication systems, with extensive experience in collaboration technologies and advanced technical staff. | |||
[https://wecom.com.br/sobre-nos/ Wecom -About us] | |||
== Description == | == Description == | ||
| Line 55: | Line 41: | ||
=== Users App === | === Users App === | ||
The '''Users App''' is the interface used by users to link their Google Calendar account to the Innovaphone presence system. It focuses only on enabling the connection between the user and their calendar through Google authentication. | The '''Users App''' is the interface used by users to link their Google Calendar account to the Innovaphone presence system. It focuses only on enabling the connection between the user and their calendar through Google authentication. | ||
[[File: | [[File:Gcalendar user app interface detail.png|none|thumb|404x404px|Users app interface with google account pop-up]] | ||
==== Connecting with Google account ==== | ==== Connecting with Google account ==== | ||
| Line 65: | Line 51: | ||
# After selecting an account, the integration process will begin automatically. | # After selecting an account, the integration process will begin automatically. | ||
#* Once completed, the account will be linked to the Innovaphone system. | #* Once completed, the account will be linked to the Innovaphone system. | ||
[[File:Gcallendar Connect Button.png|none|thumb|Connect button]] | [[File:Gcallendar Connect Button.png|none|thumb|Connect button]] | ||
<blockquote>⇒ '''Note:''' Before starting the connection process, ensure you're already logged into the correct Google account in your browser. This helps avoid selecting the wrong account and ensures the integration is completed with the intended calendar.</blockquote> | <blockquote>⇒ '''Note:''' Before starting the connection process, ensure you're already logged into the correct Google account in your browser. This helps avoid selecting the wrong account and ensures the integration is completed with the intended calendar.</blockquote> | ||
==== Viewing Upcoming Meetings ==== | |||
On the main screen, users can see a list of their upcoming scheduled meetings. | |||
Each meeting is displayed as a card containing: | |||
* '''Title''' | |||
* '''Start time''' | |||
[[File:Gcalendar Upcoming Meetings.jpg|none|thumb|392x392px|Upcoming meetings list with active meeting]] | |||
When a meeting card is clicked, Gcalendar redirects the user based on how the event was created: | |||
* If the event does '''not''' include a Google Meet link, the user is taken to the event details page in Google Calendar. | |||
* If the event includes an associated '''Google Meet''' link, the user is redirected directly to the online meeting. | |||
<blockquote>⇒ This behavior allows users to quickly join virtual meetings while still providing access to full event details when no meeting link is available.</blockquote> | |||
==== Creating a New Meeting ==== | |||
To schedule a new meeting: | |||
# Click the '''+''' button on the main screen. | |||
# A creation modal will open with the following fields: | |||
#* '''Summary''' – The title of the meeting. | |||
#* '''Description''' – Details or agenda of the meeting. | |||
#* '''Location''' – Where the meeting will occur (physical address or online). | |||
#* '''Start time''' – When the meeting begins. | |||
#* '''End time''' – When the meeting ends. | |||
#* '''Time zone''' – The time zone for the meeting. | |||
#* '''Attendees''' – Email addresses of participants who should receive an invitation. | |||
#* '''Add Google Meet''' – When checked, a Google Meet link is automatically generated and included in the event. | |||
After filling in the required information: | |||
* Click '''Save''' to create the meeting. | |||
* Click '''Cancel''' to close the modal without saving any changes. | |||
[[File:Gcalendar Create Meeting Modal.jpg|none|thumb|420x420px|Meeting creation modal]] | |||
==== Disconnecting from Google account ==== | ==== Disconnecting from Google account ==== | ||
| Line 75: | Line 96: | ||
# Click the '''Disconnect''' button to unlink your current Google Calendar account from the Innovaphone presence system. | # Click the '''Disconnect''' button to unlink your current Google Calendar account from the Innovaphone presence system. | ||
# Once disconnected, presence synchronization will be disabled for that user. | # Once disconnected, presence synchronization will be disabled for that user. | ||
[[File:Gcallendar Disconnect Button Dtl.png|none|thumb|392x392px|Disconnect button]] | |||
==== Meeting-based Presence Synchronization ==== | |||
When a meeting is active in the user’s Google Calendar, Gcalendar automatically updates the user’s Innovaphone presence to reflect that meeting. | |||
[[File:Status and Status Name.png|none|thumb|392x392px|User's status and status name change when meeting is happening]] | |||
# While the meeting is in progress, the user’s presence status is set to '''DND (Do Not Disturb)'''. | |||
# At the same time, the user’s '''status text''' is updated to the '''meeting title'''. | |||
# Once the meeting ends, Gcalendar restores the user’s presence status and status text to the '''previous values''' that were set before the meeting started. | |||
[[File:Status change while meeting occurs.png|none|thumb|392x392px|DND status change while meeting occurs]] | |||
<blockquote>⇒ This behavior ensures that colleagues can immediately see when a user is busy in a meeting, while preserving the user’s original presence settings after the meeting finishes.</blockquote> | |||
[[File: | ==== Active Meeting Notification Badge ==== | ||
When one or more meetings are currently in progress, the Gcalendar app displays a notification badge on its icon. | |||
[[File:Gmeet notification badge.png|none|thumb|392x392px|Notification badge for ongoing meetings]] | |||
* The badge shows the '''number of active meetings''' occurring at that moment. | |||
* This allows users to quickly identify when they are in one or multiple ongoing meetings. | |||
* The badge automatically updates in real time as meetings start or end. | |||
* When no meetings are active, the notification badge is not displayed. | |||
=== Admin App === | === Admin App === | ||
| Line 98: | Line 140: | ||
[[File:Gcallendar Google Client ID Update.png|none|thumb|519x519px|Google Client ID input and update button]] | [[File:Gcallendar Google Client ID Update.png|none|thumb|519x519px|Google Client ID input and update button]] | ||
[[File:Gcallendar Client Secret Update.png|none|thumb|519x519px|Client Secret input and update button]] | [[File:Gcallendar Client Secret Update.png|none|thumb|519x519px|Client Secret input and update button]] | ||
===Multi-PBX ready=== | |||
<!-- Mandatory topic. --> | |||
<!-- Give test-prooved statement about product usability in Multi-PBX-systems / Master-Slave --> | |||
<!-- I.e. can the application be operated towards slave-pbxes, by slave-users, special configuration steps, special requirements, ... --> | |||
<!-- If applicable, provide hints about required configuration steps below in the chapter Configuration --> | |||
===Cloud ready=== | |||
<!-- Mandatory topic. --> | |||
<!-- Give test-prooved statement about product usability in Cloud-environments / Hosted PBXes --> | |||
<!-- I.e. can the application be operated via NAT-boundaries, special configuration steps, special requirements, ... --> | |||
<!-- If applicable, provide hints about required configuration steps below in the chapter Configuration --> | |||
===Supported languages=== | |||
<!-- Mandatory topic. --> | |||
<!-- List the translated languages which the application provides. Comma-separated is sufficient --> | |||
Portuguese, English, Spanish, German | |||
== Licensing == | == Licensing == | ||
| Line 113: | Line 172: | ||
==== System Requirements ==== | ==== System Requirements ==== | ||
* '''Innovaphone firmware:''' Version | * '''Innovaphone firmware:''' Version <code>14r1</code> or later | ||
* '''App platform:''' Innovaphone '''myApps''' system with '''App Platform''' active | * '''App platform:''' Innovaphone '''myApps''' system with '''App Platform''' active | ||
* '''PBX Manager:''' Required to register and configure the Users and Admin Apps | * '''PBX Manager:''' Required to register and configure the Users and Admin Apps | ||
| Line 121: | Line 180: | ||
* A '''Google Cloud Project''' with valid '''OAuth 2.0 credentials''' (Client ID and Client Secret) | * A '''Google Cloud Project''' with valid '''OAuth 2.0 credentials''' (Client ID and Client Secret) | ||
* The following URIs must be configured in the Google project: | * The following URIs must be configured in the Google project: | ||
** '''Authorized JavaScript origins:''' | ** '''Authorized JavaScript origins:''' <code>https://app_platform</code> | ||
** '''Authorized redirect URI:''' | ** '''Authorized redirect URI:''' <code>https://app_platform/domain/app_name/newToken</code> | ||
== Versions == | == Versions == | ||
The '''Gcalendar''' application follows the release versioning aligned with the Innovaphone platform. | The '''Gcalendar''' application follows the release versioning aligned with the Innovaphone platform. | ||
* '''Initial release version:''' | * '''Initial release version:''' <code>14r1</code> | ||
* '''Latest available version:''' | * '''Latest available version:''' <code>2004 sr0</code> (as of February 23, 2026) | ||
* '''Build number:''' | * '''Build number:'''<code>14A1149 dvl</code> | ||
* '''Supported architectures:''' | * '''Supported architectures:''' <code>arm</code>, <code>x86_64</code>, <code>arm64</code> | ||
<blockquote>⇒ New versions are published and made available through the Wecom App Store.</blockquote> | <blockquote>⇒ New versions are published and made available through the Wecom App Store.</blockquote> | ||
| Line 140: | Line 199: | ||
# Go to [https://console.cloud.google.com/ Google Cloud Console]. | # Go to [https://console.cloud.google.com/ Google Cloud Console]. | ||
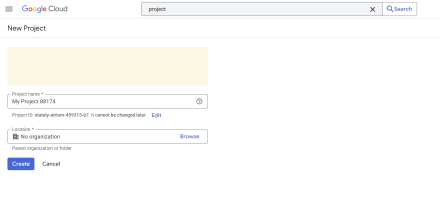
# Select or create a '''Google Cloud Project'''.<blockquote>◇ | # Select or create a '''Google Cloud Project'''.<blockquote>◇ This project will host the credentials used by Gcalendar to access the Google Calendar API. We recommend creating a dedicated project for better control and security.</blockquote>[[File:Google Cloud Select-Create Project.png|none|thumb|425x425px|Google Cloud Console welcome page with select project button outlined (here the project is already selected)]]<blockquote>Clicking the '''"Select Project"''' button will open a '''modal''' where you can choose or create a project.</blockquote>[[File:Google Cloud Select Project If Selected.png|none|thumb|353x353px|Project selection modal]]<blockquote>If a project already exists, click on its name from the list to open it. If not, click '''"New Project"''' in the top-right corner to create one.</blockquote>[[File:Google Cloud New Project Page.png|none|thumb|440x440px|New project creation page]] | ||
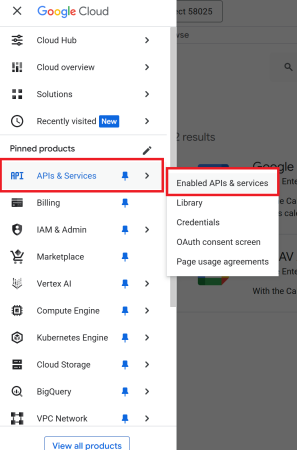
# In the top-left corner, click the '''hamburger menu icon''' (☰) to expand the left navigation menu. | # In the top-left corner, click the '''hamburger menu icon''' (☰) to expand the left navigation menu. | ||
# In the | #* Before continuing to the OAuth configuration, you need to make sure the Google Calendar API is enabled. | ||
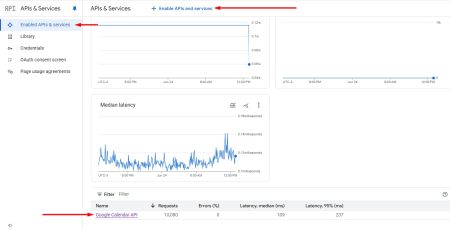
# From the sidebar, go to '''APIs & Services > Enabled APIs & services'''.[[File:Google Cloud Sidebar API Services.png|none|thumb|450x450px|Opening the APIs & Services section to enable the Calendar API]] | |||
# At the top of the page, click '''+ Enable APIs and services'''.<blockquote>Once enabled, it will appear in the list of active APIs under '''Enabled APIs & Services'''.If the Google Calendar API is already enabled, you may skip the steps below and proceed directly to the OAuth configuration.</blockquote>[[File:Google Cloud Enable APIs Services.jpg|none|thumb|450x450px|Enabling API button and viewing the enabled Google Calendar API]] | |||
# In the API Library, search for: <code>calendar</code>. | |||
#* From the results, click on '''Google Calendar API'''.[[File:Google Clou APIs Google Calendar Search.jpg|none|thumb|450x450px|Searching for the Google Calendar API in the API Library]] | |||
# On the API page, click the blue '''Enable''' button to activate it.[[File:Google Cloud Enabling Google Calendar.jpg|none|thumb|450x450px|Enabling the Google Calendar API]] | |||
# Now click the '''hamburger menu icon''' (☰) again to return to the sidebar. | |||
# Navigate to '''API & Services > OAuth consent screen'''.[[File:Google Cloud Left Menu API Outlined.png|none|thumb|482x482px|Left menu: '''APIs & service -> OAuth consent screen''']] | |||
#* If it's your first time, configure the consent screen with basic app details (organization name, app name, email, etc.). | #* If it's your first time, configure the consent screen with basic app details (organization name, app name, email, etc.). | ||
#* Once configured, you'll be redirected to the '''Google Auth Platform / Overview''' page. | #* Once configured, you'll be redirected to the '''Google Auth Platform / Overview''' page. | ||
| Line 150: | Line 216: | ||
# Add the following values: | # Add the following values: | ||
#* '''Authorized JavaScript origins''' | #* '''Authorized JavaScript origins''' | ||
#** | #** <code>https://app_platform</code> | ||
#* '''Authorized redirect URIs''' | #* '''Authorized redirect URIs''' | ||
#** | #** <code>https://app_platform/domain/app_name/newToken</code>[[File:Google Cloud Create OAuth Client ID.jpg|none|thumb|411x411px|Create OAuth client ID inputs]] | ||
# After creation, copy the generated: | # After creation, copy the generated: | ||
#* '''Client ID''' | #* '''Client ID''' | ||
#* '''Client Secret'''[[File:Google Cloud Client ID Client Secret.jpg|none|thumb|434x434px|Client credentials available after creating]] | #* '''Client Secret'''[[File:Google Cloud Client ID Client Secret.jpg|none|thumb|434x434px|Client credentials available after creating]] | ||
# Open the '''Gcalendar Admin App''' and insert the values in the respective fields and click '''Update''' (see [ | # Open the '''Gcalendar Admin App''' and insert the values in the respective fields and click '''Update''' (see [[#Updating Google OAuth Credentials|Update Google OAuth Credentials]] section above).<blockquote>▷ This links the Google authentication flow to the presence system, allowing users to authorize their calendars.</blockquote> | ||
# On the left menu, go to '''Data Access''' under the '''Google Auth Platform''' section.<blockquote>◇ This section lists the sensitive scopes (permissions) your app is requesting during OAuth authorization. These are required for accessing user calendars.</blockquote>[[File:Google Cloud Add or Remove Scopes.png|none|thumb|510x510px|Click "Add or remove scopes" to open the scope selection menu]] | |||
<blockquote>▷ This links the Google authentication flow to the presence system, allowing users to authorize their calendars.</blockquote> | # Click the blue '''Add or remove scopes''' button.<blockquote>◇ A sidebar will open listing all available scopes from enabled APIs. You can search and select the necessary calendar-related scopes for your application.</blockquote> | ||
# In the sidebar that appears, search for and select the following calendar scopes: | |||
#* <code>../auth/calendar.events</code> – View and edit calendar events. | |||
#* <code>../auth/calendar.events.owned</code> – Modify events on owned calendars.[[File:Google Cloud Data Access Scopes Correct.png|none|thumb|400x400px|Data Access section showing added calendar scopes]]<blockquote>▷ These scopes must be added to your app for Google to allow access to calendar data through the API. Make sure they match the level of access your app requires.</blockquote> | |||
== Installation == | == Installation == | ||
| Line 184: | Line 253: | ||
# Find the '''Gcalendar''' app. | # Find the '''Gcalendar''' app. | ||
# Download the latest available version compatible with your system architecture. | # Download the latest available version compatible with your system architecture. | ||
[[File:Gcalendar myapps wecom appstore.png|none|thumb|418x418px|Gcalendar on MyApps' Wecom's App Store]] | [[File:Gcalendar myapps wecom appstore.png|none|thumb|418x418px|Gcalendar on MyApps' Wecom's App Store]] | ||
| Line 190: | Line 258: | ||
# In '''AP Manager''', click '''App upload''' (top right). | # In '''AP Manager''', click '''App upload''' (top right). | ||
# Select the | # Select the <code>.app</code> package you downloaded from the portal. | ||
# After successful upload, the app will appear in your list and show as '''Running'''. | # After successful upload, the app will appear in your list and show as '''Running'''. | ||
[[File:App Upload Button on MyApps AP Manager.png|none|thumb|485x485px|App Upload button on AP Manager outlined]] | |||
[[File:Gcallendar on AP Manager Innovaphone.jpg|none|thumb|490x490px|Gcalendar on AP Manager]] | |||
=== Step 3: Add Application Instance === | |||
# After uploading the app, click the yellow '''+ Add''' button to create an instance of the application. | |||
[[File: | # Fill in the required fields: | ||
#* '''Name:''' A recognizable name for the instance. | |||
#* '''Domain:''' The domain for the PBX. | |||
#* '''Password:''' A secure admin password for the app instance. | |||
#* '''Webserver path:''' Optional path (or leave blank). | |||
#* '''Database host:''' Leave empty for local DB or specify IP/DNS if external. | |||
#* '''Database name''' and '''Database user''': Use consistent values for your environment. | |||
#* '''Database password:''' Corresponding DB password. | |||
# When all values are filled, click '''Save'''. | |||
[[File:AP Manager Gcalendar App Instance Creation Example.png|none|thumb|440x440px|Example of instance creation screen in AP Manager]] | |||
=== Final Step: Registering the App in PBX Manager === | === Final Step: Registering the App in PBX Manager === | ||
| Line 204: | Line 285: | ||
#* An '''Admin App''' | #* An '''Admin App''' | ||
# Assign access rights as needed. | # Assign access rights as needed. | ||
[[File:PBX Manager Add an App flow - part 1.png|none|thumb|440x440px|PBX Manager Add an App select the app]] | [[File:PBX Manager Add an App flow - part 1.png|none|thumb|440x440px|PBX Manager Add an App select the app]] | ||
[[File:Gcallendar PBX Manager Add an App flow - part 2.png|none|thumb|440x440px|PBX Manager Add an App configurations]] | [[File:Gcallendar PBX Manager Add an App flow - part 2.png|none|thumb|440x440px|PBX Manager Add an App configurations]] | ||
| Line 214: | Line 294: | ||
== Contact == | == Contact == | ||
{| | |||
| Wecom PORTO ALEGRE - RS | |||
|- | |||
Av. Carlos Gomes, 466 / 401 | | Av. Carlos Gomes, 466 / 401 | ||
|- | |||
Boa Vista - CEP 90480-000 | | Boa Vista - CEP 90480-000 | ||
|- | |||
| Wecom FLORIANÓPOLIS - SC | |||
|- | |||
| SC 401, 8600 - Room 7 Corporate Park - Block 2 | |||
|- | |||
SC 401, 8600 - Room 7 | | Santo Antônio de Lisboa - CEP 88050-001 | ||
|- | |||
Corporate Park - Block 2 | | Tel: +55 48 3112.6200 | ||
|- | |||
Santo Antônio de Lisboa | | Mail: [mailto:marketing@wecom.com.br marketing@wecom.com.br] | ||
|- | |||
CEP 88050-001 | | Support: [mailto:dev@wecom.com.br dev@wecom.com.br] | ||
|} | |||
For any questions please refer to [https://wecom.com.br/fale-conosco/ our contact page.] | For any questions please refer to [https://wecom.com.br/fale-conosco/ our contact page.] | ||
Latest revision as of 15:38, 2 March 2026
| FIXME: Work in progress, still incomplete |

Product Name


Wecom Gcalendar
Certification Status
Space dedicated to Gcalendar certification information.
Category
Computer Telephony Integration and Unified Messaging / Unified Communication
Vendor
![]()
Wecom are integrators, maintainers, and distributors of unified communications systems. Aimed at the corporate market, our focus is on promoting digital transformation for the businesses we advise, presenting the best mobility and collaboration tools available on the market. We are partners with leading brands and distributors in Brazil. With a solid portfolio of clients in a wide range of segments, our activities include consulting, project development, implementation and maintenance of communication systems, with extensive experience in collaboration technologies and advanced technical staff.
Description
Gcalendar is a Partner App developed by Wecom to integrate Google Calendar events with the Innovaphone presence system.
The app operates through two components:
- Users App – Where the users initiate their account linking process via Google login.
- Admin App – Allows configuration of the integration with editable fields for Google Client ID and Client Secret, along with a dedicated OAuth authorization URL.
This setup enables real-time status synchronization and supports four languages: Portuguese, English, Spanish, and German.
Functions
This section provides an overview of each core part of the Gcalendar application. It highlights what actions can be performed, and how to navigate through the available features. Additionally, this section provides step-by-step explanations for each functionality.
Users App
The Users App is the interface used by users to link their Google Calendar account to the Innovaphone presence system. It focuses only on enabling the connection between the user and their calendar through Google authentication.

Connecting with Google account
- Open the Gcalendar Users App.
- Click the Connect button.
- A Google login popup will appear.
- This popup allows users to choose or log into a Google account.
- After selecting an account, the integration process will begin automatically.
- Once completed, the account will be linked to the Innovaphone system.

⇒ Note: Before starting the connection process, ensure you're already logged into the correct Google account in your browser. This helps avoid selecting the wrong account and ensures the integration is completed with the intended calendar.
Viewing Upcoming Meetings
On the main screen, users can see a list of their upcoming scheduled meetings. Each meeting is displayed as a card containing:
- Title
- Start time

When a meeting card is clicked, Gcalendar redirects the user based on how the event was created:
- If the event does not include a Google Meet link, the user is taken to the event details page in Google Calendar.
- If the event includes an associated Google Meet link, the user is redirected directly to the online meeting.
⇒ This behavior allows users to quickly join virtual meetings while still providing access to full event details when no meeting link is available.
Creating a New Meeting
To schedule a new meeting:
- Click the + button on the main screen.
- A creation modal will open with the following fields:
- Summary – The title of the meeting.
- Description – Details or agenda of the meeting.
- Location – Where the meeting will occur (physical address or online).
- Start time – When the meeting begins.
- End time – When the meeting ends.
- Time zone – The time zone for the meeting.
- Attendees – Email addresses of participants who should receive an invitation.
- Add Google Meet – When checked, a Google Meet link is automatically generated and included in the event.
After filling in the required information:
- Click Save to create the meeting.
- Click Cancel to close the modal without saving any changes.

Disconnecting from Google account
- Open the Gcalendar Users App.
- If a Google account is already connected, the Connect button will be replaced by a Disconnect button.
- Click the Disconnect button to unlink your current Google Calendar account from the Innovaphone presence system.
- Once disconnected, presence synchronization will be disabled for that user.

Meeting-based Presence Synchronization
When a meeting is active in the user’s Google Calendar, Gcalendar automatically updates the user’s Innovaphone presence to reflect that meeting.

- While the meeting is in progress, the user’s presence status is set to DND (Do Not Disturb).
- At the same time, the user’s status text is updated to the meeting title.
- Once the meeting ends, Gcalendar restores the user’s presence status and status text to the previous values that were set before the meeting started.

⇒ This behavior ensures that colleagues can immediately see when a user is busy in a meeting, while preserving the user’s original presence settings after the meeting finishes.
Active Meeting Notification Badge
When one or more meetings are currently in progress, the Gcalendar app displays a notification badge on its icon.
- The badge shows the number of active meetings occurring at that moment.
- This allows users to quickly identify when they are in one or multiple ongoing meetings.
- The badge automatically updates in real time as meetings start or end.
- When no meetings are active, the notification badge is not displayed.
Admin App
The Admin App provides configuration options required to authorize and manage the Google integration. It is intended for system administrators and enables control over OAuth credentials used for user authentication.

Updating Google OAuth Credentials
To enable or update the integration between Gcalendar and Google Calendar, you’ll need to provide the correct Client ID and Client Secret obtained from your Google Cloud project.
- Open the Gcalendar Admin App.
- Locate the fields labeled Google Client ID and Client Secret.
- Paste the values copied from your Google OAuth Credentials into the respective fields.
- Click the Update button next to each field to save the changes.
⇒ Notes:
- Ensure both values are correctly copied and properly formatted.
- Incorrect credentials will prevent users from authenticating.
- The Client Secret is sensitive—never share or expose it publicly.


Multi-PBX ready
Cloud ready
Supported languages
Portuguese, English, Spanish, German
Licensing
The Gcalendar application is licensed via the Innovaphone Pricelist.
Currently, it is not yet listed on the official Innovaphone Partner App Licenses page, but it is expected to be included in future updates.
License type: Innovaphone Pricelist
License model: One license per user
Prerequisites
Before installing and using Gcalendar, ensure your environment meets the following requirements:
System Requirements
- Innovaphone firmware: Version
14r1or later - App platform: Innovaphone myApps system with App Platform active
- PBX Manager: Required to register and configure the Users and Admin Apps
OAuth Setup
- A Google Cloud Project with valid OAuth 2.0 credentials (Client ID and Client Secret)
- The following URIs must be configured in the Google project:
- Authorized JavaScript origins:
https://app_platform - Authorized redirect URI:
https://app_platform/domain/app_name/newToken
- Authorized JavaScript origins:
Versions
The Gcalendar application follows the release versioning aligned with the Innovaphone platform.
- Initial release version:
14r1 - Latest available version:
2004 sr0(as of February 23, 2026) - Build number:
14A1149 dvl - Supported architectures:
arm,x86_64,arm64
⇒ New versions are published and made available through the Wecom App Store.
Configuration
Google OAuth Setup (Admin Only)
To enable account linking between the Innovaphone presence system and Google Calendar, administrators must configure OAuth 2.0 credentials using the Google Cloud Platform beforehand.
- Go to Google Cloud Console.
- Select or create a Google Cloud Project.
◇ This project will host the credentials used by Gcalendar to access the Google Calendar API. We recommend creating a dedicated project for better control and security.
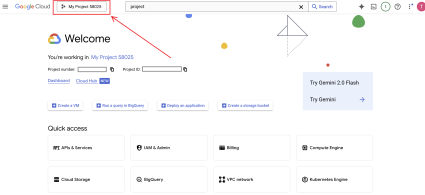
Google Cloud Console welcome page with select project button outlined (here the project is already selected) Clicking the "Select Project" button will open a modal where you can choose or create a project.

Project selection modal If a project already exists, click on its name from the list to open it. If not, click "New Project" in the top-right corner to create one.
New project creation page - In the top-left corner, click the hamburger menu icon (☰) to expand the left navigation menu.
- Before continuing to the OAuth configuration, you need to make sure the Google Calendar API is enabled.
- From the sidebar, go to APIs & Services > Enabled APIs & services.
Opening the APIs & Services section to enable the Calendar API - At the top of the page, click + Enable APIs and services.
Once enabled, it will appear in the list of active APIs under Enabled APIs & Services.If the Google Calendar API is already enabled, you may skip the steps below and proceed directly to the OAuth configuration.
Enabling API button and viewing the enabled Google Calendar API - In the API Library, search for:
calendar.- From the results, click on Google Calendar API.
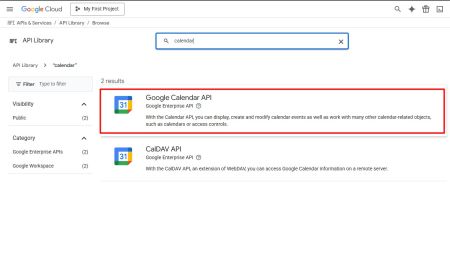
Searching for the Google Calendar API in the API Library
- From the results, click on Google Calendar API.
- On the API page, click the blue Enable button to activate it.
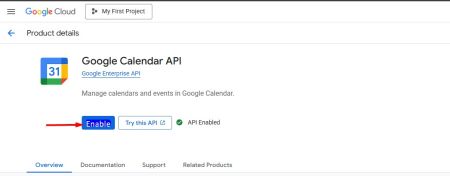
Enabling the Google Calendar API - Now click the hamburger menu icon (☰) again to return to the sidebar.
- Navigate to API & Services > OAuth consent screen.

Left menu: APIs & service -> OAuth consent screen - If it's your first time, configure the consent screen with basic app details (organization name, app name, email, etc.).
- Once configured, you'll be redirected to the Google Auth Platform / Overview page.
- Click Clients in the left menu and then click "+ Create client".
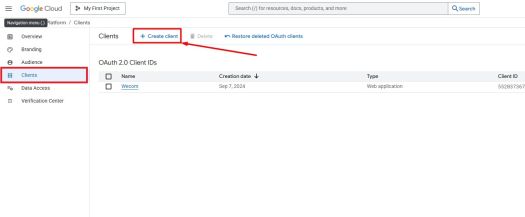
Creating client option in Clients page - Choose Application Type: Web Application.
- Enter a recognizable name (e.g., Gcalendar Integration).
- Add the following values:
- Authorized JavaScript origins
https://app_platform
- Authorized redirect URIs
https://app_platform/domain/app_name/newToken
Create OAuth client ID inputs
- Authorized JavaScript origins
- After creation, copy the generated:
- Client ID
- Client Secret

Client credentials available after creating
- Open the Gcalendar Admin App and insert the values in the respective fields and click Update (see Update Google OAuth Credentials section above).
▷ This links the Google authentication flow to the presence system, allowing users to authorize their calendars.
- On the left menu, go to Data Access under the Google Auth Platform section.
◇ This section lists the sensitive scopes (permissions) your app is requesting during OAuth authorization. These are required for accessing user calendars.
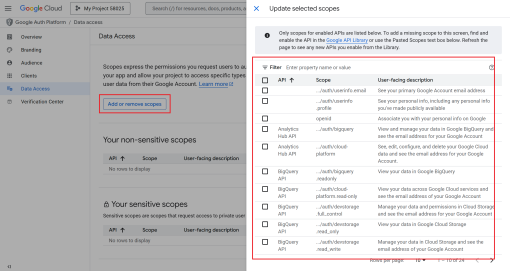
Click "Add or remove scopes" to open the scope selection menu - Click the blue Add or remove scopes button.
◇ A sidebar will open listing all available scopes from enabled APIs. You can search and select the necessary calendar-related scopes for your application.
- In the sidebar that appears, search for and select the following calendar scopes:
../auth/calendar.events– View and edit calendar events.../auth/calendar.events.owned– Modify events on owned calendars.
Data Access section showing added calendar scopes ▷ These scopes must be added to your app for Google to allow access to calendar data through the API. Make sure they match the level of access your app requires.


Installation
Follow the steps below to install the Gcalendar application in your Innovaphone environment.
Option 1: Installing via AP Manager App Store (Recommended)
You can install Gcalendar directly through the App Platform Manager (AP Manager) by accessing the App Store:
- Open the AP Manager.
- Click the yellow App Store button in the top-right corner.
- Search for Gcalendar in the list.
- Select the latest version and confirm the download.
- The app will be automatically installed and ready to configure.
🛈 This is the easiest and fastest way to deploy the app.


Option 2: Manual Installation via Upload
If the app is not yet listed in the App Store, follow the steps below:
Step 1: Download the App Package
- Visit the official Wecom myApps Downloads Portal.
- Find the Gcalendar app.
- Download the latest available version compatible with your system architecture.

Step 2: Upload to AP Manager
- In AP Manager, click App upload (top right).
- Select the
.apppackage you downloaded from the portal. - After successful upload, the app will appear in your list and show as Running.


Step 3: Add Application Instance
- After uploading the app, click the yellow + Add button to create an instance of the application.
- Fill in the required fields:
- Name: A recognizable name for the instance.
- Domain: The domain for the PBX.
- Password: A secure admin password for the app instance.
- Webserver path: Optional path (or leave blank).
- Database host: Leave empty for local DB or specify IP/DNS if external.
- Database name and Database user: Use consistent values for your environment.
- Database password: Corresponding DB password.
- When all values are filled, click Save.

Final Step: Registering the App in PBX Manager
- Open the PBX Manager.
- Go to the Apps section.
- Click Add App and register:
- A Users App
- An Admin App
- Assign access rights as needed.


⇒ After registration, both apps will appear in MyApps and are ready for use.
Copyright
Copyright information.
Contact
| Wecom PORTO ALEGRE - RS |
| Av. Carlos Gomes, 466 / 401 |
| Boa Vista - CEP 90480-000 |
| Wecom FLORIANÓPOLIS - SC |
| SC 401, 8600 - Room 7 Corporate Park - Block 2 |
| Santo Antônio de Lisboa - CEP 88050-001 |
| Tel: +55 48 3112.6200 |
| Mail: marketing@wecom.com.br |
| Support: dev@wecom.com.br |
For any questions please refer to our contact page.