Howto:Deploy Yealink Devices on myApps: Difference between revisions
No edit summary |
|||
| Line 21: | Line 21: | ||
<b>Step3: Create an object for yealinkphone</b><br> | <b>Step3: Create an object for yealinkphone</b><br> | ||
1. Go to the | 1. Go to the PBX Manager, you can see the instance "yealinkphone" you just created<br> | ||
2. Click AP "yealinkphone", then click “Add an app” to create an object for "yealinkphone"<br> | 2. Click AP "yealinkphone", then click “Add an app” to create an object for "yealinkphone"<br> | ||
3. Enter the name, SIP and choose the template to create<br> | 3. Enter the name, SIP and choose the template to create<br> | ||
| Line 42: | Line 42: | ||
3. Select “master IP Phone”<br> | 3. Select “master IP Phone”<br> | ||
[[Image:Select master.png]]<br> | [[Image:Select master.png]]<br> | ||
4. Choose the users you want to assign the phone | 4. Choose the users you want to assign the phone and enter the MAC of the desk Phone. You can configure multiple phones at once. Then wait and click the "Finish" button<br> | ||
[[Image:Enter mac.png]]<br> | [[Image:Enter mac.png]]<br> | ||
| Line 48: | Line 48: | ||
==How to deploy Yealink DECT Phone on Innovaphone?== | ==How to deploy Yealink DECT Phone on Innovaphone?== | ||
<b>Step 1: Download the Yealink app in “App Store”</b><br> | |||
[[Image:APP Store.png]] | |||
<b>Step 2: Create an instance for Provisioning DECT</b><br> | |||
1. Go to the AP manager -> Installed apps, you can see the “Yealink” in the app list<br> | |||
2. Click “Add” to create an instance for Provisioning DECT<br> | |||
3. Enter the name, Domain, Password, and Database password to create<br> | |||
[[Image:Create instance DECT.png]]<br> | |||
4. Start the app and instance<br> | |||
[[Image:Start APP DECT.png]]<br> | |||
<b>Step3: Create an object for Provisioning DECT</b><br> | |||
1. Go to the PBX Manager, you can see the instance "provisioningdect" you just created<br> | |||
2. Click AP "provisioningdect", then click “Add an app” to create an object for Provisioning DECT<br> | |||
3. Enter the name, SIP, and choose the template to create<br> | |||
[[Image:Create object DECT.png]]<br> | |||
4. In all apps list, you will see the app object Yealinktest you just created. Add it to the Home screen<br> | |||
[[Image:Add to home screen DECT.png]]<br> | |||
<b>Step 4: Customize other device configurations and MAC for the Provisioning DECT object</b><br> | |||
1. Go to the "yltestdect", which is the Provisioning DECT object you just created<br> | |||
[[Image:Yltestdect.png]]<br> | |||
2. Click the hamburger icon in the upper right corner<br> | |||
[[Image:Hamburger icon DECT.png]]<br> | |||
3. Customize other device configurations and MAC here<br> | |||
[[Image:APP configuration DECT.png]]<br> | |||
<b>Step 5: Configure the handset and account for your W90/W80/W70B</b><br> | |||
1. Go to the “Users Admin”-> “Register Phones”, click “+ New phone registrations”<br> | |||
[[Image:Register phone.png]]<br> | |||
2. Select the YealinkProvisioningDect<br> | |||
[[Image:Select Yealink DECT.png]]<br> | |||
3. Select “master IP Phone”<br> | |||
[[Image:Select master.png]]<br> | |||
4. Choose the users you want to assign handsets to, and enter the IPUI of the handsets. Then wait and click the "Finish" button<br> | |||
[[Image:Enter mac DECT.png]]<br> | |||
<b>Step 6: Reset W90/W80/W70B</b><br> | |||
<b>Step 7: Connect handset to the W70/W90, then the deployment is completed</b><br> | |||
W70B: Go to W70B web portal, under “Handset & VOIP”->” Start Register Handset”<br> | |||
W90: Go to W90DM web portal, under “Handset & VOIP”->” Register Handset”, click “Add Handset”, and click “Start Register Handset”. (Before this step, we have to ensure W90 base is connected with W90DM)<br> | |||
Handset: Press OK -> Settings -> Registration -> Register handset and select one base slot to register the handset<br> | |||
Refer to:<br> | |||
1. https://support.yealink.com/en/portal/knowledge/show?id=6458b6dab1fa936c57b5674b<br> | |||
2. https://support.yealink.com/en/portal/knowledge/show?id=6458b6dab1fa936c57b56761<br> | |||
===Known Problems=== | ===Known Problems=== | ||
[https://support.yealink.com/en/portal/knowledge/show?id=616e8af9d02500669fc5003e I have DM configured, why can't register the handset to DM?] | |||
<!-- == Related Articles == --> | <!-- == Related Articles == --> | ||
[[Category:Howto|{{PAGENAME}}]] | [[Category:Howto|{{PAGENAME}}]] | ||
Revision as of 07:50, 1 December 2023
Applies To
This information applies to
- Yealink desk phone T3 series, T4 series, T5 series, VP59
- Yealink conference phone
- Yealink DECT phone
How to deploy Yealink desk phone on Innovaphone?
Step 1: Download the Yealink app in “App Store”

Step 2: Create an instance for Yealink
1. Go to the AP manager -> Installed apps, you can see the “Yealink” in the app list
2. Click “Add” to create an instance for Yealink app
3. Enter the name, Domain, Password, and Database password to create
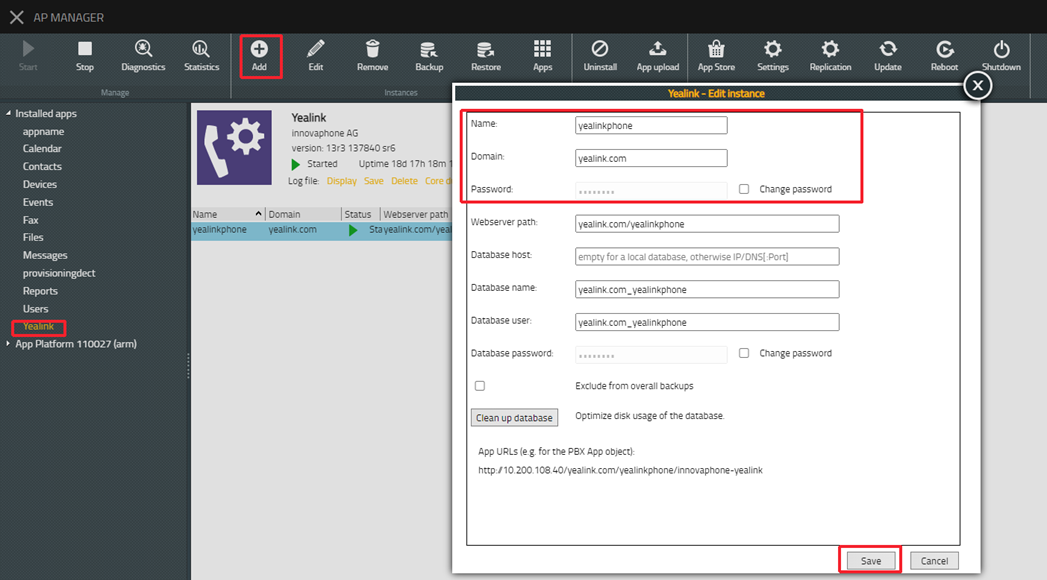
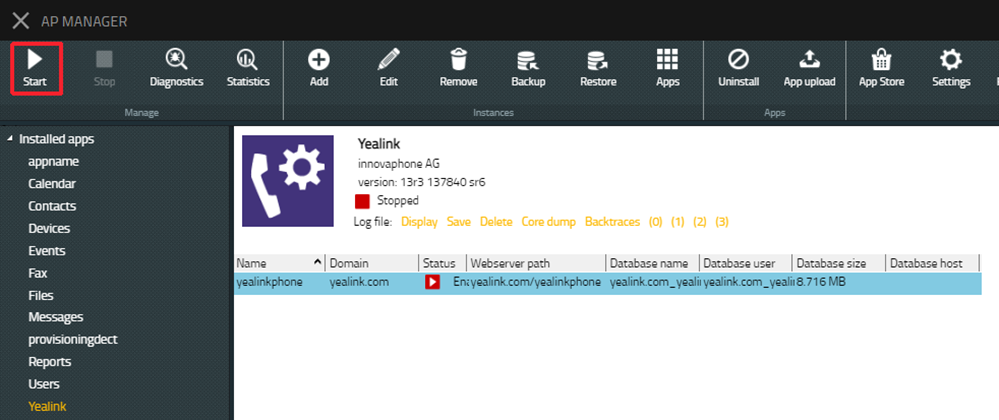
4. Start the app and instance.
Step3: Create an object for yealinkphone
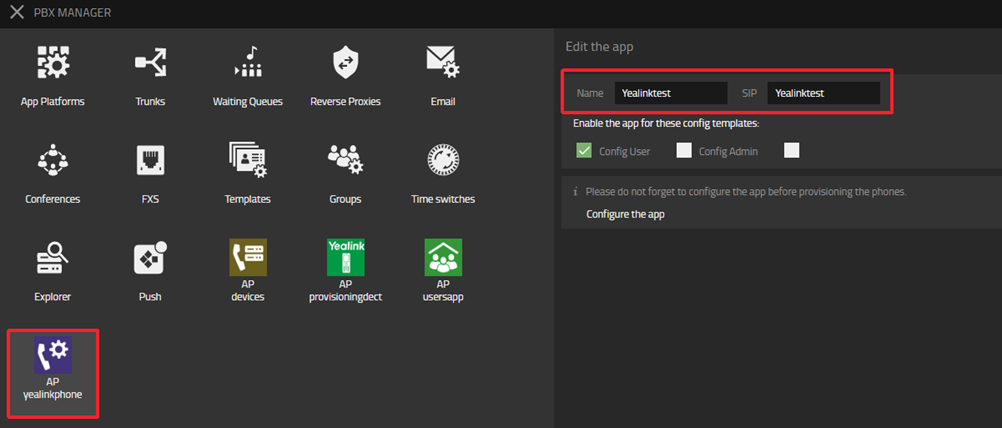
1. Go to the PBX Manager, you can see the instance "yealinkphone" you just created
2. Click AP "yealinkphone", then click “Add an app” to create an object for "yealinkphone"
3. Enter the name, SIP and choose the template to create
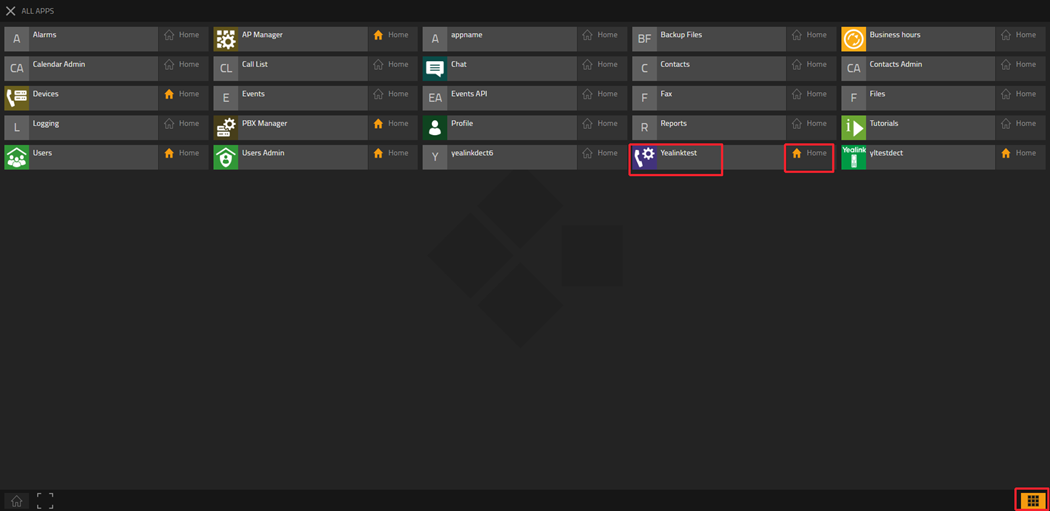
4. In all apps list, you will see the app object Yealinktest you just created. Add it to the Home screen
Step 4: Customize other device configurations
1. Go to the Yealinktest, which is the Yealink object you just created
2. Click the hamburger icon in the upper right corner
![]()
3. Customize other device configurations here
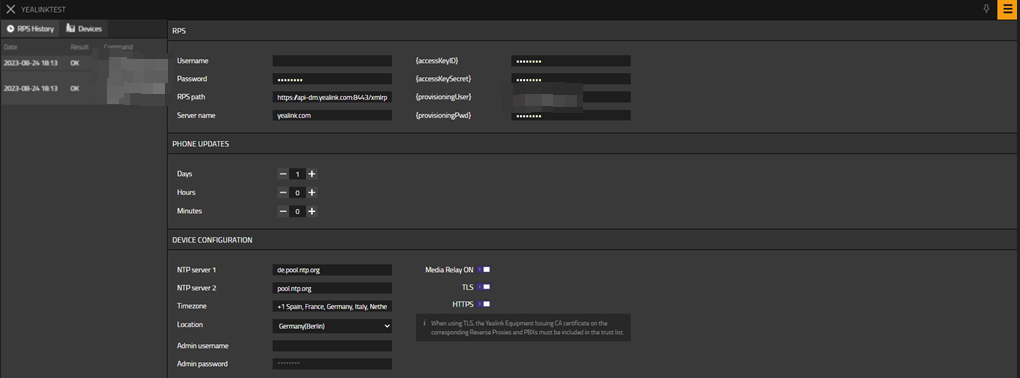
Step 5: Configure the desk Phone MAC and account
1. Go to the “Users Admin”-> “Register Phones”, click “+ New phone registrations”
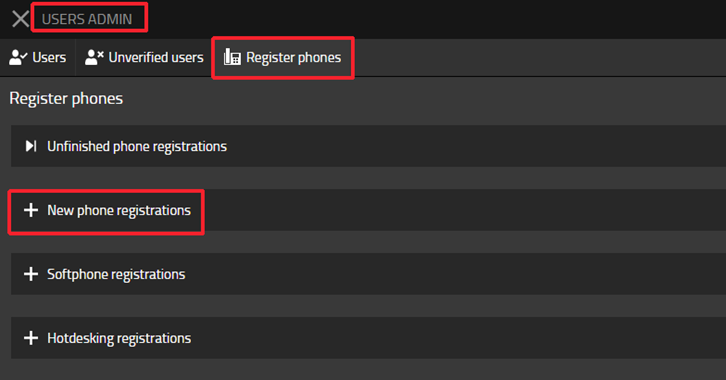
2. Select the Yealink

3. Select “master IP Phone”

4. Choose the users you want to assign the phone and enter the MAC of the desk Phone. You can configure multiple phones at once. Then wait and click the "Finish" button

Step 6: Reset the desk Phone, then the deployment is completed
How to deploy Yealink DECT Phone on Innovaphone?
Step 1: Download the Yealink app in “App Store”

Step 2: Create an instance for Provisioning DECT
1. Go to the AP manager -> Installed apps, you can see the “Yealink” in the app list
2. Click “Add” to create an instance for Provisioning DECT
3. Enter the name, Domain, Password, and Database password to create
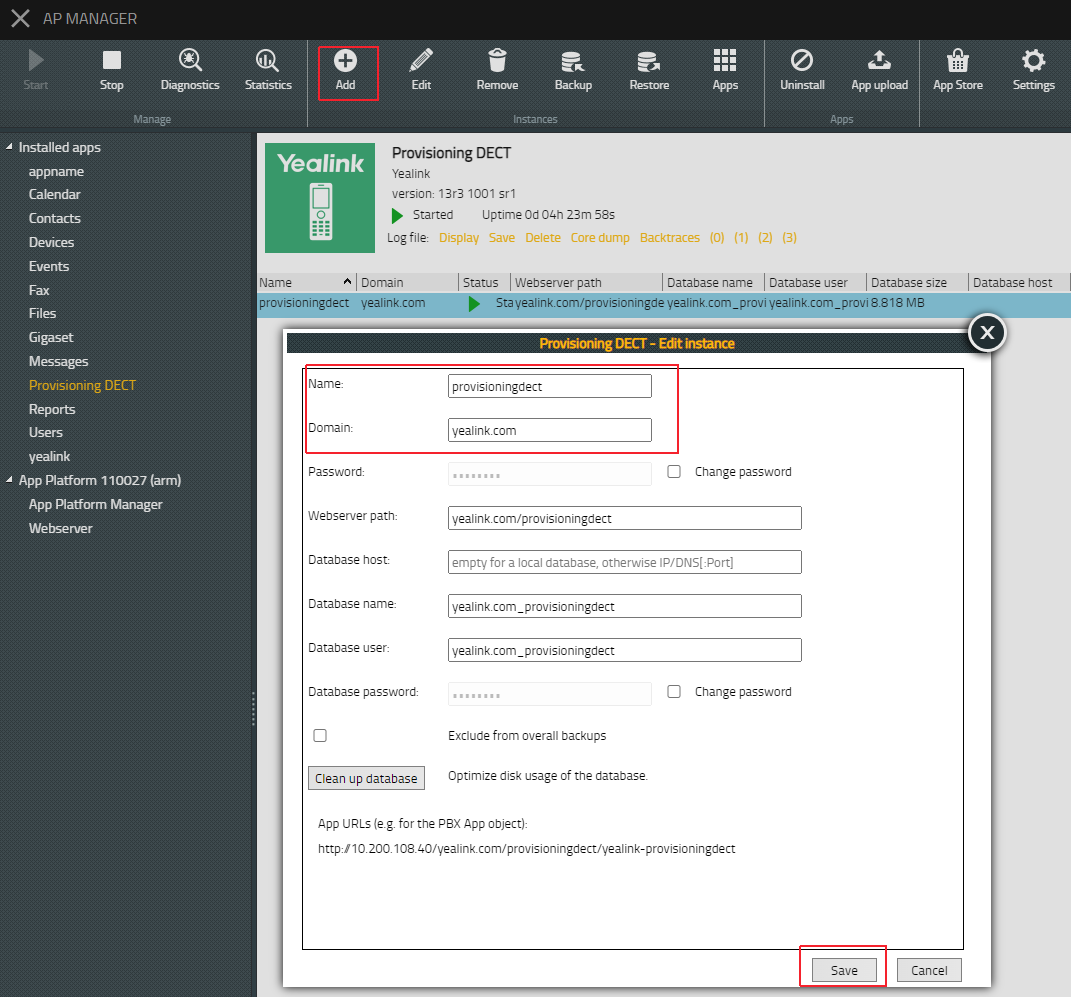
4. Start the app and instance
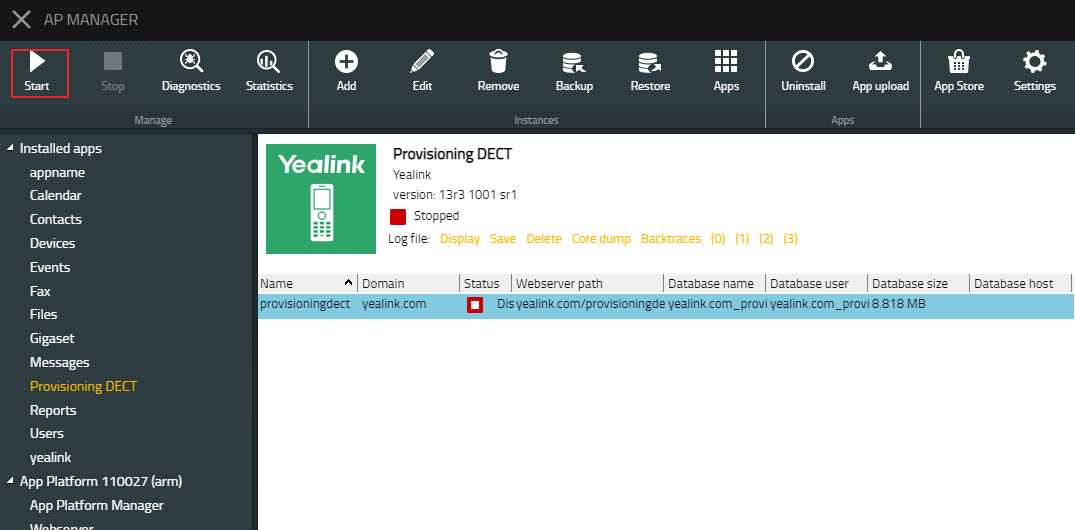
Step3: Create an object for Provisioning DECT
1. Go to the PBX Manager, you can see the instance "provisioningdect" you just created
2. Click AP "provisioningdect", then click “Add an app” to create an object for Provisioning DECT
3. Enter the name, SIP, and choose the template to create
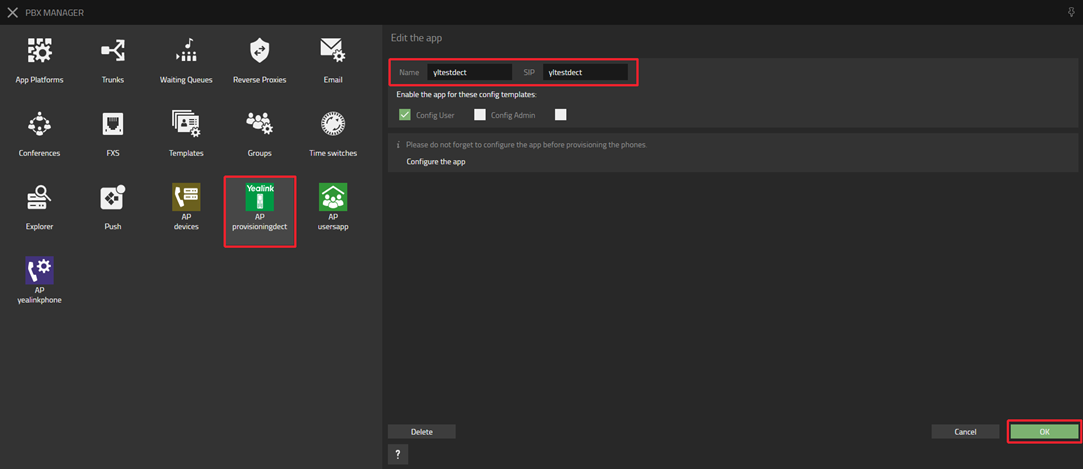
4. In all apps list, you will see the app object Yealinktest you just created. Add it to the Home screen
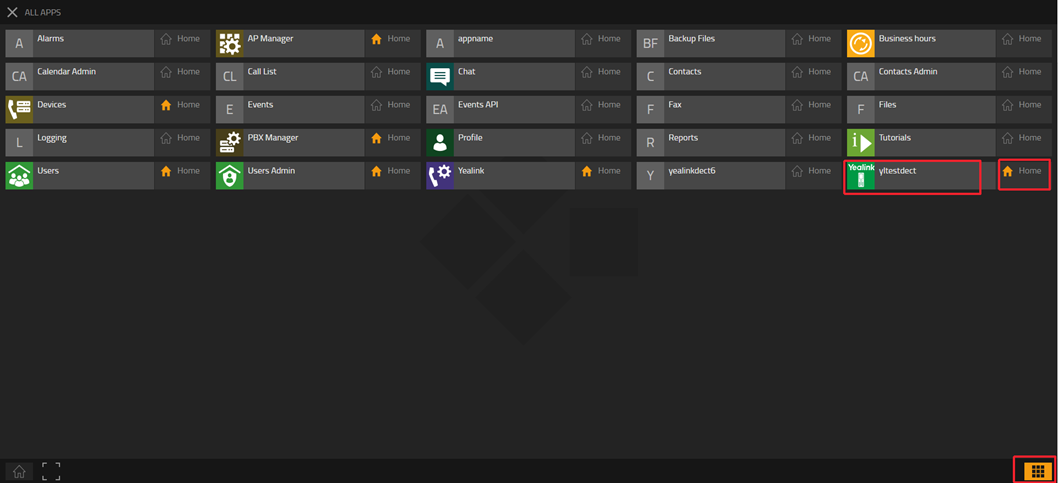
Step 4: Customize other device configurations and MAC for the Provisioning DECT object
1. Go to the "yltestdect", which is the Provisioning DECT object you just created

2. Click the hamburger icon in the upper right corner
![]()
3. Customize other device configurations and MAC here
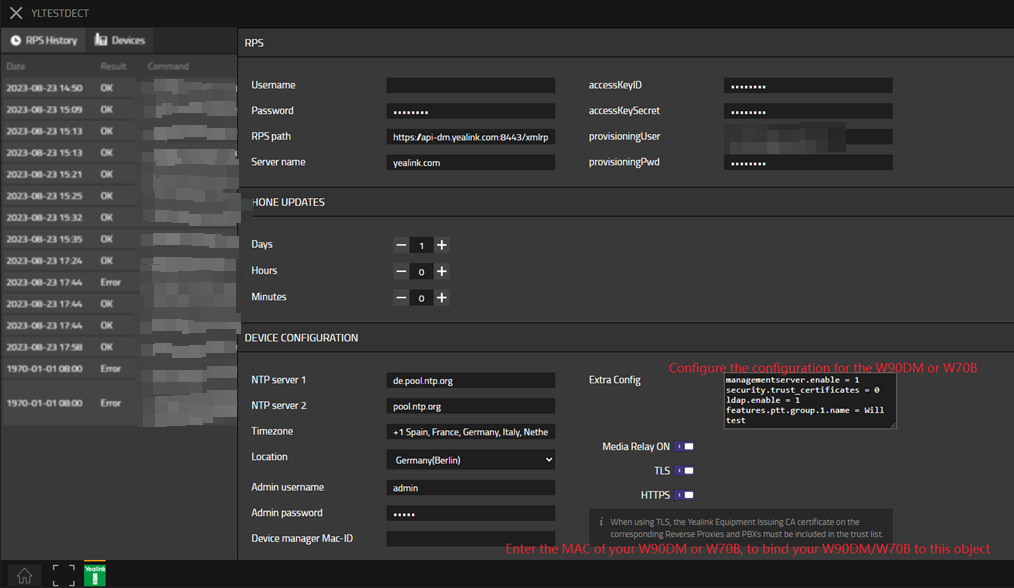
Step 5: Configure the handset and account for your W90/W80/W70B
1. Go to the “Users Admin”-> “Register Phones”, click “+ New phone registrations”

2. Select the YealinkProvisioningDect

3. Select “master IP Phone”

4. Choose the users you want to assign handsets to, and enter the IPUI of the handsets. Then wait and click the "Finish" button

Step 6: Reset W90/W80/W70B
Step 7: Connect handset to the W70/W90, then the deployment is completed
W70B: Go to W70B web portal, under “Handset & VOIP”->” Start Register Handset”
W90: Go to W90DM web portal, under “Handset & VOIP”->” Register Handset”, click “Add Handset”, and click “Start Register Handset”. (Before this step, we have to ensure W90 base is connected with W90DM)
Handset: Press OK -> Settings -> Registration -> Register handset and select one base slot to register the handset
Refer to:
1. https://support.yealink.com/en/portal/knowledge/show?id=6458b6dab1fa936c57b5674b
2. https://support.yealink.com/en/portal/knowledge/show?id=6458b6dab1fa936c57b56761