Howto14r2:Step-by-Step Connector for Microsoft365: Difference between revisions
mNo edit summary |
No edit summary |
||
| Line 6: | Line 6: | ||
The Connector for Microsoft365 synchronises Microsoft Teams presences with the innovaphone PBX and back. In this Step-by-Step I will show you how to configure it. | The Connector for Microsoft365 synchronises Microsoft Teams presences with the innovaphone PBX and back. In this Step-by-Step I will show you how to configure it. | ||
[[File:M365-function.jpg|left|thumb| | [[File:M365-function.jpg|left|thumb|630x630px|m365-function.jpg/]] | ||
| Line 49: | Line 49: | ||
** Assign a Name to this App | ** Assign a Name to this App | ||
[[Image:App_Registration_Connector_for_Microsoft365.png|thumb|none|600px|app_registration_connector_for_microsoft365.png/]] | [[Image:App_Registration_Connector_for_Microsoft365.png|thumb|none|600px|app_registration_connector_for_microsoft365.png/|app_registration_connector_for_microsoft365.png/]] | ||
Switch to the Authentication Tab on the left side | Switch to the Authentication Tab on the left side | ||
* Enable "Allow public client flows" | * Enable "Allow public client flows" | ||
[[Image:Authentication_Connector_for_Microsoft365.png|thumb|none|600px|authentication_connector_for_microsoft365.png/]] | [[Image:Authentication_Connector_for_Microsoft365.png|thumb|none|600px|authentication_connector_for_microsoft365.png/|authentication_connector_for_microsoft365.png/]] | ||
Switch to api permissions on the left side | Switch to api permissions on the left side | ||
[[Image:Azure_Select_Api-Permission.png|thumb|none|600px|azure_select_api-permission.png/]] | [[Image:Azure_Select_Api-Permission.png|thumb|none|600px|azure_select_api-permission.png/|azure_select_api-permission.png/]] | ||
* Configure delegated permissions | * Configure delegated permissions | ||
| Line 65: | Line 65: | ||
** Presence.Read.All | ** Presence.Read.All | ||
[[Image:Azure_Select_Api-Permission_Delegated.png|thumb|none|600px|azure_select_api-permission_delegated.png/]] | [[Image:Azure_Select_Api-Permission_Delegated.png|thumb|none|600px|azure_select_api-permission_delegated.png/|azure_select_api-permission_delegated.png/]] | ||
* Grant access to the api permissions, if not possible you have to ask an admin | * Grant access to the api permissions, if not possible you have to ask an admin | ||
[[Image:APIPermission_Connector_for_Microsoft365.png|thumb|none|600px|apipermission_connector_for_microsoft365.png/]] | [[Image:APIPermission_Connector_for_Microsoft365.png|thumb|none|600px|apipermission_connector_for_microsoft365.png/|apipermission_connector_for_microsoft365.png/]] | ||
Now configure the following attributes for the Connector for Microsoft365 | Now configure the following attributes for the Connector for Microsoft365 | ||
| Line 78: | Line 78: | ||
* Password | * Password | ||
[[Image:Overview_Connector_for_Microsoft365.png|thumb|none|600px|overview_connector_for_microsoft365.png/]] | [[Image:Overview_Connector_for_Microsoft365.png|thumb|none|600px|overview_connector_for_microsoft365.png/|overview_connector_for_microsoft365.png/]] | ||
====Create an App for syncing PBX to Teams==== | ====Create an App for syncing PBX to Teams==== | ||
| Line 85: | Line 85: | ||
* The Client ID and Tenant ID has been created automatically. These values are needed to configure the Connector for Microsoft365 App. | * The Client ID and Tenant ID has been created automatically. These values are needed to configure the Connector for Microsoft365 App. | ||
[[Image:Overview_Connector_for_Microsoft365_Sync_to_Teams.png|thumb|none|600px|overview_connector_for_microsoft365_sync_to_teams.png/]] | [[Image:Overview_Connector_for_Microsoft365_Sync_to_Teams.png|thumb|none|600px|overview_connector_for_microsoft365_sync_to_teams.png/|overview_connector_for_microsoft365_sync_to_teams.png/]] | ||
* Open Certificates & Secrets on the left | * Open Certificates & Secrets on the left | ||
| Line 91: | Line 91: | ||
* Save the Value as you need it later | * Save the Value as you need it later | ||
[[Image:Authentication_Connector_for_Microsoft365_Sync_to_Teams.png|thumb|none|600px|authentication_connector_for_microsoft365_sync_to_teams.png/]] | [[Image:Authentication_Connector_for_Microsoft365_Sync_to_Teams.png|thumb|none|600px|authentication_connector_for_microsoft365_sync_to_teams.png/|authentication_connector_for_microsoft365_sync_to_teams.png/]] | ||
* Open api permissions on the left | * Open api permissions on the left | ||
[[Image:Azure_Select_Api-Permission.png|thumb|none|600px|azure_select_api-permission.png/]] | [[Image:Azure_Select_Api-Permission.png|thumb|none|600px|azure_select_api-permission.png/|azure_select_api-permission.png/]] | ||
* configure application permission and add the following permission | * configure application permission and add the following permission | ||
** Presence.ReadWrite.All | ** Presence.ReadWrite.All | ||
[[Image:Azure_Select_Api-Permission_Application.png|thumb|none|600px|azure_select_api-permission_application.png/]] | [[Image:Azure_Select_Api-Permission_Application.png|thumb|none|600px|azure_select_api-permission_application.png/|azure_select_api-permission_application.png/]] | ||
* Grant access to the api permissions, if not possible you have to ask an admin | * Grant access to the api permissions, if not possible you have to ask an admin | ||
[[Image:APIPermission_Connector_for_Microsoft365_Sync_to_Teams.png|thumb|none|600px|apipermission_connector_for_microsoft365_sync_to_teams.png/]] | [[Image:APIPermission_Connector_for_Microsoft365_Sync_to_Teams.png|thumb|none|600px|apipermission_connector_for_microsoft365_sync_to_teams.png/|apipermission_connector_for_microsoft365_sync_to_teams.png/]] | ||
| Line 130: | Line 130: | ||
*** <code>https://public.dns/your.domain/microsoft365/subscriptions</code> | *** <code>https://public.dns/your.domain/microsoft365/subscriptions</code> | ||
*** Save your changes | *** Save your changes | ||
*** [[Image:Microsoft365_admin_app_2_14r2.png|thumb|none|600px|microsoft365_admin_app_2_14r2.png/]] | *** [[Image:Microsoft365_admin_app_2_14r2.png|thumb|none|600px|microsoft365_admin_app_2_14r2.png/|microsoft365_admin_app_2_14r2.png/]] | ||
* Open Manage Teams accounts | * Open Manage Teams accounts | ||
| Line 138: | Line 138: | ||
** Click on the check mark | ** Click on the check mark | ||
** Make sure to add an Azure Portal communication user for each 650 user you want to subscribe | ** Make sure to add an Azure Portal communication user for each 650 user you want to subscribe | ||
** [[Image:Microsoft365_admin_app_2_14r2_user.png|thumb|none|600px|microsoft365_admin_app_2_14r2_user.png/]] | ** [[Image:Microsoft365_admin_app_2_14r2_user.png|thumb|none|600px|microsoft365_admin_app_2_14r2_user.png/|microsoft365_admin_app_2_14r2_user.png/]] | ||
* After successful configuration and subscription, the Microsoft services will connect to the specified ''Notification URL'' for presence and line state updates. | * After successful configuration and subscription, the Microsoft services will connect to the specified ''Notification URL'' for presence and line state updates. | ||
* For this to work, it is important to make sure that the specified ''Notification URL'' is reachable from the Microsoft services, meaning from the public internet. | * For this to work, it is important to make sure that the specified ''Notification URL'' is reachable from the Microsoft services, meaning from the public internet. | ||
| Line 149: | Line 149: | ||
**ClientSecretSynctoTeams - Insert the shared secret (from the in preparation created PBX to Teams app) | **ClientSecretSynctoTeams - Insert the shared secret (from the in preparation created PBX to Teams app) | ||
[[Image:Microsoft365_admin_app_3_14r2.png|thumb|none|600px|microsoft365_admin_app_3_14r2.png/]] | [[Image:Microsoft365_admin_app_3_14r2.png|thumb|none|600px|microsoft365_admin_app_3_14r2.png/|microsoft365_admin_app_3_14r2.png/]] | ||
* For the sync direction from PBX to Teams, the app itself needs visibility permissions (presence, on-the-phone) for the users who should be synced to Teams. The configuration tag is visibility for each user object. | * For the sync direction from PBX to Teams, the app itself needs visibility permissions (presence, on-the-phone) for the users who should be synced to Teams. The configuration tag is visibility for each user object. | ||
Revision as of 13:58, 17 January 2025
If you have difficulty understanding the written language, we recommend to use www.deepl.com for translation.
If installed, you can also use the translation function of your browser by right-clicking.
The Connector for Microsoft365 synchronises Microsoft Teams presences with the innovaphone PBX and back. In this Step-by-Step I will show you how to configure it.

Purpose
The Presence of a User will be synchroniced From Teams to the PBX and vice versa. This way the Users presence is always up-to-date for both Systems.
Features
- Synchronisation of the presence between Teams and PBX and vice versa
Limitations
- Line states set by the PBX does not block calls in Teams
- Maximum number of supported Users per communication User
- Synchronisation Delay due to limitations in the Graph-API
- Communication Users with MFA are not supported as technical communication users for the Connector
- Subscription Timeout
For more information regarding the Limitations please see: https://wiki.innovaphone.com/index.php?title=Reference14r2:Concept_App_Service_Connector_for_Microsoft_365#Known_Limitation
Requirements
- innovaphone PBX
- innovaphone Application Platform
- App(Connector for Microsoft 365)
- PBX-App(innovaphone-microsoft365) license per user - order no. 02-00050-009
- account in Azure Portal of Microsoft (for each of the technical communication users, no permission role needed)
- Each communication user must have a Teams license applied, more infos can be found here
- Each communication user can be used to subscribe the presence of up to 650 users. (If you want to synchronize more than 650 users, you will need a multitude of communication users)
- Must not have multi factor authentication activated
- Must have access from the internet to your App Platform
- This can be done by using a reverse proxy or other firewall
- The public endpoint must have a valid, public signed certificate (in order to make a trusted SSL connection from the Azure cloud to the Application Platform possible)
- A valid certificate is required in all involved network entities - at least in the App Platform and if used in the Reverse Proxy; to ensure transmission of MS365 HTTPS POST requests to the app service in order to send notifications.
- Admin account for Azure Portal (only necessary for granting needed permission for registered app during setup)
Configuration
In this scenario, we will take all the neccessary steps to configure the Connector for Microsoft365 App and the Azure Portal.
Create an App for syncing Teams to PBX
- First you have to add an app registration in the Azure Portal of Microsoft
- Assign a Name to this App

Switch to the Authentication Tab on the left side
- Enable "Allow public client flows"

Switch to api permissions on the left side

- Configure delegated permissions
- Add the following permissions
- User.Read.All
- Presence.Read.All

- Grant access to the api permissions, if not possible you have to ask an admin

Now configure the following attributes for the Connector for Microsoft365
- Client ID (already given after successful registration of the App) as shown in the picture
- Tenant ID (already given after successful registration of the App) as shown in the picture
- User
- Password

Create an App for syncing PBX to Teams
- Create a new App registration for the synchronisation from the PBX to Teams
- The Client ID and Tenant ID has been created automatically. These values are needed to configure the Connector for Microsoft365 App.

- Open Certificates & Secrets on the left
- Create a new Client secret
- Save the Value as you need it later

- Open api permissions on the left
- configure application permission and add the following permission
- Presence.ReadWrite.All

- Grant access to the api permissions, if not possible you have to ask an admin

Installing and configuring App Platform and PBX
Install the following App from the App Store on your App Platform:
- Connector for Microsoft365
Now create a Instance and add an App through the PBX-Manager Plugin. Also assign this Admin App to a User/Template.
Note: If you don't know how this works, have a look here: https://wiki.innovaphone.com/index.php?title=Course14:IT_Advanced_-_04_Setting_up_the_Application_Platform#Adding_an_App_Service_instance
Synchronization from Teams to the PBX
- First you will need to configure the inbound sync from Teams to PBX
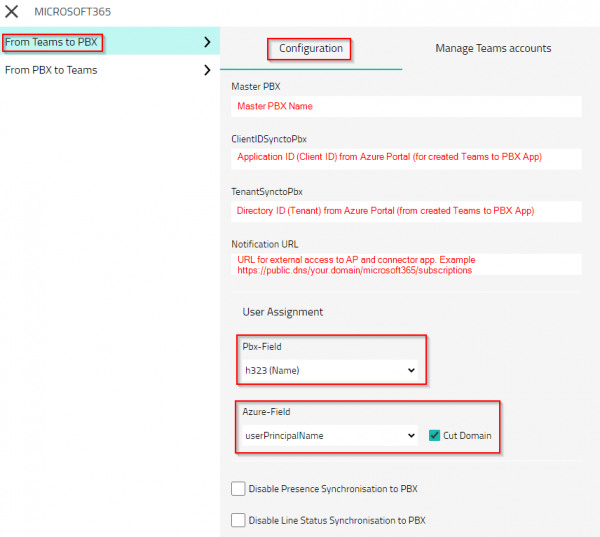
- Open Configuration
- Master PBX - Set the name of your Master PBX (Not full DNS name, really just only the PBX name) Good: [pbx] Bad: [pbx.domain.tld]
- ClientIDSynctoPbx - Insert the Application ID (Client ID) from Azure Portal (from the preparation created Teams to PBX app)
- TenantSynctoPbx - Insert the Directory ID (Tenant) from Azure Portal (from the preparation created Teams to PBX app)
- Notification URL - You need to specify the address Microsoft can send presence updates to.
- You need to make sure that you define a URL where you can reach your App Platform from the public internet
public.dns - Next you need the domain you have configured in the app instance before (3.2.2)
your.domain - Next you need the name of the instance you have configured before (3.2.2)
microsoft365 - The URL will always be terminated by
subscriptions https://public.dns/your.domain/microsoft365/subscriptions- Save your changes
microsoft365_admin_app_2_14r2.png/
- You need to make sure that you define a URL where you can reach your App Platform from the public internet

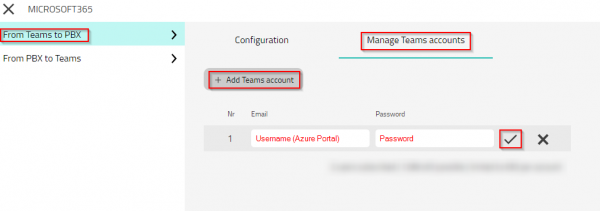
- Open Manage Teams accounts
- Click on Add Teams account
- Enter username (Azure Portal account in email format)
- Enter password
- Click on the check mark
- Make sure to add an Azure Portal communication user for each 650 user you want to subscribe
microsoft365_admin_app_2_14r2_user.png/
- After successful configuration and subscription, the Microsoft services will connect to the specified Notification URL for presence and line state updates.
- For this to work, it is important to make sure that the specified Notification URL is reachable from the Microsoft services, meaning from the public internet.

It can take up to 10 Minutes until all check marks are green, and the sync is working
Synchronization from the PBX to Teams
- For the outbound synchronization you select from PBX to Teams in the admin app
- ClientIDSynctoTeams - Insert the Application ID (Client ID) from Azure Portal (from the in preparation created PBX to Teams app)
- TenantSyncto Teams - Insert the Directory ID (Tenand) from Azure Portal (from the in preparation created PBX to Teams app)
- ClientSecretSynctoTeams - Insert the shared secret (from the in preparation created PBX to Teams app)

- For the sync direction from PBX to Teams, the app itself needs visibility permissions (presence, on-the-phone) for the users who should be synced to Teams. The configuration tag is visibility for each user object.
Verification
Change the presence of a User
- Change the presence of a User in Microsoft Teams from Available to Busy
- Check if the myApps presence also changes to Busy
- Change the presence of a User in myApps from Available to Busy
- Check if the Microsoft Teams presence also changes