Reference10:Voice Recorder/Setup: Difference between revisions
mNo edit summary |
mNo edit summary |
||
| Line 23: | Line 23: | ||
[[Image: | [[Image:VR004Bis.png]] | ||
=== Recorder Name === | === Recorder Name === | ||
| Line 97: | Line 90: | ||
Enter the path to the main screen of the reporting, tipical (and default) is “/apps/innovaphone-reporting/report.php”. | Enter the path to the main screen of the reporting, tipical (and default) is “/apps/innovaphone-reporting/report.php”. | ||
=== Trunk Access === | |||
Indicate the trunk access number (tipically "0") | |||
=== Swap incoming/outgoing === | |||
What “incoming” or “outgoing” is depends on the point of view. If clicked “in” and “out” (“i”, “o”) are simply swapped. | |||
=== Save and exit === | |||
=== Try to reach reporting === | === Try to reach reporting === | ||
| Line 126: | Line 130: | ||
Note that file in the backup path will never be touched. | Note that file in the backup path will never be touched. | ||
=== | == GROUP EMAIL ALARM == | ||
If the recorder switch on the master alarm a supervisor can be receive an email. The message object is "Voice Recorder " trecordername + " - ALARM NOTIFICATION" while the body text is "Automatic generated Alarm - Do NOT answer!". | |||
Please note that a mail is sending just one time even if the error is recovered automatically (for example if the reporting is reachable again, then fails, then works etc.). To rearm the email the master alarm must be quit. This is intentionally to avoid tons of emails in case of toggling errors. The rule is that after an alarm email the application has to be checked. | |||
=== e-mail account === | |||
Enter the destination email account for example kwa@innovaphone.com | |||
If this field is empty the feature is off. | |||
=== e-mail server === | |||
Enter the e-mail server, for example 145.5.23.24 | |||
=== Password === | |||
Not necessary for Exchange but could be. | |||
=== Start in Taskbar === | |||
If checked the recorder will start minimized. Because the recorder has a complete user interface this software is not designed to run as a service. For automatic start-up include the .exe in the auto-start folder. | |||
=== Write all operations in logfile === | |||
Do not confuse the logfile with the error logfile, the error log is written in any case and named iREC_Error_Log. This logfile is called iRECsys_Log.txt and contains all operational tasks like copy of file, converting ecc., not just events like startup or errors. This flag should be switched on just in special situation for example during installation of a new system or in case of error searching, because this file becomes very huge and there is no automatic limitation foreseen. | |||
=== Save and | === Save and Exit === | ||
The setup is saved, like on a start-up a health check is done (looking if the setup sound reasonable, check of the I/O devices) and the timer are armed. | The setup is saved, like on a start-up a health check is done (looking if the setup sound reasonable, check of the I/O devices) and the timer are armed. | ||
Revision as of 11:58, 25 June 2013
This article is preliminary – The product and functions described are not actually available and can be modified or canceled in any moment!
The recorder has to “know” basically 3 things: where are the recordings (pcap files), where the reporting tool is and where the results should be stored.
The setup is stored in the directory where the recorder is running; therefore more recorders can be started on one single system using different directories. Please note that the setup file is a XML file but AES crypt, so not readable.
In the headline of the setup the version is displayed, note that the version can be displayed also in the recorder main menu clicking on the innovaphone logo.
The setup described in this page concerns version 1.00 of the Recorder Software.
The software was developed under Win7 but should operate also using windows Server (while the player software is not running without special setups using windows server).
The recorder requires reporting Version 10, Build 10043 or higher.
The recorder requires working Reporting software. The reporting can work on a physical gateway or on a VMware environment (even on a player). See relative articles how to setup the reporting tool.
Recorder Setup
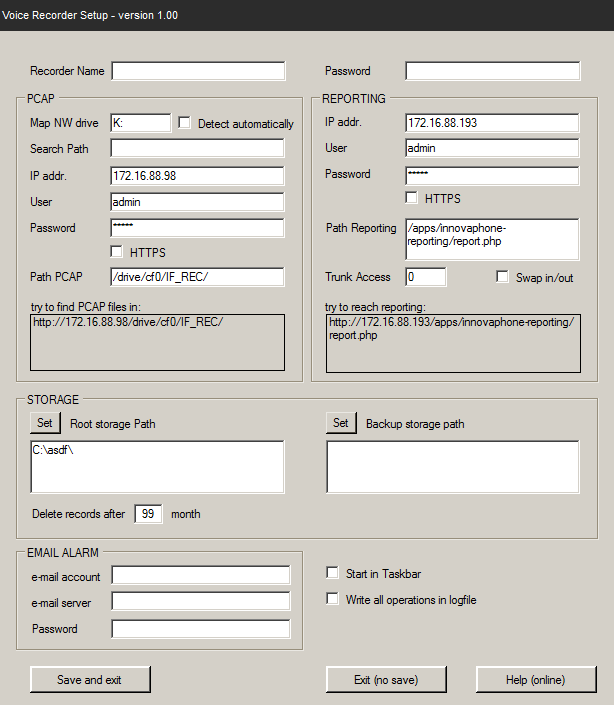
This decription concerns that screen:
Recorder Name
This Name is displayed on the headline of the main menu and also reported in the start- up message log file. It is just an optional and has no further function; it can also be leaved blank.
Password
Password of this setup, if blank no password is asked to access to this setup. Please note that this password is also the default password for the player and can therefore be an important security feature.
GROUP PCAP
The setup parameter in this panel allows this recording software retrieve the .pcap files. These files can be located on the Compact flash or on a webdav server. Both cases are supported; please note that storing voce on a CF means low performance and additional workload for the PBX-CPU in case of file copy.
Map Network Drive
A virtual drive should be mapped, typical letters are for example “K:” or “H:”. Indicate the letter including the “:”. Once started you will see in the explorer the network drive, if terminated correctly the network drive will be removed and is no longer visible in the explorer.
Detect automatically
If checked a free drive letter is detected automatically and assigned.
Search Path
This field must be blank in case of a CF, in case of a network access to a drive (webdav server) indicate the root or also the complete path (using or not the “Path PCAP” field). Observe that the IP Address is ignored if this field is not empty.
IP address
Enter the IP address in case of using a CF on a Gateway.
User/Password
Enter the credential to access to the CF. If using a webdav server the PC where this application is running must have access to the relative directory without credential from the application.
HTTPS
Check if the CF is using HTTPS
Path PCAP
Enter the missing path data to access the directory.
Try to find PCAP files
This info panel shows you in real time the resulting path in function of your setup inputs. The path indicated here is the one the software uses to reach the pcap files.
GROUP REPORTING
The setup parameter in this panel allows this recording software connect the reporting toll and retrieve the CDR records. The Reporting can run on a gateway or VMware (player or native), there is no difference for this setup.
IP address
Enter the IP address of the device where the reporting is running. If you run the reporting on a PC enter the IP address indicated on the VMware virtual machine. If it is not visible enter “ifconfig” in the VMware panel, the address is shown under inet addr. Remember that the address is never 127.0.0.1 (even if the reporting is running on the same PC).
User/Password
Enter the credential to access to the reporting, default is “reporting” and “linux”.
HTTPS
Check if the reporting is using HTTPS
Path Reporting
Enter the path to the main screen of the reporting, tipical (and default) is “/apps/innovaphone-reporting/report.php”.
Trunk Access
Indicate the trunk access number (tipically "0")
Swap incoming/outgoing
What “incoming” or “outgoing” is depends on the point of view. If clicked “in” and “out” (“i”, “o”) are simply swapped.
Save and exit
Try to reach reporting
This info panel shows you in real time the resulting path in function of your setup inputs. The path indicated here is the one the software uses to reach reporting, if you enter this path in an explorer you should see the main menu of the reporting.
GROUP STORAGE
The setup parameter in this panel defines where the voice records are stored. While the Root storage Path is mandatory the backup path is a option.
Set Root storage path
The path indicated in this option is the working directory where the files after retrieving, naming and converting are written. It is also the directory where the player will look and search for files.
If you click the “Set” button a directory dialog box appear, select the directory where you want store the voice records and confirm. You can edit the path even manually, not recommended.
Set Backup path
This path is optional; if blank the feature is off.
If you click the “Set” button a directory dialog box appear, select the directory where you want store a backup of the voice records and confirm. You can edit the path even manually, not recommended.
Note that files stored in the backup directory are not visible for the player and even the automatic delete is not active. The indicated directory is typically on a NAS or SAN system.
Delete records after moth
The indicated number of month is the maximum storage depth. The minimum is 2 (so the actual and the last month will always be available), indicating 99 disable the feature. Deleted files cannot be recovered, the name of the deleted files are reported in the syslog.
Note that file in the backup path will never be touched.
GROUP EMAIL ALARM
If the recorder switch on the master alarm a supervisor can be receive an email. The message object is "Voice Recorder " trecordername + " - ALARM NOTIFICATION" while the body text is "Automatic generated Alarm - Do NOT answer!".
Please note that a mail is sending just one time even if the error is recovered automatically (for example if the reporting is reachable again, then fails, then works etc.). To rearm the email the master alarm must be quit. This is intentionally to avoid tons of emails in case of toggling errors. The rule is that after an alarm email the application has to be checked.
e-mail account
Enter the destination email account for example kwa@innovaphone.com
If this field is empty the feature is off.
e-mail server
Enter the e-mail server, for example 145.5.23.24
Password
Not necessary for Exchange but could be.
Start in Taskbar
If checked the recorder will start minimized. Because the recorder has a complete user interface this software is not designed to run as a service. For automatic start-up include the .exe in the auto-start folder.
Write all operations in logfile
Do not confuse the logfile with the error logfile, the error log is written in any case and named iREC_Error_Log. This logfile is called iRECsys_Log.txt and contains all operational tasks like copy of file, converting ecc., not just events like startup or errors. This flag should be switched on just in special situation for example during installation of a new system or in case of error searching, because this file becomes very huge and there is no automatic limitation foreseen.
Save and Exit
The setup is saved, like on a start-up a health check is done (looking if the setup sound reasonable, check of the I/O devices) and the timer are armed.
Exit (no save)
Same like Save and exit without saving setups.
Help (online)
Access to this web-page.
Reporting Setup
In the reporting there is no special setup required. If running on a VMware assure that the reporting starts each time with the same IP address.
The recorder requires reporting Version 10, Build 10043 or higher.
Important: Each extension producing a .pcap file must be included in the reporting! If just some extensions should be recorded (and just for them reporting licenses are foreseen) a special setup in the routing is required to assure that just those extension will pass the recording GW.
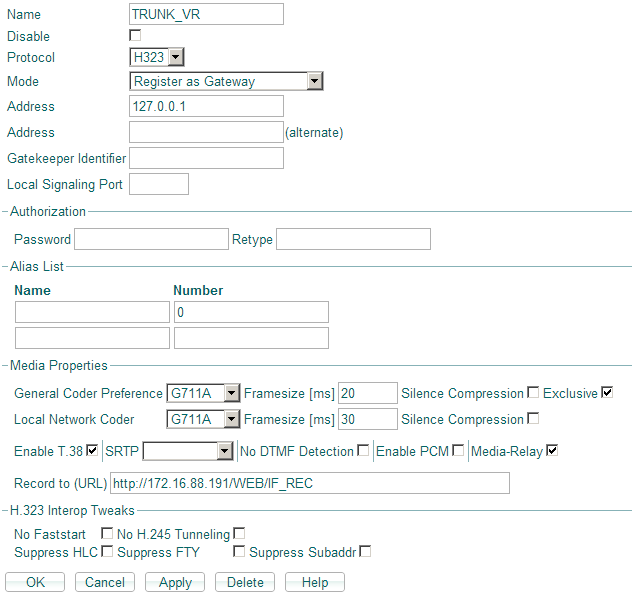
Gateway Setup
The voice has to transit a logical GW where the URL “Record to (URL)” is defined. Including or excluding extensions in the routing allow selective recording of just defined extension (or exclude some extensions). Also mapping in the PBX can be used to manipulate call routing. See relative chapters in the Wiki.
Example:
Note: The Media Properties for this GW has to be set to G711A Exclusive! Therefore just this codec can be recorded. The media relay flag has to be switched on to force audio pass-through (and therefore recording) also in case if IP to IP calls.
The CDR0 or CDR1 must point to the reporting tool (Type = “REMOTE-AP”, IP address and Port 80).
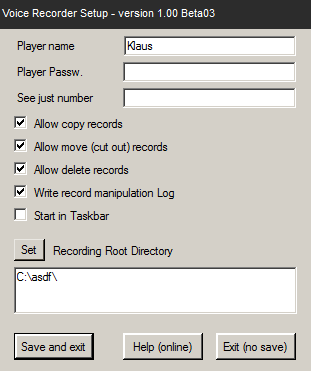
Player Setup
This decription concerns the Player Setup, that or a similar screen:
The Setup is stored in the directory where the player is running in a file named “iPlayer_Setup.xml”.
The file is an xml file but his contend is encrypted and can therefore not be manipulated manually.
The local error and events are stored in a text file named “iPlay_Sys_Log.txt” in the directory where the software is running.
The last player position on the screen is stored in a file named “PlayerPos.txt”, if this file is missing or deleted the player will start up on the windows default startup position.
Note: If the application starts on a hide position you can track it back to the main window activating the application on the taskbar and press the windows button + shift + left arrow.
The manual setup of the Player is stored in a file names “iPlayer_User_Setup.xml” in the directory of the application. This file contains the actual values and options, for example the actual selected player volume. If the Player starts up again the user will found his previous selected switched and options.
"Player Name": Define the Name of this Player (use the user name for example), this name will appear on the main player window but will also identify the user in the central log file.
"Player Password": If blank no password is required to access to this setup. If a password is defined it must be entered to access this setup. If a password is entered or changed the firmware check if in the indicated recording directory a centralized password is found. If yes this master password must be indicated correctly. This is done to avoid that a user delete the setup file, starts the player and access to the setup indicating the recording path and then being able to manipulate.
"See just number": the extension number indicated here is copied to the “Filter A” field of the Player. The “filter A” field is disabled automatically and therefore this user will see just “his” recordings. Like in the filter A and B fields also here wildcards can be used. “2?” for example will show all records from extension “20” to “29” while “203” will show just records of extension 203. If leaved blank this feature is off and the “Filter A” field enabled.
“Allow copy records”: if checked records can be copied, if not the relative button is not shown in the player.
“Allow move (cut out) records”: if checked records can be moved to other directories, if not the relative button is not shown in the player.
“Allow delete records”: if checked the user can delete records, if not the relative button is not shown in the player.
“Write record manipulation Log”: if checked each copy, move or delete action will be logged in a central log file on the recorder directory (therefore all manipulations are logged in one single log file). Please note that copy move and delete operations are possible just on the working folders where the player is pointing (and typically not in the backup path).
“Start in Taskbar”: if checked this application starts-up minimized in the taskbar.
“Set recording directory root”: if pressed a directory dialog is opened and the path to the root directory of the recorder can be selected.
“Save and Exit” saved this setup, “Exit (no save)” leaved this setup without saving.


