Howto:Flowe - Wecom - Partner App: Difference between revisions
Complete scripts initial page function section |
Detailing of step by step of scripts management page |
||
| Line 58: | Line 58: | ||
=== Scripts - Initial Page === | === Scripts - Initial Page === | ||
[[File:Flowe's Scripts' Initial Page.png|thumb|584x584px|Scripts' Initial Page | [[File:Flowe's Scripts' Initial Page.png|thumb|584x584px|Scripts' Initial Page with highlighted features|flowe's_scripts'_initial_page.png/]] | ||
The Scripts '''Initial Page''' section is the main entry point of the Flowe application. Upon launching the app, users are presented with an overview of all existing XML scripts that have been created or imported into the system where users can quickly access, search for and manage scripts. | The Scripts '''Initial Page''' section is the main entry point of the Flowe application. Upon launching the app, users are presented with an overview of all existing XML scripts that have been created or imported into the system where users can quickly access, search for and manage scripts. | ||
| Line 74: | Line 74: | ||
# The results will be shown below | # The results will be shown below | ||
[[File:Flowe Scripts' Search Bar.png|none|thumb|394x394px| | [[File:Flowe Scripts' Search Bar.png|none|thumb|394x394px|flowe_scripts'_search_bar.png/|flowe_scripts'_search_bar.png/]] | ||
==== 2. Add new script ==== | ==== 2. Add new script ==== | ||
| Line 81: | Line 81: | ||
** You will be redirected to [[#Scripts - Management Page|Scripts Management Page]] | ** You will be redirected to [[#Scripts - Management Page|Scripts Management Page]] | ||
[[File:Flowe Scripts Add Button.png|none|thumb| | [[File:Flowe Scripts Add Button.png|none|thumb|flowe_scripts_add_button.png/|flowe_scripts_add_button.png/]] | ||
==== 3. Import script ==== | ==== 3. Import script ==== | ||
| Line 92: | Line 92: | ||
#* The imported script will appear in the list below | #* The imported script will appear in the list below | ||
[[File:Flowe Scripts Import Button.png|none|thumb| | [[File:Flowe Scripts Import Button.png|none|thumb|flowe_scripts_import_button.png/|flowe_scripts_import_button.png/]] | ||
[[File:Flowe Import Script Modal.png|none|thumb| | [[File:Flowe Import Script Modal.png|none|thumb|flowe_import_script_modal.png/|flowe_import_script_modal.png/]] | ||
==== 4. Download script ==== | ==== 4. Download script ==== | ||
| Line 100: | Line 100: | ||
** The download will begin as soon as you click | ** The download will begin as soon as you click | ||
[[File:Flowe Download Script Button.png|none|thumb|Download script button]] | [[File:Flowe Download Script Button.png|none|thumb|Download script button|flowe_download_script_button.png/]] | ||
==== 5. Edit script ==== | ==== 5. Edit script ==== | ||
| Line 107: | Line 107: | ||
** You will be redirected to [[#Scripts - Management Page|Scripts Management Page]] | ** You will be redirected to [[#Scripts - Management Page|Scripts Management Page]] | ||
[[File:Flowe Edit Script Button.png|none|thumb|Edit script button]] | [[File:Flowe Edit Script Button.png|none|thumb|Edit script button|flowe_edit_script_button.png/]] | ||
==== 6. Delete script ==== | ==== 6. Delete script ==== | ||
| Line 118: | Line 118: | ||
#* The modal will close | #* The modal will close | ||
[[File:Flowe Delete Script Button.png|none|thumb|Delete script button]] | [[File:Flowe Delete Script Button.png|none|thumb|Delete script button|flowe_delete_script_button.png/]] | ||
[[File:Flowe Delete Script Modal.png|none|thumb|Delete specified script modal]] | [[File:Flowe Delete Script Modal.png|none|thumb|Delete specified script modal|flowe_delete_script_modal.png/]] | ||
=== Scripts - Management Page === | === Scripts - Management Page === | ||
The Scripts '''Management Page''' is the core interface for creating and editing XML scripts within the Flowe application. This page is designed to provide users with a intuitive interactive editor where scripts can be built from scratch or modified as needed. | The Scripts '''Management Page''' is the core interface for creating and editing XML scripts within the Flowe application. This page is designed to provide users with a intuitive interactive editor where scripts can be built from scratch or modified as needed. | ||
[[File:Flowe New Script Management Page.png|thumb|473x473px|Management page with highlighted features (new script)]] | |||
[[File:Flowe Previously Made Script Management Page.png|thumb|473x473px|Management page with highlighted features (previously made script)]] | |||
The interface is divided into the following key areas: | The interface is divided into the following key areas: | ||
| Line 136: | Line 137: | ||
Elements are based on the official [https://www.innovaphone.com/xsd/vm.htm Innovaphone XML Schema]. | Elements are based on the official [https://www.innovaphone.com/xsd/vm.htm Innovaphone XML Schema]. | ||
[[File:Flowe Script Collapsed Functions.png|none|thumb|465x465px|Collapsed functions when script is opened]] | |||
==== 1. Elements List ==== | |||
The '''Elements List''' contains all XML components available for building scripts in the Flowe application. These elements are based on the official [https://www.innovaphone.com/xsd/vm.htm Innovaphone XML Schema], used for managing the script structure and logic within the XML file. | |||
[[File:Flowe Add Element.png|thumb|383x383px|Add element]] | |||
[[File:Flowe Assign Element.png|thumb|383x383px|Assign element]] | |||
[[File:Flowe If Element.png|thumb|382x382px|If element with nestable element space]] | |||
* '''How to use the elements:''' Users can insert elements inside functions and fill out the required fields according to their purpose and the Innovaphone documentation. Each element should be configured with the necessary data to achieve the expected behavior within the script logic. | |||
* '''Nested elements:''' Some elements allow other elements to be placed inside them, supporting nested structures. For example, you can insert a <code>Switch</code> block inside an <code>If</code> condition, and within that <code>Switch</code>, you can have additional <code>If</code> conditions, and so on. These elements are collapsible, with a collapsing button next to the element's name. | |||
* '''Custom element – "Comment":''' In addition to the standard Innovaphone elements, Flowe provides a new custom element named '''Comment''' (as of now, shown as "Comentário"). This element is designed purely for documentation purposes and allows users to insert comments directly into the XML code. These comments have no effect on script execution and serve only as notes or explanations within the file. | |||
[[File:Flowe Comment Element.png|none|thumb|534x534px|Comment element]] | |||
* In the example shown in the images: | |||
** '''Add element:''' one can write two values and the output. | |||
** '''Assign element:''' one can assign a value to a variable | |||
** '''If element:''' one can define the condition and nest an element inside. The else if and else elements are not automatically created. | |||
** '''Comment element:''' with a text input, one can add a comment to the script in the position where the element was added. | |||
==== 2. Search for element ==== | |||
* Write in the "Search elements..." input area | |||
** Use keywords that match either the element name or its description | |||
[[File:Flowe Scripts' Search Bar.png|none|thumb|410x410px|Search elements input]] | |||
[[File:Flowe Script Search Element Example.png|none|thumb|Searching element example]] | |||
==== | ==== 3. Change script name ==== | ||
==== | ==== 4. Cancel creation/edition ==== | ||
==== | ==== 5. Save script ==== | ||
==== | ==== 6. Add function to script ==== | ||
==== | ==== 7. Add element to function ==== | ||
==== | ==== 8. Fill element information ==== | ||
==== | ==== 9. Remove element from function ==== | ||
=== IVRs === | === IVRs === | ||
Revision as of 16:10, 5 May 2025
| Partner App Info | |
|---|---|
 | |
| Name | Flowe |
| Company | Wecom |
| Version | 1.0 |
| Compatibility | Innovaphone XML Schema |
| License | Via Innovaphone Pricelist |
| Languages | Portuguese, English, German |
Product Name
Flowe Link
Certification status
Space dedicated to Flowe certification information.
Category
VoIP system management products
Vendor

Wecom
Description
Flowe is a Partner App developed by Wecom for the Innovaphone MyApps platform. It is designed to simplify the creation, edition, and management of XML scripts and Voicemail Objects within the PBX.
With a user-friendly and responsive interface optimized for mobile and desktop use, Flowe allows administrators to:
- Create and edit XML scripts visually
- Import and export script files
- Create and assign scripts to IVRs (Interactive Voice Response systems)
- Manage multi-language content (Portuguese, English, German)
Flowe enhances productivity by abstracting technical complexity and aligning with Innovaphone’s native schema definitions.
Functions
This section provides an overview of each core part of the Flowe application. It highlights the purpose of each page, what actions can be performed, and how to navigate through the available features. Additionally, this section provides step-by-step explanations for each functionality.
Scripts - Initial Page
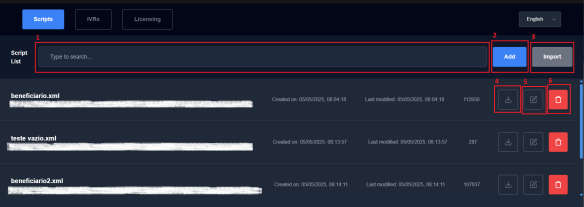
The Scripts Initial Page section is the main entry point of the Flowe application. Upon launching the app, users are presented with an overview of all existing XML scripts that have been created or imported into the system where users can quickly access, search for and manage scripts.
The interface is divided into a search bar, a list of scripts, and two main action buttons: Add and Import. Each script listed displays essential information such as its filename, creation date, last modification date, file size and a unique identifier.
Additionally, each script entry offers three direct action buttons:
- Download – allows the user to download the XML file locally.
- Edit – redirects the user to the Script Management page, where the script can be fully edited.
- Delete – opens a confirmation modal for script deletion.
1. Search for script
- Write in the "Type to search..." input area
- The results will be shown below

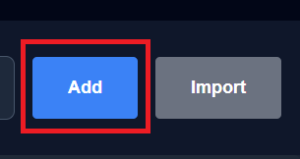
2. Add new script
- Click on the "Add" button beside the search bar
- You will be redirected to Scripts Management Page
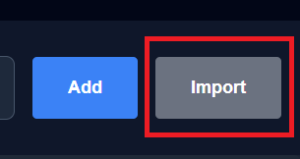
3. Import script
- Click on the "Import" button beside the search bar
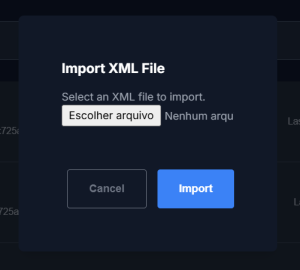
- An import modal will open
- Select the file by clicking on the "Select file" button
- A file selection pop-up will open
- Click on the modal's "Import" button
- The imported script will appear in the list below
4. Download script
- Click on the download icon button on the right of the script's informations
- The download will begin as soon as you click
5. Edit script
- Click on the edit icon button on the right of the script's informations
- You will be redirected to Scripts Management Page
6. Delete script
- Click on the trash/delete icon button on the right of the script's informations
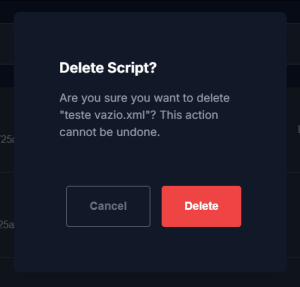
- A delete modal will open
- If you want to delete, click on the "Delete" button on the right
- The file will be deleted and won't appear in the list
- If you misclicked or don't want to delete, click on the "Cancel" button on the left
- The modal will close
Scripts - Management Page
The Scripts Management Page is the core interface for creating and editing XML scripts within the Flowe application. This page is designed to provide users with a intuitive interactive editor where scripts can be built from scratch or modified as needed.
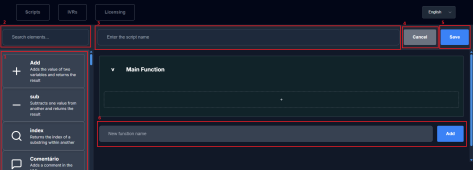

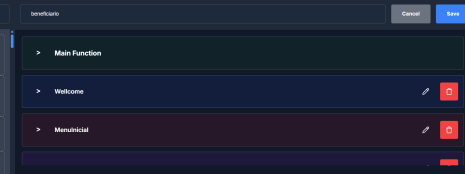
The interface is divided into the following key areas:
- Script Name Input – Located at the top of the page, this input field is mandatory. Users must define a unique name for the script before they can save it.
- Elements List – Positioned on the left side, this section contains all available XML elements, each with a brief description, that can be inserted into the script.
- Search Bar for Elements – A search bar above the elements list allows users to search through using keywords that match either the element name or its description.
- Script Body – The main workspace is located on the right side and displays the full structure of the script as collapsed blocks. Each script begins with a pre-created Main Function (automatically provided when starting a new script), the following functions and, inside each function, users can dynamically insert and manage elements.
- Add New Function – Below the script body, an input field and button allow users to sequentially create new named functions.
- Action Buttons:
- Save – Saves the current script, either as a new file or as an update to an existing one.
- Cancel – Aborts the script creation or editing process and returns the user to the Initial Scripts Page.
Elements are based on the official Innovaphone XML Schema.
1. Elements List
The Elements List contains all XML components available for building scripts in the Flowe application. These elements are based on the official Innovaphone XML Schema, used for managing the script structure and logic within the XML file.


- How to use the elements: Users can insert elements inside functions and fill out the required fields according to their purpose and the Innovaphone documentation. Each element should be configured with the necessary data to achieve the expected behavior within the script logic.
- Nested elements: Some elements allow other elements to be placed inside them, supporting nested structures. For example, you can insert a
Switchblock inside anIfcondition, and within thatSwitch, you can have additionalIfconditions, and so on. These elements are collapsible, with a collapsing button next to the element's name. - Custom element – "Comment": In addition to the standard Innovaphone elements, Flowe provides a new custom element named Comment (as of now, shown as "Comentário"). This element is designed purely for documentation purposes and allows users to insert comments directly into the XML code. These comments have no effect on script execution and serve only as notes or explanations within the file.

- In the example shown in the images:
- Add element: one can write two values and the output.
- Assign element: one can assign a value to a variable
- If element: one can define the condition and nest an element inside. The else if and else elements are not automatically created.
- Comment element: with a text input, one can add a comment to the script in the position where the element was added.
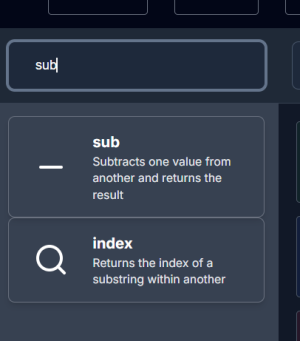
2. Search for element
- Write in the "Search elements..." input area
- Use keywords that match either the element name or its description

3. Change script name
4. Cancel creation/edition
5. Save script
6. Add function to script
7. Add element to function
8. Fill element information
9. Remove element from function
IVRs
The IVRs Page is the main interface for managing IVR entries within the Flowe application. It allows users to create, edit, and organize IVRs that are associated with existing XML scripts.
The interface is divided into the following key areas:
- IVR Search Bar – Positioned at the top of the page, this input allows users to search through existing IVRs by title.
- Add IVR Button – Located to the right of the search bar, this button opens a modal window to create a new IVR entry. It is mandatory to associate the IVR with a previously created script.
- IVRs List – Displays all IVRs in a card-based format. Each card contains the following details:
- Title – The unique name identifying the IVR.
- Internal Number – The internal extension assigned to the IVR.
- SIP Number – The SIP number configured for the IVR.
- Script – The XML script that is linked to the IVR.
- Action Buttons on Each IVR:
- Edit – Opens the same modal used for creation, pre-filled with the IVR’s current data for editing.
- Delete – Removes the IVR after confirmation.
IVRs are fully integrated with the Scripts module, ensuring that each IVR is functional only if a valid script is associated with it.
Search for IVR
Add new IVR
Edit IVR
Delete IVR
Additional Functions
Licensing Page
The Licensing page displays essential licensing information related to the Flowe application. This page is purely informational and does not contain interactive elements. It typically shows a message with contact details for inquiries or further licensing procedures.
Language Configuration
The language selector is always visible within the application's interface, allowing users to seamlessly switch between Portuguese, English, and German at any time. This ensures that the application is accessible and user-friendly across different language preferences, with all texts dynamically updated upon selection.
Licensing
Licensing information.
Prerequisites
Prerequisites information.
Versions
Versioning information.
Configuration
Configuration information.
Installation
Installation information.
Copyright information
Contact
Contact information.