Howto:Billboard - Wecom - Partner App: Difference between revisions
→Functions: Users adjusted and Admins finished. Images added, step by step complete Tag: 2017 source edit |
m →Versions: Fix with latest version info Tag: 2017 source edit |
||
| Line 249: | Line 249: | ||
<!-- Needs further analysis and clarification. --> | <!-- Needs further analysis and clarification. --> | ||
* '''Current version:''' 1.0 | * '''Current version:''' 1.0 | ||
* '''Latest release:''' <code> | * '''Latest release:''' <code>1011 final</code> | ||
* '''Release date:''' | * '''Release date:''' June 17, 2025 | ||
* '''Innovaphone compatibility:''' Yes | * '''Innovaphone compatibility:''' Yes | ||
* '''Architectures supported:''' <code>arm</code>, <code>x86_64</code>, <code>arm64</code> | * '''Architectures supported:''' <code>arm</code>, <code>x86_64</code>, <code>arm64</code> | ||
Revision as of 13:00, 30 June 2025
Product Name
Billboard Link
Certification Status
Space dedicated to Billboard certification information.
Category
Space dedicated to Billboard category information.
Vendor

Wecom
Description
Billboard is a Partner App developed by Wecom to modernize internal communications by digitizing traditional bulletin boards. Through a user-friendly interface integrated into Innovaphone’s myApps workspace, departments (referred to as "groups" within the app) can publish announcements with scheduled validity, targeted visibility, and interaction tracking.
Main components:
- Users App – For general users to access and interact with department posts.
- Admin App – For administrators to manage groups, posts, and licensing.
Functions
Users App
The Users App is the interface where users access, read, create, and manage department posts, based on their permissions (viewer or editor). Each user sees only the groups they are part of.
1. Accessing a Group
- Upon opening the Users App, the main screen lists all groups (departments) the user belongs to.
- To enter a group, simply click on the desired group.
Groups are color-coded and may display badges for new or unseen posts.
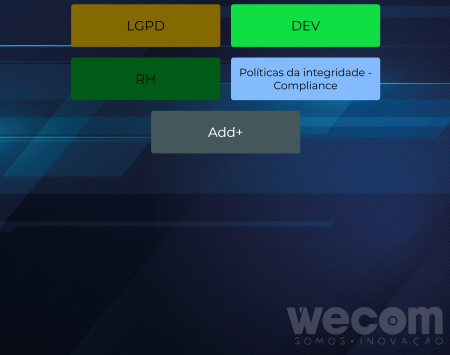
Users App main page with every group you are on
2. Creating a Group (Admins only)
- Only users assigned with the "create department" permission (via Admin App) will see the Add+ button on the main screen.

Groups page with "+ Add" button outlined - Click Add+ to open the group creation modal.
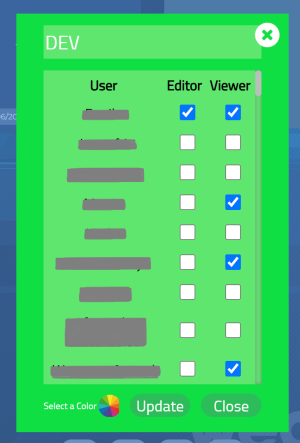
- Fill in:
- Enter the Department Name
- Select the color using the color picker
- Assign users to roles:
- Editor – Can manage posts, see group's history and edit the department.
- Viewer – Can only view posts.
- Clicking "Viewer" name label selects all users as viewers.
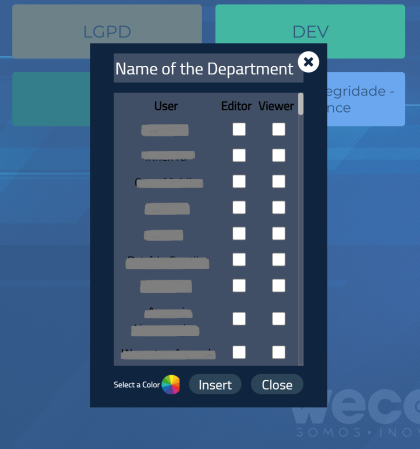
Group creation modal with roles selection, color picking and name input
3. Viewing a Post
- Inside a group, posts are displayed as cards.
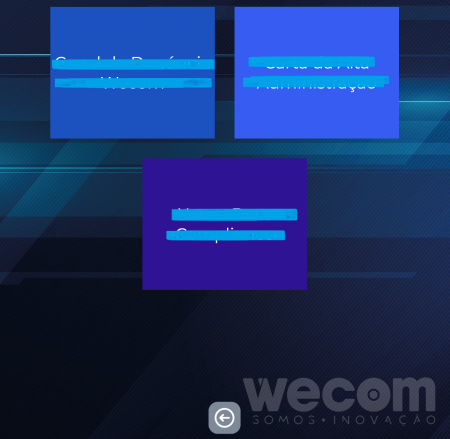
Posts inside a group - Click on a post to open its details.
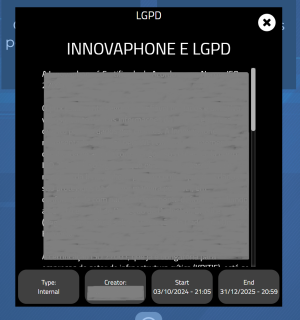
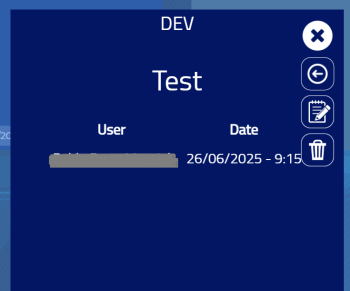
Open post with information and description - The post view shows:
- Type (External or Internal)
- Creator's name
- Start and end dates of visibility
- To close the post, click the X button in the top right corner.
4. Creating a Post
- Editors will see an Add+ card within the department page.

Posts on a group with Editor view, with "Add+" card - Click it to open the post creation modal.
- Fill in the following:
- Click Insert to save or Close to cancel.
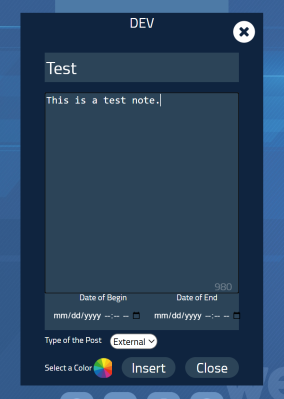
Post creation and editing modal
5. Editing or Deleting a Post
- If you are the creator or an editor of the group:
6. Viewing Post History
- Inside the post, click the Clock icon to view who has accessed it.
7. Managing Groups (Editor role)
- Editors see extra options in the bottom menu of the department page.
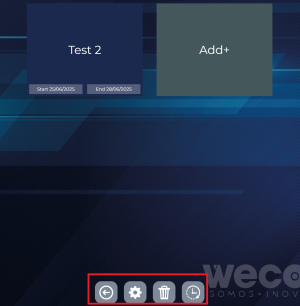
Posts on a group as an Editor with bottom menu outlined
- Click the trash icon to delete the group.
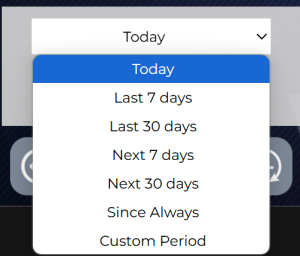
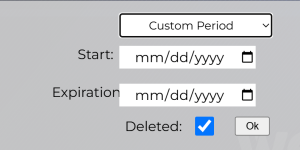
- Click the clock icon to access post history.
- Click the gear icon to edit group settings:
Admin App
The Admin App provides global management functionalities for users, groups (departments), and posts. Only users marked as administrators via this panel will have access to it.
1. Granting Administrator Access
- Access the Admin App – it will open on the Users Page by default.
- Use the search bar at the top to find the user you wish to promote.
- Locate the user in the list below.
- Click the checkbox next to their name to grant administrator privileges.
Only an existing admin can assign admin rights to another user.

2. Managing the Billboard License
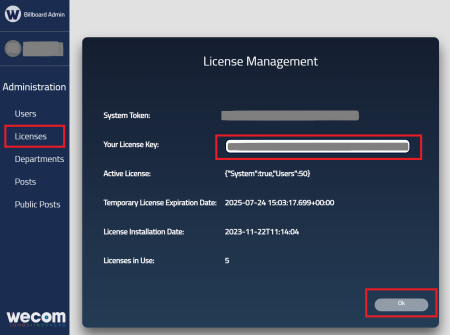
- In the Admin App sidebar, click on the Licensing tab.
- Review the license information displayed on the page.
- If activating a license:
- Enter the provided License Key.
- Click on the Ok activation button on the bottom-right corner to validate and enable the license.
- System Token: Unique identifier required to validate the license.
- License Key: Provided by Wecom for unlocking the application.
- Active License: Displays whether the license is valid and how many users are supported.
- Temporary License Expiration: Shows when the 30-day trial period ends.
- Installation Date: Indicates when the active license was installed.
- Licenses in Use: Number of users currently connected to the Billboard Users App.
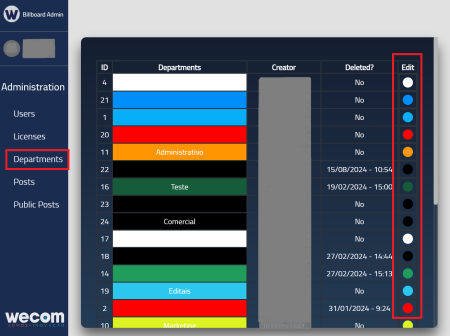
3. Managing Departments
- In the Admin App sidebar, click on the Departments tab.
- Browse the list of all departments created in the system.
- Scroll to locate the department you wish to edit.
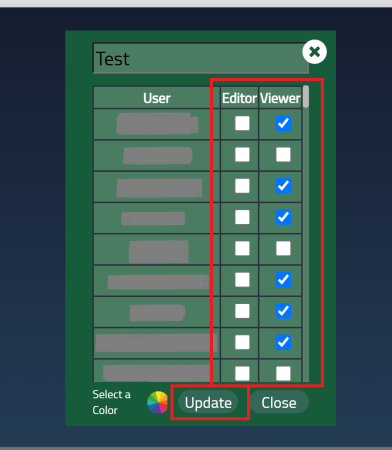
- Click on the color circle next to the department to open the editing modal.
- In the modal:
- Update the department's name.
- Change its color using the color picker.
- Add or remove users as Editors or Viewers.
- Save the changes to apply them.
- The list includes all departments, including those marked as deleted.
- Deleted departments are labeled with their deletion date.
- Each department entry shows:
- Department name
- Assigned color
- Creator's name
- Status (active or deleted)
4. Managing Posts
- Click on the Posts tab in the Admin App sidebar.
- Browse the full list of posts created across all departments.
- Scroll to locate a specific post.
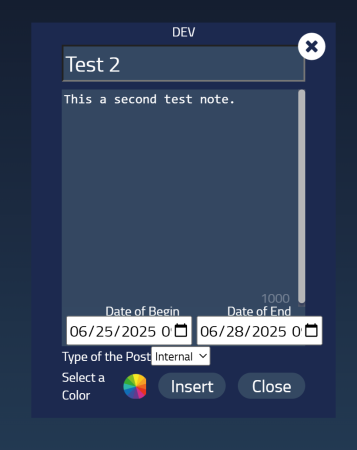
- Click the edit icon next to a post to open the editing modal.
- In the modal:
- Modify the title, description, color, type, and visibility period.
- Save the changes to update the post.
- The post list includes:
- Active posts
- Expired posts
- Deleted posts (showing the deletion date)
- Each post displays:
- Title
- Department (group) association
- Type: Internal or External
- Start and end dates (visibility period)
- Creator's name
- Current status: active, expired, or deleted

5. Accessing Public Posts
- In the sidebar, click on the Public Posts tab.
- A modal will appear, redirecting you to the Billboard Users App to view a list of posts.
- Click on any post from this list.
- Only posts with the "External" type selected during creation appear here.
- This page is read-only and used for quick access to public content.

Component Diagram
The diagrams below illustrate the architecture of the Billboard application and its interaction with the Innovaphone platform, as well as the various components involved.
User and Admin Interaction Flow
Flow Overview:
- ADMIN: The administrator has the ability to manage groups and posts across the system, including controlling visibility and user access.
- DEPARTMENT (Group): Represents different groups (like IT and HR), each having specific announcements and user interactions.
- NOTES: Each group can have specific notes (e.g., IT or HR), which are shown to relevant users.
- USERS: Users from various groups (IT, HR, and General) can access posts that are published within their allowed groups.
Application Architecture
Flow Overview:
- PBX Platform: Interacts with the Billboard App, managing internal communication and service integration.
- APP Platform: Hosts the Billboard Service, which manages posts and user interactions, and communicates with the database.
- Service DWC: Responsible for managing the backend services for the Billboard app, providing routes to interact with both the database and the PBX platform.
This architecture shows how the components integrate within the Innovaphone ecosystem, allowing for seamless communication between groups and users through the Billboard app.
Licensing
Billboard is licensed via the Innovaphone Pricelist.
License type: Innovaphone Pricelist License model: One license per user Trial: 30 days temporary license available after installation
Prerequisites
System Requirements
- Innovaphone firmware:
14r1or later - Innovaphone App Platform with myApps
- PBX Manager for app registration
Licensing Activation
- Requires license token and file provided by Wecom
- Insert into Admin interface for activation
Versions
- Current version: 1.0
- Latest release:
1011 final - Release date: June 17, 2025
- Innovaphone compatibility: Yes
- Architectures supported:
arm,x86_64,arm64
Installation
Option 1: App Store
- Open AP Manager
- Click the yellow App Store button
- Search and install "Billboard"
Option 2: Manual Upload
- Download package from Wecom
- Upload via "App Upload" in AP Manager
Register in PBX Manager
- Open PBX Manager
- Go to "Apps"
- Add and configure:
- Billboard Users App
- Billboard Admin App
Copyright
Space dedicated to Flowe copyright information.
Contact
- PORTO ALEGRE - RS
Av. Carlos Gomes, 466 / 401
Boa Vista - CEP 90480-000
Tel: +55 51 3079.5000
- FLORIANÓPOLIS - SC
SC 401, 8600 - Room 7
Corporate Park - Block 2
Santo Antônio de Lisboa
CEP 88050-001
Tel: +55 48 3112.6200
Mail: comercial@wecom.com.br
Support: suporte@wecom.com.br
Website: wecom.com.br
For any questions please refer to our contact page.
