Howto15r1:Step-by-Step Use SIP to loop in a legacy PBX
If you have difficulty understanding the written language, we recommend to use www.deepl.com for translation.
If installed, you can also use the translation function of your browser by right-clicking.
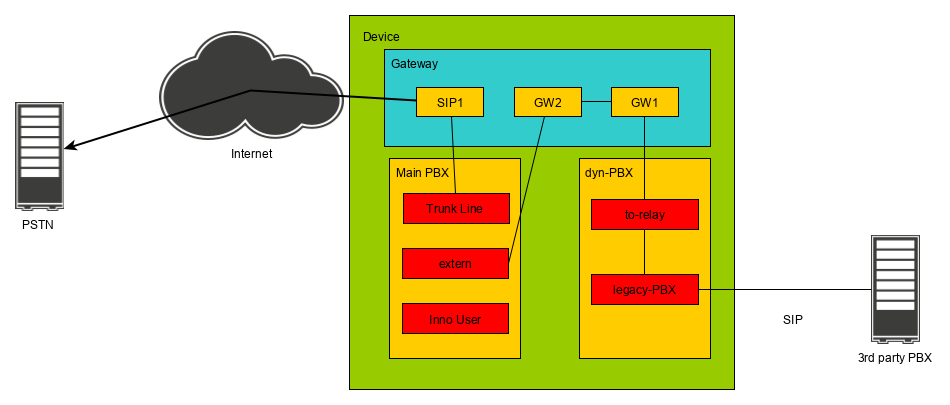
This article explains how to use a Dyn-PBX to integrate a legacy PBX from another vendor with an Innovaphone PBX for soft migration. This means that you don't have to replace the old PBX all at once; instead, you can switch over to Innovaphone one step at a time.
Purpose
This article aims to establish a soft migration scenario that allows for a gradual transition from an existing system to Innovaphone, thereby minimizing risk, downtime, and disruption to daily operations. It is important that all traffic to and from the legacy PBX passes through the relay, as the CDPN (Called Party Number) and CGPN (Calling Party Number) must be adjusted before entering the Innovaphone PBX. You can use a gateway without registration or an outgoing registration to the existing (legacy) PBX, provided that the legacy system supports it. Alternatively, a Gatekeeper/Registrar license could be used to create a simplified solution; however, this approach would be costly for the short transition phase of the soft migration. The solution described in this article requires only three port licenses and a Dyn-PBX, making it a cost-effective and practical option for a smooth migration.
Features
- Both, the old and new systems, run at the same time during the migration phase.
- Soft migration allows you to migrate in phases (e.g. department by department or user group by user group)
- New system components are tested in real-world conditions with a small group of users before full rollout.
- Calls can be routed between the legacy PBX and the Innovaphone PBX as needed
Limitations
- The CDPN/CGPN sent to the legacy PBX can only be set to an unknown format with an internal prefix (e.g., 004971134282723), rather than the international format with a plus sign (+).
Requirements
- 3 Port licenses
- Latest major firmware
Things to know before you begin
- The PBX password of your (main) PBX.
General Information
- This article will not explain how to set up a system. We assume that you have already used the Install to set up a PBX and an AP, as well as apps and user objects. For the purposes of this article, we will refer to the PBX created by the Install as the main PBX.
- The SIP provider connection, previously used by the legacy PBX, will now be used on your Innovaphone device. Users of the legacy PBX should still be able to use this trunk but the call passes through the Innovaphone PBX.
- We assume in this article that both the provider and the legacy PBX will send the CDPN/CGPN either in the E.164 format (+497113428271) or an unknown format with an internal prefix, such as 00497113428271. This article will not discuss the national or subscriber number format. Of course your SIP provider and legacy PBX might behave differently in your project.
- In general we recommend to use a SIP profile or if no SIP profile exists, the Generic SIP trunk, for the connection to the SIP trunk.
- This scenario explains the solution with a DDI trunk. Please let us know in the Community Connect if such an article is also required for a MSN trunk.
Configuration
Dyn PBX General Setup
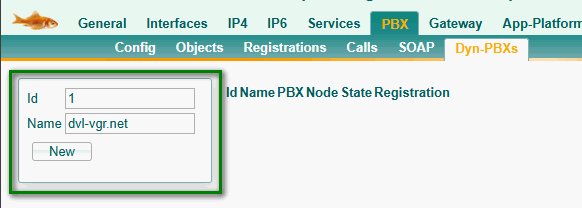
First go to PBX/Dyn-PBXs
- Enter an unique dyn-PBX ID (e.g 1)
- Enter a name. Since this PBX should be part of our system, please enter the same system name as your main PBX has. (e.g dvl-vgr.net)
- Click New
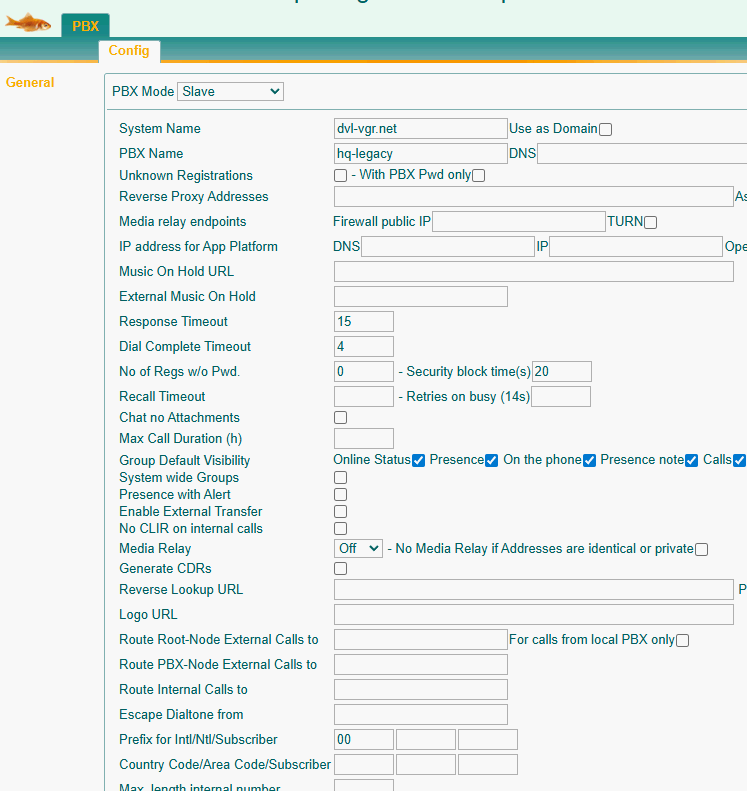
When you click on the id (1), a new window will open, which will bring you to the PBX/Config/General configuration of your dyn-PBX
- Select Slave as PBX Mode.
- Configure a PBX Name (lower case letter) which identifies the physical location of the PBX. Therefore we will use hq-legacy.
- Configure No of Regs w/o Pwd. to 0 as we want to be on the save side
- Configure the Prefix for Int. (international calls) to 00
- Enable Log Calls so you can see the calls in the syslog when troubleshooting the call flow
- Click OK
The next step is to go to PBX/Config/Security on your dyn-PBX
- Enter the same PBX Password as used in the main PBX
- Click OK
- Reboot the PBX or turn the PBX Mode Off and Slave again.
Dyn-PBX PBX Object
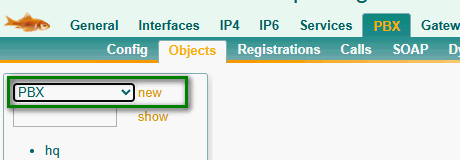
Go to PBX/Objects on your main PBX.
- Select a PBX object from the drop down menu
- Click on New
- Configure a Long Name and Name (lower case letters) that matches the PBX name of the dyn-PBX hq-legacy.
- Configure a Number. Choose a number that is unlikely to be needed in your dial plan. (e.g **8).
- Select root as Parent node.
- Select the main PBX as Parent PBX.
- Assign a Password to the object.
Legacy PBX Registration
Open PBX/Objects on your dyn-PBX
- Select a Gateway object from the drop down menu
- Click on New
- Configure a Long Name and Name (lower case letters) that matches the PBX name of the dyn-PBX legacy-pbx
- Configure a Number that is used as prefix (e.g #2)
- Select root as Parent node.
- Select the hq-legacy as Parent PBX.
- Assign a Password to the object
- Check the Prefix check mark in the Gateway tab of the object
- Click OK
Now you need to register the old legacy PBX to this new object via SIP. This configuration is of course different on each device. But I would expect you have configuration options like:
Proxy: IP address or DNS name of your Innovaphone PBX
AOR userpart: the name of the gateway object e.g legacy-pbx
AOR domainpart: system name of the Innovaphone PBX e.g dvl-vgr.net
Alias: the name of the gateway object e.g legacy-pbx
Password: the password you assigned to the gateway object
Relay registration
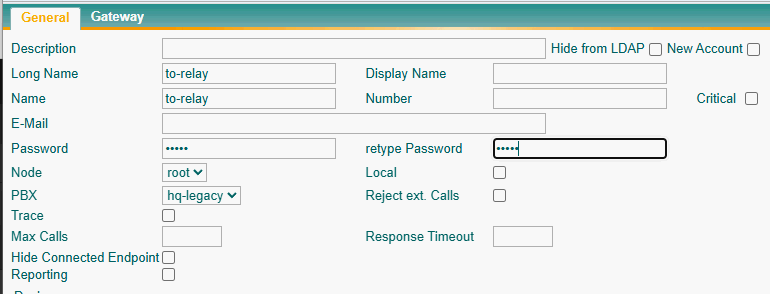
After a successful registration of your legacy PBX, please go back to PBX/Objects on your dyn-PBX and create a second Gateway object
- Select a Gateway object from the drop down menu
- Click on New
- Configure a Long Name and Name (lower case letters) (e.g to-relay)
- No need for a number
- Select root as Parent node.
- Select the hq-legacy as Parent PBX.
- Assign a Password to the object
- Click OK
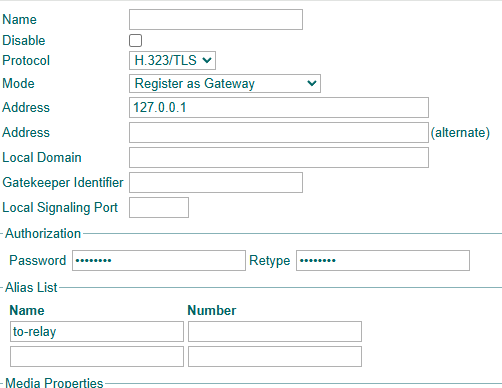
Now go to the gateway layer of your device. Please go to Gateway/GK and open one of your GW interfaces. (e.g GW1)
- Configure a descriptive name (optional)
- Select H.323/TLS as Protocol
- Select Register as Gateway as Mode
- Configure 127.0.0.1 as address
- Set the same password as you did for the object to-relay
- Enter the Name to-relay in the Alias List
Dyn-PBX Registration
Go back to PBX/Config/General on your dyn-PBX and then scroll down to the Slave PBX section
- Change the Registration Mode to H.323/TLS
- Enter 127.0.0.1 or the DNS name or IP address of your main PBX.
- Enter the password you configured on the PBX object
- Set Route Master calls if no Master to to to-relay as configured before
- Set Max Calls to Master to 0.
- Limit Port license to 2
- Click on OK
- Reboot your PBX
Extern object
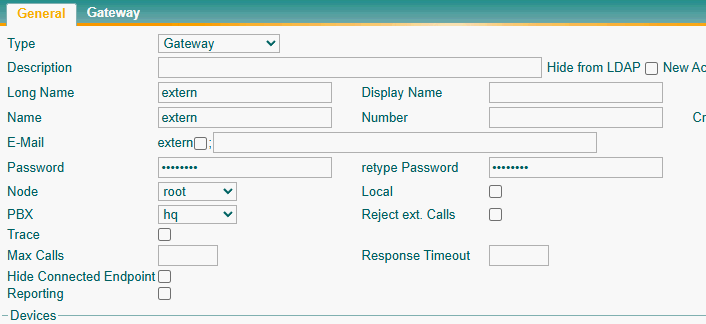
Now go to the main PBX and set up another gateway object
- Select a Gateway object from the drop down menu
- Click on New
- Configure a Long Name and Name (lower case letters) (e.g extern)
- No need for a number
- Select root as Parent node.
- Select the hq as Parent PBX.
- Assign a Password to the object
- Click OK
Extern registration
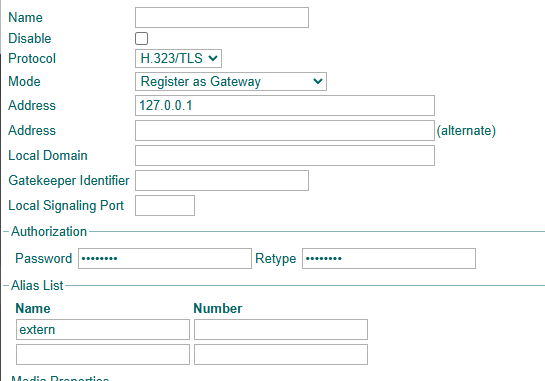
Afterwards go to the gateway layer of your device. Please go to Gateway/GK and open one of your GW interfaces. (e.g GW2)
- Configure a descriptive name (optional)
- Select H.323/TLS as Protocol
- Select Register as Gateway as Mode
- Configure 127.0.0.1 as address
- Set the same password as you did for the object extern
- Enter the Name extern in the Alias List
Root Node External on the main PBX
Go to PBX/Config/General of your main PBX
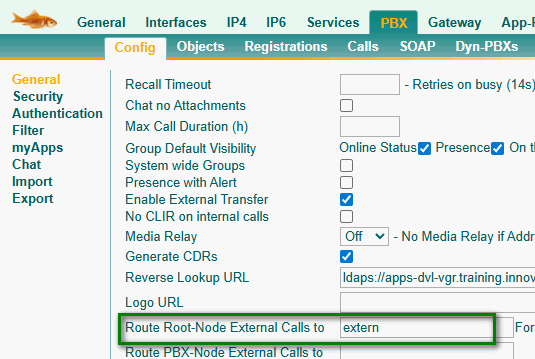
- Configure the Option Route Root-Node External Calls to to extern
Trunks Settings Plugin
Please use the Trunks Settings plugin for the connection to your carrier. If a SIP profile for the customers provider is available, please use this, otherwise you can use the Default SIP trunk for the conenction. When finished the Trunks Settings plugin will have created interface maps and routes between the SIP interface and the PBX. As a result, only the extension number will be forwarded to the PBX as a CDPN. The country code, area code (if applicable), and subscriber number will be removed. Furthermore the Trunks plugin will create Clip no Screening adjustments in the outbound route. This means that if an external call is rerouted from the PBX to an external number, the calling party number will be adjusted to match the number originally sent by the provider.
Routing
There is no need to change the routing between the SIP interface and the PBX. It should remain the same.
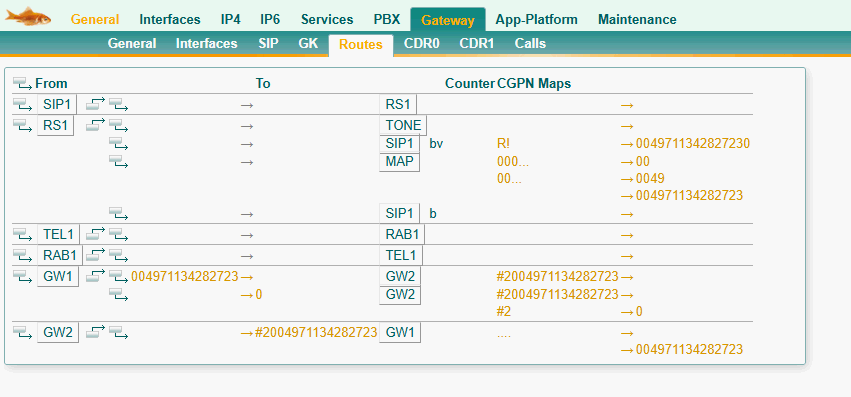
Route4 from Main PBX to Legacy PBX
Create a route from GW2, which is registered with the external object in the main PBX, to GW1, which is registered with the to-relay object in the dyn-PBX. We also need to create a CDPN mapping that applies the prefix of the legacy PBX object (#2) and the entire root number (e.g., 00497113428271). Note that you cannot change the international prefix to a "+" sign in this part of the configuration.
Route from Legacy PBX to Main PBX
For the other way around you need a route from GW1 to GW2. This route has two maps.
The first map is for calls to extension numbers in the innovaphone PBX from the legacy PBX. Since it has the same root number, we will remove it as well as the #2 prefix and root number from the CGPN.
The second map is for external calls from the legacy PBX. It adds the trunk line number to the CDPN. It will also remove the #2 prefix and root number from the CGPN. For rerouted calls within the legacy PBX, only the #2 prefix is removed, and a 0 is applied to the CGPN.
Verification
- Calls from external to a user on both PBXs should work
- Calls from an Innovaphone user to an external as well as a legacy user should be possible
- Calls from an legacy PBX user to an external as well as an Innovaphone user should be possible
- Call forwardings between users of both PBXs should be possible
- Call forwardings to external destinations should be possible from both PBXes
But what about calls in national or subscriber format?
We did not explain this on purpose in this article because the routing table is complicated as is. Describing other formats would have complicated the article even more.
Tipps for Troublshooting
- If you receive a CDPN or CGPN from the legacy PBX in a different number format, please create a syslog with PBX calls, Gateway calls, and Gateway Routing enabled, and review the incoming numbers. Adjust your maps accordingly.
- The connected number is sent by the answering party. If the connected number (the number displayed after the call is established) does not meet your requirements, it can only be modified using an interface map.
