Howto:Hotdesk - MediaRunway - Partner App: Difference between revisions
Created page with "<!-- replace CompanyLogo by real logo-name. Do not change size & alignment. Upload image by pressing red link --> |200px|right ==Product Name== <!-- Mandatory topic. --> <!-- replace CompanyName & ProductName by real names and add URL to productpage --> <!-- MR-TODO: Replace NewAppName (newappname) with the name of your app --> MediaRunway [https://mediarunway.com/myapps/ Call Info] ==Certification Status== <!-- do not remove..." |
mNo edit summary |
||
| (31 intermediate revisions by 3 users not shown) | |||
| Line 6: | Line 6: | ||
<!-- replace CompanyName & ProductName by real names and add URL to productpage --> | <!-- replace CompanyName & ProductName by real names and add URL to productpage --> | ||
<!-- MR-TODO: Replace NewAppName (newappname) with the name of your app --> | <!-- MR-TODO: Replace NewAppName (newappname) with the name of your app --> | ||
MediaRunway [https://mediarunway.com/myapps/ | MediaRunway [https://mediarunway.com/myapps/ Hotdesk] | ||
==Certification Status== | ==Certification Status== | ||
<!-- do not remove comment. Will be added by innovaphone upon document check, app availablity in innovaphone-appstore & operational check --> | <!-- do not remove comment. Will be added by innovaphone upon document check, app availablity in innovaphone-appstore & operational check --> | ||
{{Template:Compat_Status_referral_product_new|type=App}} | |||
This App has been listed September 2023. | |||
==Category== | ==Category== | ||
| Line 37: | Line 40: | ||
<!-- MR-TODO: Change to icon of the app 100x100 --> | <!-- MR-TODO: Change to icon of the app 100x100 --> | ||
[[Image:mediarunway- | [[Image:mediarunway-hotdesk.png]] | ||
<!-- Give description about the main product purpose. --> | <!-- Give description about the main product purpose. --> | ||
| Line 44: | Line 46: | ||
<!-- MR-TODO: Max. 3 sentences describing the general functionality of the app. --> | <!-- MR-TODO: Max. 3 sentences describing the general functionality of the app. --> | ||
''' | '''Hotdesk''' is a myApps App. | ||
The Hotdesk myApps App enables an easy change of telephones when you change your workplace. This can be done by a click in the Windows myApps Client. Tested with innovaphone and SNOM phones. | |||
<!-- For further information refer to vendor product website via link --> | <!-- For further information refer to vendor product website via link --> | ||
| Line 65: | Line 67: | ||
<!-- Give functional description about the application. Use formattings if needed --> | <!-- Give functional description about the application. Use formattings if needed --> | ||
<!-- Preferred format is a short list of functions/buzz words offered by the product --> | <!-- Preferred format is a short list of functions/buzz words offered by the product --> | ||
In a hotdesk scenario a user change his workplace. On a Windows PC the user login with personal credentials. Thats also possible on a innovpaphone phone. With the Hotdesk app the registration of the phone could be done with the myApps app. And so it is also possible to do hotdesking also with 3rd party phones like snom. And so hotdesking also work in scenarios where a phone device has no display and input buttons. There are three possible ways to do the registration with the hotdesk app. | |||
*typing the desk name to an input field | |||
*clicking on a button to send the computer name of the desktop pc, if PCs then notebooks are used) | |||
*clicking on a button to send the (thin) client name, if the user works on a terminalserver | |||
When one of the possibilities is used the app checks the matching table of desk-/computername and phone-mac-adress and do a mac-adress changing in the users hardware_id list and also realize that the phone app app icon will not be lost on the users my apps home screen. | |||
The hotdesk app admin decide which of these three possibilities will be shown in the hotdesk user app. | |||
For the matching of the phone-mac-address and the desk-/computername the admin has to upload a csv file with the matching infos. | |||
<!-- | <!-- | ||
| Line 81: | Line 85: | ||
<!-- Mandatory topic. --> | <!-- Mandatory topic. --> | ||
<!-- Give information about costs and licensing model. Use formattings if needed --> | <!-- Give information about costs and licensing model. Use formattings if needed --> | ||
Licensing: | Licensing: innovaphone licensing, one license per user with any number of devices for one instance of the app. No floating licensing, only the users who got a configured license have access. | ||
==Prerequisites== | ==Prerequisites== | ||
| Line 97: | Line 93: | ||
<!-- MR-TODO: Prerequisites needed for this app. See current MR apps as example and the prerequisites-template.md file. --> | <!-- MR-TODO: Prerequisites needed for this app. See current MR apps as example and the prerequisites-template.md file. --> | ||
<!-- None (at least knowledge about installing an App and adding the App Object for the users) --> | <!-- None (at least knowledge about installing an App and adding the App Object for the users) --> | ||
You need a pbx with Hotdesk app license, and compatible phones (like innovaphone and snom). | |||
==Versions== | ==Versions== | ||
| Line 110: | Line 102: | ||
<!-- List compatible major innovaphone firmware versions. Several listings are valid --> | <!-- List compatible major innovaphone firmware versions. Several listings are valid --> | ||
<!-- MR-TODO: Replace NewAppName and versions text. What SDK version was used during development? With which platform versions was it tested? --> | <!-- MR-TODO: Replace NewAppName and versions text. What SDK version was used during development? With which platform versions was it tested? --> | ||
* MediaRunway | * MediaRunway Hotdesk 1.0 (133xxx) | ||
** innovaphone V13r3 | ** innovaphone V13r3, V14r1 | ||
===Application versions used for interop testing=== | ===Application versions used for interop testing=== | ||
| Line 117: | Line 109: | ||
<!-- replace 3rd-Pty-Application by real name --> | <!-- replace 3rd-Pty-Application by real name --> | ||
<!-- MR-TODO: Replace NewAppName and versions text. What SDK version was used during development? With which platform versions was it tested? --> | <!-- MR-TODO: Replace NewAppName and versions text. What SDK version was used during development? With which platform versions was it tested? --> | ||
* MediaRunway | * MediaRunway Hotdesk 1.0 (133xxx) | ||
<!-- adjust tested innovaphone FW --> | <!-- adjust tested innovaphone FW --> | ||
** innovaphone IPVA V13r3 sr8 | |||
** innovaphone IPVA V13r3 | |||
| Line 140: | Line 122: | ||
<!-- If not present, no certificate will be given at all --> | <!-- If not present, no certificate will be given at all --> | ||
<!-- in any case you must be aware of the fact that any questions concerning configuration issues will be directly forwarded by innovaphone to you as manufacturer --> | <!-- in any case you must be aware of the fact that any questions concerning configuration issues will be directly forwarded by innovaphone to you as manufacturer --> | ||
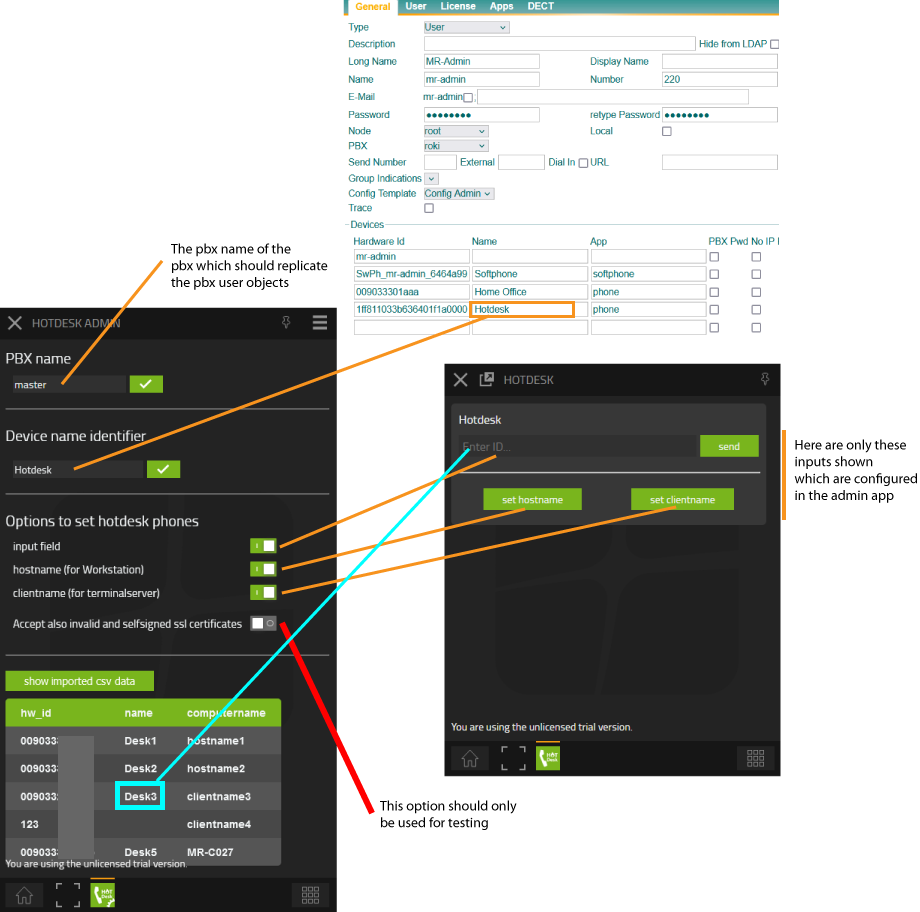
With the Hotdesk admin app you can configure the app. | |||
<!-- MR-TODO: In case it needs to be configured, place text here. If the configuration part is more than a few sentences, go ahead and add a new section below ==Installation==. See current apps as example. --> | <!-- MR-TODO: In case it needs to be configured, place text here. If the configuration part is more than a few sentences, go ahead and add a new section below ==Installation==. See current apps as example. --> | ||
===Configure | ===Configure the Hotdesk app=== | ||
This is to configure in the Hotdesk admin app: | |||
* | * the pbx name | ||
* | * the name of the hotdesk device, configured in the pbx user object (on each user object it has to be the same name) | ||
* the options which buttons (functions) will be shown in the Hotdesk user app to register the phone | |||
* upload a csv with the list of hw_id (phone mac adress) and a name for the desk of the workplace, and optional the windows host-/clientname | |||
* | [[File:Hotdesk-admin-app-configuration.png]] | ||
* | |||
===Upload csv file=== | |||
That a user could register a phone with the Hotdesk app, the admin has to upload a correct csv file in the Hotdesk admin app. | |||
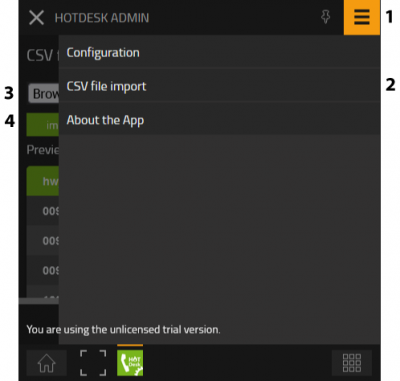
* 1. click in the admin app on the hamburgermenue | |||
* 2. click in the menue on CSV file import [csv format: "hw_id","name","computername"] | |||
* 3. click on browse (choose the csv file you want to upload) | |||
* 4. after the selection of the csv file for upload you will see a table with the csv data, to save this data in the application you have to click on import. | |||
ATTENTION: | |||
* a windows computername has a limit of 15 character | |||
* if the csv upload has an error, the updloaded csv data before is deleted | |||
[[File:Hotdesk-csv-upload.png|400px]] | |||
=== | |||
* | |||
* | |||
* | |||
* | |||
* | |||
* | |||
[[ | |||
==Installation== | ==Installation== | ||
After installing the | After installing the app, adding the app instance and the app object for the users and the admin, one can start using "Hotdesk". The steps of the installation process are the same as described in this article [https://wiki.innovaphone.com/index.php?title=Howto:Callback_-_mediarunway_-_3rd_Party_Product#Install_app_from_App_Store "Callback - Install App from App Store"] only with different names. | ||
===Brief summary of the installation=== | ===Brief summary of the installation=== | ||
* Install the app from app store | * Install the app from app store | ||
* Create an instance of the app | * Create an instance of the app | ||
** Values needed: Name (" | ** Values needed: Name ("Hotdesk", no blanks here please) - Domain (your platform domain) - App Password (generate one, 15 characters) - DB Password (generate one, 15 characters) - other values will be filled up automatically | ||
* Add the user and the admin object with PbxManager (when selecting the name, please do not use spaces.) | * Add the user and the admin object with PbxManager app (when selecting the name, please do not use spaces.) | ||
* [https://wiki.innovaphone.com/index.php?title=Howto: | * [https://wiki.innovaphone.com/index.php?title=Howto:Hotdesk_-_MediaRunway_-_Partner_App#Configuration Configuration and licensing] | ||
The following is an installation example. | The following is an installation example. | ||
| Line 245: | Line 159: | ||
<!-- MR-TODO: Screenshots show how it should look like. --> | <!-- MR-TODO: Screenshots show how it should look like. --> | ||
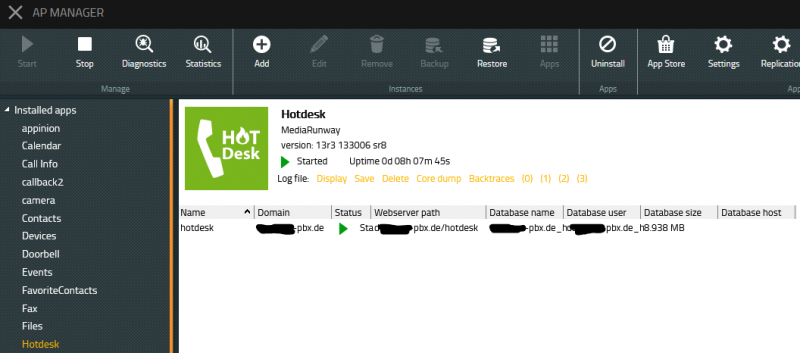
===AP manager settings=== | ===AP manager settings=== | ||
<!-- MR-TODO: Change the picture, adjust px to width of your picture. Replace newappname. --> | <!-- MR-TODO: Change the picture, adjust px to width of your picture. Replace newappname. --> | ||
[[Image: | [[Image:Hotdesk_ap_manager.png|800px]] | ||
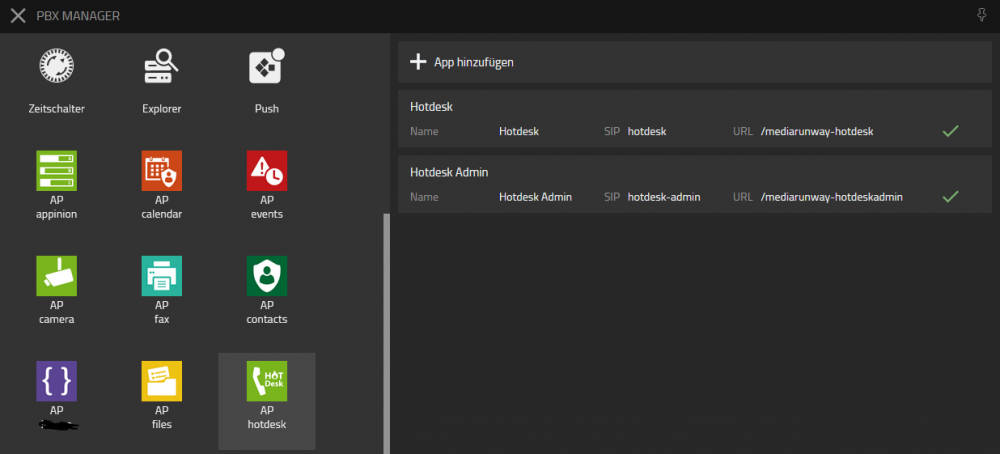
===PBX manager settings=== | ===PBX manager settings=== | ||
<!-- MR-TODO: adjust text as needed (Does your app have an admin area?) --> | <!-- MR-TODO: adjust text as needed (Does your app have an admin area?) --> | ||
You have to create the user and admin object. | |||
<!-- MR-TODO: Change the picture, adjust px to width of your picture. Replace newappname. --> | <!-- MR-TODO: Change the picture, adjust px to width of your picture. Replace newappname. --> | ||
[[Image: | [[Image:Hotdesk_pbx_manager.png|1000px]] | ||
==Copyright information== | ==Copyright information== | ||
The following third party tools had been used to create the | The following third party tools had been used to create the Hotdesk app: | ||
* | * csv parser (license: MIT): [https://www.papaparse.com/ Papap Parse] | ||
** [https://github.com/mholt/PapaParse GitHub] | |||
** [https://github.com/ | |||
==Contact== | ==Contact== | ||
Latest revision as of 07:00, 27 June 2024

Product Name
MediaRunway Hotdesk
Certification Status

This App has been listed September 2023.
Category
Computer Telephony Integration and Unified Messaging / Unified Communication
Vendor
MediaRunway is an ITC enterprise that provides its customers with contemporary IT services in all areas - Your business, our solution.
Description
Hotdesk is a myApps App.
The Hotdesk myApps App enables an easy change of telephones when you change your workplace. This can be done by a click in the Windows myApps Client. Tested with innovaphone and SNOM phones.
MediaRunway - About this application
Functions
In a hotdesk scenario a user change his workplace. On a Windows PC the user login with personal credentials. Thats also possible on a innovpaphone phone. With the Hotdesk app the registration of the phone could be done with the myApps app. And so it is also possible to do hotdesking also with 3rd party phones like snom. And so hotdesking also work in scenarios where a phone device has no display and input buttons. There are three possible ways to do the registration with the hotdesk app.
- typing the desk name to an input field
- clicking on a button to send the computer name of the desktop pc, if PCs then notebooks are used)
- clicking on a button to send the (thin) client name, if the user works on a terminalserver
When one of the possibilities is used the app checks the matching table of desk-/computername and phone-mac-adress and do a mac-adress changing in the users hardware_id list and also realize that the phone app app icon will not be lost on the users my apps home screen.
The hotdesk app admin decide which of these three possibilities will be shown in the hotdesk user app. For the matching of the phone-mac-address and the desk-/computername the admin has to upload a csv file with the matching infos.
Licensing
Licensing: innovaphone licensing, one license per user with any number of devices for one instance of the app. No floating licensing, only the users who got a configured license have access.
Prerequisites
You need a pbx with Hotdesk app license, and compatible phones (like innovaphone and snom).
Versions
Compatible innovaphone firmware versions
- MediaRunway Hotdesk 1.0 (133xxx)
- innovaphone V13r3, V14r1
Application versions used for interop testing
- MediaRunway Hotdesk 1.0 (133xxx)
- innovaphone IPVA V13r3 sr8
Configuration
With the Hotdesk admin app you can configure the app.
Configure the Hotdesk app
This is to configure in the Hotdesk admin app:
- the pbx name
- the name of the hotdesk device, configured in the pbx user object (on each user object it has to be the same name)
- the options which buttons (functions) will be shown in the Hotdesk user app to register the phone
- upload a csv with the list of hw_id (phone mac adress) and a name for the desk of the workplace, and optional the windows host-/clientname
Upload csv file
That a user could register a phone with the Hotdesk app, the admin has to upload a correct csv file in the Hotdesk admin app.
- 1. click in the admin app on the hamburgermenue
- 2. click in the menue on CSV file import [csv format: "hw_id","name","computername"]
- 3. click on browse (choose the csv file you want to upload)
- 4. after the selection of the csv file for upload you will see a table with the csv data, to save this data in the application you have to click on import.
ATTENTION:
- a windows computername has a limit of 15 character
- if the csv upload has an error, the updloaded csv data before is deleted
Installation
After installing the app, adding the app instance and the app object for the users and the admin, one can start using "Hotdesk". The steps of the installation process are the same as described in this article "Callback - Install App from App Store" only with different names.
Brief summary of the installation
- Install the app from app store
- Create an instance of the app
- Values needed: Name ("Hotdesk", no blanks here please) - Domain (your platform domain) - App Password (generate one, 15 characters) - DB Password (generate one, 15 characters) - other values will be filled up automatically
- Add the user and the admin object with PbxManager app (when selecting the name, please do not use spaces.)
- Configuration and licensing
The following is an installation example.
AP manager settings
PBX manager settings
You have to create the user and admin object.
Copyright information
The following third party tools had been used to create the Hotdesk app:
- csv parser (license: MIT): Papap Parse
Contact
| MediaRunway GmbH & Co. KG |
| Venloer Str. 8 |
| D-41569 Rommerskirchen |
| Tel: +49 2183 80628-0 |
| Mail: myApps-sales@mediarunway.com |
| Support: myApps-support@mediarunway.com |
| Website: MediaRunway.com |
For any questions please refer to our contact page.


