Howto:Gigaset-DeskPhone-App - Gigaset - Partner App
Product Name
Gigaset Gigaset-DeskPhone-App
Certification Status
This App has been listed July 2025.
Category
SIP hardware and software endpoints
Vendor
![]()
With innovative communication solutions from Gigaset professional, your organisation can unlock its true potential and stay ahead of the competition. Our cutting-edge telephony technology is delivered by a community of dedicated partners that can help you create a complete communications solution rather than a multitude of products. With Gigaset professional, you gain access to an open platform designed for its user-friendliness, flexibility and outstanding performance, while offering seamless compatibility with leading on-premise telephony systems and cloud-based service providers. Gigaset - Pro
Description
| Gigaset-DeskPhone App supports: | |||||||
| DeskPhone P-Series | |||||||
| P710 IP PRO | P810 IP PRO | P810B IP PRO | P820 IP PRO | P825 IP PRO | P850W IP PRO | P855BW IP PRO | |

|

|

|

| ||||
| Display | 2,8" TFT colour | 3,36" TFT colour | 5" TFT colour | 5" TFT colour | |||
| Resolution (pixels) | 320 x 240 | 320 x 240 | 480 x 272 | 480 x 272 | |||
| Tiltable display | - | - | - | Yes | - | Yes | |
| LAN switch | 2 ports, Gbit | 2 ports, Gbit | 2 ports, Gbit | 2 ports, Gbit | |||
| PoE | IEEE 802.3af, class 2 | IEEE 802.3af, class 2 | IEEE 802.3af, class 3 | IEEE 802.3af, class 3 | |||
| IP | IPv4 & IPv6 | IPv4 & IPv6 | IPv4 & IPv6 | IPv4 & IPv6 | |||
| WLAN IEEE 802.11n/ac | - | - | - | Yes | |||
| Bluetooth | - | - | Yes | - | - | Yes | |
| Headset connection via | EHS/DHSG/RJ9 interface | EHS/DHSG/RJ9 interface | EHS/DHSG/RJ9 interface | EHS/DHSG/RJ9 interface | |||
| Function keys | 4 self labeling | 4 (12) self labeling | 8 (28) self labeling | 10 (36) self labeling | |||
| G.711 A-law, µ-law
G.722 (wideband) G.726, G.729AB, GSM 6.10 (FR) |
Yes | Yes | Yes | ||||
| Soft-keys | 4 | 4 | 4 | 4 | |||
| SIP accounts | 6 | 12 | 12 | 12 | |||
| USB | No | 1 | 1 | 2 | 1 | ||
| P800 KEY PRO support | No | via USB | via USB | via USB | |||
| GRAPE (Redirect and Provisioning) | Yes | Yes | Yes | Yes | |||
The Gigaset DeskPhone App integrates the Gigaset P-Series IP PRO Phnes into the innovaphone PBX environment. After the initial setup, user and phonebook management can be done from the innovaphone myApps environment, so that no further activities need to be performed on the Gigaset Phones.
Functions
- Add / Remove Gigaset DeskPhones
- Configure the Phonebook, keys and PBX Menue on Gigaset DeskPhones
With the Gigaset DeskPhone App it is possible to automatically add and remove DeskPhones. In addition, the Phonebook, keys and PBX Menue configuration can be provisioned.
Provided APIs
- Websocket
- AdminApi
- TableUsers
- Services
- PbxApi
Licensing
No license is required for this app
Prerequisites
For BLF key signaling and pick-up a Group is needed where all phones are member of and logged in.
None (at least knowledge about installing an App on the AP Platform and adding the App Object via PBX Manager)
Versions
Compatible innovaphone firmware versions
- innovaphone V14r2
- innovaphone V15r1 final
Application versions used for interop testing
- Gigaset DeskPhone-App - 1108 sr1
- innovaphone V15r1 final
- Gigaset Desktop IP PRO 10.1.198.16
Configuration
Install the App
Gigaset - DeskPhone - App
innovaphone settings
As an admin, create the environment settings in the Gigaset DeskPhone App.
For the innovaphone PBX, enter the domain, the IP address of the PBX or the FQDN, the SIP- or SIP-TLS Port, the MasterPBX-Name and the PBX password. You can also set Logname or E164 as an alternative, when DN is not set. If you want to show VoiceMail Messages into Phone Display enter the VoiceMail Number. Also define if reverse proxy and/or STUN Server should be activated or not and configure it accordingly.

Gigaset settings
Enter the parameters for the phones to reach the App Platform. SIP realm and App Platform adress as an IP adress or FQDN. Also SIP port and protocol. if you need other SIP port then 5060/5061 via reverse Proxy, maybee if you use Gigaset DECT Provsioing App in paralell, enter it here. Port to Reverse Proxy still stays as 5060/5061.
Username and password will be set for the phones web-ui. the phone connects via SIP with the App Platform, therefore the SIP-Password is needed. You can generate a random Password by uses the button below.
If activating the additional admin mode, only basic settings will be shown in the web UI. After entering the administrator mode password, the complete admin web UI of the phone will be unlocked again.

number formatting
access code, prefixes, country and area code will be automatically read from the system.
this settings are not used by the phone at the moment.

key settings
This DeskPhone app reads the user's key configuration in two places. 1. Configured keys of the type: Dial and Partner
and 2. The user's favorites.
You can choose the order in which these two are displayed on the phone:
- Favorites first, then keys
- Keys first, then favorites
- Do not provision any changes

and you can choose where these keys should start on the phone:
- Ocupy from first page
- Occupy from second page
- Assign to key module
- Do not provision any changes

DekPhone App will automatically provide a PBX menu to the phones, like Gigaset Feature Control App does for Gigaset DECT. Howto:Gigaset-Feature-Control-App - Gigaset - Partner App
- Directory: will provide the local innovaphone LDAP contacts for dialing
- Diversion: see actual call diversion, set/change/activate/deactivate Diversion targets for Always, Busy and on No response.
- Group: show, join and leave Groups
- Presence: see actual Presence, change Presence to Online/Away/Busy/DND
- Working: see actual status of working and Start/Stop working

- advanced call forwarding: extend the Diversion menu by Diversion Busy and on No response.
- static groups: static Groups are shown on buttom of the list.
- function key: F4 as default, but you can choose F1-F3 also. this are they keys below the display of the phone.
- context sensitivity of the function key: e.g. on F4 normally info button is displayed when info messages are present, and into info menu the PBX menu button will shown until all mssages ar read, which this switch you can deactivate this behavior.
- menu name: this name will be displayed on the previously selected key.
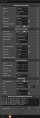
Directory settings
Under Phonebook settings you can activate sync for three different phonebooks. 1.st the standard LDAP directory of the innovaphone PBX (PBX0).
or alternatively enter all parameters manually according to the LDAP server used.
Please enter the IP address, port and previously created access data for the innovaphone LDAP. You can also define Contacts APP (Howto:Gigaset-Provisioning-App - Gigaset - Partner App#Contacts APP) or any other LDAP Directory in paralell.
In addition, you can now select which phone book should be selected on the phonebook key and which on the INT key. You can also select which one should be used for reverse lookup.
Phone number formatting
Call number formatting reads access code and prefixes from the pbx or you can define it manually.
This is used for reverse lookup and call settings. you can change more call settings manually or via own provisioning parameters.
If you activate wild carding and enter your internal number length and Emergencey Numbers, the Gigaset DECT System will wildcarding your phone number search into the phonebook.
for example: the access code will be stripped and then *4989123 is searched for instead of 004989123, or *89123 is searched instead of 089123.
provisioning parameters in XML format
You have the possibility to add provisioning parameters by your own in xml strings. You can find all provisioning parameters here:
Gigaset Provisioing Parameters
please have in mind, that you have to replace special signs with placeholders:
& – '&';
‘ – '&apos';
< – '<';
> – '>';
” – '"';
Ä - 'Ä';
Ö - 'Ö';
Ü - 'Ü';
ä - 'ä';
ö - 'ö';
ü - 'ü';
ß - 'ß';
here are a few examples for popular provisioning parameters:
<param name="DmGlobal.0.SuotaEnable" value="1" /> --> Enable Software Update over the Air for Gigaset Handsets
<param name="hs.@.DirectAccessDir" value="1"/> --> change Directory Access Key to Local Directory
<param name="hs.@.IntKeyDir" value="10"/> --> change Int Key to LDAP Directory
<param name="hs.@.ShowMissedCalls" value="0" /> --> deactivates LED signaling for Missed Calls
<param name="hs.@.ShowMissedAlarms" value="0" /> --> deactivates LED signaling for Missed Alarms
<param name="hs.@.ShowMissedNetAM" value="0" /> --> deactivates LED signaling for Missed Voicemails
Advanced settings
"Reload Gigaset Devices" will be reload all Gigaset Handsets from Devices List and generate a new Provisioning File. Keyword is the APP-Name, which is also inserted into the Devices. Wildcards are allowed. Don't press Save and Send Button, when after Reload "0 Devices" is shown, check the keyword carefully. otherwise it could happen that all your Handsets are deleted and you have to register them again.
if you have Gigaset Feature Control App installed and configured this settings are not longer greyed out. With Gigaset Feature Control App you can set your diversions and presence into PBX. You can also activate or deactivate your group memberships and start or stop your working time recording. Longname will be shown in Info Center and Settings. Shortname is shown on Feature Key if configured.
Click on the Save icon to save the entered configuration. The app generates a provisioning path from the data.
This path does not change as long as you do not change the MAC-ID.
Copy this path and paste it on the Gigaset Integrator under Settings --> System --> Provisioning and configuration.
Execute the first provisioning via the button "Start Auto Configuration" and log out of the web interface,
because as long as you are logged in, no provisioning can be performed by the app!
-
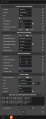 innovaphone_gigasetapp_admin2.0_http.png/
 -
 innovaphone_gigasetapp_admin2.0_sip_rvp_tls.png/
|
|
|


Add Devices to User
Now create new end devices as usual via UserAdmin or the Profile app. Select "Gigaset" in the manufacturer selection field and then enter the IPUI of the handset instead of the MAC address. You can find the IPUI of the handset on the box, in the battery compartment or by switching to the menu on the handset with the right button and typing "*#06#". Now the IPUI is displayed in the top line.
After you have saved the new handset, Gigaset Provisioning will automatically transfer the account to the integrator and start the login window for 5 minutes. Now you can register the new handset with the default PIN "0000".
If you want to trigger provisioning again, e.g. to open the login window again, press the Save button in the Admin area of the Gigaset Provisioning app again. The successful transfer is indicated by a message. If the provisioning was not successful, this is also displayed. This can have 2 reasons, either you are still logged in on the integrator in the background or you have changed the admin password on the integrator in the meantime and have not stored the new one in the settings of the app.

Usage over ReverseProxy
As you can see, the app provides a small SIP server. For this SIP server, a SIP realm should be used that is not used in any other system in the environment. As an example: If the SIP realm / system domain of the environment is "example.com", "gigaset.example.com" could be used as the SIP realm for the App Service. The advantage now is that we can enter this domain on the reverse proxy and direct it from there to the SIP port of the App Service.
From 136097 onwards we added the possibilty to activate Reverse Proxy support for multiple instances directly in the settings. see chapter below.

Multiple Instances
From 136097 onwards we added the possibilty to activate Reverse Proxy support for multiple instances directly in the settings.
If you want to run multiple instances of the app on one AppPlatform, the local SIP ports of the app service must not overlap. This means that different ports must be used for SIP provisioning in each app service. The distinction can be made in the reverse proxy on the basis of the SIP realm used.
If the local SIP port of the app is e.g. 5062, but the reverse proxy can only be reached via port 5060/5061. An outbound proxy must also be distributed to the DECT Manager. Therefore you can now activate "Enable Reverse Proxy Support" and enter seperate Ports for Connecting to the Reverse Proxy and connecting from Reverse Proxy to the APP Platform.
You can use one SIP-Realm for all APP-Instances and maybee DeskPhone Provisioning. The Port must be unique and must not be assigned twice.

Directory Settings
After activating directory synchronisation you have the possibility to activate and configure thre sources simultaneously: innovaphone LDAP directory, any other LDAP directory and innovaphone myContacts APP.

fill in the needed data like host, Port and Credentials.
After all phonebooks, and maybee Gigaset Feature Controll App, are configured you can choose which ones will be used for phonebook key, INT key and Reverse Lookup.

Contacts APP
Use innovaphone Contacts App for forward search and reverse lookup from Gigaset Handsets
Requirements
- Gigaset firmware V2.59 or higher (supports new provisioning parameter <param name="LDAPDir.0.BlankFilter" value="(metaSearchNumber=0*)"/> )
- for Reverse Lookup number formatting in Contacts has to be without +49 - for example 02871 91-0 instead of +49 2871 91-0 otherwise reverse lookup will not work. For search and dialing this doesn't matter..
Configuration
- Host : apps.company.tld (address of the AP)
- Port : 636
- TLS : yes/no
- LDAP : dc=entries
- Username : [from PBX-Manager / AP Contacts / Change Configuration / User (LDAP)]
- Password : [from PBX-Manager / AP Contacts / Change Configuration / Password (LDAP)]
- Name filter : (cn=%) or (|(cn=%)(sn=%))
- Number filter : (metaSearchNumber=%)
- number format : +* (default) or 0*
- all other entries as shown in below screenshot are preconfigured


Forward lookup on different Nodes
In some cases internal PBX Users are in different Nodes. When searching on a Handset for internal PBX Users the Result won't show the Nodeprefix for the Users - therefore the Calls would get lost and not reach the right Destination. For this to work you can either use a Meta Directory or an innovaphone PBX for use as Phone Book only.
Use of an innovaphone PBX as Phone Book: You can use an additional innovaphone PBX which replicates all the Users from the Master PBX with type "Active Directory Replication", this way you're able to define the nodes within the extension field. It's important here to also define the guid for the Users, this Configuration will look like this then:

At last: You have to set the phone book PBX as your target phone book at the phone book settings
Advanced settings
Reload Gigaset devices : this can e.g. become necessary if the app has been uninstalled and is reinstalled, to collect all previously configured handsets from the system. Devices will be reloaded and provisioning file new generated. Keyword is the APP-Name, which is also inserted into the Devices. Wildcards are allowed. Don't press Save and Sending Button, when after Reload "0 Devices" is shown. check the keyword carefully. otherwise it could happen that all your Handsets are deleted and you have to register them again.
Gigaset Feature Control APP connection : with Gigaset Control App you can set your diversions and presence into PBX.\n You can also activate or deactivate your group memberships and start or stop your working time recording.\n Longname will be shown in Info Center and Settings. Shortname is shown on Feature Key if configured.
Release Notes
Update Notice
Even though this should be the standard procedure, we would still like to point this out.
Before installing an update, we recommend backing up the PBX and the Gigaset application on the application platform so that a rollback of the configuration is possible.
136017 - final
- Startversion
136035 - sr1
GUI and App
- Change App Icon and Logo
- Support more languages
Innovaphone System Settings
- Add Configuration for SIP Port of PBX
- Add Checkmark for TLS
- Add Configuration for PBX Name of Master PBX (required after Update)
- Add Configuration for Usage of Longname or Number instead no Displayname is availabe.
- Add Checkmark "ReverseProxy" for authorization of DECT Devices over ReverseProxy
Gigaset System Settings
With the update, you have the option to run the Gigaset app as a small SIP server. This is necessary to register the transmitter with the app via a special SIP profile. The registration is done with a separate SIP domain directly on the AppPlatform without registering via the PBX. This makes it possible to run the app via the reverse proxy on Cloud PBX environments.
- Add Registration time for DECT Device Register
- Add New Option "Connect via SIP" instead of http
- implementation of small SIP server methods "Register" , "Check Sync"
- Add Configuration for Provisiong SIP Domain (different from PBX Domain)
- Add Configuration for SIP Port of App Platform
- Add Checkmark for TLS
- Add Username for SIP Authentication on App Platform
- Add Password for SIP Authentication on App Platform
- Add the possibility of specifying the prefixes and internal number length, for phone number formatting, based on the innovapone configuration
- Add Checkmark for wildcarding, so that reverse lookup in Phonebooks works independent of the saved format
- Add the possibility of specifying emergency numbers
- Add a field for adding individual provisioning parameters as an xml string
136036 - SR2
- Increase paketsize for receiving SIP Request in App Service
136097 - sr2.7
Note: The app must be opened after migration, save configuration and close, after that open again!
Known Problems
Same SIP Port/Protocol for PBX and APP-Plattform via Reverse Proxy
is not working, due to load optimizations of Reverse Proxy. choose 5061/TLS for PBX and 5060/TCP for App Plattform.
Provisioning of devices via Users Admin not working
Please note the following for environments that do not have Internet access. In this case, the assignment of devices via the Users Admin may be disrupted. The Gigaset App works together with the provisioning service of the Devices App. The online provisioning server from innovpahone "config.innovaphone.com" is entered as the default in the Devices app. If the environment cannot reach the server, the process is aborted. To avoid this, offline provisioning must be configured for the domain in the Devices app. https://wiki.innovaphone.com/index.php?title=Reference13r1:Concept_Offline_Provisioning
Reverse Lookup is not Working for LDAP
As an Workaround, delete international and national dialing location from number formatting parameters.
Provisioning option not available in Users Admin when giving Profile app a custom name
When the name or long name of your profile app PBX object differs from the default names "Profile" (long name) and "profile" (name), you won't have the option to select "Gigaset - Gigaset Provisioning" as the manufacturer of the phone if you try to create new phone registrations via Users Admin.
Related Articles
Contact
Gigaset Technologies GmbH
Frankenstraße 2
46395 Bocholt
Tel: +49 2871 91-0
E-Mail: de.pro@gigaset.com
Support
+49 (89) 8780 6575 + PIN Code
support@gigaset.com
Become a partner
https://gigasetportal.force.com/Partner
App Feature Request
Dennis Zimmermann
Technical Sales Manager
dennis.zimmermann@gigaset.com