Howto13r3:Step-by-Step Hot Desking
If you have difficulty understanding the written language, we recommend to use www.deepl.com for translation.
If installed, you can also use the translation function of your browser by right-clicking.
Hot desking should allow employees to request any desk of their choice. Therefore, the desk phone should be switched to the respective user profile at the push of a button. This document explains the necessary configuration steps. Additionally, please take the security considerations seriously.
Purpose
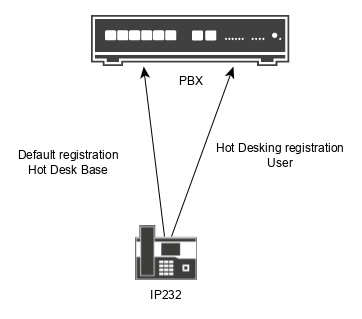
Users should be able to claim any desk they want. A default user that allows emergency calls should be registered on the phone by default. In addition, a hot-desking function key should allow enabling a user profile on the phone.
Features
- Easy way to activate a user profile on a desk phone with the click of a button
- Users must enter their password in addition to their username or number to authenticate themselves
Limitations
- Configuration is lost after the reboot of a device
- There is no automatic logout. The user profile will remain active until the hot desking button is pressed again or the device is rebooted.
Requirements
- Innovaphone PBX version 13r3 and up
- The default user (Hot Desk Base user) requires one port license
- innovaphone desk phone providing function keys (IP11x, IP2x2)
Things to know before you begin
- Think of a strong password. If secure passwords are required, a password generator may be used (e.g. https://www.lastpass.com/features/password-generator).
- The admin user who performs configuration and provisioning must have access to the phone app, devices, and users, as well as their APIs and his apps tab
Configuration
In this scenario, we will take all the necessary steps to configure a default user on all Hot Desking phones. Each phone will have a function key that allows each user to log into their personal profile. Furthermore, this base user will only be allowed to call emergency numbers.
Create a config template - PBX Manager
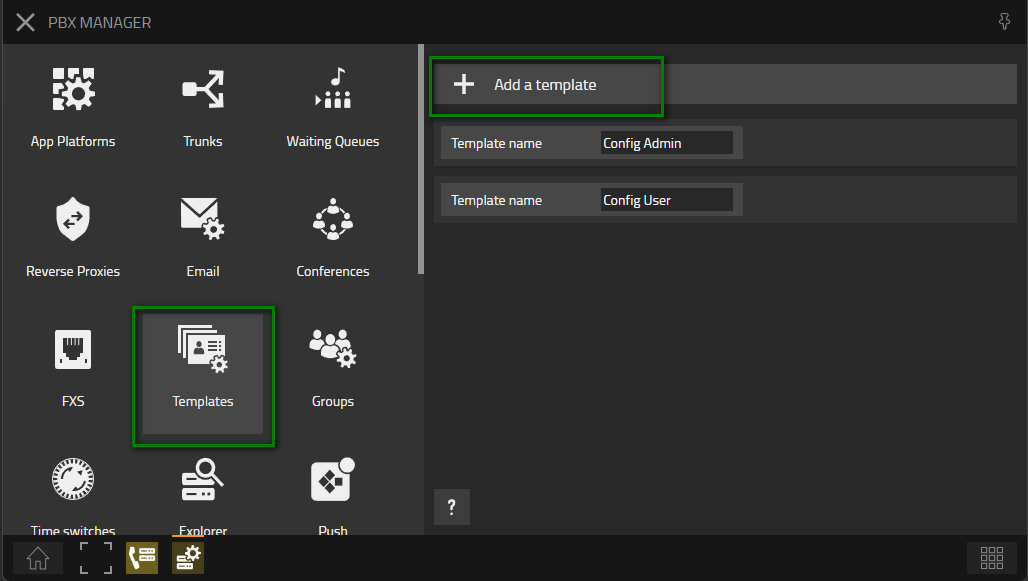
First we recommend to create a new template. Please go to the Templates PBX manager Plugin and add a new template.
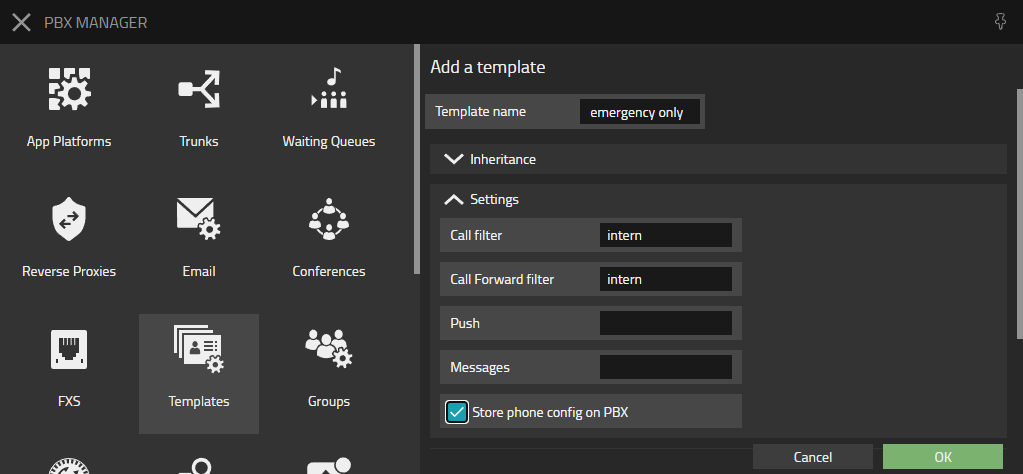
Assign a name to this template and configure the following options in the settings section
- Call filter: select intern
- Call Forward filter: select intern
- Store phone config on PBX: Enable
Please be aware that this template should not inherit a configuration from another template. A license or access to an app is not requirement.
Create a Hot Desk Base User - Users Admin app
Open your Users Admin app and add two new user. The first user will be used as a default user on all Hot Desking phones. In this example, we will name the user Hot Desk Base but you can choose the name as you wish
- Hide from LDAP: Enable
- Username: hot-desk-base
- Password: Give a strong password
- ID: Hot Desk Base
- Extension: Please configure a extension number outside your numbering plan. In this example we set the Extension number to #10
- Template: Please select the template you created in the last step
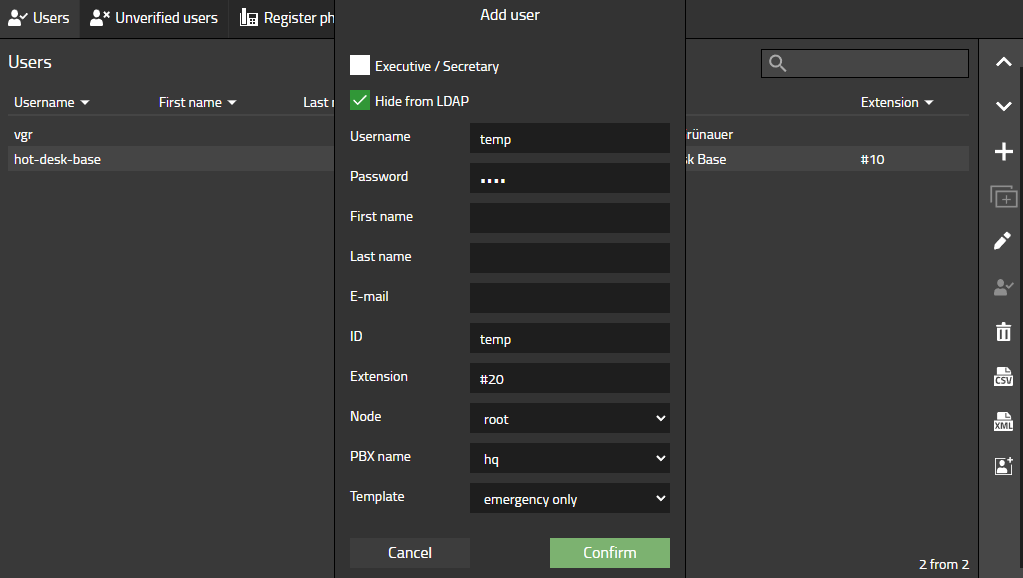
Afterwards please create another user which is used during the provisioning for a short period of time.
- Hide from LDAP: Enable
- Username: temp
- Password: Give a strong password
- ID: temp
- Extension: Please configure a extension number outside your numbering plan. In this example we set the Extension number to #20
- Template: Please select the template you created in the last step
Create Hot Desking Hardware ID
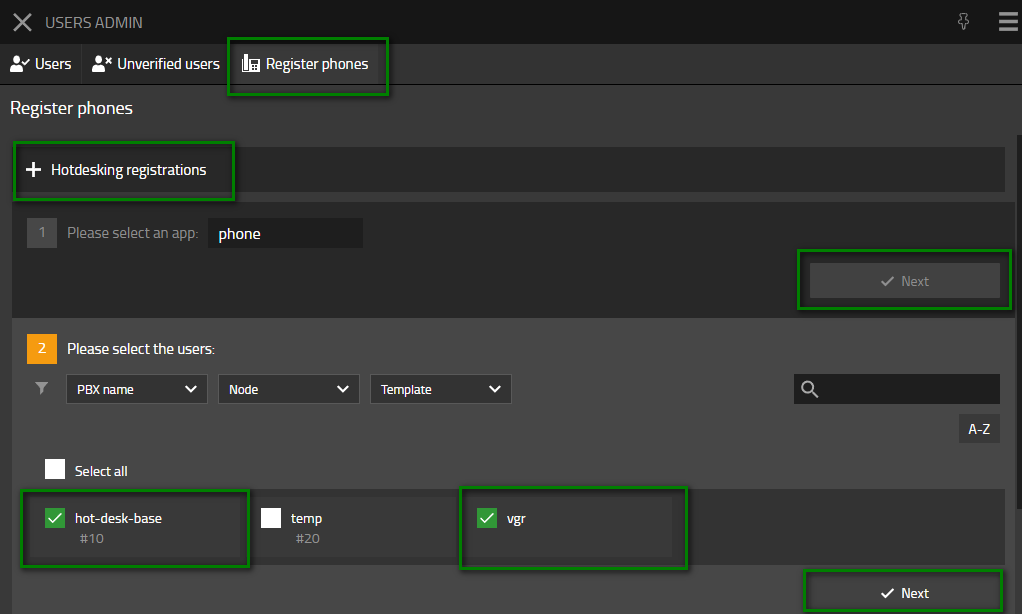
As a next step please open Register phones in the top menu of the users admin app and click on + Hotdesking registration.
Select the phone app and click on next.
Select your hot-desk-base user and any user which should be able to do hot desking. Afterwards press next and then finish.
Create category - Devices app
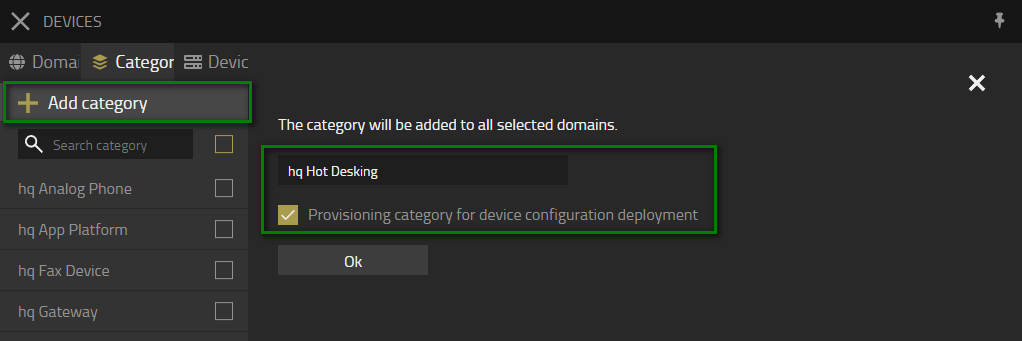
Go to your Devices app and select Categories. Afterwards click on Add category. Assign a name like PBX name Hotdesking and enable the check mark Provisioning category for device configuration deployment
Devices Configuration - Devices App
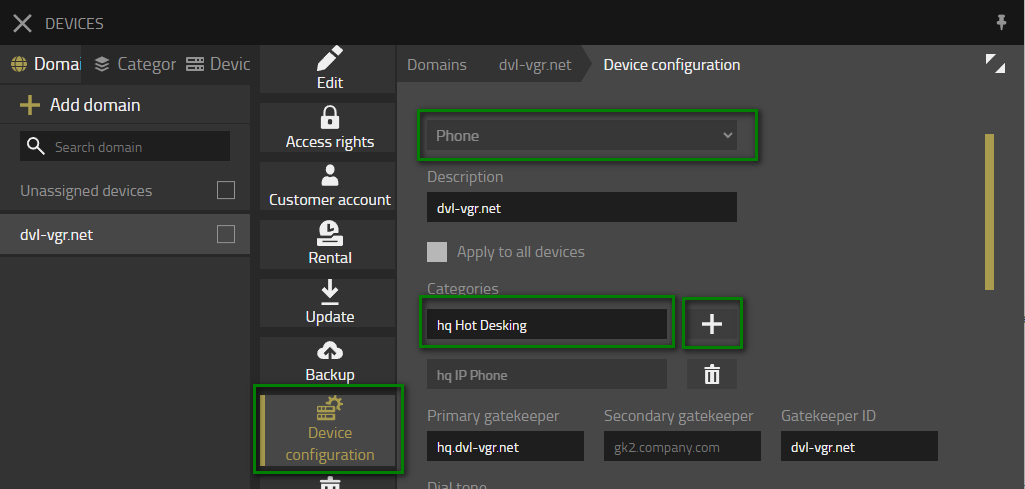
As a next step select your domain in our devices app and click on Device configuration.
Assign category to Phone configuration
Open your Phone device configuration and add the category you just created to your Phone device configuration by selecting the category and then click the + symbol. This way the device will receive all necessary options like gatekeeper ID or primary gatekeeper address from this device configuration. Afterwards don't forget to press OK.
Create Expert configuration
As a final step of your configuration please click on Define device configuration and select Expert configuration
- Please assign a descriptive name like Hot Desking
- Select the category you just created from the drop down menu and click the + symbol
- Please create an update script to register your phone with your Hot Desk Base user and configure a Hot Desking function key. You can use the following example, but please change <your secure password> to the Hot Desk Base users password you created earlier
config add PHONE SIG /h323 hot-desk-base /gk-pwd <your secure password>
vars create PHONE/USER-CFG/00000 p %3cuser%3e%3cf+id='0'+label='hot-desking'%3e%3chotdesk+label='log+out'+pbx='1'/%3e%3c/f%3e%3c/user%3e
mod cmd UP1 check iresetn hot-desk
config write
config activate
Verification
Provision a phone to Hot Desk Base user - Users Admin app
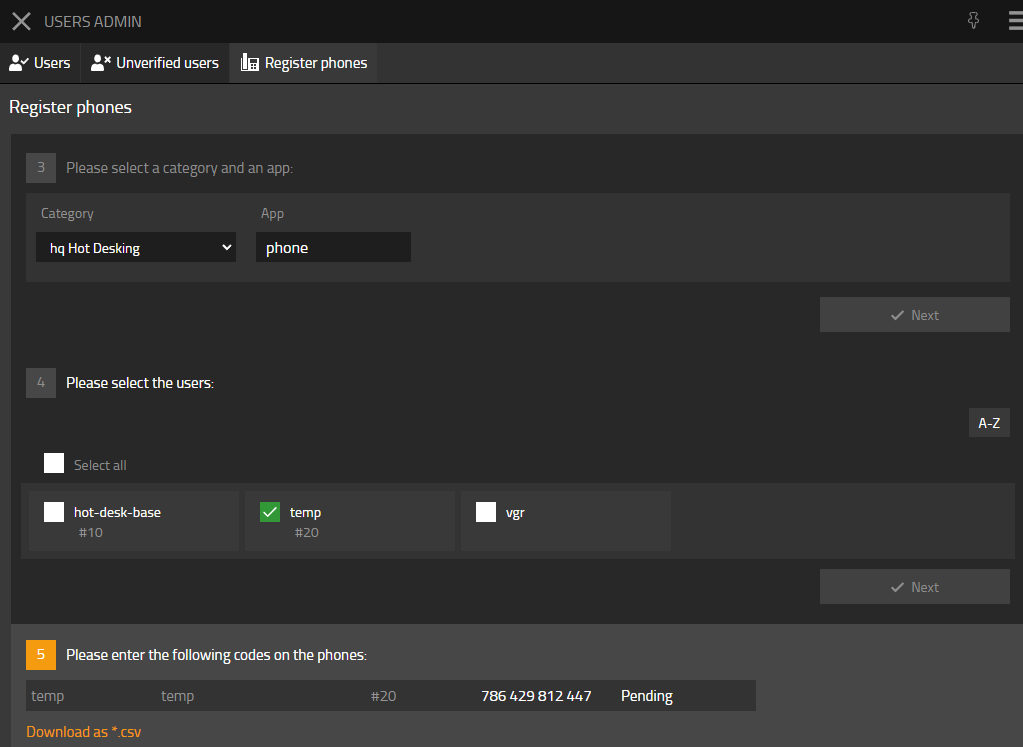
Create a provisioning code through for the temp user in the users admin app. Enter this provisioning code into a phone that has previously been reset to factory defaults. The phone will be provisioned and will be registered on the Hot Desk Base user.
Use Hot-Desking function key - Phone
Through the expert configuration script, the Hot Desk Base user received a Hot Desking function key. By pressing the key, the user can input his name or number and his personal password. The phone creates a registration on the PBX for this user. Note that users must have a hardware ID on their user object that matches their name. Furthermore if the registration needs to pass a reverse proxy, you will need to activate the corresponding flag or the registration will fail.
Tutorial in a Video
Here you can find this tutorial in a Video to help you even more.
Security Considerations
A common requirement is that users have problems entering their personal password through the phone UI. In this case, we recommend using OAuth2 Authentication Reference13r3:Concept_OAuth2_Windows_Authentication for myApps. This way, you can reuse the user's personal password since myApps uses the Windows Domain password for authentication. Please be aware that using a simple password is a security concern because a malicious attacker could guess it. As result, please make sure you configure IP Filter and set No of Regs w/o Pwd. to 0.
Known issues
Related Articles
You may also consider to use the MediaRunway Hotdesk partner application for simple phone assignment via the Windows myApps Client when changing workstations.
