Howto13r2:RecordingsApp: Difference between revisions
| Line 8: | Line 8: | ||
[[Image:Recordings-howto1 1.png]] | [[Image:Recordings-howto1 1.png]] | ||
=Configuration in the PBX Manager | =Configuration in the PBX Manager Plugin= | ||
==AP | ==Part 1 - Adding objects through the Recordings AP== | ||
You need to | *First you're going to add 2 new objects for the Recordings App to function. | ||
**Here you need to add one object for '''"User"''' and one for '''"Admin"'''. | |||
**You have three fields to fill out. | |||
***''Name'': Here youre going to name the App | |||
***''SIP'': Here you need to name the SIP | |||
***''TYPE'': Here you can choose what type this object is going to have. | |||
[[Image:Recordings- | [[Image:Recordings-howto3 1.png]] | ||
At the end, it should look like this: | |||
[[Image:Recordings-howto2 1.png]] | |||
[[Image:Recordings- | |||
==Configuring Templates== | ==Configuring Templates== | ||
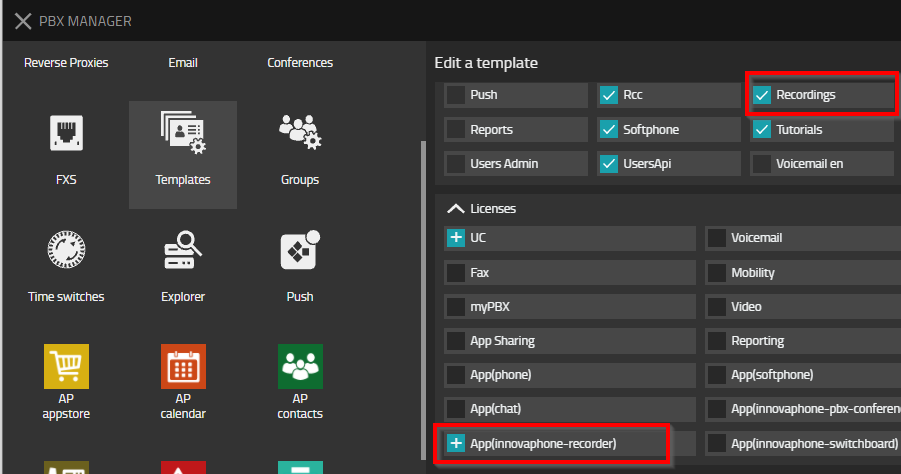
*For the app to work, you need to give out permissions and licences for the templates. | |||
**Select the user template and give him the app permission and the licence. | |||
**Select the admin template and give him the admin-app permission and also the licence. | |||
**Now users with either template can use the appropiate apps. | |||
[[Image:Recordings-howto4 1.png]] | |||
[[Image:Recordings- | |||
=Setting up Devices= | =Setting up Devices= | ||
Revision as of 12:53, 30 September 2021
Setting up the Instance
- In this Step you're going to Setup the Instance of the Recordings App
- For this you need to download the app in the AP Manager Plugin.
- After installing the latest version, you need to add a new instance.
- You need to fill all the important information in the newly opened window.
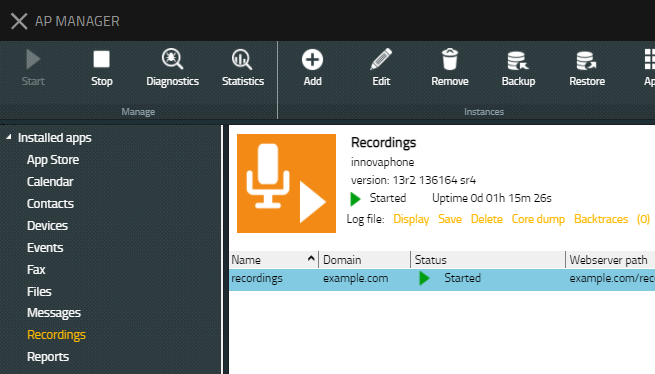
- After setting up the instance and starting it, it should look like the following:
Configuration in the PBX Manager Plugin
Part 1 - Adding objects through the Recordings AP
- First you're going to add 2 new objects for the Recordings App to function.
- Here you need to add one object for "User" and one for "Admin".
- You have three fields to fill out.
- Name: Here youre going to name the App
- SIP: Here you need to name the SIP
- TYPE: Here you can choose what type this object is going to have.
At the end, it should look like this:
Configuring Templates
- For the app to work, you need to give out permissions and licences for the templates.
- Select the user template and give him the app permission and the licence.
- Select the admin template and give him the admin-app permission and also the licence.
- Now users with either template can use the appropiate apps.
Setting up Devices
Configuring the PBX
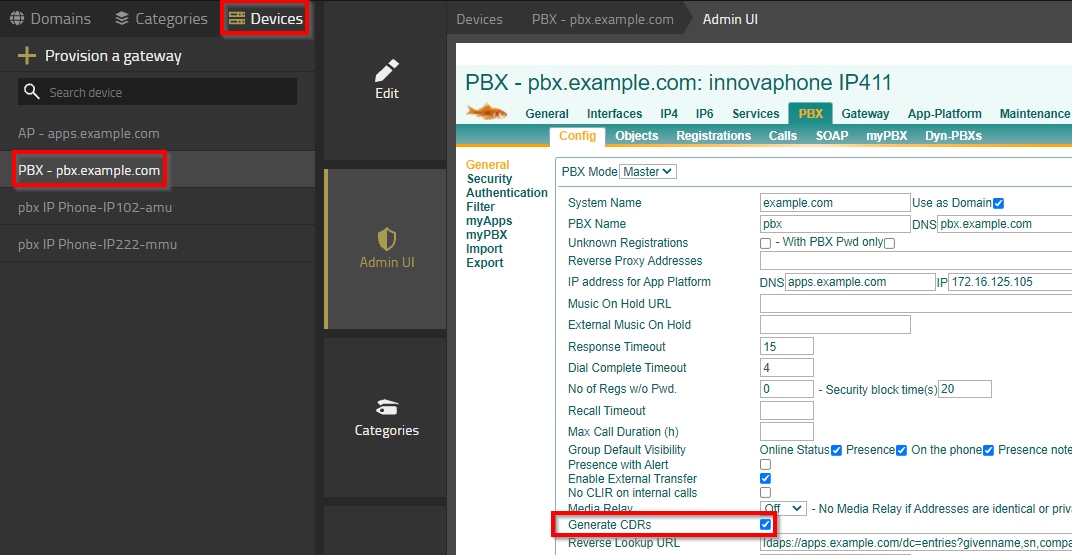
CDR
Here you need to configure your PBX and your phones. We're going to start with the PBX.
After selecting your PBX on the Devices-tab, you need to navigate to the PBX tab. Under general, you need to activate "Generate CDRs".
After that, the CDR need to get configured. For this you're going to select the "Gateway" tab, and the subtab "CDR1".
The following configuration is needed:
Type: HTTP Adress: here you need to either set the IP Adress of your application platform, or the name of it which is resolved from your DNS Server. Method: External (POST) Path: Now you need the mentioned case-sensitive URL which looks like: "/domain/recordings/cdr". If you are not careful, the app is not going to work.
Checking the object
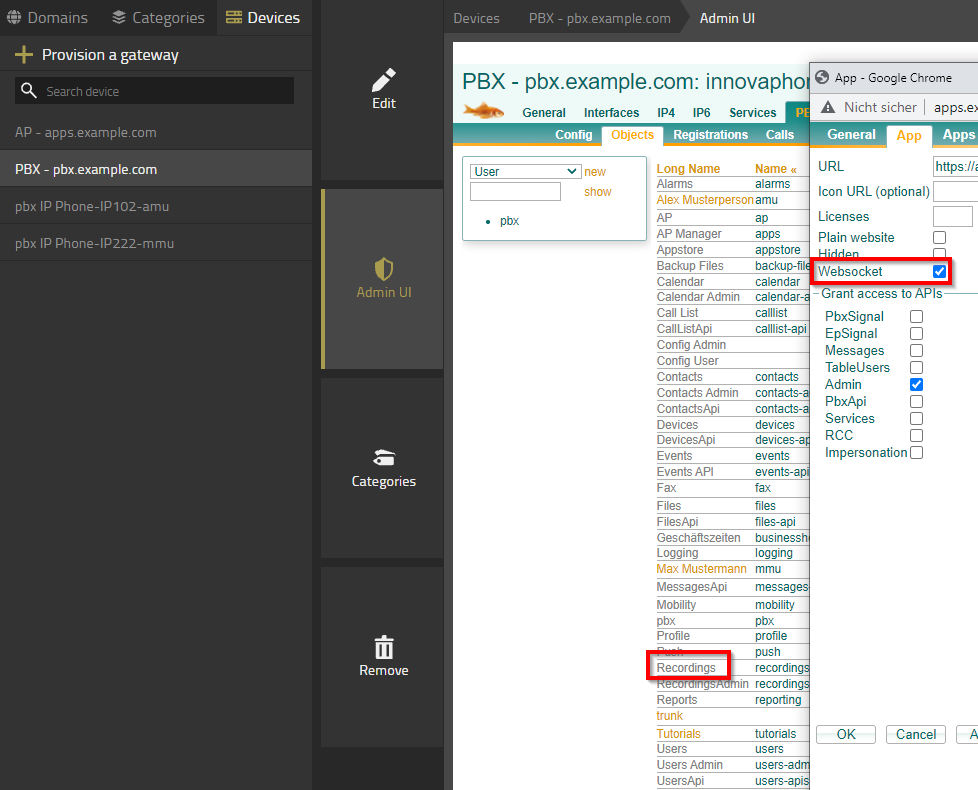
Also, it could happen that Websocket isn't ticked in "Objects".
You need to navigate to the "PBX" tab and the subtab "Objects". Click on the "Recordings" object to configure it. Check the first "App" tab if "Websocket" is activated. If not, activate it.
Configuring the Phones
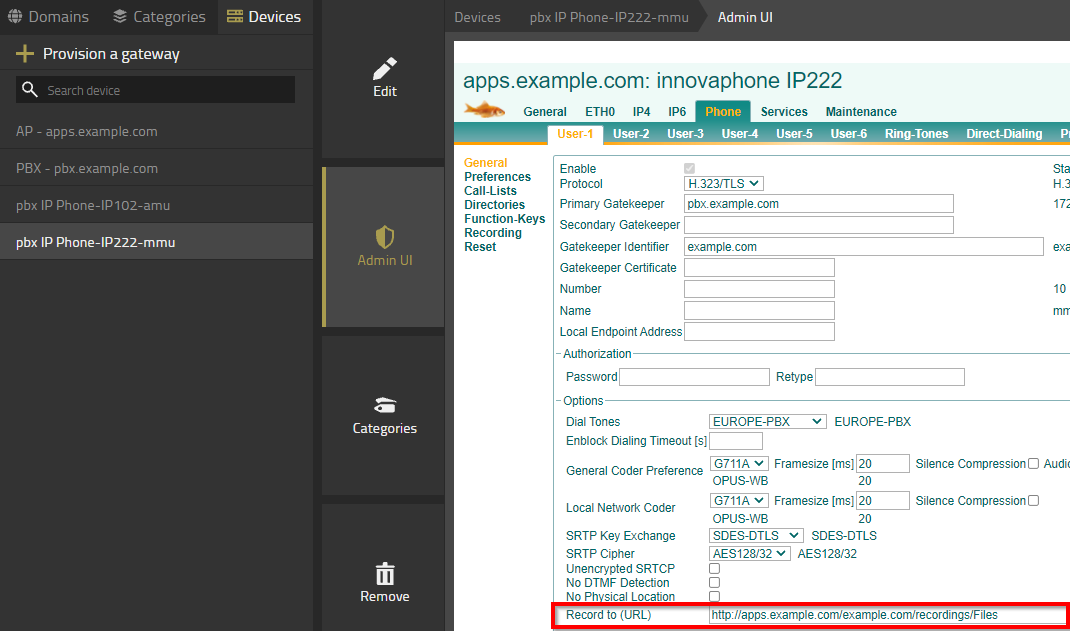
After that, you need to configure the phones. For this, select a phone and go to the "Phone" tab.
Way down below, you can spot the URL field which needs to be the following: http://app-platform/domain/recordings/Files
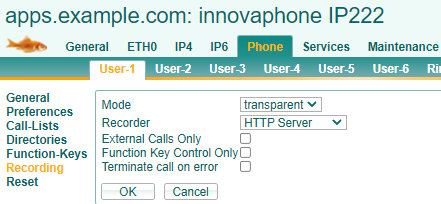
You also need to setup the "Recording" tab which is found on the left.
Mode: Transparent: This means that the call will be recorded instantly. Recorder: HTTP Server
Configuring the App
Now you can put the "Recordings" and the "RecordingsAdmin" App to your home screen from the appstore on the bottom right.
You need to open the admin-app so you can configure it.
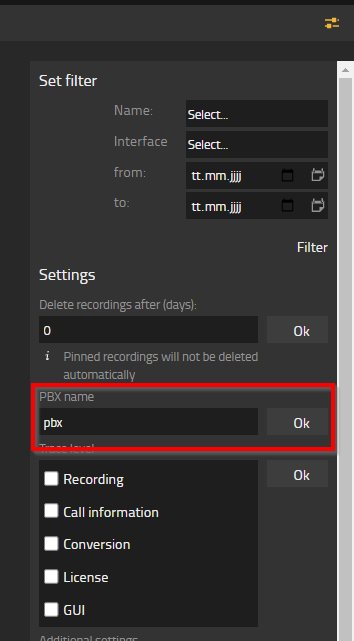
After opening it, you see that you get a message which says that no PBX name is configured which you need to set.
On the upper right is a menu button. After pressing it, a sidemenu will open. Down below you see the option "PBX name". Here you set the name you gave the PBX.
After that, the configuration is done and you can freely use the app.
