Howto13r2:RecordingsApp: Difference between revisions
Jump to navigation
Jump to search
No edit summary |
|||
| Line 1: | Line 1: | ||
=Setting up the Instance= | =Setting up the Instance= | ||
[[Image:Recordings-howto1 1.png|thumb|upright=1.0|right|AP Manager]] | |||
* In this Step you're going to Setup the Instance of the Recordings App | * In this Step you're going to Setup the Instance of the Recordings App | ||
** For this you need to download the app in the AP Manager Plugin. | ** For this you need to download the app in the AP Manager Plugin. | ||
| Line 6: | Line 7: | ||
** After setting up the instance and starting it, it should look like the following: | ** After setting up the instance and starting it, it should look like the following: | ||
=Configuration in the PBX Manager Plugin= | =Configuration in the PBX Manager Plugin= | ||
==Adding objects through the Recordings AP== | ==Adding objects through the Recordings AP== | ||
[[Image:Recordings-howto3 1.png|thumb|upright=1.0|right|PBX Manager]] | |||
[[Image:Recordings-howto2 1.png|thumb|upright=1.0|right|PBX Manager Result]] | |||
*First you're going to add 2 new objects for the Recordings App to function. | *First you're going to add 2 new objects for the Recordings App to function. | ||
**Here you need to add one object for '''"User"''' and one for '''"Admin"'''. | **Here you need to add one object for '''"User"''' and one for '''"Admin"'''. | ||
| Line 17: | Line 19: | ||
***''TYPE'': Here you can choose what type this object is going to have. | ***''TYPE'': Here you can choose what type this object is going to have. | ||
==Configuring Templates== | ==Configuring Templates== | ||
[[Image:Recordings-howto4 1.png|thumb|upright=1.0|right|Templates]] | |||
*For the app to work, you need to give out permissions and licences for the templates. | *For the app to work, you need to give out permissions and licences for the templates. | ||
**Select the user template and give him the app permission and the licence. | **Select the user template and give him the app permission and the licence. | ||
| Line 29: | Line 27: | ||
**Now users with either template can use the appropiate apps. | **Now users with either template can use the appropiate apps. | ||
=Configuring the App= | =Configuring the App= | ||
[[Image:Recordings-howto20.png|thumb|upright=5.0|right|App Configuration]] | |||
*Now you need to set the PBX name into the settings of the app, which is found in the '''RecordingsAdmin''' - app | *Now you need to set the PBX name into the settings of the app, which is found in the '''RecordingsAdmin''' - app | ||
**After opening the app, you can open a sidebar-menu with the upper right menu button. | **After opening the app, you can open a sidebar-menu with the upper right menu button. | ||
**Below you see the setting which is called '''"PBX name"'''. Here you set the name you gave the PBX. | **Below you see the setting which is called '''"PBX name"'''. Here you set the name you gave the PBX. | ||
<br> | |||
<br> | |||
<br> | |||
<br> | |||
<br> | |||
<br> | |||
<br> | |||
<br> | |||
<br> | |||
<br> | |||
<br> | |||
<br> | |||
<br> | |||
<br> | |||
=Configuring the CDR settings= | =Configuring the CDR settings= | ||
==CDR Checkbox== | ==CDR Checkbox== | ||
[[Image:Recordings-howto5 1.png|thumb|upright=5.0|right|CDR Checkbox]] | |||
*To fully function, you need to activate the CDR option in the PBX. | *To fully function, you need to activate the CDR option in the PBX. | ||
**To do that, you need to select the '''PBX - Config''' tab | **To do that, you need to select the '''PBX - Config''' tab | ||
***Here you need to check the '''"Generate CDRs"''' checkbox. | ***Here you need to check the '''"Generate CDRs"''' checkbox. | ||
<br> | |||
==Configuring CDR== | ==Configuring CDR== | ||
[[Image:Recordings-howto6-1.png|thumb|upright=5.0|right|CDR Configuration]] | |||
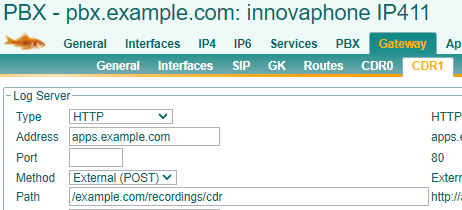
*In this step you are going to setup the CDR tab in the PBX | *In this step you are going to setup the CDR tab in the PBX | ||
**Those settings you can find under '''Gateway - CDR1'''. | **Those settings you can find under '''Gateway - CDR1'''. | ||
| Line 55: | Line 68: | ||
****''Path:'' Here you need to put a case-sensitive URL: '''"/domain/recordings/cdr"'''. | ****''Path:'' Here you need to put a case-sensitive URL: '''"/domain/recordings/cdr"'''. | ||
=Checking the object= | =Checking the object= | ||
[[Image:Recordings-howto7-1.png|thumb|upright=5.0|right|Checkboxes]] | |||
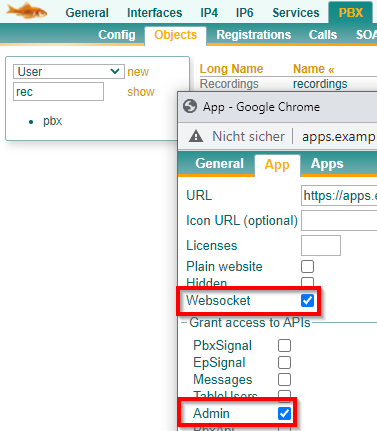
*It could happen that '''Websocket''' and '''Admin''' isn't ticked in '''"Objects"'''. | *It could happen that '''Websocket''' and '''Admin''' isn't ticked in '''"Objects"'''. | ||
**To check this, you need to navigate to '''PBX - Objects''' | **To check this, you need to navigate to '''PBX - Objects''' | ||
**Here you select the '''Recordings''' object and select the first '''App''' tab. | **Here you select the '''Recordings''' object and select the first '''App''' tab. | ||
**Both checkboxes should be ticked. | **Both checkboxes should be ticked. | ||
<br> | |||
<br> | |||
<br> | |||
<br> | |||
<br> | |||
<br> | |||
<br> | |||
=Checking the SIP-settings= | =Checking the SIP-settings= | ||
[[Image:Recordings-howto9-1.png|thumb|upright=5.0|right|SIP-Trunk]] | |||
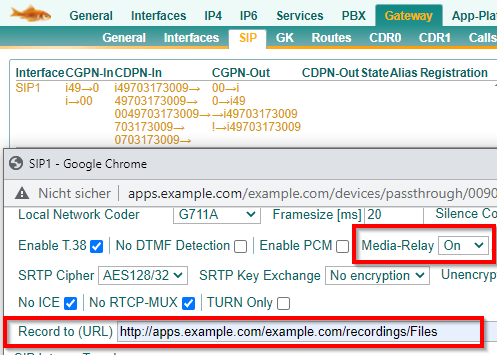
*Since you also wanna record any call that goes through your SIP-trunk, you need to put a URL into the SIP. | *Since you also wanna record any call that goes through your SIP-trunk, you need to put a URL into the SIP. | ||
**For this, you select the '''Gateway - SIP''' tab. | **For this, you select the '''Gateway - SIP''' tab. | ||
***Make sure that the URL is put correctly and also the Media-Relay is on. | ***Make sure that the URL is put correctly and also the Media-Relay is on. | ||
<br> | |||
<br> | |||
<br> | |||
<br> | |||
=Configuring the Phones= | =Configuring the Phones= | ||
==Setting up the URL== | ==Setting up the URL== | ||
[[Image:Recordings-howto8-1.png|thumb|upright=5.0|right|URL]] | |||
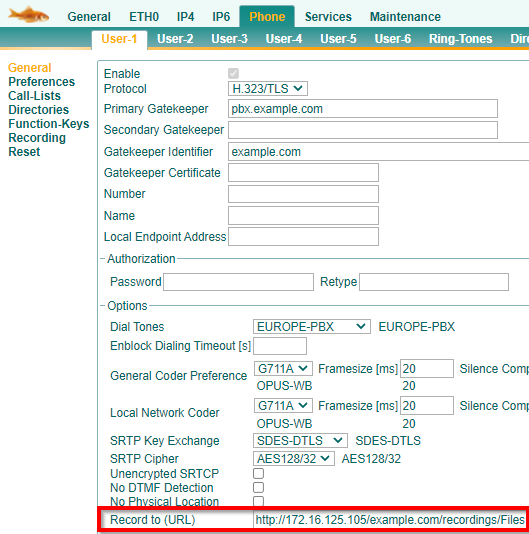
*To actually record the calls, the phones need to be set up correctly. | *To actually record the calls, the phones need to be set up correctly. | ||
**Select a phone and go to the '''"Phone"''' tab. | **Select a phone and go to the '''"Phone"''' tab. | ||
**Down below, you again need to put a case-sensitive URL into the field, which follows the following rule: | **Down below, you again need to put a case-sensitive URL into the field, which follows the following rule: | ||
***'''http://app-platform/domain/recordings/Files''' | ***'''http://app-platform/domain/recordings/Files''' | ||
<br> | |||
<br> | |||
<br> | |||
<br> | |||
==Setting up the Recording-Tab== | ==Setting up the Recording-Tab== | ||
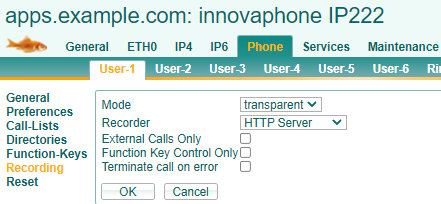
[[Image:Recordings-howto19.png|thumb|upright=5.0|right|Recording-Tab]] | |||
*To fully function, the following changes need to be made in the '''Recording-Tab''' | *To fully function, the following changes need to be made in the '''Recording-Tab''' | ||
**''Mode:'' Transparent: This means that the call will be recorded instantly. | **''Mode:'' Transparent: This means that the call will be recorded instantly. | ||
**''Recorder:'' HTTP Server | **''Recorder:'' HTTP Server | ||
After this, the app is free to use. | After this, the app is free to use. | ||
Revision as of 09:21, 5 October 2021
Setting up the Instance
- In this Step you're going to Setup the Instance of the Recordings App
- For this you need to download the app in the AP Manager Plugin.
- After installing the latest version, you need to add a new instance.
- You need to fill all the important information in the newly opened window.
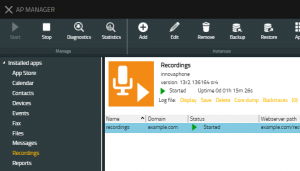
- After setting up the instance and starting it, it should look like the following:
Configuration in the PBX Manager Plugin
Adding objects through the Recordings AP
- First you're going to add 2 new objects for the Recordings App to function.
- Here you need to add one object for "User" and one for "Admin".
- You have three fields to fill out.
- Name: Here youre going to name the App
- SIP: Here you need to name the SIP
- TYPE: Here you can choose what type this object is going to have.
Configuring Templates
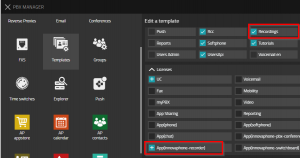
- For the app to work, you need to give out permissions and licences for the templates.
- Select the user template and give him the app permission and the licence.
- Select the admin template and give him the admin-app permission and also the licence.
- Now users with either template can use the appropiate apps.
Configuring the App
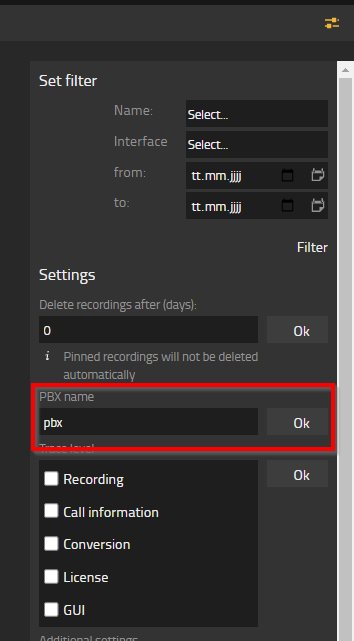
- Now you need to set the PBX name into the settings of the app, which is found in the RecordingsAdmin - app
- After opening the app, you can open a sidebar-menu with the upper right menu button.
- Below you see the setting which is called "PBX name". Here you set the name you gave the PBX.
Configuring the CDR settings
CDR Checkbox
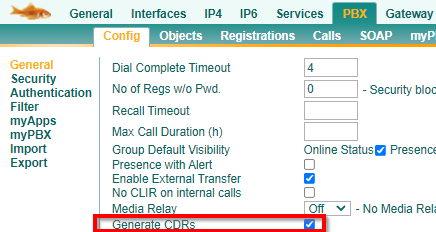
- To fully function, you need to activate the CDR option in the PBX.
- To do that, you need to select the PBX - Config tab
- Here you need to check the "Generate CDRs" checkbox.
- To do that, you need to select the PBX - Config tab
Configuring CDR
- In this step you are going to setup the CDR tab in the PBX
- Those settings you can find under Gateway - CDR1.
- The following settings need to be made:
- Type: HTTP
- Adress: here you need to either set the IP Adress of your application platform, or the name of it which is resolved from your DNS Server.
- Method: External (POST)
- Path: Here you need to put a case-sensitive URL: "/domain/recordings/cdr".
- The following settings need to be made:
- Those settings you can find under Gateway - CDR1.
Checking the object
- It could happen that Websocket and Admin isn't ticked in "Objects".
- To check this, you need to navigate to PBX - Objects
- Here you select the Recordings object and select the first App tab.
- Both checkboxes should be ticked.
Checking the SIP-settings
- Since you also wanna record any call that goes through your SIP-trunk, you need to put a URL into the SIP.
- For this, you select the Gateway - SIP tab.
- Make sure that the URL is put correctly and also the Media-Relay is on.
- For this, you select the Gateway - SIP tab.
Configuring the Phones
Setting up the URL
- To actually record the calls, the phones need to be set up correctly.
- Select a phone and go to the "Phone" tab.
- Down below, you again need to put a case-sensitive URL into the field, which follows the following rule:
Setting up the Recording-Tab
- To fully function, the following changes need to be made in the Recording-Tab
- Mode: Transparent: This means that the call will be recorded instantly.
- Recorder: HTTP Server
After this, the app is free to use.
