Howto:Master - Slave Numbering Scheme with one Node and more Pbx/Locations: Difference between revisions
mNo edit summary |
mNo edit summary |
||
| Line 48: | Line 48: | ||
===Configuration=== | ===Configuration=== | ||
===Configuring the MasterPbx | ===Configuring the MasterPbx=== | ||
[[image:Locations_2.png]] | [[image:Locations_2.png]] | ||
Revision as of 15:18, 4 July 2007
Applies To
This information applies to
- IP 6000, V6
- IP 3000, V6
- IP 800, V6
- IP 305, V6
- IP 302, V6
- IP 202, V6
Build 06-60400.31 or later
More Information
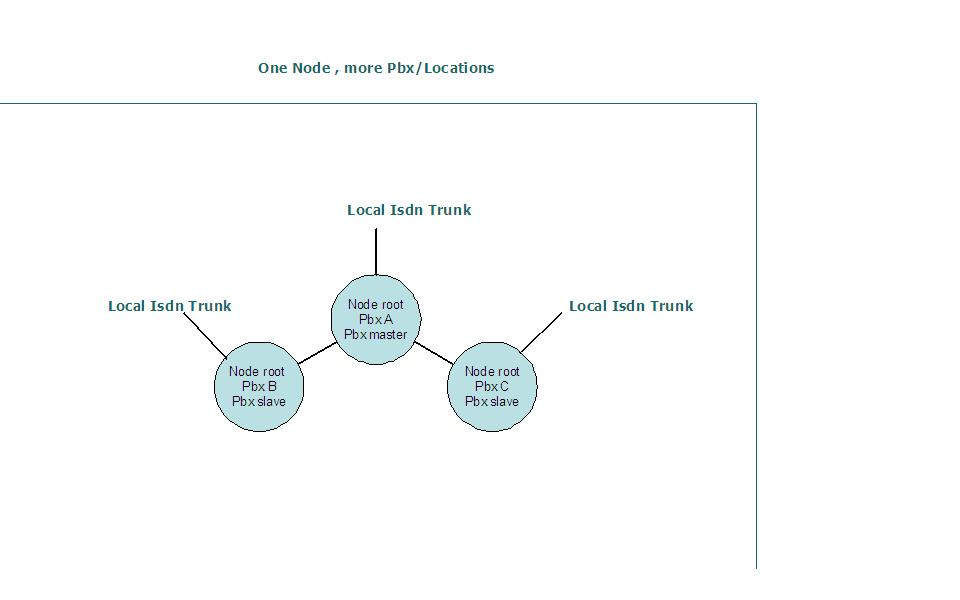
How to configure a Numbering Node with one Node and more Pbx/Locations
Having more innovaphone locations. On every site (location) is an innovaphone
Gateway with Isdn connection (Local Isdn Trunk) and one virtual Pbx over all locations.
That means every number in this location concept is uniqe.
Every Endpoint dials only the number of any phone in any location.
Also every Endpoint dials the trunk line Number (e.g 0) and gets a local break out.
General Explanation of the numbering node and Pbx
go to Howto:Description of the Numbering Scheme used in V6
Problem Details
IF for every remote location a local isdn breakout is needed –
therefore it takes a little tricky configuration.
Configuration
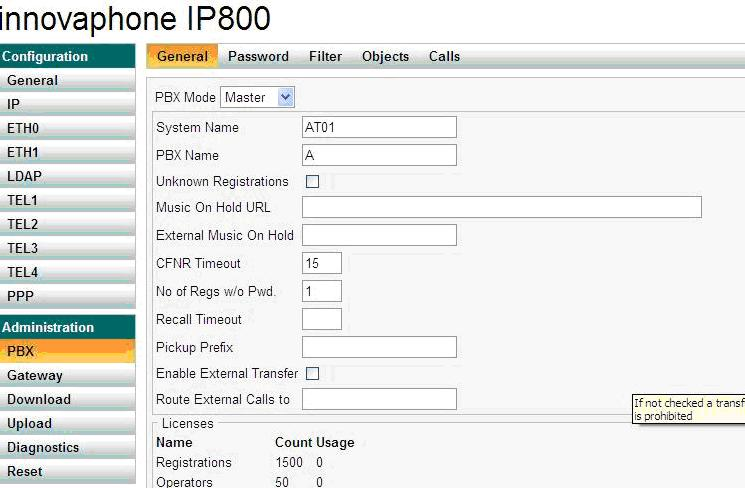
Configuring the MasterPbx
Pbx Mode Master
System Name is the Gatekeeper Id (AT01)
And the Pbx name (A)
Here you define the pbx name , later in the user objects you configure on what Pbx (pbx name) the phones should register.
Registering/Configuring Endpoints (e.g Phones) on the Master Pbx.
User Object
The node: You can have different nodes on one Gateway (Pbx) to have more virtual Pbx.
For example having same extensions.
Also you can have one node per Pbx
The node root is the upper tree node, all other nodes are below the root node – this are
all own virtual Pbx. So if in a node a number is not found it will go to the upper node .
On the Pbx field you define on what Pbx the Phones register, here it is the local
Pbx (A).
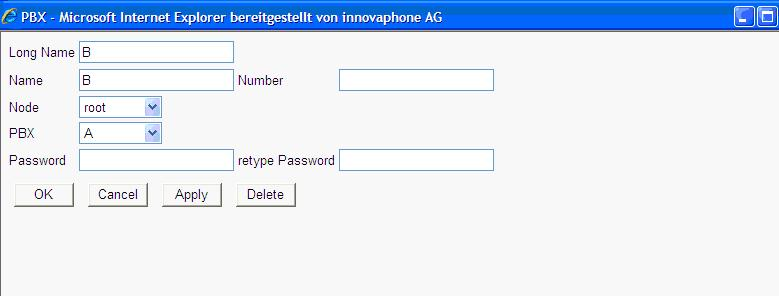
Then you have to define the Pbx of the remote Location in the Master
Pbx Object
The name and long name is the same as the pbx name on the remote location.
Node is the root and the Pbx is the master Pbx (A), Password is not needed, if you take
a Password then you have to configure this in the Slave Pbx also
(andminstration/pbx/general slave Pbx Password)
Configuring the slave Pbx
Pbx password
The Pbx Password of all the slaves must be the same as on the Master Pbx.
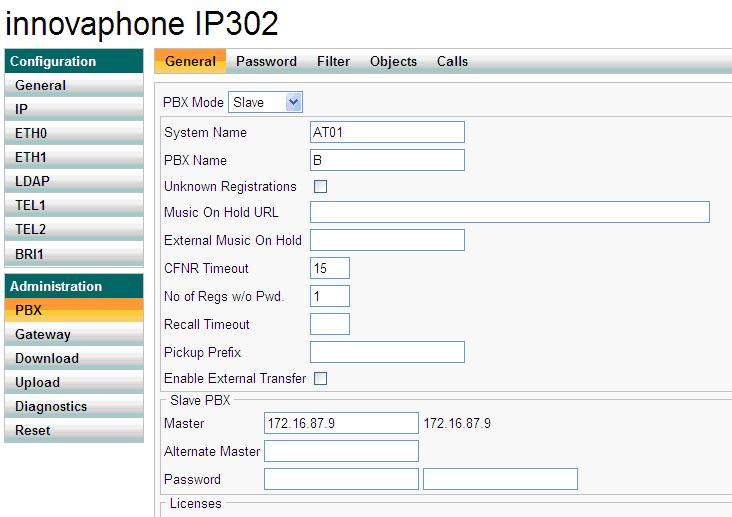
Configuring the Slave Mode
Pbx Mode is Slave,.
System Name (Gatekeeper ID) is the same as on the Master
Slave Pbx , Master: Here put the IP Address of the Master Pbx
Having an alternate Master (Standby Pbx put here the IP Address of the Masters
Standby Pbx)
Password : If you configured a password on the Pbx Object in the Master Pbx then put
the same here.
Configuring Ldap
All the User Obejcts of all Locations get configured in the Master Pbx (A)
The remote locations (slaves) get this user objects automatically in their Pbx –
therefore we work with LDAP replication.
Configure the Ldap replication on a Slave Pbx
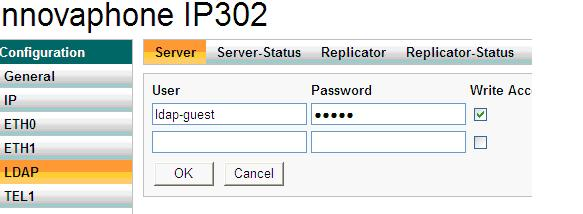
Configuration/Ldap
The default Ldap user is ldap-guest and the password is ipxxx
Activate write access.
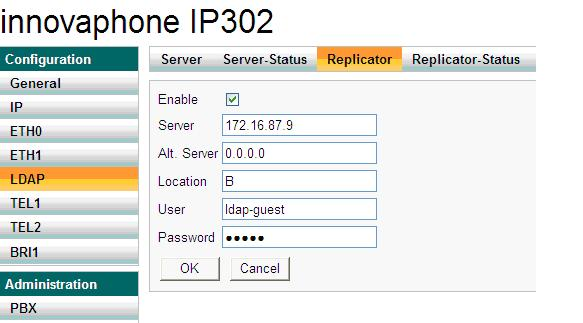
In the Replicator configure the Ldap Master
Server : IP address of the Master Pbx
Location: if it is empty all user data from the Master pbx will be replicated.
Here you only need the User data of this slave pbx (B) - own user data.
User and password as above.
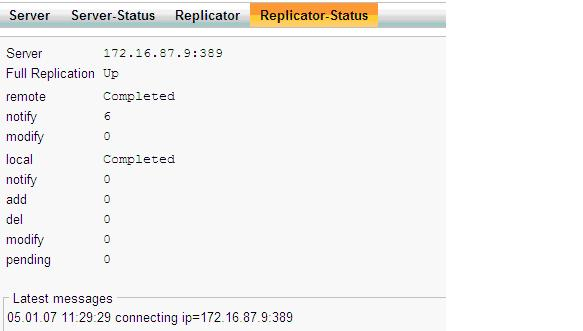
To see if the Ldap replication works go to Replicator Status
Full Replication must be UP
Configuring /Registering a Endpoint (e.g Phone) for the Pbx B
In the Master Pbx open a New User Object
User Object
Node root and Pbx B (the Pbx of the remote Location – Slave Pbx where the Phone should register)
Configuring local Trunk User for every Pbx
Every Phone on every Pbx is in the node root –so they can call each other only by calling the extension.
The Trunk users must be in different nodes, because there can only be one Trunk user with one unique number in one node.
So therefore configure one Trunk user in the node root and one Trunk user in another node (for example here B).
If a user from the Slave Pbx (B) dials 0 - gets the routing via the Trunk user in location B.
If the user in Location A is dialing the 0 there is no 0 in node A so the calls goes automatically to the upper node –
and there in the root node is the Trunk User for the Master location (A).
Configuration on Master
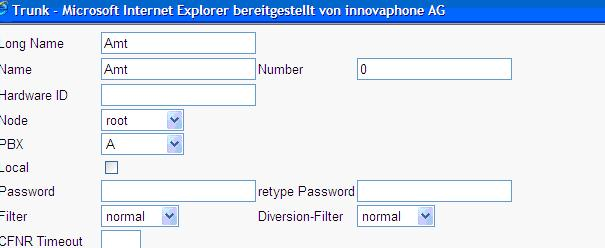
Trunk User on Master
Trunk Object –must be registered in the relay or direct at the Interface for dialing out/in
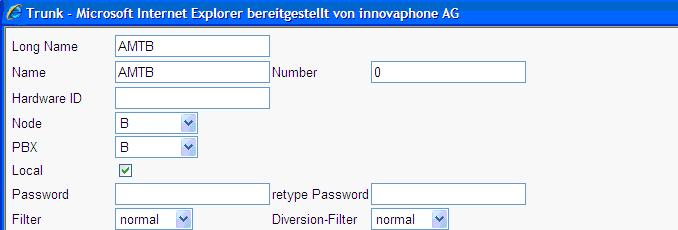
Trunk user for Slave Pbx
The Long Name /Name must be different
As node chose here B
As Pbx B (slave Pbx to register)
The Local Flag MUST be on !
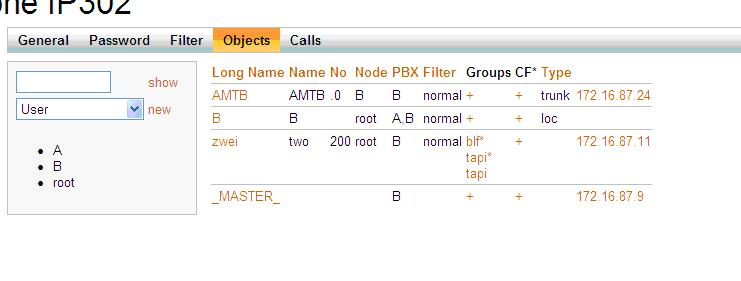
Like this it should be on the Matser Pbx
Registered Trunk user
Registered phones
And registered Location (B) Slave Pbx
Configuration in the slave Pbx
Here you have also configure the relay or Interface registration to the Trunk User.
In the Relay configuration for the Trunk User take only the Trunk Name not the Trunk number.
And if the configuration is right you see that the Master is up the local Trunk user and the local Phones are registered.
Redundancy
If the Slave Pbx fails the local Phones register automatically on the Master Pbx .
When a phone is making a registering to the local Pbx (Slave) then in the response it gets also the information of the alternate Gatekeeper (IP Address of the Master Pbx) also on every refresh of the phone.
With the innovaphone Locations Concept there is also redundancy included
Howto:How to configure numbering node with X nodes and X pbx.
