Howto13r3:Step-by-Step Open H.323 Federation
If you have difficulty understanding the written language, we recommend to use www.deepl.com for translation. If installed, you can also use the translation function of your browser by right-clicking.
The article will describe how to configure an open H323 Federation in an simplified way. Here is not the idea to go deep into some federation details. if you think that federation is missing some feature, you can write them into our suggestion forum
Purpose
Open federation allows you to establish IP encrypted communication with others innovaphone systems (e.g. two separate customer installed with innovaphone want to do internal call together, share presence, chat). The usage of a regular telecommunications service provider (TSP) is not needed.
Features
- Call between two innovaphone systems which are not in a master/slave environment
- UC features possible : Video during a call, application sharing, 3 way-calls and video calls
- Chat
- Presence info sharing, favourite
Limitations
- This solution shows only the configuration of an open federation. More about closed federation can be found here
- If your installation is already configured with the general PBX route feature "Route external calls to", this guide is not for you. This does not mean that federation is not possible in that particular case
Requirements
- innovaphone PBX
- innovaphone TURN
- Optional STUN server
- Internet access and external access of your innovaphone PBX
- Valid domain and signed certificate installed Reference11r1:Certificate_management
- 1 SRV record
- 1 A record
- 1 Port License
Things to know before you begin
- You will need to use two GW interface, be sure to have them available
- The System Name of the PBX must be equal to the domain part used for E-Mails
Configuration
In our scenario, we have the following initial situation:
- Configure 2 GW interfaces
- Adjust CLI for call federation and creates route for both federation calls direction
- Define new filter set to restrict call with number
- Define a Gateway object in the PBX and apply a filter on it
- Define the PBX federation call route
- Definition of the A and SRV record needed to make Federation signalling work with innovaphone system
- Define a basic visibility filter
- Configuration of TURN
step 1: Gateway side
The VoIP gateway interfaces configuration
Configure 2 GW under Reference13r3:Gateway/GK/GW, one register internally toward the PBX, the other one act as Federation open interface
- GW One Toward the PBX:
- Name: optional (in our example we have named it internal Federation)
- Protocol: H323/TLS
- Mode: Register as Gateway
- Address: your PBX FQDN (e.g. pbx.voipsystem.tld)
- Gatekeeper Identifier: the PBX system name
- GW Open Federation:
- Name: optional (in our example we have named it H323 Federation)
- Protocol: H323/TLS
- Mode: Gateway without Registration
- Address: 0.0.0.0 with the checkbox "Federation" ticked
- Local Domain: when the local domain cannot be used for external federation, you can configure a working domain that will automatically match the local domain
- Mask: 0.0.0.0
Hint: The 0.0.0.0 allow any network to reach this interface, you can restrict to specific network by entering its IP and sub network
Hint2: The local domain option has been introduced in v13r3sr7
Routing table : the routing configuration and CGPN suppression
You need to define 2 routes under Reference9:Gateway/Routes in both directions, in our case we want to have the route at the top of the routing table, we need to click on the top left icon.

| From | To | Direction |
|---|---|---|
| GW16: H323 Federation | GW15: internal Federation | Incoming traffic |
| GW15: internal Federation | GW16: H323 Federation | Outgoing traffic |
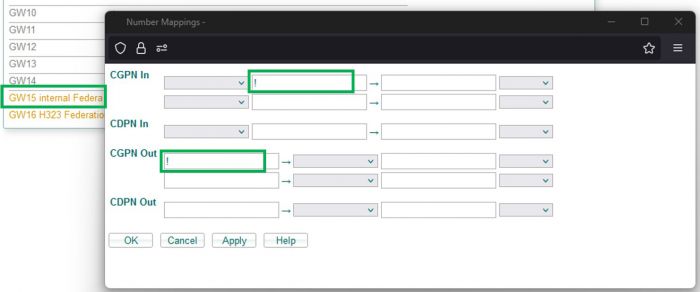
And then open the CGPN maps menu to insert an exclamation mark under the Number In field. Reference9:Gateway/CGPN-Maps
Hint: CGPN suppress is important in order to have a well formatted displayed name (e.g. John and not 209@yourdomain.tld) and also to be able to call federation destination.
Gateway interface (GK) : CGPN suppression
Open the interface which register internally in our case GW15 and set like in the screenshot below the exclamation mark ! under the CGPN In and CGPN Out
step 2: PBX side
The PBX filter definition
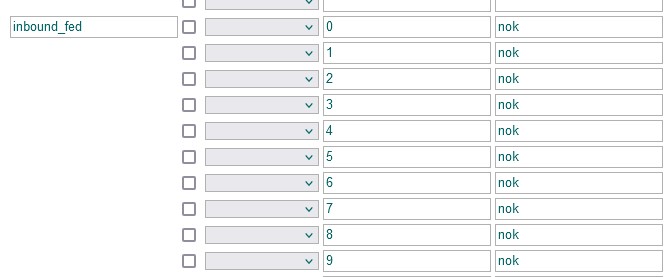
We do not want to have the internal user being call over a number but rather with email addresses, therefore we need to define a filter and apply it later on. like in the screenshot forbid all number and name your filter smartly in order to retrieve it later on.
Filter definition is under Reference13r1:PBX/Config/Filter.
The PBX Gateway object
As we have a Voip interface configured on the gateway side, we need to register it into our PBX. Create a PBX Gateway Object, name it smartly (can helps in the syslogs) like this example:
- Tab General
- Long Name: Federation
- Name: federation
- Password: a secure one, even not needed, take the habit to secure your PBX objects
- Node: according to your setup
- PBX: according to your setup
- Under ---Devices---
- Hardware ID: 005056xxxxxx-GW15 (as we have used the GW15 connected in TLS mode, we need to enter the mac of the PBX followed by the sign "-" and the respective used gateway interface
We need then to apply the previously defined filter into this Gateway object. To do so, navigate to :
- Tab Gateway
- Filter: select in the drop-down list your filter, in our example it is inbound_fed
Route Root-Node External Calls to
As you already know, the idea of federation communication is to use email. Of course our PBX does not know the target email to dial out and thus will drop the federation call. We need to root the federation traffic toward the previously created PBX Gateway object which is connected to our gateway interface GW15.
- Under Reference13r3:PBX/Config/General
- Route Root-Node External Calls to: Federation (Hint: configure here the Long name of the object and not the name, which is in our example "Federation")
step 3: DNS side
DNS, A and SRV records let's make this clear
In few words, SRV records provide more infos, like for our case a specific service and point to a A records. SRV records are needed for the federation signalling with innovaphone system. A records point to a specific public IP which is bound to the system where the federation interface is configured. It can run separated into a dedicated box or in the same box where the pbx is. In your DNS controller you need to configure the following DNS records types.
- SRV type:
_h323s._tcp.yourcompany.tldand/or_h323federationtls._tcp.yourcompany.tld - A type:
federation.yourcompany.tld
SRV record infos to provide:
- Type: SRV
- Service: h323s and/or h323federationtls
- Protocol: tcp
- TTL: your desired value
- Port: 1300
- Target: federation.yourcompany.tld
SRV records should point to your FQDN A record where the Federation interface is configured. (e.g. federation.yourcomapny.tld) A Record infos to provide:
- Type: A
- Domain Name: federation.yourcompany.tld (as used in our example)
- IP Address: the Public WAN address of federation interface
- TTL: your desired value
Hint: if you use the same box for PBX and federation interface and the system is installed with DNS, you can use the PBX DNS name as A record, not mandatory to configured one dedicated)
step 4: Default visibility settings
Visibility filter is important when we use federation. It can be configured by:
- The administrator in the admin UI under Reference13r3:PBX/Objects, column visibility for a specific user or for a template Reference13r1:PBX/Objects/Visibility
- The user via his Profile App under Privacy
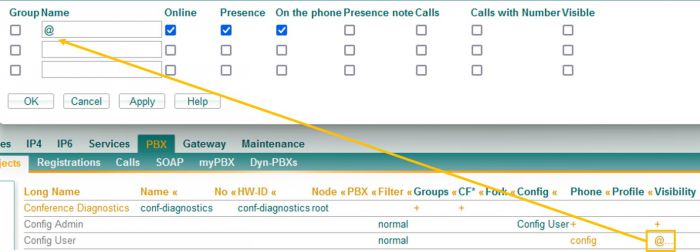
Here an example of a deployed visibility via the Config User template with a minimum of informations, no contact name or number or customized presence note will be shared.
- Name: entering @ match all domain
- Online: show if you are logged-in or not
- Presence: show the coloured labels if you are available(green), busy(red), away(yellow), do not, disturb(violet)
- On the phone: show a busy presence state with the text On the phone
Hint: when no presence is shared the contact will always appear Offline(grey)
step 5: Configuration of a TURN server
In order to relay the RTP between NAT we need to have a working turn server, in 13r3 we have a new mechanism to use a TURN server behind a NAT router, it is not needed to have the turn directly on the wan network anymore.
Hint: for security reason it is better to run the turn server in a separate system
TURN endpoint media relay
Tick the TURN option under Reference13r3:PBX/Config/General
Public IP of TURN server and port configuration
Go to your system where the turn server is running (e.g. your SBC) under Reference13r3:IP4/NAT/General
- Verify that the option enable under STUN/TURN server is ticked
- Configure the Public IP address who belong to the TURN server (which is also bound to your turn server DNS A record)
Note: Define a turn user and password if it is not done, if you use the TURN installed by the v13 installer, this is already configured !!! Things to check and to be sure to have it properly configured !!!
- Be sure to have a A records pointing to your TURN server (e.g. turn.domain.tld)
- Be sure to have the TCP and UDP port 3478 allowed in your firewall toward the TURN server (if you use the standard turn port)
- Be sure to have also the RTP-UDP range is forwarded for incoming traffic and opened for the outgoing traffic from the firewall toward your TURN server (default is 16384 / 32767). The configuration of port range can be found under Reference13r2:IP4/General/Settings
Deploy TURN configuration
You need to be sure for the federation that ALL endpoints of your system are configured to use the defined TURN server, also in the same time we can configure the STUN server. The PBX and the SBC need a STUN/TURN configuration.
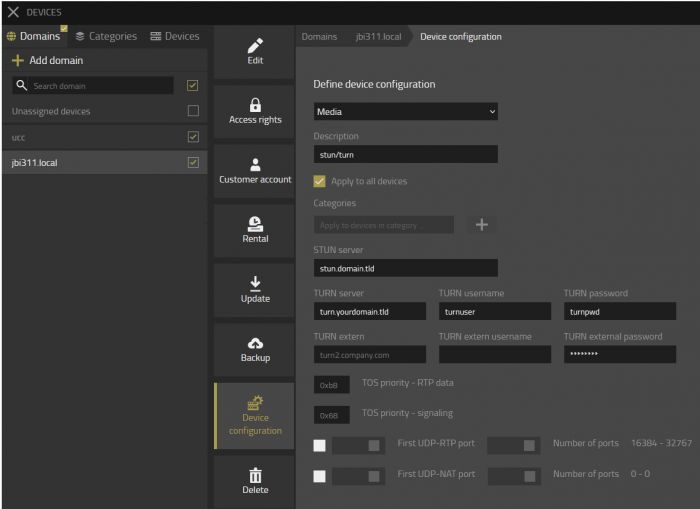
- Open you devices App and select your domain. Navigate in the middle menu to "Device configuration"
- Open the category Media and configure your TURN server
- You can also configure a STUN server if it is not configured as it is used for the ICE signalling in general
Hint: All devices connected to Devices App will be configured with your TURN and STUN configuration, if they have no connection to Devices (e.g. offline devices) they will not get the new devices configuration.
Verification
Outgoing traffic
- Start a chat
- You should be able to find the external user in the search field of the Chat App and start a conversation, the presence state should be also visible (if allowed by the other side).
- Start a call
- You should be able to find the external user in the search field of the Phone/Softphone App and place a call. App sharing and video should also works.
Incoming traffic
- Add a federated contact as favourite
- You can type the email address of the federated contact in your Phone App or Softphone App and click on the star to add it into your favourite list.
- Pay attention at the first received federation communication
- In the admin under Reference12r2:General/Certificates, you should see the certificate of the client who want to federate with you as rejected. You need to trust it for the very first connection.
- Your visibility
- Do not forget to adjust your visibility filter based on your needs (e.g. disallow all kind of visibility for a specific federated user or domain).
Known issues
- Pictures of users are not transmitted and so not displayed. The federation system does not communicate with the Users application service and cannot retrieve profile picture.
- Call pickup : Currently call-pickup is not possible between federated systems.


