Howto13r3:Step-by-Step Shared Fax App ressources in the Cloud
Jump to navigation
Jump to search
If you have difficulty understanding the written language, we recommend to use www.deepl.com for translation.
If installed, you can also use the translation function of your browser by right-clicking.
Purpose
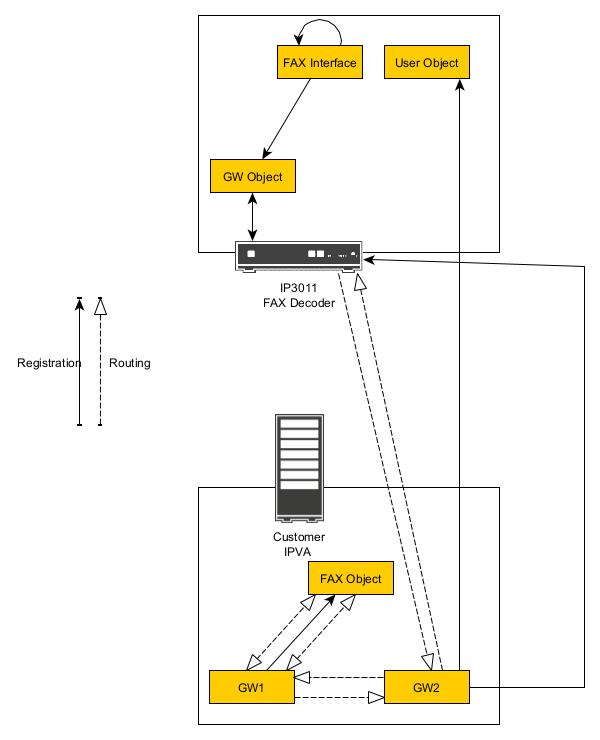
This article is useful for Cloud providers. An IPVA doesn't have DSPs, because of this you may want your Cloud Customers to use a physical device for coding/decoding Fax. In this article I will show you how you can configure a PBX and share external Fax resources for your Cloud Devices.
Features
- Easy way to share FAX resources from a physical Device
- Cloud Customers will have access to Audiofax (i.e. G.711A) Fax
Requirements
- Innovaphone PBX
- The FAX Interface registration requires one Port and one FAX License on the FAX Gateway.
- Every PBX registration requires one Port License on the FAX Gateway.
- The FAX Object on the Customer PBX requires one Port License.
Pre-Configuration of the FAX Gateway
PBX Configuration
- Go to PBX/Config and Choose "Master" as PBX Mode
- Enter the following parameters: System Name, PBX Name, Reverse Proxy Addresses
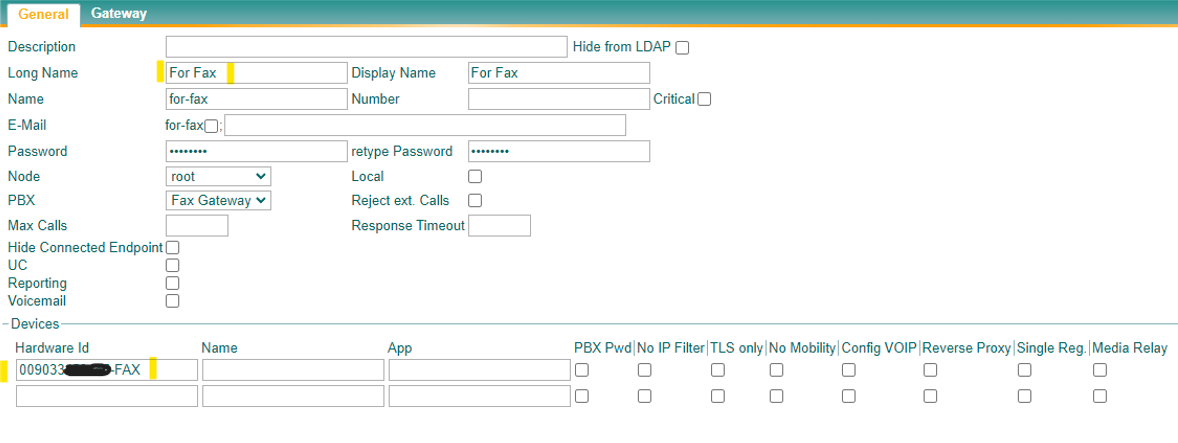
- Important: Enter "For Fax" in "Route Root-Node External Calls to", we will create this Object later, you can also name it something else but it's important that the Long Name matches
Setting up the FAX Registration and the Fax Interface
- First, go to Gateway/Interfaces
- Now open the FAX Interface and enter following parameters: Name, Protocol: H.323/TLS, Gatekeeper Address: 127.0.0.1
- Tick following checkboxes below: Enable T.38, Audio FAX Support
- Now, register the FAX Interface to a Gateway Object
- Head to the Section PBX/Objects
- Create a new "Gateway" Object
- Enter the following parameters: Long Name (this name is important for the step above in "PBX Configuration"), Display Name, Name, Password (the matching Password for the FAX Interface)
- As Hardware ID you enter your FAX Gateway "Mac Address-Interface", e.g. "12ABC7426CDD-FAX"
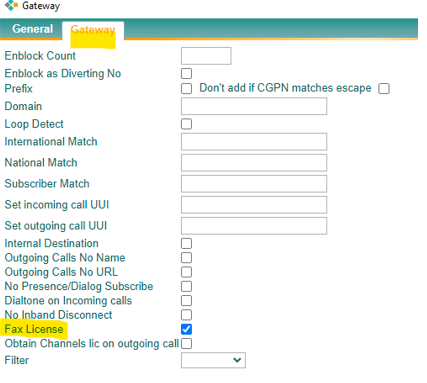
- Make sure to tick "Fax License" in the "Gateway" section
Configuration of the Cloud customers PBX
Configure the first Gateway Interface
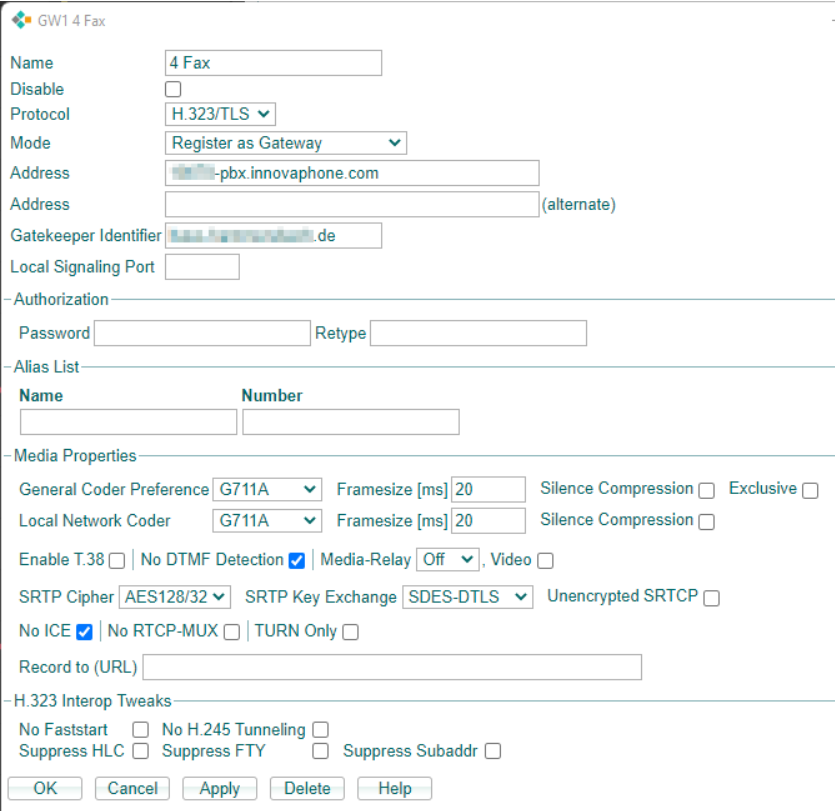
- 1. First, open the first Gateway interface on Gateway/GK/GW1
- 2. Enter the following parameters (Name: "4 Fax"; Protocol: "H323/TLS"; Mode: "Register as Gateway"; Adress "DNS name of the Cloud PBX"; Gatekeeper Identifier: "######.com")
- 3. Tick following parameters (Enable T.38: checked; Audio FAX Support: checked)
Creating the FAX Object and registering it to your recently configured Gateway Interface
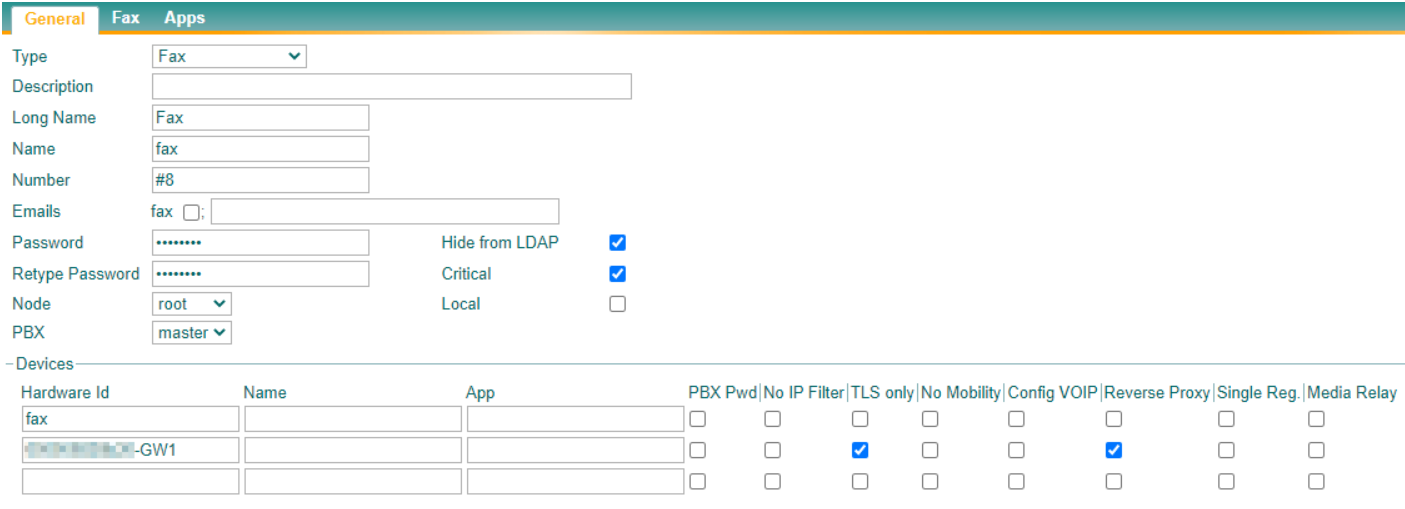
- Open PBX/Objects and create a new "Fax Object"
- Enter the following parameters (Long Name: "Fax"; Name: "Fax"; Hide from LDAP "checked"; Critical "checked")
- Also edit the Hardware ID of the Fax object to following format: "IPVAMAC-Interface", for example: "0A4C8BF9DD21-GW1"
- "TLS Only" and "Reverse Proxy" must be checked
- Enter the right innovaphone FAX URL in section "Fax"
Configuration and registering of the second Gateway Interface
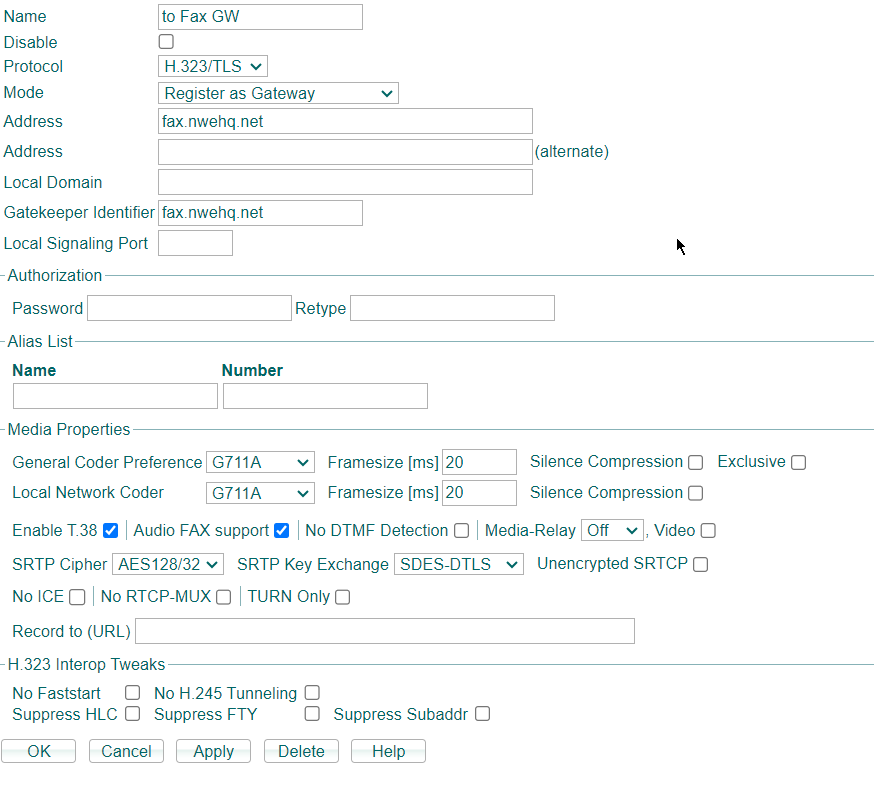
- First, open the second Gateway interface on Gateway/GK/GW2
- Enter the following parameters (Name: "to Fax GW"; Protocol: H323/TLS; Mode: Register as Gateway; Address: "Your Gateway address"; GK-Identifier: "Your Gatekeeper address";)
- Tick the following parameters: (Enable T.38: checked; Audio FAX Support: checked)
Configuration of two routes
First route
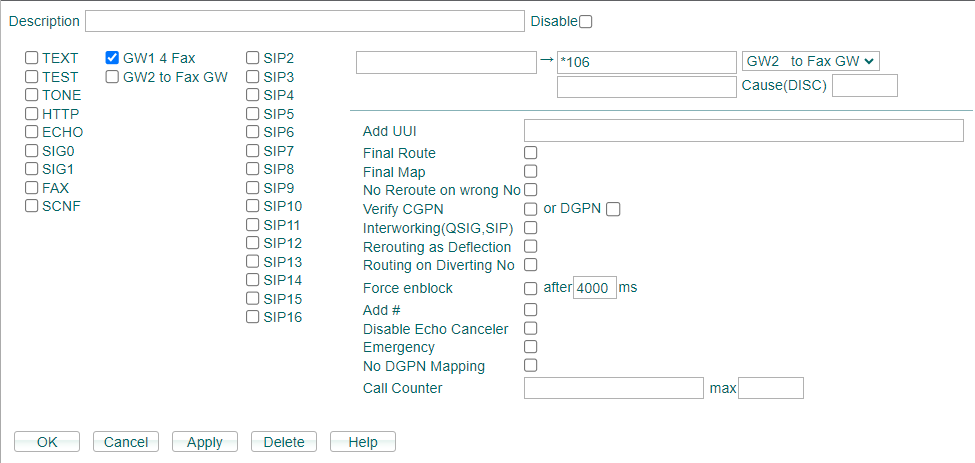
- At first, open the route Tables under /Gateway/Routes/
- Create a new Route by pressing the Arrow next to the "From" Table header
- For the first route from GW1->GW2 you will need a prefix in the following format: "*" + "INSTANCENUMBER" e.g. "*XXXXX". (Without quotes), you can also use the Customernumber but this Number must be identical to the "name" of the Fax Gateway User (which we will create later)
- Tick the "GW1 4Fax" check
- Select "GW2 to FAX GW" at the Dropdown menu on the right
Second route
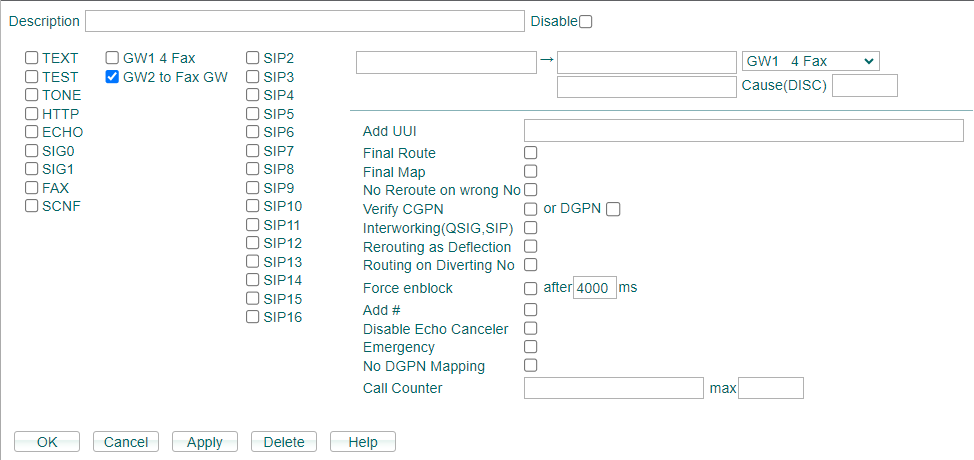
- Create a new Route by pressing the Arrow next to the "From" Table header
- For the second route tick the Checkbox "GW2 to FAX GW" and in the same Dropdown menu as before select "GW1 4Fax".
- The routes should then look like this:
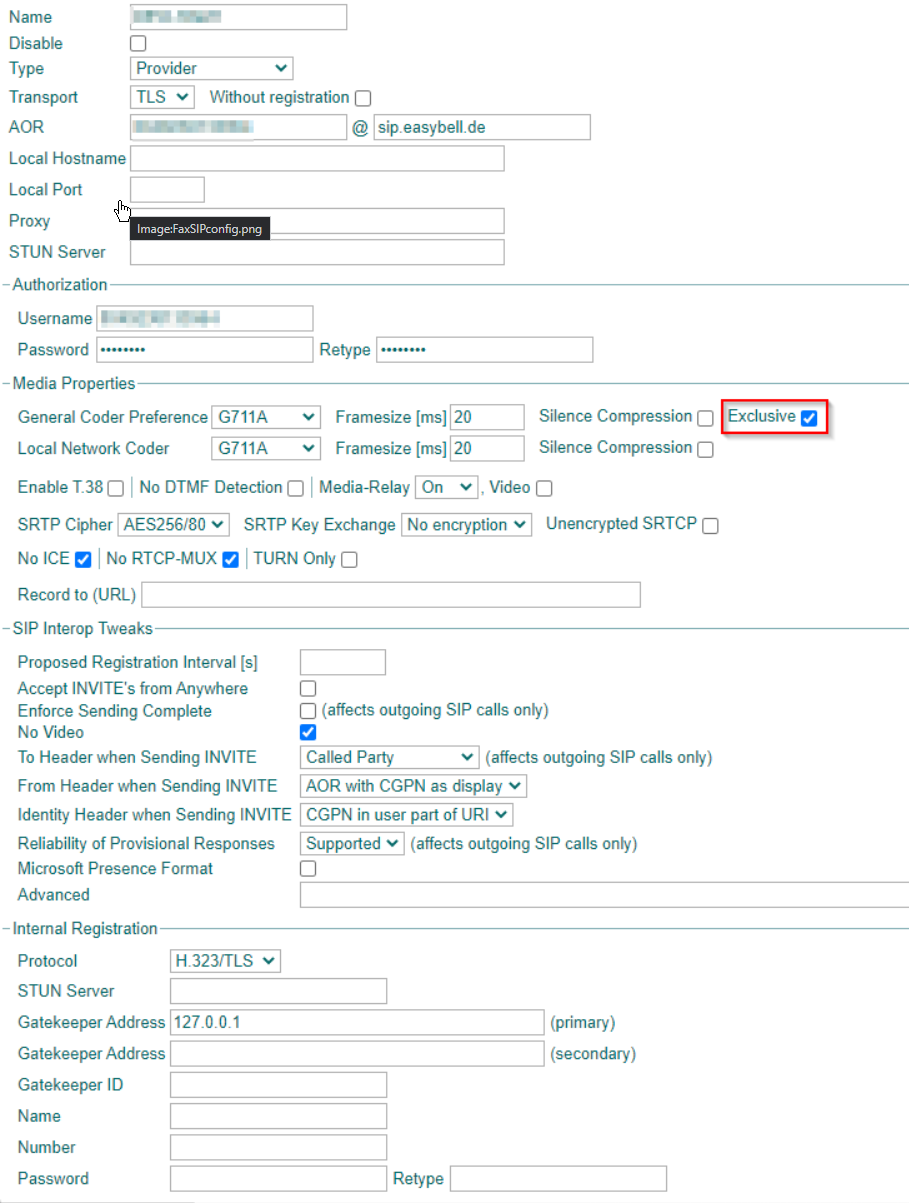
Adjustment of the SIP-Trunk
- First, open the Customer PBX
- Open the right SIP-Trunk at Gateway/SIP
- Check if the "Exclusive" check is ticked, If not then tick this check.
Configuration on your Fax Gateway for all Customers
- Open PBX/Objects
- Create a new "User" Object
- Edit following parameters:
- Description: "Customer Domain"
- Long Name: Instancenumber/customernumber
- Display Name: Instancenumber/customernumber
- Name: Instancenumber/customernumber
- Password: Choose a secure Password
- Hardware-ID: "IPVAMAC-GW2" e.g. "ABCDEF012345-GW2"
- Reverse-Proxy: checked
- If you have configured it successfully, your Users should be shown in the "Registration" page at PBX/Registrations
- Repeat this step with every new Cloud customer that you want to share FAX resources with.
Verification
Sending a FAX to another User through the FAX App
Open the FAX App and send a Fax. Address your FAX App Number + extension of User e.g. your FAX App has the Number "70" and your User has the Extension "4" -> then send a Fax to the Number "704"
