Reference13r2:Concept App Service Queues
The Queues App Service can be installed on an innovaphone App Platform and be used to manage calls and waiting queues with myApps.
Applies To
- innovaphone PBX from version 13r2final
Requirements
- innovaphone PBX
- innovaphone Application Platform
- Firmware V13r2xx
- Users Admin App
- Profile App
- Calllist App
- Calllist API
- RCC
- The Waiting Queues already configured on the PBX
Apps
innovaphone-switchboard
 This is an App, where the user can manage the calls received using the RCC API. The calls displayed will be the ones which destination is the own user or one of the waiting queues that are being monitorized. Calls can also be started from the input field or selecting one user from the Busy Lamp Field or the users search.
Parameters:
- Websocket
- Admin
- to be able to edit the User object to monitorize or unmonitorized a waiting queue
- TableUsers
- to be able to replicate the users for the BLF
- PbxApi
- to edit the presence information
- RCC
- to use the RCC API to manage the calls
innovaphone-switchboard-admin
 This is an App, where an administrator can manage the users rights and can assign waiting queues to users.
The rights that can be set are:
- Edit waiting queues
- Edit presence
- Edit call diversions and mobility
Parameters:
- Websocket
- Admin
- to be able to assign the waiting queue groups to the user
- TableUsers
- to be able to replicate the users from the PBX
PBX Manager Plugins
Queues
With the Queues plugin the Switchboard App and Switchboard Admin App Objects can be created, edited and deleted on the PBX.
Configuration
- Download the Queues App via App Store.
- Install the App on the App Platform Manager.
- Create a instance for the Queues App on the App Platform Manager.
- Create a new Switchboard App Object with the PBX Manager Plugin.
- Assign the app to authorized users (who will be allowed to open the app) using a config template or directly on the user object.
- Configure waiting queues on the PBX if needed or use the Switchboard Admin App to assign the waiting queues and manage the users rights.
- Open the Switchboard App and select a device on the hamburger menu.
Switchboard App - User interface
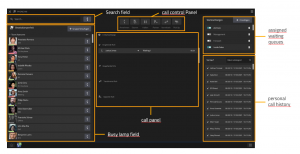
The user interface is divided in 3 pannels:
- Left pannel : Busy Lamp Field and users search
- Central pannel: Calls
- Right pannel: Waiting queues and calls history
There are also a hamburger menu, where configuration settings can be edited.
Left pannel
Busy Lamp Field
The BLF is displayed on the left pannel. There all the users replicated from the PBX are displayed and it can be undocked and displayed on another window. Information displayed by user:
- Profile picture
- Presence
- Common name
- Phone number
Actions allowed:
- Select a user to Transfer a call by clicking on it
- Start a call by using the phone button
- Start a chat
- Send an email
- Send a "Call me back" notification by email
- Display contact information
- Add the user to a BLF group
Users search
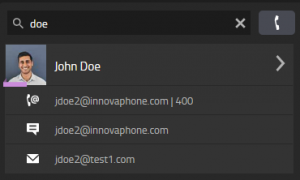
The users search (Search API) can be done with the input field. This input field can also be used to directly dial using the phone button. Information displayed by user:
- Profile picture
- Presence
- Common name
Actions allowed:
- Select a user to Transfer a call by clicking on it
- Start a chat
- Start a call
- Send an email
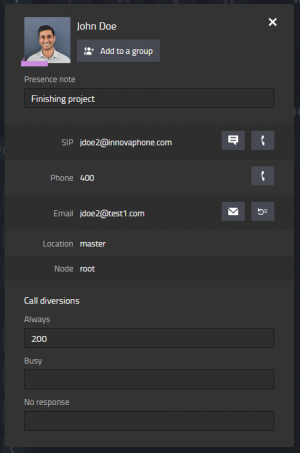
The user details can also be expanded by clicking on the arrow icon. Data displayed (read only) for the user:
- Profile picture
- Common name
- SIP
- Phone number
- PBX
- Node
Data displayed that can also be edited for the user (if the user has the appropriate rights):
- Presence note
- Presence
- Call diversions
- Mobility
Actions allowed:
- Start a chat
- Start a call (by SIP and phone number)
- Send an email
- Send a "Call me back" notification by email
- Add the user to a BLF group
Center pannel
On the center pannel the calls are displayed.
Calls
The calls are divided in 5 sections: in the waiting queue, incoming, outgoing, parked and transferred.
Depending on the call state, different actions are allowed to manage the calls:
- Connect/Disconnect a call
- Mute/Unmute a call
- Hold/Release a call
- Park/Unpark a call
- Transfer a call to a user or connect 2 calls
- Pick up a transferred call or a call from the waiting queue
Right pannel
On the right pannel the waiting queues and the calls history are displayed.
Waiting Queues
On the right pannel the waiting queues are displayed. They can be added by clicking on "Add waiting queue" (only displayed if the user has the appropriate right), which will automatically add the user to the given group. The calls will be displayed on the calls section and from there they can be picked up or transferred to an user.
Calls history
On this pannel also the calls history is displayed, which is received from the Call List API.
Information displayed on entry:
- Call flow
- Call information (source/destination, date and duration)
Actions allowed:
- Start a call
- Start a chat
- Send an email
- Send a "Call me back" notification by email
- Display contact information
- Add the user to a BLF group
On the hamburger menu the shortcuts can be edited and the size of the users items from the BLF can be customized.
Edit shortcuts
To edit a shortcut, the shortcut must be selected and then the desired key pressed. Afterwards it has to be clicked again to finish the editing.
Size of the user items (BLF)
There are 2 different size:
- Icons only: only the profile picture, presence and common name will be displayed.
- Detailed large: the phone number and the call button are displayed too.
Select monitorized device
If a device is selected, all the calls from that device will be monitorized by the app.
Known issues
Related Articles
- SDK Integration (if the content is available)


