Reference9:Concept Operator
Applies To
This information applies to
- innovaphone Operator V9
The article's intent is to serve as the Operator 9 information center. The addressed audience is administrators, partners, resellers.
Requirements
- at least Windows 7 (and higher) - Windows Vista & Windows XP may work
- Windows Terminal Server
- 1.5 GHz CPU (32-bit, or 64-bit), Dual-Core is recommended
- 2 GB of RAM
- DirectX 9 capable graphics adapter
- .NET Framework 3.5
More Information
The innovaphone Operator 9 succeeds the innovaphone Operator 8.
- A busy lamp field(busy field, BLF) is the main addendum to the application.
- Condensed user information: Display Name, Number, PBX
- An entry's context menu allows to reveal detailed user informations for an entry
- Colored User status: available(registered & not engaged in a call), engaged in a call, not registered
- Symbolized presence status: presence activity, presence note(as tooltip)
- Display options for the BLF window
- within the main window
- within a separate window
- within a separate window on a 2nd monitor
- Two different entry layouts can be selected in three different sizes(small, medium, large)
- Freely placeable labels
- Simplified usage
- Drag&Drop or keyboard-only usage possible
- main functionalities (accept call, initiate call) just with ENTER
- direct dialing without search / just use number
- Blind transfer eased - just use '+'
- Search
- Full text search
- Fast, now the application default
- Targets large-scale installations
- Indexing: Long Name, Name, Number, Groups, PBX/Location
- Ldap search
- Support for Active Directory's attributes "department", "description"
- "department" offers button to search for alternative destinations within a department
- Pbx search
- "group" offers button to search for alternative destinations within a group
- Email integration, send notification on missed calls
- Individual PBX can be excluded/barred from the operator's search view
- Full text search
- Call Switching
- Symbol indicating external calls
- Park+Wait functionality for blind-transferred calls towards busy internal destinations.
- Allows for operator procedure: The extension is busy. Do you want to wait?..
- Blinking indicator for parked and muted calls
- Outgoing calls can be placed without paying attention to call diversions
- Call diversions can be manipulated from operator (if access right is granted)
- Call journal with simplified and detailed representation (successful, missed, transferred, etc.). Cyclic storage of max. 300 calls.
- Miscellaneous
- Alternative layout
- Nightswitch supported in GUI
- Secured access (HTTPS/TLS)
- Call context for currently active incoming call.
Download
- The software can be downloaded from the apps section: http://download.innovaphone.com/ice/9.00/#apps
Application History
The hotfix history can be found in the operator 9 release notes
Full Text Index
One shortcoming of the predecessor application was the confinement to search for PBX users either by name or by long name only. The Operator 9 therefore offers the new search capability by full text index.
The full text index was implemented application-local. That is, that index is not going to be maintained by the PBX, but by the Operator application itself in-RAM. Thus, making full text queries lightning fast.
The full text indexed is supposed to scale well within large installations. In contrast the busy lamp field is expected to be operable with up to ~300 pbx users.
Administrators must keep control of what is going to be fed into the index. This task must be accomplished by configuration of regular group memberships within a PBX. As a quick exemplary rule of thumb:
- Make the operator's PBX object an active member of a group e.g. "soap". Make all other user objects that shall be indexed (non-active) members of the same group "soap".
What is indexed?
- Name
- Long Name
- Display Name
- Number
- Node number + number
- Groups
- PBX
Busy-Field
Layout
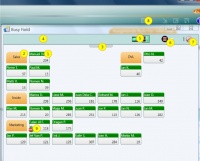
A screenshot featuring some numbered screen elements, explains the BLF's makeup.
- 1)BLF entry
- 2)BLF label
- 3)Thumb for menu panel
- 4)Menu panel(slid out)
- 5)Selector for BLF display as separate window or within main window
- 6)Selector for the layout of BLF entries
- 7)Erase button for selected BLF entries/labels
- 8)Button to initially show the BLF
- 9)Example of a BLF entry with a presence symbol
Arranging Entries
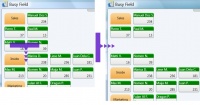
- Create a free line
- Select 2x entries
- Drag the selected entries onto some other entries
- All entries within the target line and all lines below are going to be moved downwards.
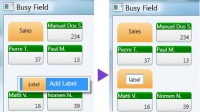
- Adding a label
- Right-Click into a free location
- A context menu appears - select Add Label
- A label is going to be placed.
- Left-Click into the label, in order to edit the label's text.
- Changing the position of a single entry
- Left-Click the entry and keep the left mouse button pressed.
- Drag the entry into its new position.
- Drop the entry by releasing the mouse button.
In case of an entry already occupying the new position, the two entries are going to exchange their positions.
- Changing the position of multiple entries
- Left-Click into a free position and keep the left mouse button pressed.
- Open up a selection rectangle. Entries intersecting with the rectangle are going to be selected.
- Release the left mouse button.
- Left-Click onto one of the selected entries and keep the left mouse button pressed.
- Drag the entries into their new position.
- Drop the entries by releasing the mouse button.
In case of one or more entries already occupying the new position, the entire lines containing those entries and the lines below are going to be moved downwards.
Configuration
This section hilights a few key concepts of the Operator configuration. A few prerequisites must be considered.
- The operator's phone must be configured, such that call waiting is enabled. This is important, because of situations whith more than one call being active at the phone. Some such scenarios may be obvious: operator user is engaged in a call while an internal caller is trying to directly call through to the operator's desk. Some such scenarios aren't obvious. For instance the operation to unpark a call may often coincide with a call just being signalled by a waiting queue towards the operator's phone.
- Within the PBX the value PBX/Configuration/General/Recall Timeout should be set to a value greater than 0 seconds. Otherwise the call list Transferred Calls will remain empty and unaccepted blind transferred calls will never fallback to the operator.
General
The application is going to establish at least two Soap sessions. One for the operator user's identity. And one for the query user's identity.
The first session is needed in order to receive call informations for the operator user's phone. This session will be established only at the PBX configured under IP Address.
The second session is needed to receive user informations for all PBX user objects that shall be full text indexed. It is also needed for all PBX user objects that shall appear within the busy field. The Operator is going to establish this session type at every known PBX.
- Query User As a rule of thumb
- Create a user object _TAPI_ (or SOAP) on all PBXs within the network of PBXs (if Slaves are replicated from a Master, just create this user at Master without assigning it to a PBX).
- The user _TAPI_ must be an active member of a group tapi(or soap).
- All other users (also the ones at Slave PBXes) that shall be full text indexed must become a non-active member in the group tapi.
- In case of slave scenarios, the slavePBX object at Master itself needs to be part of that group. Note: This will not work when having "sub-slaves" being registered to slaves itself.
- A dedicated PBX as search base can be selected via the drop down menu in the search area. Typing "." in the search field opens a pop-up field containing all PBXes.
- Create a user object _TAPI_ (or SOAP) on all PBXs within the network of PBXs (if Slaves are replicated from a Master, just create this user at Master without assigning it to a PBX).
WQ (Waiting Queue)
A WQ teams-up with an operator's phone by a group membership.
- A waiting queue wq-reception may exist.
- The WQ is an active member of a group reception.
- The operator user is a non-active member of the group reception.
Calls for the WQ are from now on also signalled towards the operator.
Nightswitch
The nightswitch configuration is just a front-end for the PBX Boolean object. Its actual purpose is to provide a means for a diversion. A diversion that leads callers into an out-of-business-hour announcement. Here is the idea behind:
- A waiting queue wq-reception may exist and is configured under WQ.
- Enter the number (55 in this example) towards the out-of-business-hour announcement under Diversion. It may be the number of a dedicated voicemail object.
- Configure the time definitions for the regular business hours.
- 1st: Start 9:00, End 17:00, Mon-Fri
- 2nd: Start 0:00, End 0:00, Sat-Sun
- As Mode select Automatic
Note: The automatic mode may be overridden by selecting Manual On or Manual Off as mode. Manual On causes the CFU (see below) to become active immediately and permanently.
What happens behind the curtain is as follows:
- A new boolean object wq-reception-nightswitch will be created automatically by the Operator app'.
- The boolean object is configured with the time definitions from above.
- A CFU is configured at the WQ wq-reception.
- The CFU will have the number 55 from above as destination.
- The CFU references the Boolean object wq-reception-nightswitch from above.
The mode selector for the boolean object will be available for the user. Watch out for the WQ calls list.
Miscellaneous
Configuration of the Phone's Conference Facility (Recording-/Greeting Function)
Every innovaphone telephone offers a tiny conference function. Besides its apparent use, the conference function may be utilized to realize audio recording. The corresponding configuration page can be found within the phone's web UI under Configuration/RegistrationX/Recording.
Within the context of the innovaphone Operator it may also be used to provide the means for a personal audio greeting. A greeting that is about to played right after an incoming call was connected. For each incoming call over the course of a working-day.
Both scenarios require a voicemail script.
Note: Only one of the two possibilities can be configured. Either the audio recording or the greeting function. The two cannot be used concurrently.
The following two sub-sections are going to explain the required configuration steps for both scenarios.
Greeting Function
A few assumptions are taken into consideration.
- The PBX box offers a CF-card that is up and running.
- A voicemail object is going to listen on number 77.
Deploy the following voicemail script (audio menu in english)
- download Media:Greeting.zip
- copy onto a CF-card underneath a directory greeting
At the PBX create a new voicemail object
- Proceed to PBX/Objects/New Voicemail
- Enter Long Name, Name, Number as eg.: vm-greet, vm-greet, 77
- Enter the Script URL as http://127.0.0.1/drive/CF0/greeting/greet.xml
Configure the recording function at the operator user's telephone
- Proceed to Configuration/RegistrationX/Recording
- Select manual as Mode
- Enter 77 as Number
Within the innovaphone Operator proceed to File/Configuration/Misc.
- Assignment of the Recording-function: Choose Greeting
- Destination Number: Enter the number (77 in this example) that was configured in the phone's web UI underneath Configuration/RegistrationX/Recording.
The audio greeting will start automatically for incoming external calls. The decision which calls are treated as external calls is based on the configuration of File/Configuration/LDAP Location/External Line (Mostly 0). A button will be displayed on-top of the list of incoming calls, if an audio greeting is played. The button allows to stop the greeting.
The audio greeting won't be started for:
- a fallback call, i.e. a call that was blind-transferred, but never connected.
- a call that was unparked
- a call that was refetched from the list of blind-transferred calls
- internal calls
In order to record a new audio greeting
- Just dial the number of the voicemail object (77 in this example).
- The script will prompt for a key press on the telephone
- Record the new greeting and stop the recording with another key press on the telephone
- You will be prompted with the new greeting
- End the call (on-hook) - the new greeting will be active from now on.
Recording Function
This functionality is actually a reuse of a solution being available since firmware version 6. Please read through the following article:
All that's needed to be configured within the innovaphone Operator can be found underneath File/Configuration/Misc..
- Assignment of the Recording-function: Choose Recording
- Destination Number: Enter the number that was configured in the phone's web UI underneath Configuration/RegistrationX/Recording.
A recording button will then be offered on-top of the list of incoming calls. The button allows to start/stop recording and serves as an indicator lamp.
External LDAP-database access
innovaphone Operator offers possibility to connect external databases for adress search via LDAP.
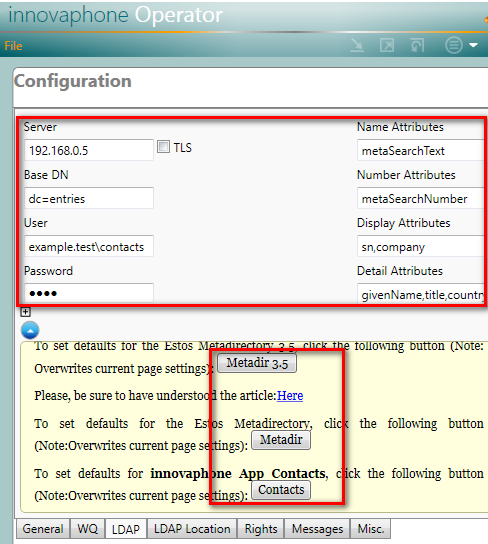
Setup is done at File/Configuration tab 'LDAP' by filling appropriate fields for connection data and ldap attributes.
The questionmark-icon opens a help page with some predefined LDAP-profiles for
- innovaphone Contacts (available from operator version 90236)
- Estos MetaDir
Use radio buttons to fill fields. Connection specific data like server, user and password need to be filled manually.
Special settings for LDAP Profile: Estos MetaDirectory 3.5
This article section will explain how to configure the MetaDirectory to enable full-text search by means of a single LDAP attribue.
In a standard configuration the search within the Operator application is performed according the edit field Configuration/LDAP/Name Attributes. The list of name attributes defaulted previously to company,sn,givenName and could be set by means of a profile button within the LDAP inline-help.
A second profile button Estos MetaDirectory 3.5 was added into the inline-help. If that button was clicked, it sets the list of name attributes to a single attribute searchContact. The searchContact attribute is kind of a meta attribute, that doesn't physically exist within the LDAP database. It rather serves as a vehicle realizing a full-text query processing whereby multiple physical attributes will be considered by the MetaDirectory.
Which physical attributes are getting queried is subject of an administrative task. As the following screenshot illustrates, the MetaDirectoy's Search Assistant is the place where an administrator controls the behaviour of the full-text search triggered by the searchContact attribute. The search assistant allows to check multiple database fields within the column Contact search. All database fields enabled are going to be considered for the searchContact-related full-text search.

As can be seen right next to the column Contact search resides the column Number search. The same principle applies. However, it is not targeting the attribute searchContact, but the attribute searchNumber. This is why the edit field Configuration/LDAP/Number Attributes will be set to searchNumber when clicking the profile button mentioned above.
- Benefits
- Short and concise LDAP filters are sent towards the MetaDirectory
- Indexed search increases overall query performance
Configuration, Specialties
This section covers somewhat advanced configuration aspects.
Suppress Call Display
A privacy list may be administrated manually within the operator's configuration file. The purpose is to provide a means for privacy, such that call details won't be visible from within the application.
- Click on the button File/Configuration/Misc/AppData.
- A Windows Explorer is going to come up, showing the contents of C:\Users\<your user directory>\AppData\Roaming\innovaphone AG\innovaphone Operator\.
- Terminate the operator.
- Open swconfig.xml witin a text editor
- Enter the list as in the following excerpt (name=".." corresponds to the user's short name)
<?xml version="1.0" encoding="UTF-8"?>
<switchboard>
    <config>
	...
	<privacy>
	   <hide name="mst"/>
	</privacy>
	...
    </config>
</switchboard>- It's also possible to add all objects to a privacy list by adapting the config part as below:
<?xml version="1.0" encoding="UTF-8"?>
<switchboard>
    <config>
	...
	<privacy>
	   <hide hide-all="true"/>
	</privacy>
	...
    </config>
</switchboard>- Restart the app'.
Suppress Presence Display
(From on hotifx16)A privacy list may be administrated manually within the operator's configuration file. The purpose is to provide a means for privacy, such that presence details won't be visible from within the application.
- Click on the button File/Configuration/Misc/AppData.
- A Windows Explorer is going to come up, showing the contents of C:\Users\<your user directory>\AppData\Roaming\innovaphone AG\innovaphone Operator\.
- Terminate the operator.
- Open swconfig.xml witin a text editor
- Enter the list as in the following excerpt (name=".." corresponds to the user's short name)
<?xml version="1.0" encoding="UTF-8"?>
<switchboard>
    <config>
	...
	<privacy>
	   <hide-presence name="mst"/>
	</privacy>
	...
    </config>
</switchboard>- It's also possible to add all objects to a privacy list by adapting the config part as below:
<?xml version="1.0" encoding="UTF-8"?>
<switchboard>
    <config>
	...
	<privacy>
	   <hide-presence hide-all="true"/>
	</privacy>
	...
    </config>
</switchboard>- Restart the app'.
Suppress PBX search
A special configuration option within the configsw.xml file deactivates display of the PBX search. Valid for Operator version 9.0211 onwards.
- Terminate the operator.
- Open swconfig.xml witin a text editor
- Add the new command line as in the following excerpt
<?xml version="1.0" encoding="UTF-8"?>
<switchboard>
  <config>
    ...
    <hide-search>pbx</hide-search>
    ...
  </config>
</switchboard>- store swconfig.xml
- Restart the application.
Unattended Installation
The following command line for the MS Installer program msiexec[1] has been reported to be working with the All Users installation setting.
msiexec /i innovaphone.operator.setup.msi /passive /l* "Logdatei.txt" INSTALLDIR="C:\Program Files\innovaphone AG\innovaphone® Operator\" ALLUSERS=1
Start With A Disctinct UI Culture
The system culture controls the UI culture. The Operator appears in english on an english OS.
To force a different culture
- Win Explorer Browse to C:\Program Files (x86)\innovaphone AG\innovaphone® Operator
- Right-Click on innovaphone.operator
- A context menu opens. Select Send To Desktop As Shortcut.
- Locate the newly created shortcut/link on the desktop and click on Properties.
- Modify the target from
"C:\Program Files (x86)\innovaphone AG\innovaphone® Operator\innovaphone.operator.exe"
Into
"C:\Program Files (x86)\innovaphone AG\innovaphone® Operator\innovaphone.operator.exe" /culture de-DE
Possible cultures are
- english en-GB
- czech cs-CZ
- german de-DE
- italian it-IT
- dutch nl-NL
- french fr-FR
- norwegian nb-NO
- polish pl-PL
- swedish se-SE
- spanish es-ES
- russian ru-RU
An alternative to the shortcut object vehicle is configuration file swconfig.xml. The format is as follows
<?xml version="1.0" encoding="UTF-8"?>
<switchboard>
    <config>
	...
        <culture>de-DE</culture>
	...
    </config>
</switchboard>
swconfig.xml into /AppData/Local/
The default directory for configuration data(swconfig.xml) is C:\Users\<user>\AppData\Roaming\innovaphone AG\innovaphone Operator.
To keep the configuration not roaming, but PC-local, the operator application can be forced to look into Local instead:
- Click the button File/Configuration/Misc/AppData (Datei/Konfiguration/Diverses/AppData)
- WinExplore starts and displays C:\Users\<user>\AppData\Roaming\innovaphone AG\innovaphone Operator.
- Terminate the operator application
- Within the WinExplorer move to C:\Users\<user>\AppData\Local\
- Under 'Local' create the directory innovaphone AG
- Under 'innovaphone AG' create the directory innovaphone Operator
- Copy swconfig.xml from C:\Users\<user>\AppData\Roaming\innovaphone AG\innovaphone Operator into the new location C:\Users\<user>\AppData\Local\innovaphone AG\innovaphone Operator
When starting the operator it is now referencing swconfig.xml from the newly created directory C:\Users\<user>\AppData\Local\innovaphone AG\innovaphone Operator.
Hosted PBX (Slave with license only)
If you connect to a slave with license only activated you also have to activate the configuration Configuration :: Various :: Do not search at the master. Otherwise the Opeartor will search or try configuration on the license master which will not work.
Addressing Large Scale Installations
One of the lengthy discussions throughout the product design phase concerned large installations. Say, installations with more than 300 pbx users, up to a few thousand of them.
To make a long story short - eventually it turned out the main gimmick, the new busy lamp field, wasn't suitable. With a BLF the need for a search function would have emerged which was deemed contradictory to the intended purpose of a BLF.
Hence, the existing PBX search function received a major overhaul by adding the new Full Text Index. The goal of the full text index was to provide a search function being perceived as fast and superior to the one of the predecessor application. The BLF was left as-is without an extra search capability.
Finally, a checklist aiding planning of large scale installations
- Make the operator an active member of a group e.g. "soap".
- Make all other pbx users, that shall be searchable non-active members of the same group "soap".
- Ensure the Operator 9's PBX search is configured for Full Text/Volltext
- On the PC running the Operator 9 watch out for resource consumption.
- A countermeasure against too much of memory consumption is to completely disable the BLF[4]. See the checkmark Configuration/Misc/BLF Deactivate.
Troubleshooting
How to obtain logs with Operator Application
When an error occurs the Operator Application will give an alert on status bar.
Click "save trace" button to retrieve the log:
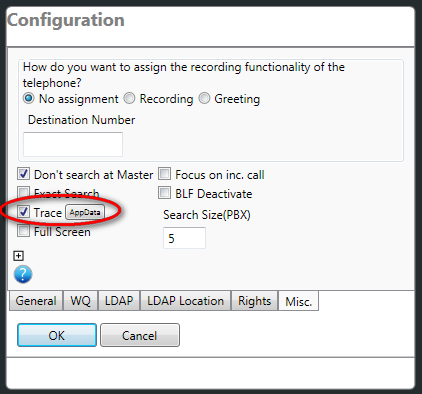
Permanent tracing can be enabled with the "trace" option at File/Configuration/Misc
Known Issues
Application Won't Start On Windows XP
Symptom
The application doesn't start properly on Windows XP. An error text file is going to be generated comprising the following content:
31.07.2009 16:40:46,innovaphone Operator,8.0.38.0

OS: Microsoft Windows NT 5.1.2600 Service Pack 2
CLR:    2.0.50727.1433

An internal error occurred

Alarms:
Exception, date=31.07.2009 16:40:45, info=unhandled exception
================================================================
'System.Windows.Controls.ToolTip' value cannot be assigned to property 'Value' of object 'System.Windows.Setter'.
'System.Windows.Controls.ToolTip' is not a valid value for 'Setter.Value';
values derived from Visual or ContentElement are not supported.
Error at object 'System.Windows.Controls.ToolTip' in markup file 'operator;component/activecallsincontrol.xaml'.
at System.Windows.Markup.XamlParseException.ThrowException(String message, Exception innerException, Int32 lineNumber, Int32 linePosition, Uri baseUri, XamlObjectIds currentXamlObjectIds, XamlObjectIds contextXamlObjectIds, Type objectType)
...
Solution
Have a look into what Windows Update offers as optional components. If there's a cumulative update for .NET 2.0/3.0/3.5 you're asked to install said update (addendum: The update may also show up as .NET 3.5 SP1[5]). That update is going to upgrade the CLR onto the required version. Please note that Service Pack 3 is mandatory.
Remarks
The original .Net Common Language Runtime (CLR) is not suitable and too old.
Blind-Transferred Calls Don't Show Up in List of "Transferred Calls"
Symptom
Calls that were blind-transferred by the Operator application may probably not appear in the respective call list.
Solution
- At the PBX browse to PBX/Config/General - Field "Recall Timeout"
- Enter something useful in seconds (30 or 60)
Remarks
A blind-transferred call is going to fall-back after that amount of seconds if not accepted in-between.
Blind-Transferred Calls Don't Fall Back
Symptom
Calls that were blind-transferred by the Operator application don't fall-back to the operator.
Solution
- The cause and solution are the same as in Blind-Transferred Calls Don't Show Up in List of "Transferred Calls"
Operator Freezes On Startup
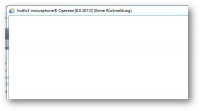
The operator application was reported to get stuck on startup. The user interface turned white and did not respond to any input.
Symptom
The application window looks as follows
.
Solution
This symptom can occur due to a corruption of the framework's font cache data file. Try the workaround:
- Start/Run of services.msc
- Stop the service Windows Presentation Foundation Font Cache 3.0.0.0/Windows Presentation Foundation-Schriftartcache 3.0.0.0
- Now delete the system file FontCache3.0.0.0.dat
The file likely resides under Windows XP in
--
%systemdrive%\Documents and Settings\LocalService\Local Settings\Application Data

The file likely resides under Windows Vista/7 in
--
%windir%\ServiceProfiles\LocalService\AppData\Local
- Reboot the machine
Operator Displays Corrupted Fonts
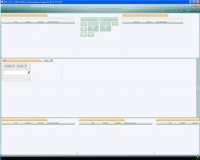
After 2 years of service the operator application was reported to suddenly display corrupted fonts.
Symptom
The application window looks as follows
.
Solution
This symptom occurred due to a corruption of the framework's font cache data file. Try the workaround:
- Start/Run of services.msc
- Stop the service Windows Presentation Foundation Font Cache 3.0.0.0/Windows Presentation Foundation-Schriftartcache 3.0.0.0
- Now delete the system file FontCache3.0.0.0.dat
The file likely resides under Windows XP in
--
%systemdrive%\Documents and Settings\LocalService\Local Settings\Application Data

The file likely resides under Windows Vista/7 in
--
%windir%\ServiceProfiles\LocalService\AppData\Local
- Reboot the machine
Remarks
It is the same root cause as above in Operator Freezes On Startup.
Pickup Of WQ Calls
From on build 90112 the pickup of WQ calls is only possible for calls not in the CONNECT state.
- Activate the checkmark PBX/Objects/<WQ Object>/Queue/Operator connect for SOAP
- this setting guarantees that a WQ call is displayed as CONNECTed only in case of an operator actively talking to the caller party A.
Not Working: Focus on incoming call
The configuration dialog offers an auto-focus checkmark File/Configuration/Misc/Focus on inc. call. Customers reported that the application manages getting into the foreground. However, without catching the keyboard focus. A final click into the application was necessary.
Instead, the application icon within the taskbar starts flashing, indicating that further user interaction is required. The application window looks as follows
.
This behaviour is by-design and cannot be circumvented in a common manner. An MS statement[6] clarifies this OS-behaviour:
- An application cannot force a window to the foreground while the user is working with another window. Instead, Windows flashes the taskbar button of the window to notify the user.
The only reliable way to have the auto-focus feature working is by minimizing the application to the tray area. See the following menu button.
Auto-focusing from that window-state/application-state is supposed to be more reliable in getting the application into the foreground and assigning it the keyboard focus.
Application Crash: Methode nicht gefunden/Method Not Found
Symptom
The application crashes - e.g. when searching - and prompts an exception labeled Methode nicht gefunden/Method Not Found.
Exception, date=12.06.2013 16:35:52, info=unhandled exception
================================================================
Methode nicht gefunden: "System.Object[] innovaphone.idx.IFulltextIndex.Query(Char, System.String[])".
   bei switchboard.Index.FtIndexQueryVlv(Char equalityTerminator, String[] terms, Int32 pageSize, VlvCursor& cursor)
   bei switchboard.SearchPbxControl.PbxSearchFullTextExecute(String[] terms)
...
Solution
De-install and afterwards re-install the application(The configuration won't be deleted, i.e. will remain.).
Remarks
The root-cause is a DLL versioning problem. The problem may occur after an update-install took place. That is, where a newer Operator was installed over an older, existing installation.
Inbound Calls Appear Doubled
Symptom
The upper-left list of calls titled Incoming calls for.. displays a single call as two or even more calls.
Solution
Configure a distinct Hardware ID of one of the operator's phones under File/Configuration/General/Hardware ID
Remarks
The operator is likely to have multiple registrations active, originating from multiple endpoint devices. Only one of those devices shall be selected as the operator's active phone.
Multiple Operator Instances and Nightswitch settings
Symptom
Time settings will be empty or are not saved if more than one operator instance is used.
Installation on Windows 10
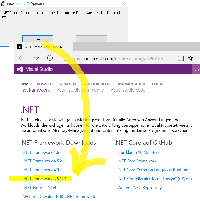
An installation was tested on Windows 10 (Microsoft Windows NT 6.2.9200.0). The installation stopped with a hint for a missing, but required .NET framework version 3.x. Just follow the offered download link for .NET 3.5 SP1 and retry the installation afterwards. This procedure provided a successful installation of the application.
Other reports from the field show that this error might be omitted by removing the PC from its domain before installation and put it back afterwards.
Application cannot Initialize at PBX
The application may fail to initialize at a PBX.
Symptom:
- The application repeatedly prompts a red-colored error message onto the status line
info='PBX Setup Completed:', error='Initialize failed!'
Cause:
- The Windows proxy settings interfere
Solution:
- Alter the proxy configuration within Internet Options/Connections(/LAN Settings). Those are accessible either via the Windows System Settings or from within the IE. Ensure that either the proxy-configuration is correct or deactivate it completely. It has been reported that the checkmark-activation of Internet Options/Connections/LAN-Settings/Bypass proxy server for local addresses also helped to solve the proxy-related problem.
Installation Operator failed
Exception, date=02.12.2015 13:20:44, info=unhandled exception
Cause:
Solution:
- Open the control panel from Windows and take a look into the logs. There should be a hint.
Contacts search: missing contacts on Full Text search
Symptom:
- Sometimes the operator cannot find existing contacts when performing a search, this only seems to happen when "Full Text" method is used.
Cause:
- This occurs when the _TAPI_ group has more than 2048 members.
Solution:
- To workaround this issue it is recommended to split the users over multiple PBXs (max 2000 per PBX) as suggested in section Addressing Large Scale Installations
Localization
The article Howto:Assist In Localization Of Operator Version 9 serves as a starting point, if you are interested in helping to localize the application.
Uninstall
When we uninstall the Operator application on Windows the user configuration it's not deleted from the Roaming folder, so if we wish to do an reinstallation of the application with a new config we must delete manually the configuration data (swconfig.xml) from the Roaming folder: C:\Users\<user>\AppData\Roaming\innovaphone AG\innovaphone Operator.
Notes
- ↑ Windows Installer, Command Line Options: http://msdn.microsoft.com/en-us/library/aa367988%28v=vs.85%29.aspx
- ↑ The PBX has a hard-coded limit of 2000 group members
- ↑ If more than 2000 users are required, those must be distributed on multiple PBXs with 2000 "soap" members each
- ↑ Calculate with 80KB per BLF entry
- ↑ .Net 3.5 SP1: http://www.microsoft.com/en-us/download/details.aspx?id=22
- ↑ Set Foreground Window: http://msdn.microsoft.com/en-us/library/ms633539%28VS.85%29.aspx
