Howto:ESENTA - MediaRunway - Partner App: Difference between revisions
Mediarunway (talk | contribs) m (→Prerequisites) |
Mediarunway (talk | contribs) |
||
| (15 intermediate revisions by the same user not shown) | |||
| Line 83: | Line 83: | ||
! App configuration/ preview !! Name plates on your ESENTA intercom system | ! App configuration/ preview !! Name plates on your ESENTA intercom system | ||
|- | |- | ||
| [[Image: | | [[Image:MediaRunway-ESENTA-admin.PNG|400px]] || [[Image:esenta_terminal_11_3.jpg|212px]] | ||
|} | |} | ||
| Line 118: | Line 118: | ||
[[File:MediaRunway-ESENTA-pbxAppObj-AppConfig.png|500px]] | [[File:MediaRunway-ESENTA-pbxAppObj-AppConfig.png|500px]] | ||
==Prerequisites== | ==Prerequisites== | ||
| Line 125: | Line 126: | ||
<!-- MR-TODO: Prerequisites needed for this app. See current MR apps as example and the prerequisites-template.md file. --> | <!-- MR-TODO: Prerequisites needed for this app. See current MR apps as example and the prerequisites-template.md file. --> | ||
<!-- None (at least knowledge about installing an App and adding the App Object for the users) --> | <!-- None (at least knowledge about installing an App and adding the App Object for the users) --> | ||
* an innovaphone PBX and Application Platform | * an innovaphone PBX and Application Platform with min. Firmware V14r1 | ||
* the ESENTA door intercom system | * the ESENTA door intercom system | ||
* valid licenses | * valid licenses | ||
* and ensure that the Application Platform and PBX can communicate with the door intercom system from ESENTA via the lan / wan (internet) | * and ensure that the Application Platform and PBX can communicate with the door intercom system from ESENTA via the lan / wan (internet) | ||
==Versions== | ==Versions== | ||
| Line 147: | Line 149: | ||
<!-- adjust tested innovaphone FW --> | <!-- adjust tested innovaphone FW --> | ||
** innovaphone IPVA V14r1 sr4 | ** innovaphone IPVA V14r1 sr4 | ||
==Configuration== | ==Configuration== | ||
| Line 158: | Line 161: | ||
<!-- MR-TODO: In case it needs to be configured, place text here. If the configuration part is more than a few sentences, go ahead and add a new section below ==Installation==. See current apps as example. --> | <!-- MR-TODO: In case it needs to be configured, place text here. If the configuration part is more than a few sentences, go ahead and add a new section below ==Installation==. See current apps as example. --> | ||
===ESENTA APP in myApps - configuration=== | |||
'''Pbx Configuration''' | |||
Open the ESENTA admin app in myApps and go to "Pbx Configuration", maybe click on the hamburger menu to see the navigation bar on the right side. | |||
[[Image:MediaRunway-ESENTA-AdminApp-PbxConfiguration.PNG|500px]] | |||
'''Device Configuration''' | |||
Use the Select field in the naviagtion on the right side to choose the automatic created first device or create a new one. | |||
After this click in the right navi on "Device" (done for the selected device) and fill out the form. | |||
The street and number will be shown when the screensaver activates on the ESENTA videodoorbell device. | |||
Authentication should be set to "Secret in header" in productive use from an ESENTA device. "No" could be used for easier troubleshooting, if an administrator want easy access the url from a pc. | |||
[[Image:MediaRunway-ESENTA-AdminApp-DeviceConfiguration.PNG|500px]] | |||
'''Nameplates Configuration''' | |||
First a preview is shown of the actual Nameplates configuraiton. Click on the pen in the row of the nameplate you want to change or in the upper right on "+ Add" to add another nameplate. | |||
[[Image: | [[Image:MediaRunway-ESENTA-admin.PNG|400px]] | ||
When clicked on the pen button or "+ Add", then you will see the next form. It is necessary to fill out both sip and num! | |||
[[Image:MediaRunway-ESENTA-AdminApp-NameplateConfiguration.PNG|500px]] | |||
===ESENTA SIAS - Door intercom configuration=== | |||
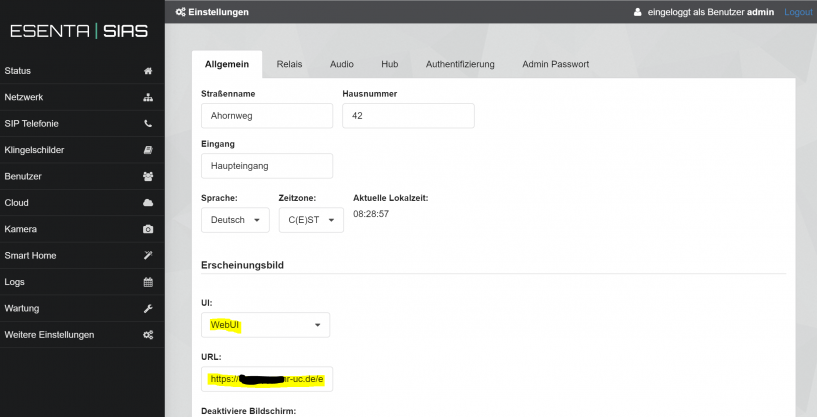
Switch at "Weitere Einstellungen > Allgemein > UI:" to "WebUI" and paste the URL from the ESENTA myApps App Device page in the URL input field. | |||
[[Image: | [[Image:esenta_intercom_link_configuration.PNG|817px]] | ||
You see a preview of the Nameplates here, because the URL config was already done before. | |||
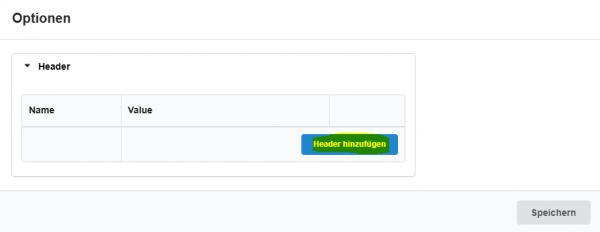
Then click on the button "Optionen" and you will see the next popover and there click on "Header hinzufügen". | |||
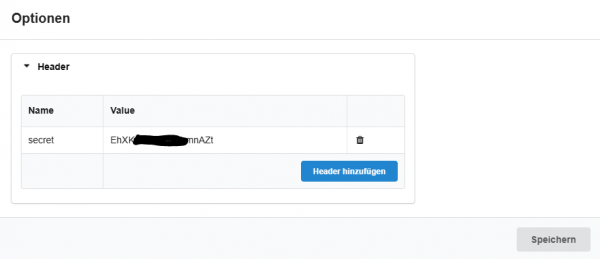
Fill the form in the first line with "secret" and in the second line with the copied header information from the device page in the ESENTA Admin myApps App. | |||
[[Image:MediaRunway-ESENTA-device-HeaderSecretConfig1.PNG|600px]] | |||
[[Image:MediaRunway-ESENTA-device-HeaderSecretConfig2.PNG|600px]] | |||
[[Image: | |||
[[Image:MediaRunway-ESENTA-device-HeaderSecretConfig3.PNG|600px]] | |||
==Installation== | ==Installation== | ||
| Line 223: | Line 210: | ||
===AP manager settings=== | ===AP manager settings=== | ||
<!-- MR-TODO: Change the picture, adjust px to width of your picture. Replace newappname. --> | <!-- MR-TODO: Change the picture, adjust px to width of your picture. Replace newappname. --> | ||
[[Image: | [[Image:MediaRunway-ESENTA-APmanagerSettings.png|900px]] | ||
===PBX manager settings=== | ===PBX manager settings=== | ||
Latest revision as of 14:13, 30 June 2024
Product Name
MediaRunway ESENTA
Certification Status

This App has been listed March 2024.
Category
SIP hardware and software endpoints
Vendor
MediaRunway is an ITC enterprise that provides its customers with contemporary IT services in all areas - Your business, our solution.
ESENTA GmbH develops multifunctional IP video door intercom systems and smart home solutions. The SIAS IP video door intercom is more than a simple doorbell, it is a home automation and communication unit and combines the four core applications that should be used in every modern building:
Voice over IP video door communication function, access function using multi-factor authentication, smart home function and video surveillance & alarm function.
Description
Configure your ESENTA door intercom system and enable calls to any internal subscriber.
MediaRunway - About this application
Functions
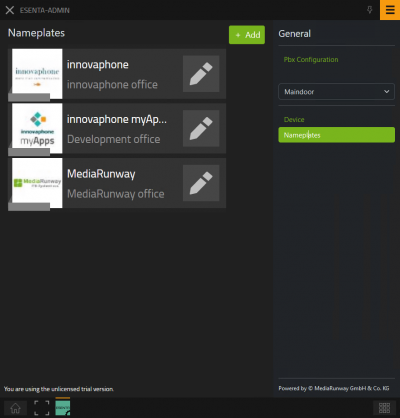
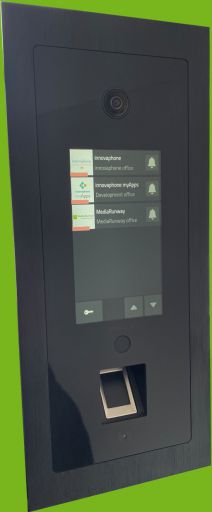
The ESENTA door intercom system can be used with SIP out of the box. This App is based on innovaphones WebRTC/ widget technology, so you can do all the nameplate configurations in the PBX myApps App "ESENTA" and you need no remote connection via e.g. VPN to the ESENTA to do these configurations. Also is the WebRTC technology mostly more innovaphone cloud friendly. This app display an myApps like design on the ESENTA display and shows the presence state if the user has these rights.
| App configuration/ preview | Name plates on your ESENTA intercom system |
|---|---|
 |
|
Licensing
- innovaphone PBX Version V14r1 or above
- a port license is used by the esenta app to establish a voip registration at the pbx
- video license (optional) for the esenta app object is required to establish video connections [*]
- ESENTA license is required to configure the nameplates in the pbx then in the ESENTA itself (one per ESENTA device)
[*] UC License can also be used since it includes a Video License
PBX license table, with needed license for the ESENTA app:
How to add this license to the app object of the ESENTA admin app:
Prerequisites
- an innovaphone PBX and Application Platform with min. Firmware V14r1
- the ESENTA door intercom system
- valid licenses
- and ensure that the Application Platform and PBX can communicate with the door intercom system from ESENTA via the lan / wan (internet)
Versions
Compatible innovaphone firmware versions
- MediaRunway ESENTA (141000 sr4)
- innovaphone V14r1
Application versions used for interop testing
- MediaRunway ESENTA (141000 sr4)
- innovaphone IPVA V14r1 sr4
Configuration
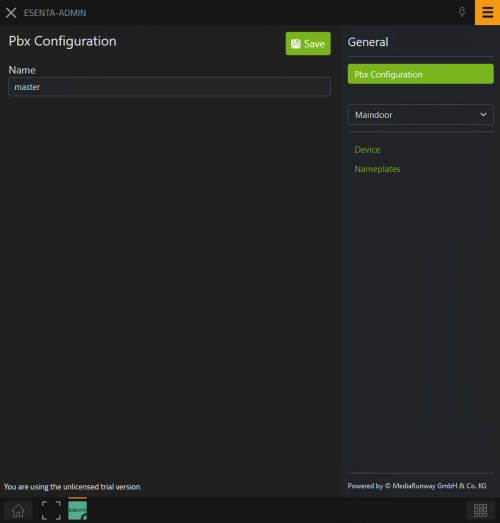
ESENTA APP in myApps - configuration
Pbx Configuration Open the ESENTA admin app in myApps and go to "Pbx Configuration", maybe click on the hamburger menu to see the navigation bar on the right side.
Device Configuration
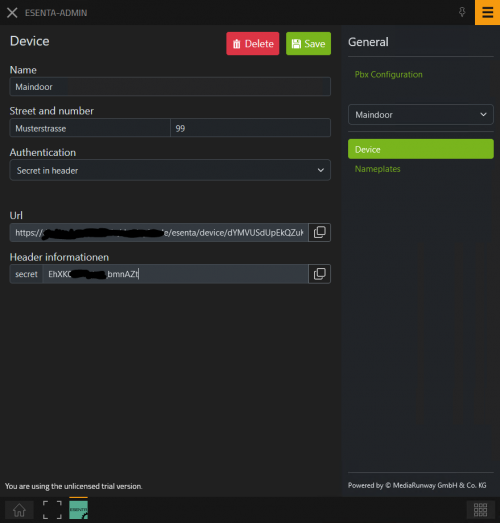
Use the Select field in the naviagtion on the right side to choose the automatic created first device or create a new one.
After this click in the right navi on "Device" (done for the selected device) and fill out the form.
The street and number will be shown when the screensaver activates on the ESENTA videodoorbell device.
Authentication should be set to "Secret in header" in productive use from an ESENTA device. "No" could be used for easier troubleshooting, if an administrator want easy access the url from a pc.
Nameplates Configuration
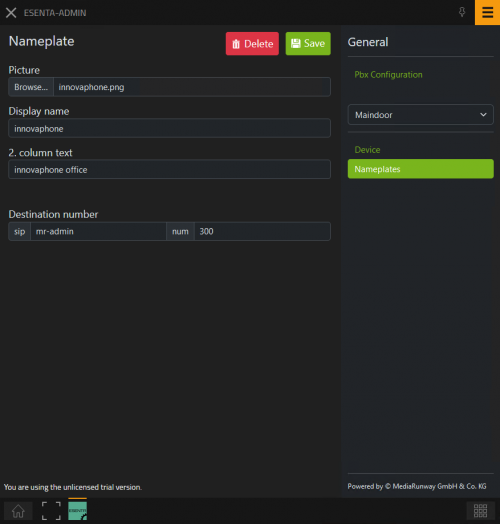
First a preview is shown of the actual Nameplates configuraiton. Click on the pen in the row of the nameplate you want to change or in the upper right on "+ Add" to add another nameplate.
When clicked on the pen button or "+ Add", then you will see the next form. It is necessary to fill out both sip and num!
ESENTA SIAS - Door intercom configuration
Switch at "Weitere Einstellungen > Allgemein > UI:" to "WebUI" and paste the URL from the ESENTA myApps App Device page in the URL input field.
You see a preview of the Nameplates here, because the URL config was already done before.
Then click on the button "Optionen" and you will see the next popover and there click on "Header hinzufügen". Fill the form in the first line with "secret" and in the second line with the copied header information from the device page in the ESENTA Admin myApps App.
Installation
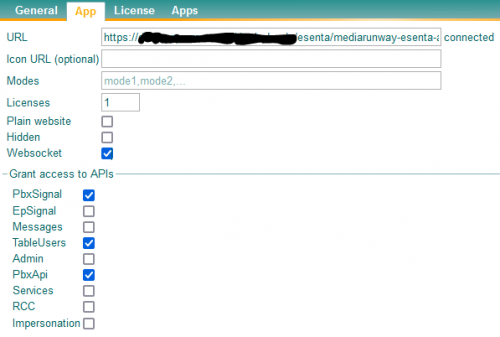
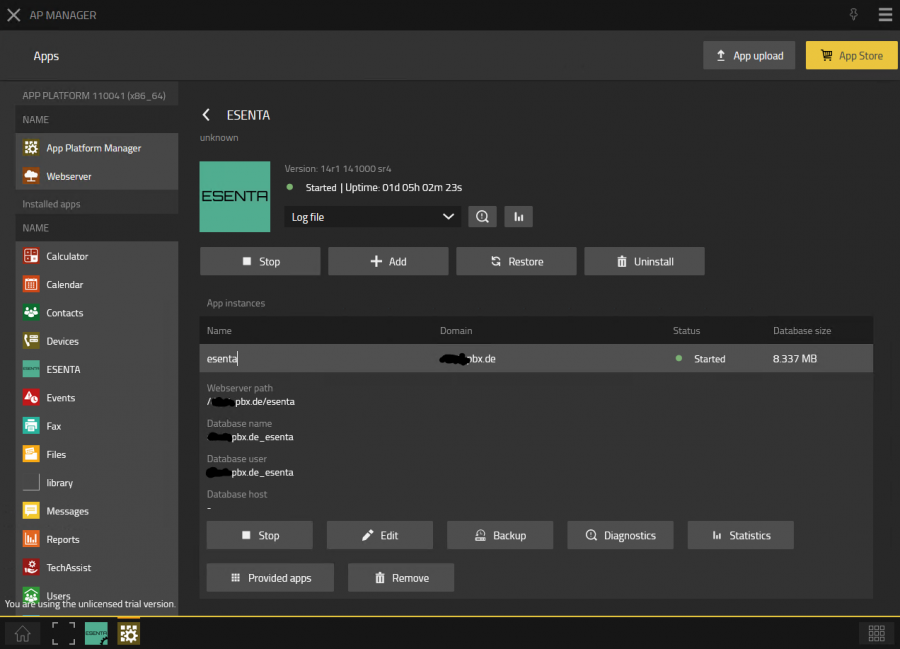
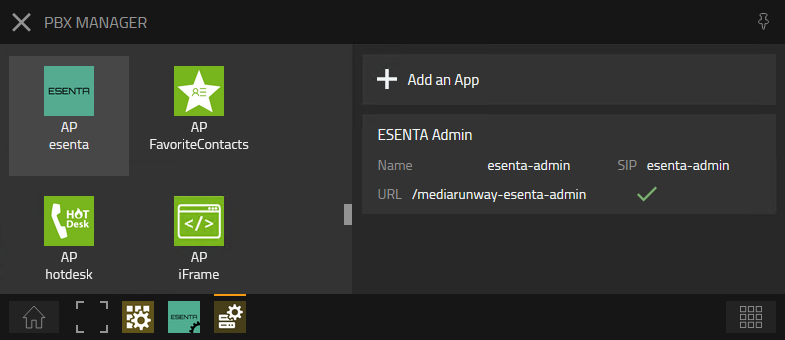
After installing the App, adding the App instance and the App Object for the admins, one can start using "ESENTA". The steps of the installation process are the same as described in this article "Callback - Install App from App Store" only with different names.
AP manager settings
PBX manager settings
Checkmark the e.g. "Config Admin" template while adding the object.
Contact
| MediaRunway GmbH & Co. KG |
| Venloer Str. 8 |
| D-41569 Rommerskirchen |
| Tel: +49 2183 80628-0 |
| Mail: myApps-sales@mediarunway.com |
| Support: myApps-support@mediarunway.com |
| Website: MediaRunway.com |
For any questions please refer to our contact page.


