Howto13r1:Access Voicemail Files: Difference between revisions
m (→Personal Data) |
|||
| Line 26: | Line 26: | ||
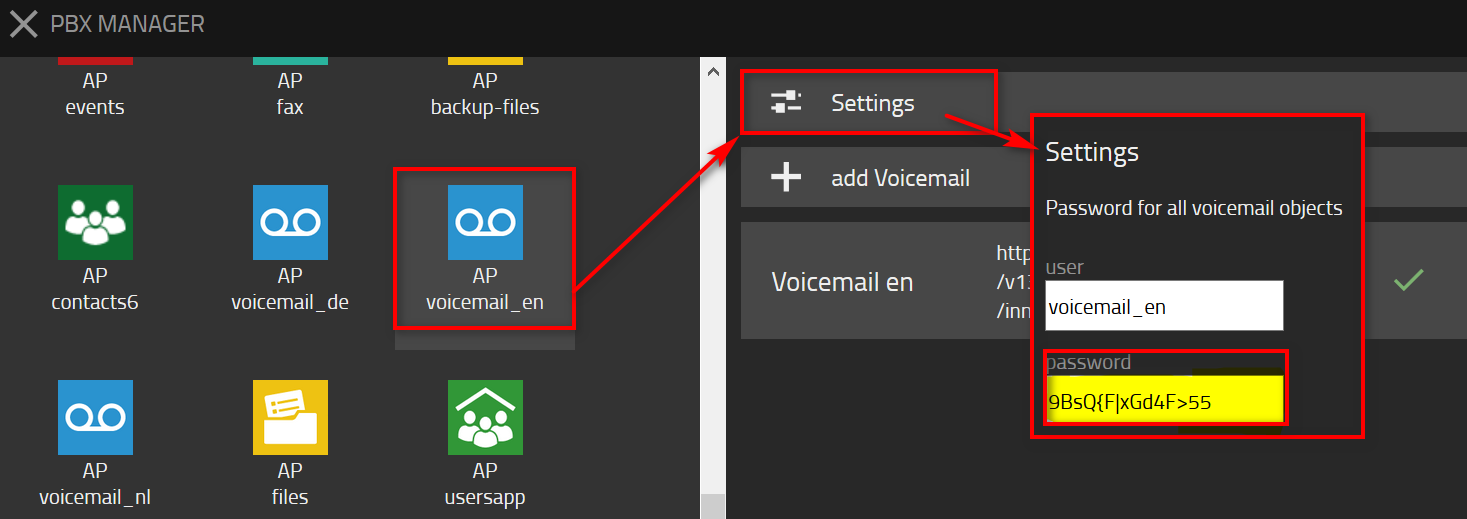
* If | * If the "instance_password" is unknown it can be viewed and may be changed via the PBX manager and the AP voicemail plugin. | ||
[[image:voicemail_passwd.png]] | [[image:voicemail_passwd.png]] | ||
Revision as of 09:12, 19 May 2020
Applies To
This information applies to
- v13r1sr10 and up
More Information
This article documents how to access voicemail related files such as personal announcements and custom voicemail-xml-scripts used in the V13-VoicemailAPP.
File Types
Personal Data
Personal voicemail data such as announcements are located within the VoicemailAPP-filesystem and are accessible via WebDAV by use of an appropriate client (e.g. WinSCP).
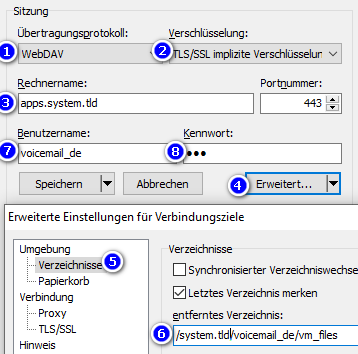
Here's a step-by-step guidance how to access those data by use of WinSCP:
- open WinSCP WebDAV client
- create a new network connection
- use protocol: WebDAV
- use encryption: TLS
- use Host: AppPlatform (e.g. "apps.system.tld")
- step to Advanced section
- at environment/directories add: <system>/voicemail_<country>/vm_files
- Save access profile and connect with the credentials "instance_name" and "instance_password"
- If the "instance_password" is unknown it can be viewed and may be changed via the PBX manager and the AP voicemail plugin.
Now one can find the user directories with the corresponding sub-directories (personal, store) and copy encoded personal greetings to these locations.
Global Data
Global voicemail data such as voicemail-xml-scripts and announcement are located within the AppPlatform-filesystem. Following a step-by-step guidance on how to access and manipulate those data:
- step to AppStore & download the currently use voicemail-package (e.g. VM-DE)
- unpack the webbuild.zip, step inside to the deepest level and also unpack httpfiles.zip
- move/change/edit the contents (e.g. replace announcements by your own, add further xml-files, ...)
- Note: no subfolders are allowed and interpreted upon processing
- zip again the whole folder httpfiles
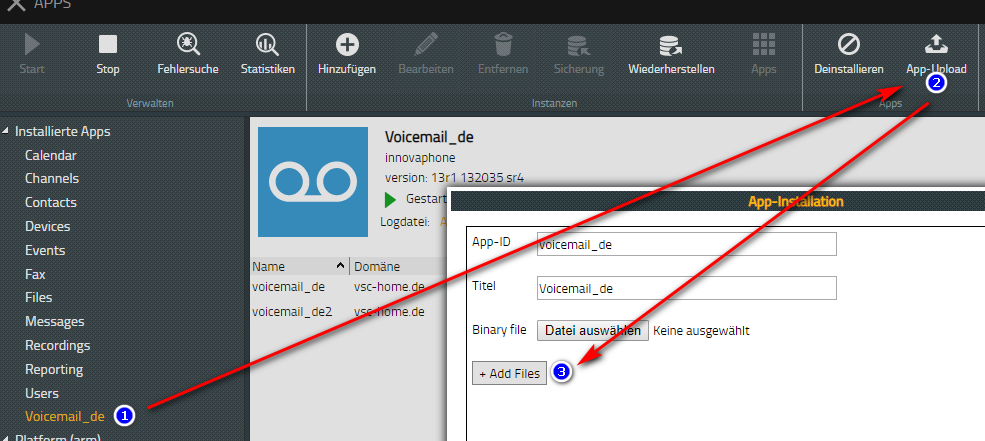
- Step to Apps-App main menu bar, select "Settings" and enable "Developer Mode"
- Select the installed voicemail-app, stop it and choose "App-Upload" in top menu bar
- In new window, via "+Add Files" the changed httpfiles.zip can be uploaded
- Note: upon data upload or VoicemailAPP-update via AppStore, any yet existing data get lost
- Address the own xml within a new instance and the associated VM object by use of an https-path
Use your own voicemail files with the voicemail-App in custom mode
Starting with V13r1sr10, voicemail can be operated in custom mode.
This mode provides a dedicated static WebDAV folder "custom" within the app-center to store for own voicemail file storage.
Content of that folder will not be changed by reset or update.
The feature is activated via option "Custom" at PBXManager/Voicemail-Setup
Following a step-by-step description on how to access and load data into the custom-folder:
- open WinSCP WebDAV client
- create a new network connection
- use protocol: WebDAV
- use encryption: TLS
- use Host: AppPlatform (e.g. "apps.system.tld")
- step to Advanced section
- at environment/directories add: <system>/voicemail_<country>/custom
- Save access profile and connect with the credentials in PBX Manager->Voicemail AP->Settings
- Upload a fully VM (scripts and announcements e.g. a full httpfiles.zip (unpacked) )
- move/change/edit the contents (e.g. replace announcements by your own, add further xml-files, ...)
- Note: no subfolders are allowed and interpreted upon processing
- Note: The data does not get lost after update


