Howto13r2:Setting up Calendar with OAuth2: Difference between revisions
No edit summary |
No edit summary |
||
| Line 2: | Line 2: | ||
This tutorial shows you, how to setup an Azure Active Directory App to let the calendar work with Microsoft 365 and OAuth2. Please note, that this is not a complete administration guide. Instead, it is a simply step-by-step tutorial which should work but maybe not the most accurate administration of your Azure AD – it’s just the way how we managed to use it. It is highly recommended to ask your Azure Administrator for details and / or read the Microsoft documentation. It is expected, that you have an Exchange user with the Application Impersonation right. More information about how to assign this role to a user can be find in the Microsoft documentation. | This tutorial shows you, how to setup an Azure Active Directory App to let the calendar work with Microsoft 365 and OAuth2. Please note, that this is not a complete administration guide. Instead, it is a simply step-by-step tutorial which should work but maybe not the most accurate administration of your Azure AD – it’s just the way how we managed to use it. It is highly recommended to ask your Azure Administrator for details and / or read the Microsoft documentation. It is expected, that you have an Exchange user with the Application Impersonation right. More information about how to assign this role to a user can be find in the Microsoft documentation. | ||
'''''Note:''''' The screenshot and labels may change because of updates done by Microsoft. The following steps had been made with the version with the Azure portal from August 2021. | '''''Note:''''' The screenshot and labels may change because of updates done by Microsoft. The following steps had been made with the version with the Azure portal from August 2021. Note also that the images are scaled. If you need a sharper image, just click on it to see it in full size | ||
== Preparation == | == Preparation == | ||
| Line 12: | Line 12: | ||
== Create an App registration inside the Azure Active Directory == | == Create an App registration inside the Azure Active Directory == | ||
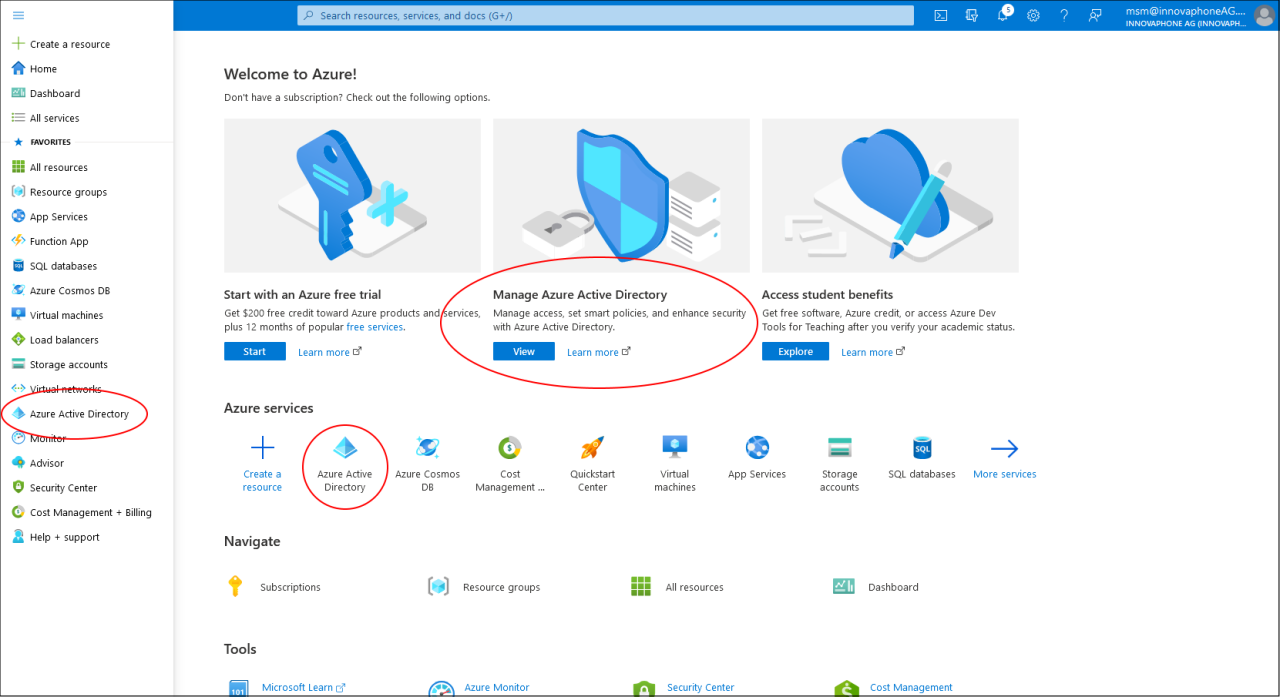
Open the azure portal (portal.azure.com) and Select “Manage Azure Active Directory” or click on one of the “Azure Active Directory” links. | Open the azure portal (portal.azure.com) and Select “Manage Azure Active Directory” or click on one of the “Azure Active Directory” links. | ||
[[Image:AD_SelAD.png| | [[Image:AD_SelAD.png|1280px]] | ||
Revision as of 11:36, 19 October 2021
How-to setup the Calendar for OAut2
This tutorial shows you, how to setup an Azure Active Directory App to let the calendar work with Microsoft 365 and OAuth2. Please note, that this is not a complete administration guide. Instead, it is a simply step-by-step tutorial which should work but maybe not the most accurate administration of your Azure AD – it’s just the way how we managed to use it. It is highly recommended to ask your Azure Administrator for details and / or read the Microsoft documentation. It is expected, that you have an Exchange user with the Application Impersonation right. More information about how to assign this role to a user can be find in the Microsoft documentation.
Note: The screenshot and labels may change because of updates done by Microsoft. The following steps had been made with the version with the Azure portal from August 2021. Note also that the images are scaled. If you need a sharper image, just click on it to see it in full size
Preparation
During the creation of an app, you need some information provided by the configuration of the Calendar and also add some information given by Azure. Because of that it is recommended to open the PBX Manager / AP Calendar in myApps (click on Configure and select “Cloud (Exchange Online)” as Sync Type) and the Azure Portal in your browser at the same time. You also have to login to the Azure Portal with an admin user to be able to add an application registration as well as to configure it.
If you get stuck or you need additional information, or if you are unsure if the way describe here is the best solution for your company, be free to use all the documentation and help links Microsoft provides in the Azure portal.
Registering the Calendar app to the Azure Active Directory
Create an App registration inside the Azure Active Directory
Open the azure portal (portal.azure.com) and Select “Manage Azure Active Directory” or click on one of the “Azure Active Directory” links.
