Howto:MyApps Cloud - Installation
If you have difficulty understanding the written language, we recommend to use www.deepl.com for translation. If installed, you can also use the translation function of your browser by right-clicking.
Applies To
This information applies to
- myApps Cloud Services
Part 1 - The installation of the myApps Cloud
The initial setup of the myApps Cloud Platform is typically conducted by a certified partner, through an installation link (URL). During this process, the system's basic configuration is done. Among others, the first PBX user is created, secure passwords are created and distributed. Last not least, the software is installed on PBX and app platform. After this step, the platform is operational.
You can also get a quick overview via our innovaphone Videos myApps Tutorials:
- English:
- German:
If possible, please have your smtp mail server credentials (server address, email address, password, etc.) in hands, which will be required in step 6 of this installation (can optionally be done in a later step). For the security of your cloud instance, we highly recommend to duly activate 2FA.
Step 1 – Execute the received installation URL
This step covers the basic network settings. Most of the fields are pre-configured and not meant to change.
- The section with the network settings shows private IP addressing inside the cloud. This setting is specific to every single cloud instance, and shall not be changed.
- The Update section shows the current version of the preinstalled system. In case an update is available, it will automatically be installed after pressing <Next>. In this case the system loads the new firmware, restarts and returns to the same screen.
- Please confirm with <Next>.
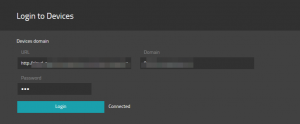
Step 2 – Connection to the myApps Cloud Devices instance
The installation program establishes, in this step, the connection to the central Devices App, through the pre-configured domain name.
This Domain name serves as identifier for every single cloud instance. Please do not change the pre-filled fields and
- Confirm with <Login>.
- When the login was successful, the status message “Connected” appears. To continue, please press <Next>.
Step 3 – The Application Platform is being installed
- In this process, no specific output is shown on the screen. When finalized successfully, the button <Next> is shown.
- To continue, please press <Next>.
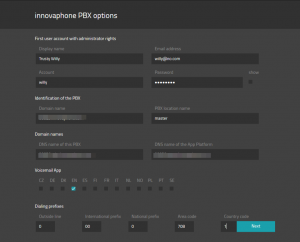
Step 4 – Innovaphone PBX Options
- The first user account with administrator rights will be configured. You will need the credentials of this account to log into the myApps.
Enter the requested values For the Entries of the Account, you can use e.g. the local part of your email address (the part before the @, no special characters, no capital letters, are allowed. Allowed are letters from a to z and the Characters .!#$%&'*+-/=?^_`{|}~ Please remember the credentials of this account. You will need it to log into the myApps.
Step 5 – Emergency Administration passwords
A secure emergency administrator password and a PBX password are created. These passwords are not used in normal operations. Both should be stored at a secure place (use cut and paste).
To continue, please press <Next>.
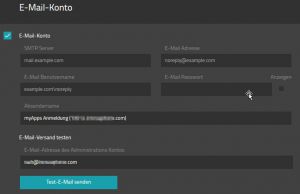
Step 6 – Email Account configuration
The email configuration is needed for functions where the PBX has to send emails, such as:
- for 2 Factor-Authentication (2FA)
- for new users web registration
Enter at this point:
- Data of your mail server
- Mail account that your PBX should use to send mails
This step is optional, but generates configurations in various areas of the cloud instance. Thus, for security reasons we strongly recommend to conclude this config, or at least to activate the 2FA, directly after finalizing the installation.
- In case this step is skipped, Part 2 of this article describes how to proceed.
Step 7 – The PBX is set up
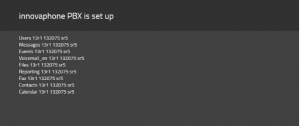
The innovaphone PBX will be set up, the standard Apps are being installed and the respective PBX Objects are being created. The next step will initiate automatically.
Step 8 - Trust certificates on the browser
Now you can go back to the normal installation process of the box.
- At first the PBX certificate will be trusted.
To trust and continue, please press <PBX certificate>.
- Secondly the App Platform certificate will be trusted.
To trust and continue, please press <App Platform certificate>.
- Now the certificate of the PBX and from the App Platform are trusted from the browser and here you should see the message that the 2 certificates have been trusted.
- Finally, leave "Test Mode" unchecked and press <Restart> to continue.
Step 9 - First Login with the created credentials
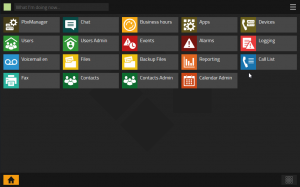
After you have entered the Credentials of the account created under Step 4, you're now logged-in and you see what is called the home screen.
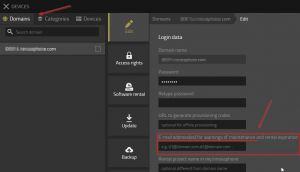
Step 10 – Email address for maintenance warnings
Please make sure to enter a valid email address here. Among other things, it is used to notify on:
- rental expiration,
- maintenance work.
Part 2 - Configuration of Email settings
In case the email settings where skipped during the installation process (step 6), it can be done now.
What normally is done by the installer in one step, can now be done manually in four steps.
Step 1 - Email configuration Plugin
Through the PbxManager's Email plugin, the smtp mail server credentials can be configured on the PBX (details here).
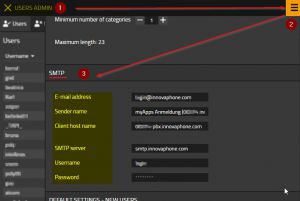
Step 2 - SMTP settings for Users Admin App
In case user should be able to create an own account through a web registration form, the Users Admin App needs to have smtp server credentials as well.
Proceed like this:
- Open the Users Admin App, click on the burger menu (upper right corner) and fill the SMTP section
(further details please check our IT_Connect Courseware to 'UsersAdmin').
Step 3 - SMTP settings for the Apps-Plattform
Proceed like this:
- Go to the Devices App, select your APPS device,
- open the Admin-UI and click on the far right edge, press "Settings".
- Choose the tabs "Smtp" and fill in the appropriate boxes.
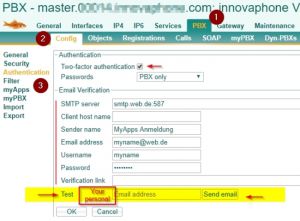
Step 4 - Activate the Two-Factor-Authentication - Check and test the settings
Proceed like this:
- Go to the Devices App, select your PBX, click on the tabs PBX, Config, Authentication, tick Two-factor authentication and press [OK]
(further details here).
Don't forget testing your settings! Especially, if you use the mail address of a public mail provider like gmail.com or web.de.
Part 3 - Configuration of Software Licenses
The software licenses, used on the myApps Cloud platform, are based on the flexible innovaphone software rental program (details here).
In order to activate licenses, proceed like this:
- Start in the Devices App. Select the respective company domain and click on the software rental tab.
- For easy activation, please manually charge the iSC Account Balance (Charge iSC-Account-Balance details here) with an activation key.
- Configure of the required licenses (Configuration details here)
- To properly operate the myApps Cloud, every single user (or trunk line) requires a minimum of 2 licenses (one "Port-Lic Standard" plus one "IPVA-Lic").
- Consequently, to operate a myApps Cloud installation for 20 users and 1 trunk-line, a total of 21 "Port-Lic Standard" plus 21 "IPVA-Lic" are needed.
- Optionally (but recommended) an Automatic iSC Reloading Service may be activated.
- Automatic iSC Reloading Service (sometimes referred to as "Auto-iSC agreement" ) can be applied through my.innovaphone.com > Add contract > Automatic iSC Reloading Service
You can also get a quick overview via our innovaphone Videos myApps Tutorials:
- English:
- German:

