Howto:Microsoft Office 365 Recommended Product Testreport: Difference between revisions
| Line 141: | Line 141: | ||
* SSH access to the Linux AP e.g. with Putty and WinSCP (Root Login in the wiki article Reference10: Concept_Linux_Application_Platform) | * SSH access to the Linux AP e.g. with Putty and WinSCP (Root Login in the wiki article Reference10: Concept_Linux_Application_Platform) | ||
==Read the fingerprint and date of the client certificate from Exchange Online on the Linux AP== | |||
===Get the certificate:=== | ===Read the fingerprint and date of the client certificate from Exchange Online on the Linux AP=== | ||
<code>openssl s_client -connect ucclab-info.mail.protection.outlook.com:25 -starttls smtp</code> | ====Get the certificate:==== | ||
(ucclab.info = ucclab-info.mail.protection.outlook.com) | <code>openssl s_client -connect ucclab-info.mail.protection.outlook.com:25 -starttls smtp</code><br> | ||
(ucclab.info = ucclab-info.mail.protection.outlook.com)<br> | |||
We save the certificate part from the answer to a new file on the Linux AP. | We save the certificate part from the answer to a new file on the Linux AP. | ||
For example | For example <code>/etc/postfix/cert/mail.protection.outlook.com.pem</code> | ||
<code>----- BEGIN CERTIFICATE ----- | <code>----- BEGIN CERTIFICATE -----<br> | ||
... | ...<br> | ||
----- END CERTIFICATE -----</code> | ----- END CERTIFICATE -----</code> | ||
===Read Fingerprint MD5:=== | ====Read Fingerprint MD5:==== | ||
We save the key because we need it at a later point. | We save the key because we need it at a later point.<br> | ||
<code>openssl x509 -noout -fingerprint -md5 -inform pem -in mail.protection.outlook.com.pem</code> | |||
<code>MD5 Fingerprint = 6E: 3E: EC: 2A: 9F: 48: 0B: F7: 89: 00: 9A: 37: E4: 2D: 50: C5</code> | |||
===Read the validity of the certificate:=== | ====Read the validity of the certificate:==== | ||
To know when the certificate expires, we read out the expiration date of the certificate. | To know when the certificate expires, we read out the expiration date of the certificate.<br> | ||
<code>openssl x509 -noout -dates -in mail.protection.outlook.com.pem</code> | |||
<code>notBefore = Dec 10 17:18:22 2017 GMT | |||
notAfter = Dec 10 17:18:22 2019 GMT | notAfter = Dec 10 17:18:22 2019 GMT</code> | ||
relay_clientcerts = hash:/etc/postfix/relay_clientcerts | ===Customize Postfix Configuration on the Linux AP=== | ||
====Customize configuration file main.cf from Postfix:==== | |||
With Putty or WinSCP on the Linux AP under <code>/etc/postfix/main.cf</code> the following adjustments have to be made: | |||
<code>smtp_sasl_security_options = noanonymous | |||
smtp_use_tls = yes | |||
smtp_tls_security_level = may | |||
smtp_tls_loglevel = 2 | |||
smtp_tls_note_starttls_offer = yes | |||
smtp_always_send_ehlo = yes | |||
smtp_tls_CAfile = /home/root/ssl_cert/ms-mail-ca.pem | |||
relay_clientcerts = hash:/etc/postfix/relay_clientcerts | |||
smtpd_tls_ask_ccert = yes | |||
smtpd_tls_security_level = may | |||
smtpd_tls_CAfile = /home/root/ssl_cert/ms-mail-ca.pem | |||
smtpd_tls_cert_file = /home/root/ssl_cert/server.crt | |||
smtpd_tls_key_file = /home/root/ssl_cert/server.key | |||
smtpd_tls_loglevel = 2 | |||
smtpd_tls_received_header = yes | |||
smtpd_client_restrictions = permit_mynetworks, permit_sasl_authenticated, permit_tls_clientcerts, reject</code> | |||
====Create/adjust new file for MD5 fingerprint data:==== | |||
With Putty or WinSCP a new file is created on the Linux AP under <code>/etc/postfix/relay_clientcerts</code> with the stored MD5 fingerprint. | |||
<code>50:34:2F:34:92:26:29:FC:92:10:47:84:50:XX:XX:XX mail.protection.outlook.com</code> | |||
With Putty this created file must be converted to a db on the Linux AP:<br> | |||
With Putty | <code>postmap relay_clientcerts</code> | ||
Finally with Putty postfix has to be restarted to activate the changes:<br> | |||
<code>service postfix restart</code> | |||
==Create Relay Host on the Linux AP== | ===Create Relay Host on the Linux AP=== | ||
On the web interface of the Linux AP, a relay host for Office 365 (Exchange Online) must be created. | On the web interface of the Linux AP, a relay host for Office 365 (Exchange Online) must be created. | ||
Under Administration - Relay Hosts -> Add relay host you can enter the destination and the authorization of the Exchange 365 (Exchange Online). | Under Administration - Relay Hosts -> Add relay host you can enter the destination and the authorization of the Exchange 365 (Exchange Online). | ||
A user from Office 365 is required for authorization. | A user from Office 365 is required for authorization. | ||
Sender Email/Domain uses the domain of Office 365. | Sender Email/Domain uses the domain of Office 365. | ||
[[Image:Faxserver_Relay-Host.png]] | [[Image:Faxserver_Relay-Host.png]] | ||
==Office 365 Connector== | ===Office 365 Connector=== | ||
On the Office 365 Online page we need a connector to forward our fax domain to the Linux AP. The Linux AP must be reachable from the internet. | On the Office 365 Online page we need a connector to forward our fax domain to the Linux AP. The Linux AP must be reachable from the internet. | ||
To do this, a new connector must be created in the Exchange Admin Center under Message Flow Connectors (+). | To do this, a new connector must be created in the Exchange Admin Center under Message Flow Connectors (+). | ||
[[Image:connector_overview_eng.png]] | |||
Give the connector a usefull name. | |||
[[Image:connector_1_name_eng.png|border]] | |||
Use the fax domain as rule for this connector. | |||
[[Image:connector_2_domain_eng.png]] | |||
Use the external IP address or the FQDN of the Linux AP which can be reached from internet. | |||
[[Image:connector_3_target_eng.png]] | |||
Also check the certificate of the Linux AP (CN of the certificate) | |||
[[Image:connector_4_TLS_eng.png]] | |||
A valid destination mail address is required to check the connector. | |||
[[Image:connector_5_targetaddress_eng.png]] | |||
Finally, the connector is checked for connectivity and mail delivery, and the result should look like this. | |||
[[Image:connector_6_final_eng.png]] | |||
===Log File=== | |||
In the log we can see if the mails arrive and sent successfully.<br> | |||
With Putty on the Linux AP:<br> | |||
<code>tail -n0 -F /var/log/mail.log</code><br> | |||
Or on the web interface of the Linux AP:<br> | |||
Diagnostics - Logs - Mail - View | |||
The log must then contain "Trusted TLS connection established from" at the connection. | |||
Trusted TLS connection established from host.outbound.protection.outlook.com [213.199.154.0]: TLSv1.2 with cipher ECDHE-RSA-AES256-SHA384 (256/256 bits) | |||
<!-- | |||
===Installation & Configuration of the vendor Software=== | ===Installation & Configuration of the vendor Software=== | ||
Revision as of 17:43, 4 April 2018
General Information
- Product name: Office 365
- Vendor: Microsoft
- innovaphone Firmware: v10 sr11
The objective of this article it's to test the Office 365 Solution together with Innovaphone Applications like innovaphone Exchange Calender Connector, innovaphone FaxServer and myPBX Office Integration.
How to configure this applications together with Office 365 and if there is any limitations.
Current test state
Testing of this product has been finalized.
Configured Scenario
Important Components and Requirements
- Office 365 Small Business Premium Plan.
- Office 365 System Requirements can be found -> Here
- innovaphone myPBX Launcher
- innovaphone PBX v10
- innovaphone Exchange Connector Application
myPBX Office Integration
Installation & Configuration of the vendor Software
In order to have myPBX Office Integration it's required to install the Office Applications.
The Office Applications are only available for some specific Office 365 Subscription Plans you could find a comparison table for the business plans here.
To install the office applications the user just login into the portal.office.com and click on the shortcut Download Software and be able to download the full package. Microsoft Install Office Guide.
Installation & Configuration of the innovaphone components
First install the myPBX launcher at the Windows PC and define the myPBX UC Client as Office Presence Provider like explained at Concept myPBX Office2010 Integration.
The system Name of the PBX should be equal to the office 365 Domain Name and also we should enable the flag "Use as Domain".
The "Name" field at the PBX User Object should match also with the Office 365 User so the Email address can be identical.
Example: Office 365 User with email rba@innovaphoneAG.onmicrosoft.com should match with User Object with name field equal to "rba".
Test Results
| Tested feature | Result |
|---|---|
| Presence Updates at Microsoft Desktop App Contact Info. | OK |
| Instant Messaging started from Desktop Microsoft App. | OK |
| Start calls from Microsoft Desktop App. | OK |
| Presence Updates at Microsoft Web App Contact Info. | NOK |
innovaphone Exchange Calender Connector
Installation & Configuration of the vendor Software
In order to be able Exchange Calender Connector connect to the Exchange Online EWS we need first to find what is the Exchange Online Server Address. The URL of Exchange Online Web Service is a URL like "https://" + "Server name" + "/EWS/Exchange.amsx", for example, "https://pod51024.outlook.com/ews/exchange.amsx" where the value that should be used for Server field at Exchange Connector is pod51024.outlook.com.
How to find the Exchange Server address you could find some indications Office365 Community Answers.
Also similar to what it's done with Local Exchange Installations it's required that each User change their permissions for vieweing Free/Busy Information at Outlook Calender Options.
With Office365 we could only find this option using the Outlook Desktop App and not the Outlook Web App, description how to find this option could be find at Concept Exchange Calender Connector Article
Note: Microsoft have alternative method to connect to EWS to a single/fixed domain (to simplify the process). The new fixed address is : outlook.office365.com this can be configured as Server on the Exchange Calender Connector Application as long the DNS it's correctly working.
Installation & Configuration of the innovaphone components
NTML Authentication it's not supported by Office 365 Exchange Online Server, so it's necessary to use basic Authentication method to connect to Exchange Online EWS.
This feature was introduced with innovaphone Exchange Connector v10sr11 like described here.
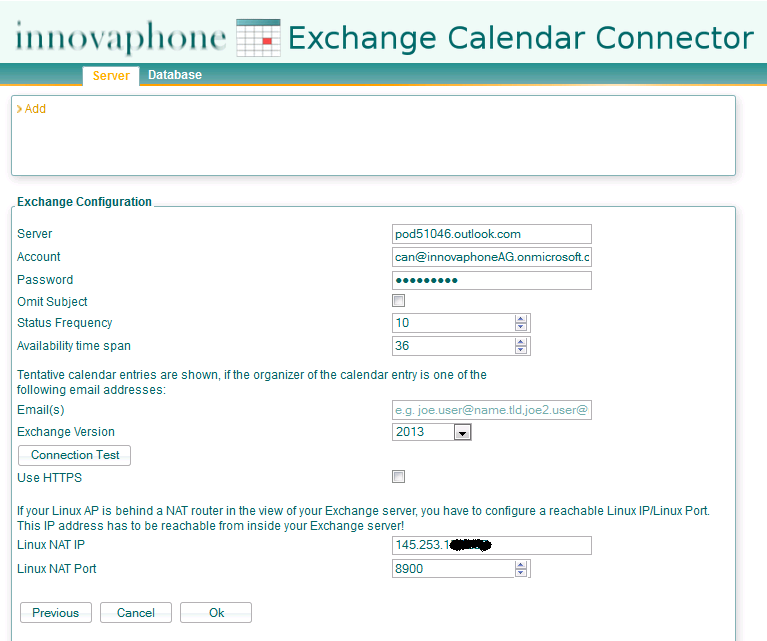
The Exchange Calender Connector configuration it's similar to any other, we need to use the Server Address we found previous for the Exchange Online Server and additional we need to set Linux NAT IP/Port so Office 365 Exchange Online can reach the Exchange Calender Connector Application from the Internet through NAT Port Forwarding.
Test Results
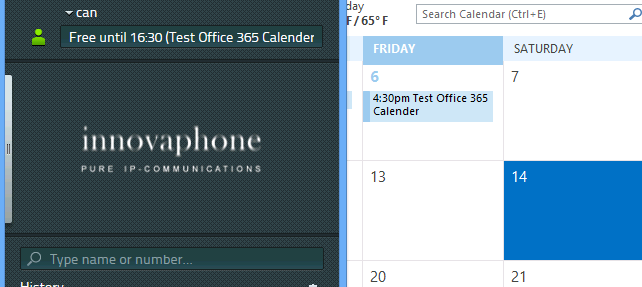
In this case they are not many different tests to perform. The innovaphone Exchange Connector Application connects successfully to the Exchange Online Server and retrieves the calender entries from it and updates the Presence at Innovaphone PBX.
innovaphone FaxServer
Use of Innovaphone FaxServer with Office 365 Exchange Online is possible however it is unsafe as Faxes can be sent by attackers on the customers expense (just by faking a proper From: address and sending from a Office 365 Cloud service).
Office 365 Lync Online
- Integration with the Office 365 Lync Online and Innovaphone PBX was not tested.
- The Lync Online solution only allow SIP Trunking with selected VoIP Carriers by Microsoft for PSTN connectivity and don't have any option to setup an own PSTN Gateway.
- Lync Online allows Federation with Skype and Lync 2013 Server on premises as explained at technet page through Edge Server. There is no current implementation of SIP Federation between Innovaphone PBX and Edge Server from Microsoft Lync.


